


这一部分主要实现的是:
替换图标
使用graphical definition添加一个混合图形
New Icons
1、替换图标。替换图标最简单的方法是将org.eclipse.gmf.examples.mindmap.edit\icons文件夹下的GIF的图像换了。
除了这个方法,比如想要替换Creation Tool Subtopic的默认图标,可以将准备好的图片Subtopic.gif放在/icons/full/obj16/Subtopic.gif目录下,然后在mindmap.gmftool中,删除Creation Tool Subtopic下的Default Image,为之添加Small Icon Bundle Image,设置属性如下:

2、重新生成mindmap.gmfgen文件。 在mindmap.gmfgen中,设置默认的向导和文件图标(或者直接替换掉org.eclipse.gmf.examples.mindmap.diagram工程下的\icons\obj16\ MindmapDiagramFile.gif),并将Diagram File Extension属性改成mmd:

3、重新生成diagram工程代码,运行,可以看到使用了新图标:

Composite Figures
现在要实现的是在上图中可以添加一个角色性的图形,用来代表资源。
Graphical Definition
4、打开mindmap.gmfgraph文件,向Figure Gallery中添加一个Figure Descriptor,并在Figure Descriptor中添加一个Rectangle,都命名为ResourceFigure。将它的Outline和Fill属性都设置为false。
5、接下来要给这Rectangle添加很多Child,这个Rectangle是作为这些所有Child的容器。例如,要给这Rectangle添加XY Layout和Ellipse作为头部,添加Polygon作为身体,还要设置大小。可以使用text editor方式打开mindmap.gmfgraph文件,将下面的代码加到文件中:
<descriptors name="ResourceFigure">
    <actualFigure xsi:type="gmfgraph:Rectangle" name="ResourceFigure"
        outline="false" fill="false">
        <layout xsi:type="gmfgraph:StackLayout" />
        <children xsi:type="gmfgraph:Rectangle" name="Resource"
            outline="false" fill="false">
            <layout xsi:type="gmfgraph:FlowLayout" vertical="true"
                forceSingleLine="true" minorAlignment="CENTER" majorSpacing="0"
                minorSpacing="0" />
            <children xsi:type="gmfgraph:Ellipse" name="Head">
                <foregroundColor xsi:type="gmfgraph:RGBColor" red="220"
                    green="220" blue="250" />
                <backgroundColor xsi:type="gmfgraph:RGBColor" red="230"
                    green="230" blue="255" />
                <size x="40" y="20" />
            </children>
            <children xsi:type="gmfgraph:Polygon" name="Body">
                <foregroundColor xsi:type="gmfgraph:RGBColor" red="220"
                    green="220" blue="250" />
                <backgroundColor xsi:type="gmfgraph:RGBColor" red="230"
                    green="230" blue="255" />
                <size x="40" y="36" />
                <template x="23" />
                <template x="23" y="5" />
                <template x="39" y="5" />
                <template x="39" y="10" />
                <template x="23" y="10" />
                <template x="23" y="17" />
                <template x="39" y="29" />
                <template x="39" y="34" />
                <template x="20" y="23" />
                <template x="1" y="34" />
                <template x="1" y="29" />
                <template x="17" y="17" />
                <template x="17" y="10" />
                <template x="1" y="10" />
                <template x="1" y="5" />
                <template x="17" y="5" />
                <template x="17" />
                <template x="23" />
            </children>
        </children>
    </actualFigure>
</descriptors>
6、在Canvas中添加一个Node,命名为Resource,并设置其Figure属性为ResourceFigure。
给Figure Gallery添加一个Figure Descriptor,并在Figure Descriptor中添加一个Label,都命名为BasicLabelFigure。
7、给 Canvas添加Diagram Label,命名为ResourceLabel,选择相应属性。注意这个Label不是作为图形的子元素,而是在它的外部,因此可以随意给它设置位置。
8、再给Rectangle ResourceFigure添加一个Label,设置Name属性为ResourceLabel,Text属性为Resource。
Tooling Definition
9、打开mindmap.gmftool,添加一个工具:

Mapping Definition
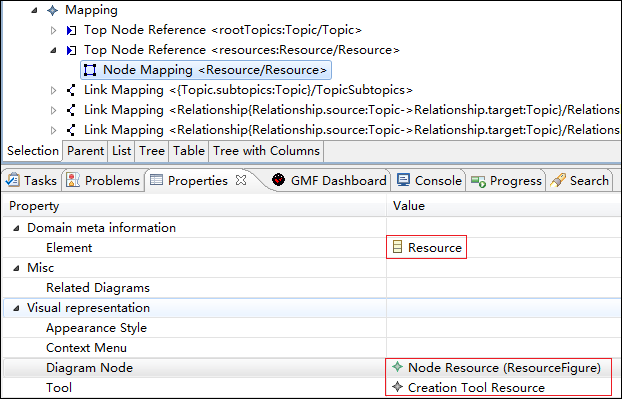
10、打开mindmap.gmfmap文件,为Mapping结点添加一个Top Node Reference,并选择Containment Feature属性为Map.resources:Resource。再向这个Top Node Reference添加一个Node Mapping,属性设置如下:
11、给这个Node Mapping添加一个Feature Label Mapping,属性如下图:

这样设置的目的是允许一个资源的标签显示为name [email@some.com]。
Generation
12、重新生成mindmap.gmfgen文件和Diagram代码,运行:
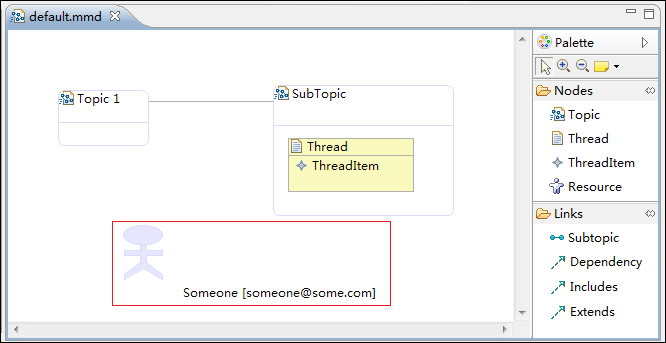
PS:目前只能达到这个效果,标签比较长的话只能显示在右下方,不知道怎么让Someone[someone@some.com]标签显示在图形的正下方。
源码:http://www.oschina.net/code/snippet_164134_19278
双子座@开源中国:http://my.oschina.net/plumsoft


 2385
2385

 被折叠的 条评论
为什么被折叠?
被折叠的 条评论
为什么被折叠?
 到【灌水乐园】发言


