


一、多数据源问题
主要思路是把dataSource、sqlSesstionFactory(用来产生sqlSession)、MapperScannerConfigurer在配置中区分开,各Mapper对应的包名、类名区分开
Tips:
MapperScannerConfigurer的作用:
通过AOP来完成Mapper接口文件,Mapper xml文件以及SqlSessionFactory之间的关联关系。这样SqlSessionTemplate就可以不用配置了
<?xml version="1.0" encoding="UTF-8"?>
 <beans xmlns="http://www.springframework.org/schema/beans"
        xmlns:xsi="http://www.w3.org/2001/XMLSchema-instance" xmlns:aop="http://www.springframework.org/schema/aop"
        xmlns:tx="http://www.springframework.org/schema/tx" xmlns:jdbc="http://www.springframework.org/schema/jdbc"
        xmlns:context="http://www.springframework.org/schema/context"
        xsi:schemaLocation="
      http://www.springframework.org/schema/context http://www.springframework.org/schema/context/spring-context-3.0.xsd
      http://www.springframework.org/schema/beans http://www.springframework.org/schema/beans/spring-beans-3.0.xsd
      http://www.springframework.org/schema/jdbc http://www.springframework.org/schema/jdbc/spring-jdbc-3.0.xsd
      http://www.springframework.org/schema/tx http://www.springframework.org/schema/tx/spring-tx-3.0.xsd
      http://www.springframework.org/schema/aop http://www.springframework.org/schema/aop/spring-aop-3.0.xsd"
        default-autowire="byName">

     <bean id="dataSource1" class="org.h2.jdbcx.JdbcConnectionPool"
           destroy-method="dispose">
         <constructor-arg>
             <bean class="org.h2.jdbcx.JdbcDataSource">
                 <property name="URL" value="jdbc:h2:r:/h2db/awbprint/a"/>
                 <property name="user" value="sa"/>
                 <property name="password" value="sa"/>
             </bean>
         </constructor-arg>
     </bean>


     <bean id="dataSource2" class="org.h2.jdbcx.JdbcConnectionPool"
           destroy-method="dispose">
         <constructor-arg>
             <bean class="org.h2.jdbcx.JdbcDataSource">
                 <property name="URL" value="jdbc:h2:r:/h2db/awbprint/b"/>
                 <property name="user" value="sa"/>
                 <property name="password" value="sa"/>
             </bean>
         </constructor-arg>
     </bean>

     <bean id="sqlSessionFactory1" class="org.mybatis.spring.SqlSessionFactoryBean">
         <property name="dataSource" ref="dataSource1"/>
         <property name="configLocation" value="classpath:mybatis-config.xml"></property>
         <property name="typeAliasesPackage" value="awbprint.mybatis.entity"></property>
         <property name="mapperLocations" value="classpath:mybatis/a/**/*.xml"></property>
     </bean>

     <bean id="sqlSessionFactory2" class="org.mybatis.spring.SqlSessionFactoryBean">
         <property name="dataSource" ref="dataSource2"/>
         <property name="configLocation" value="classpath:mybatis-config.xml"></property>
         <property name="typeAliasesPackage" value="awbprint.mybatis.entity"></property>
         <property name="mapperLocations" value="classpath:mybatis/b/**/*.xml"></property>
     </bean>

     <bean class="org.mybatis.spring.mapper.MapperScannerConfigurer">
         <property name="sqlSessionFactoryBeanName" value="sqlSessionFactory1"></property>
         <property name="basePackage" value="awbprint.mybatis.mapper.a"/>
     </bean>

     <bean class="org.mybatis.spring.mapper.MapperScannerConfigurer">
         <property name="sqlSessionFactoryBeanName" value="sqlSessionFactory2"></property>
         <property name="basePackage" value="awbprint.mybatis.mapper.b"/>
     </bean>

</beans>
上面的配置,一个连h2的a数据库,一个连h2的b数据库,至于事务管理器,大家可参考这个思路,建二个,各管各的。
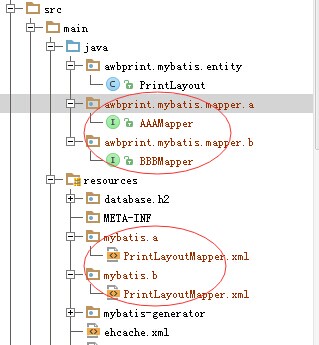
项目中mapper接口及映射文件均用包名区分开,如下图:
resultMap用来引用Mapper.xml文件中定义的resultMap(数据库字段和DO字段之间的映射关系)
resultType用来引用java代码中定义的数据结构,多为DO或BO
paramerterType定义的是入参的数据结构,@Param修饰的参数会被包装成一个map。如果不指定parameterType参数,默认就是指Map
<![CDATA[ and created_time>#{beginTime}]]>
include可以引用其它xml。如果是在ResultMap定义文件中可以使用extends来引用另外一个Mapper.xml
<if test="_parameter != null">
    <include refid="Example_Where_Clause"/>
</if>
<resultMap id="NewResultMap" extends="BaseResultMap" type="com.DemoBO">
    <collection  property="demoInfo" ofType="com.DemoInfo" resultMap="ChildMap"></collection >
</resultMap>
mybaits 中没有else要用chose when otherwise 代替
下面就是MyBatis中的if....else...表示方法
<choose>
    <when test="">
        //...
    </when>
    <otherwise>
        //...
    </otherwise>
</choose>
其中choose为一个整体
when是if
otherwise是else
<select id="selectSelective" resultType="type1">
    select
    <include refid="Base_Column_List"/>
    from xxx
    where del_flag=0
    <choose>
        <when test="xxx !=null and xxx != ''">
            and nick_name like concat(concat('%', #{key}), '%')
        </when>
        <otherwise>
            and nick_name like '**%'
        </otherwise>
    </choose>
</select>
<!--批量插入用户-->
<insert id="insertBusinessUserList" parameterType="java.util.List">
    insert into `t_user` (`id` , `user_type` , `user_login` )
    values
    <foreach collection="list" index="index" item="item" separator=",">
        <trim prefix="("  suffix=")"  suffixOverrides=",">
            <choose>
                <when test="item.id != null and item.id !=''">
                    #{item.id},
                </when>
                <otherwise>
                    '',
                </otherwise>
            </choose>
            <choose>
                <when test="item.userType != null and item.userType !=''">
                    #{item.userType,jdbcType=VARCHAR},
                </when>
                <otherwise>
                    '',
                </otherwise>
            </choose>
        </trim>
    </foreach>
</insert>
choose标签是按顺序判断其内部when标签中的test条件出否成立,如果有一个成立,则 choose 结束。
当 choose 中所有 when 的条件都不满则时,则执行 otherwise 中的sql。
类似于Java 的 switch 语句,choose 为 switch,when 为 case,otherwise 则为 default。
例如下面例子,同样把所有可以限制的条件都写上,方面使用。choose会从上到下选择一个when标签的test为true的sql执行。安全考虑,我们使用where将choose包起来,放置关键字多于错误。
<!--  choose(判断参数) - 按顺序将实体类 User 第一个不为空的属性作为:where条件 -->
<select id="getUserList_choose" resultMap="resultMap_user" parameterType="com.yiibai.pojo.User">
    SELECT *
      FROM User u
    <where>
        <choose>
            <when test="username !=null ">
                u.username LIKE CONCAT('%', #{username, jdbcType=VARCHAR},'%')
            </when >
            <when test="sex != null and sex != '' ">
                AND u.sex = #{sex, jdbcType=INTEGER}
            </when >
            <when test="birthday != null ">
                AND u.birthday = #{birthday, jdbcType=DATE}
            </when >
            <otherwise>
            </otherwise>
        </choose>
    </where>
</select>
http://www.cnblogs.com/caoyc/p/5574948.html
INSERT INTO tb_demo (id,name,update_time) VALUES (#{id},#{name},now())
ON DUPLICATE KEY
update  update_time = now()
二、如何使用Map做为参数及动态条件生成
<resultMap id="BaseResultMap" type="awbprint.mybatis.entity.PrintLayout">
    <id column="D_RECID" property="recid" jdbcType="DECIMAL"/>
    <result column="D_USER_NAME" property="userName" jdbcType="VARCHAR"/>
    <result column="D_NAME" property="name" jdbcType="VARCHAR"/>
    <result column="D_TYPE" property="type" jdbcType="VARCHAR"/>
    ...

</resultMap>

<sql id="Base_Column_List">
    D_RECID, D_USER_NAME, D_NAME, D_TYPE, ...
</sql>

<select id="select" resultMap="BaseResultMap"
        parameterType="java.util.Map">
    select
    <include refid="Base_Column_List"/>
    from T_PRINT_LAYOUT
    where D_USER_NAME = #{userName,jdbcType=VARCHAR} and D_TYPE = #{awbType,jdbcType=VARCHAR}
    <if test="recId != null">
        and D_RECID = #{recId,jdbcType=DECIMAL}
    </if>
    <if test="ids != null">
        or D_RECID in
        <foreach item="item" index="index" collection="ids"
                 open="(" separator="," close=")">
            #{item}
        </foreach>
    </if>
</select>
14-31演示了如何使用Map做为参数,动态传入查询条件,及List参数生成in(...)条件
java端代码示例:
PrintLayoutMapper mapper = context.getBean(PrintLayoutMapper.class);

Map<String, Object> map = new HashMap<String, Object>();
map.put("userName", "ADMIN");
map.put("awbType", "CARGOLABEL_MU");
map.put("recId", 1);

List<Integer> ids = new ArrayList<Integer>();
ids.add(0, 1);
ids.add(0, 2);
ids.add(0, 3);

map.put("ids", ids);

List<?> list = mapper.select(map);
其实PrintLayoutMapper接口的定义为:
public interface PrintLayoutMapper {
    ...

    List<PrintLayout> select(Map<String, Object> map);
}
最终生成的SQL语句为:
select D_RECID, D_USER_NAME, D_NAME, D_TYPE, ... from T_PRINT_LAYOUT
where D_USER_NAME = ? and D_TYPE = ? and D_RECID = ? or D_RECID in ( ? , ? , ? )
三、兼容不同的数据库
<insert id="insert">
 <selectKey keyProperty="id" resultType="int" order="BEFORE">
 <if test="_databaseId == 'oracle'">
 select seq_users.nextval from dual
 </if>
 <if test="_databaseId == 'db2'">
 select nextval for seq_users from sysibm.sysdummy1"
 </if>
 </selectKey>
 insert into users values (#{id}, #{name})
</insert>
这是官方文档上的示例,演示了如何兼容oracle与db2这二种不同的数据库,来获取序列的下一个值
mybatis的一个内置参数_parameter
1、内置的_parameter变量,对应转换后的传递参数,在只传递单参数且是没有使用@Param注解对参数命名的时候如果我们需要通过${var}的形式来访问传递的单参数,则可以使用${_parameter};
2、如果对应的Mapper接口方法是多参数或者拥有@Param命名的参数时可以使用param1、paramN的形式;
3、如果对应的Mapper接口方法参数是@Param命名的方法参数,则可以使用@Param指定的名称;
4、如果对应的Mapper接口方法拥有多个参数,且拥有没有使用@Param命名的参数,那没有使用@Param命名的参数可以通过0、1、N形式访问。
根据上述规则如我们有一个findById的方法其接收一个Long类型的参数作为ID,当使用${var}的形式引用变量时则可以写成如下这样:
<select id="findById" resultType="com.elim.learn.mybatis.model.User" parameterType="java.lang.Long" >
   select id,name,username,email,mobile from t_user where id=${_parameter}
</select>
当我们的Mapper接口方法参数使用了@Param命名的时候,我们还可以使用@Param指定的参数名。
public interface UserMapper {
   User findById(@Param("id") Long id);
}
<select id="findById" resultType="com.elim.learn.mybatis.model.User" parameterType="java.lang.Long" >
   select id,name,username,email,mobile from t_user where id=${id}
</select>
注意,但是使用了@Param对单参数命名后我们就不能再在Mapper语句中通过${_parameter}来引用接口方法参数传递过来的单参数了,因为此时其已经被包装为一个Map了,
如果要通过_parameter来引用的话,我们应该使用${_parameter.param1}或${_parameter.varName},对于上面的示例来说就是${_parameter.param1}或${_parameter.id}。
下面我们来看一个传递多参数的,假设我们有如下这样的一个Mapper语句及对应的Mapper接口方法,这个Mapper接口方法接收两个参数,第一个参数是用@Param注解指定了参数名为name,第二个参数是没有使用注解的,
具体如下:
<!-- 当对应的接口方法传递多个参数时,可以不指定parameterType参数,就算指定了也没用,因为这个时候默认是Map -->
<select id="findByNameAndMobile" resultType="com.elim.learn.mybatis.model.User">
   select id,name,username,email,mobile from t_user where name='${name}' and mobile='${1}'
</select>
List<User> findByNameAndMobile(@Param("name") String name, String mobile);
那我们的Mapper.xml文件中的对应语句需要Mapper接口方法参数时有哪几种方式呢?
按照之前的规则,对于第一个方法参数name而言,因为使用了@Param指定了参数名name,所以我们可以在Mapper.xml文件中通过变量name和param1来引用它,
而第二个参数mobile是没有使用@Param指定参数名的,则我们可以使用param2和参数相对位置“1”来引用它。
如上面的示例中,我们就是通过第二个参数的相对位置“1”来引用的。
如果我们把第二个参数改为${mobile}是引用不到,且系统会报如下错误,有兴趣的朋友可以试一下。
org.apache.ibatis.binding.BindingException: Parameter 'mobile' not found. Available parameters are [1, name, param1, param2]
一般情况下为了防止SQL注入问题,是不建议直接在where条件中使用${var}的形式访问变量的,通常会用预编译形式的#{var}。
而${var}往往是用来传递一些非where条件的内容,比如排序信息,具体用法请根据实际情况决定
http://elim.iteye.com/blog/2357967
Caused by: org.apache.ibatis.binding.BindingException: Parameter 'userId' not found. Available parameters are [arg1, arg0, param1, param2]
	at org.apache.ibatis.binding.MapperMethod$ParamMap.get(MapperMethod.java:202) ~[mybatis-3.4.4.jar:3.4.4]
	at org.apache.ibatis.reflection.wrapper.MapWrapper.get(MapWrapper.java:45) ~[mybatis-3.4.4.jar:3.4.4]
	at org.apache.ibatis.reflection.MetaObject.getValue(MetaObject.java:122) ~[mybatis-3.4.4.jar:3.4.4]
	at org.apache.ibatis.executor.BaseExecutor.createCacheKey(BaseExecutor.java:219) ~[mybatis-3.4.4.jar:3.4.4]
	at org.apache.ibatis.executor.CachingExecutor.createCacheKey(CachingExecutor.java:146) ~[mybatis-3.4.4.jar:3.4.4]
	at com.github.pagehelper.PageInterceptor.intercept(PageInterceptor.java:84) ~[pagehelper-5.0.4.jar:na]
	at org.apache.ibatis.plugin.Plugin.invoke(Plugin.java:61) ~[mybatis-3.4.4.jar:3.4.4]
	at com.sun.proxy.$Proxy201.query(Unknown Source) ~[na:na]
	at org.apache.ibatis.session.defaults.DefaultSqlSession.selectList(DefaultSqlSession.java:148) ~[mybatis-3.4.4.jar:3.4.4]
	at org.apache.ibatis.session.defaults.DefaultSqlSession.selectList(DefaultSqlSession.java:141) ~[mybatis-3.4.4.jar:3.4.4]
	at org.apache.ibatis.session.defaults.DefaultSqlSession.selectOne(DefaultSqlSession.java:77) ~[mybatis-3.4.4.jar:3.4.4]
	at sun.reflect.NativeMethodAccessorImpl.invoke0(Native Method) ~[na:1.8.0_144]
	at sun.reflect.NativeMethodAccessorImpl.invoke(NativeMethodAccessorImpl.java:62) ~[na:1.8.0_144]
	at sun.reflect.DelegatingMethodAccessorImpl.invoke(DelegatingMethodAccessorImpl.java:43) ~[na:1.8.0_144]
	at java.lang.reflect.Method.invoke(Method.java:498) ~[na:1.8.0_144]
	at org.mybatis.spring.SqlSessionTemplate$SqlSessionInterceptor.invoke(SqlSessionTemplate.java:433) ~[mybatis-spring-1.3.1.jar:1.3.1]
	... 126 common frames omitted
解决办法:
Caused by: org.apache.ibatis.binding.BindingException: Parameter 'loginId' not found. Available parameters are [1, 0, param1, param2]
Mapper.java文件中的方法要这样写:
void userInfoLogin(@Param("id")String id, @Param("loginId")String loginId);
或者不改传参,改sql:
sql中的参数用 #{0},#{1}代替即可
报错原因:
Mapper.java文件中的入参String 类型的userId必须添加使用@Param注解。非String类型的,如果只有一个参数,可以不加@Param注解
MyBatis 参数类型为String时常见问题及解决方法
1. 参数为String时的插值问题
假设有下面一Dao接口方法
public Account findByAccountType (String type)throws DaoException;
对应的Mapper.xml
<select id="findByAccountType " parameterType="string" resultType="account">
  select *
  form account
  <where>
    <if test ="type != null">
      type=#{type}
    </if>
  </where>
</select>
一般我们都是按这样的方式来写的,对于其他类型是没错的,但是如果为String的话会抛下面的异常:
There is no getter for property named 'type ' in 'class java.lang.String'
因为MyBatis要求如果参数为String的话,不管接口方法的形参是什么,在Mapper.xml中引用时需要改变为_parameter才能识别 :
<select id="findByAccountType " parameterType="string" resultType="account">
  select *
  form account
  <where>
    <if test ="_parameter!= null">
      type=#{_parameter}
    </if>
  </where>
</select>
2. 对字符串参数进行是否相等 比较时的问题
错误:
<if test="_parameter == '1' ">
  type=#{_parameter}
</if>
正确:
<if test='_parameter == "1" '>
  type=#{_parameter}
</if>
<if test="_parameter == '1'.toString() ">
  type=#{_parameter}
</if>
注:上述问题不仅限于<if>标签,其他动态sql标签在对String进行处理时也会出现同样的问题
http://www.ctolib.com/topics-113837.html
http://blog.csdn.net/whatsyournamejack/article/details/52345989
四、加强版的分支、选择判断
<select id="findActiveBlogLike"  resultType="Blog">
 SELECT * FROM BLOG WHERE state = ‘ACTIVE’
 <choose>
 <when test="title != null">
 AND title like #{title}
 </when>
 <when test="author != null and author.name != null">
 AND author_name like #{author.name}
 </when>
 <otherwise>
 AND featured = 1
 </otherwise>
 </choose>
</select>
这也是官方文档上的示例,因为<if>...</if>并没对应的<else>标签,所以要达到<if>...<else>...</else> </if>的效果,得借助<choose>、<when>、<otherwise>组合使用。
<if test="demoInfo!=null and demoInfo.id != null">
    and d.id = #{demoInfo.id}
</if>
五、避免Where 空条件的尴尬
<select id="findActiveBlogLike" resultType="Blog">
 SELECT * FROM BLOG
 WHERE
 <if test="state != null">
 state = #{state}
 </if>
</select>
如果state参数为空时,最终生成SQL语句为
 SELECT * FROM BLOG
 WHERE
执行会出错,当然,你可以在where 后加一个1=1,改成
<select id="findActiveBlogLike" resultType="Blog">
 SELECT * FROM BLOG
 WHERE 1=1
 <if test="state != null">
 and state = #{state}
 </if>
</select>
但是这个做法不太“环保”(毕竟引入了一个垃圾条件),其实只要改成<where>...</where>即可
<select id="findActiveBlogLike" resultType="Blog">
 SELECT * FROM BLOG
 <where>
     <if test="state != null">
         and state = #{state}
     </if>
 </where>
</select>
六、$与#的区别
select * from T_PRINT_LAYOUT where D_RECID = ${recId}
最后生成的SQL为:
select * from T_PRINT_LAYOUT where D_RECID = 1
即:直接将参数值替换到了原来${recId}的位置,相当于硬拼SQL
select * from T_PRINT_LAYOUT where D_RECID = #{recid,jdbcType=DECIMAL}
最后生成的SQL为:
select * from T_PRINT_LAYOUT where D_RECID = ?
即:#{...}被识别为一个SQL参数
七、大量数据的批量insert
大量数据(条数>10000)做insert时,如果按常规方式,每条insert into table(...) values(...);来提交,速度巨慢。
改善性能的思路是多条insert批量提交。
oracle环境中,有一种批量insert的小技巧,原理是 insert into ... select from ...,套在mybatis上,变形为:
INSERT INTO T_TEST
  (ID, COL_A, COL_B)
  SELECT SEQ_TEST.NEXTVAL, A.*
    FROM (
              SELECT 'A1', 'B1' FROM DUAL
    UNION ALL SELECT 'A2', 'B2' FROM DUAL
    UNION ALL SELECT 'A3', 'B3' FROM DUAL
    UNION ALL SELECT 'A4', 'B4' FROM DUAL
    UNION ALL SELECT 'A5', 'B5' FROM DUAL
    UNION ALL SELECT 'A6', 'B6' FROM DUAL
    ) A
中间的部分非常有规律,可以用foreach标签生成,参考下面的片段:
<insert id="insertBatch2" parameterType="ctas.entity.SharkFlt">
    <selectKey keyProperty="recId" order="BEFORE" resultType="Long">
      select SEQ_CTAS_SHARK_FLT.nextval as recId from dual
    </selectKey>
    insert into CTAS_SHARK_FLT (<include refid="Base_Column_List"/>) SELECT SEQ_TEST.NEXTVAL, A.*
    FROM (
    <foreach collection="list" item="item" index="index" open="" close="" separator="  union all  ">
      select #{item.awbType,jdbcType=VARCHAR}, #{item.awbPre,jdbcType=VARCHAR},... from dual
    </foreach>
    ) A
  </insert>
即使这样,也不能直接run,oracle中一次执行的sql语句长度是有限制的,如果最后拼出来的sql字符串过长,会导致执行失败,所以java端还要做一个分段处理,参考下面的处理:
List<SharkFlt> data = new ArrayList<SharkFlt>();
for (TSharkFlt f : sharkFlts) {
    data.add(getSharkFlt(f));
}

System.out.println(data.size());

long beginTime = System.currentTimeMillis();
System.out.println("开始插入...");
SqlSessionFactory sqlSessionFactory = ctx.getBean(SqlSessionFactory.class);
SqlSession session = null;
try {
    session = sqlSessionFactory.openSession(ExecutorType.BATCH, false);
    int a = 2000;//每次提交2000条
    int loop = (int) Math.ceil(data.size() / (double) a);

    List<SharkFlt> tempList = new ArrayList<SharkFlt>(a);
    int start, stop;
    for (int i = 0; i < loop; i++) {
        tempList.clear();
        start = i * a;
        stop = Math.min(i * a + a - 1, data.size() - 1);
        System.out.println("range:" + start + " - " + stop);
        for (int j = start; j <= stop; j++) {
            tempList.add(data.get(j));
        }
        session.insert("ctas.importer.writer.mybatis.mappper.SharkFltMapper.insertBatch2", tempList);
        session.commit();
        session.clearCache();
        System.out.println("已经插入" + (stop + 1) + " 条");
    }
} catch (Exception e) {
    e.printStackTrace();
    session.rollback();
} finally {
    if (session != null) {
        session.close();
    }
}
long endTime = System.currentTimeMillis();
System.out.println("插入完成,耗时 " + (endTime - beginTime) + " 毫秒!");
13,27-29这几行是关键,这一段逻辑会经常使用,为了重用,可以封装一下:
/**
 * 批量提交数据
 * @param sqlSessionFactory
 * @param mybatisSQLId SQL语句在Mapper XML文件中的ID
 * @param commitCountEveryTime 每次提交的记录数
 * @param list 要提交的数据列表
 * @param logger 日志记录器
 */
private <T> void batchCommit(SqlSessionFactory sqlSessionFactory, String mybatisSQLId, int commitCountEveryTime, List<T> list, Logger logger) {
    SqlSession session = null;
    try {
        session = sqlSessionFactory.openSession(ExecutorType.BATCH, false);
        int commitCount = (int) Math.ceil(list.size() / (double) commitCountEveryTime);
        List<T> tempList = new ArrayList<T>(commitCountEveryTime);
        int start, stop;
        Long startTime = System.currentTimeMillis();
        for (int i = 0; i < commitCount; i++) {
            tempList.clear();
            start = i * commitCountEveryTime;
            stop = Math.min(i * commitCountEveryTime + commitCountEveryTime - 1, list.size() - 1);
            for (int j = start; j <= stop; j++) {
                tempList.add(list.get(j));
            }
            session.insert(mybatisSQLId, tempList);
            session.commit();
            session.clearCache();
        }
        Long endTime = System.currentTimeMillis();
        logger.debug("batchCommit耗时:" + (endTime - startTime) + "毫秒");
    } catch (Exception e) {
        logger.error("batchCommit error!", e);
        e.printStackTrace();
        session.rollback();
    } finally {
        if (session != null) {
            session.close();
        }
    }
}
对应的,如果是批量update,也是类似的思路,只不过要注意一点:oracle环境中,多条语句提交的sql语句为
begin
  update xxx set xxx =xxx ;
  update xxx set xxx =xxx;
end;
用mytais拼的时候,参考下面的写法:
<update id="updateBatch" parameterType="java.util.List">
  <foreach collection="list" item="item" index="index" open="begin" close="end;" >
    update xxx set x=#{item.x,jdbcType=VARCHAR} where x =#{item.x,jdbcType=VARCHAR};
  </foreach>
</update>
关于批量提交的性能,Oracle环境下,我大概测试了一下:
insert into ... select xxx
union all select yyy
union all select zzz;
最快,其次是
begin
insert into ... values ...;
insert into ... values ...;
end;
当然最慢是逐条insert提交,最后谈下Spring与mybatis集成后,AOP事务管理 对 批量提交的影响 ,通常情况下,我们会这样配置AOP事务管理:
<tx:advice id="txAdvice" transaction-manager="transactionManager">
    <tx:attributes>
        <tx:method name="do*" read-only="false" rollback-for="java.lang.Exception"/>
        <tx:method name="*" propagation="SUPPORTS" read-only="true"/>
    </tx:attributes>
</tx:advice>

<aop:config>
    <aop:pointcut id="pc" expression="execution(* ctas.service.*.*(..))"/>
    <aop:advisor pointcut-ref="pc" advice-ref="txAdvice"/>
</aop:config>
这样,ctas.service(及子包)下的所有方法都被拦截,而且只有do开头的方法,具有可写的事务(即:能insert/update/delete记录),而其它方法是只读事务(即:只能select数据),但是我们前面谈到的批量提交操作,都是写代码手动提交的,不需要spring管理,所以配置中需要将某些方法排除,可以约定self开头的方法,由开发者自己管理事务,不需要spring代为管理,上面的配置要改成:
<aop:config>
    <aop:pointcut id="pc" expression="execution(* ctas.service.*.*(..)) and !execution(* ctas.service.*.self*(..)))"/>
    <aop:advisor pointcut-ref="pc" advice-ref="txAdvice"/>
</aop:config>
通过 and !execution(...) 将self开头的方法排除就可以了,前面的批量操作代码写到selfXXX方法中。
关于批量提交,还有一种情况:父子表的批量插入。思路还是一样的,但是SQL的写法有点区别,原理参考下面的语句(Oracle环境)
DECLARE
  BASE_ID   INTEGER;
  DETAIL_ID INTEGER;
BEGIN
  --第1组记录
  SELECT SEQ_T_BASE.NEXTVAL INTO BASE_ID FROM DUAL;
  INSERT INTO T_BASE (ID, FEE) VALUES (BASE_ID, ?);

  SELECT SEQ_T_DETAIL.NEXTVAL INTO DETAIL_ID FROM DUAL;
  INSERT INTO T_DETAIL (ID, BASE_ID, FEE) VALUES (DETAIL_ID, BASE_ID, ?);
  SELECT SEQ_T_DETAIL.NEXTVAL INTO DETAIL_ID FROM DUAL;
  INSERT INTO T_DETAIL (ID, BASE_ID, FEE) VALUES (DETAIL_ID, BASE_ID, ?);

  --第2组记录
  SELECT SEQ_T_BASE.NEXTVAL INTO BASE_ID FROM DUAL;
  INSERT INTO T_BASE (ID, FEE) VALUES (BASE_ID, ?);

  SELECT SEQ_T_DETAIL.NEXTVAL INTO DETAIL_ID FROM DUAL;
  INSERT INTO T_DETAIL (ID, BASE_ID, FEE) VALUES (DETAIL_ID, BASE_ID, ?);
  SELECT SEQ_T_DETAIL.NEXTVAL INTO DETAIL_ID FROM DUAL;
  INSERT INTO T_DETAIL (ID, BASE_ID, FEE) VALUES (DETAIL_ID, BASE_ID, ?);

  --...
END;
xml映射文件中的写法:
<insert id="insertBatch" parameterType="java.util.List">
    DECLARE
    base_id INTEGER ;
    detail_id INTEGER ;
    <foreach collection="list" item="item" index="index" open="begin" close="end;">
        select seq_t_base.nextval into base_id from dual;
        insert into t_base(id, fee) values(base_id, #{item.baseEntity.fee,jdbcType=DECIMAL});
        <foreach collection="item.details" item="detail" index="index">
            select seq_t_detail.nextval into detail_id from dual;
            insert into t_detail(id, base_id, fee) values(detail_id,base_id,#{detail.fee,jdbcType=DECIMAL});
        </foreach>
    </foreach>
</insert>
List中的Dto定义
public class BaseDetailDto {

    private TBase baseEntity;

    private List<TDetail> details;

    public TBase getBaseEntity() {
        return baseEntity;
    }

    public void setBaseEntity(TBase baseEntity) {
        this.baseEntity = baseEntity;
    }


    public List<TDetail> getDetails() {
        return details;
    }

    public void setDetails(List<TDetail> details) {
        this.details = details;
    }
}


 8662
8662


 被折叠的 条评论
为什么被折叠?
被折叠的 条评论
为什么被折叠?
 到【灌水乐园】发言


