要开始下面的步骤,你最好现在这里https://github.com/CEWendel/SWTableViewCell 下载代码,然后开始。
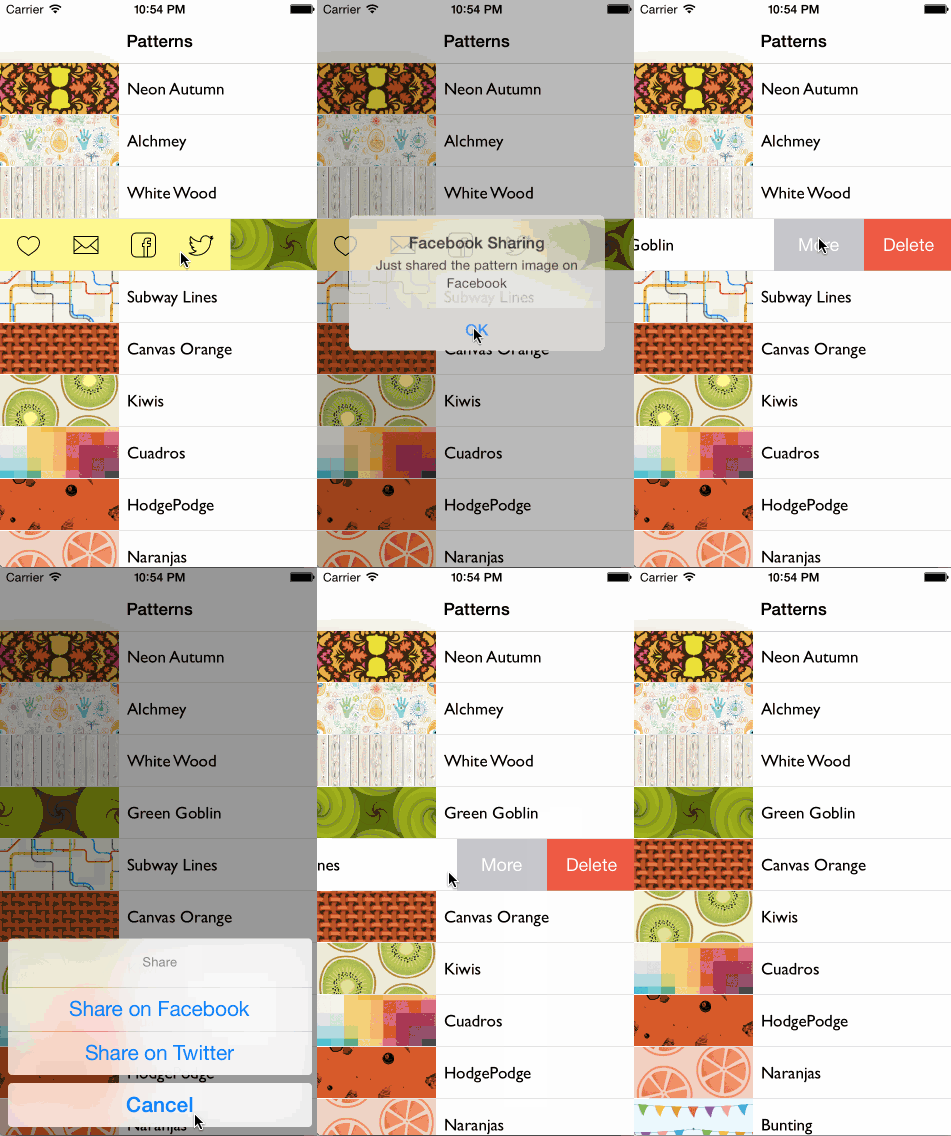
这次的教程,比较类似https://github.com/TeehanLax/UITableViewCell-Swipe-for-Options ,和 https://github.com/alikaragoz/MCSwipeTableViewCell 。完成后的界面就想下面的图像显示:


接下来就是创建一个最传统的tablView,如果你知道创建怎样穿件,那你就可以开始创建了,如果你不知道怎样创建你可以从这里下载https://www.dropbox.com/s/mxb9icmkxkfpw67/SwipeTableCellTemplate.zip 。
如果你想要 完成像下面图片展示的tableview一样,那么你可以从http://thepatternlibrary.com 这里下载tableview中显示的图片。

到这里为止,我们还没有完成前期的准备工作。,如果你想完成漂亮的滑动显示更多的信息,我们还要包含这里的代码,下载地址https://github.com/CEWendel/SWTableViewCell 。
现在,所有的准备工作都已经完成,记下来开始完善我们的代码。
找出刚才下载的SWTableViewCell,把它添加到我们的工程中,你最好新建一个文件夹来存放代码,这样你的工程看上去会更有清爽。如下图所示

接下来要做的就是怎样使用SWTableViewCell
利用SWTableViewCell代理你代码中的UITableViewCell 来扩展你的table view cell --SWTableViewCell事实上是继承自UITableViewCell,只是在滑动的时候添加了几个按钮。
通过 cellForRowAtIndexPath:方法来创建按钮 ---SWTableViewCell有两个属性,分别是leftUtilityButtons和rightUtilityButtons。你可以通过创建数组来完成两个属性的同时创建,当然你不需要同时创建来那个两边的滑动
实现SWTableViewCellDelegate 协议 -----协议的可选方法允许开发者创建按钮,当用户滑动cell的时候,didTriggerRightUtilityButtonWIthIndex,和didTriggerLeftUtilityButtonWithIndex就会创建相应的左边还是右边的按钮,当然具体的还要你自己去实现。
导入SWTableViewCell类扩展我们的TableViewCell
#import <UIKit/UIKit.h>
#import "SWTableViewCell.h"

@interface CustomTableViewCell:SWTableViewCell
@property (weak, nonatomic)IBOutlet UIImageView *patternImageView;
@Property (weak, nonatomic)IBOutlet UILabel *patternLablel;

@end
创建按钮
#import <UIKit/UIKit.h>
#import "SWTableViewCell.h"

@interface SwiptTableViewController:UITableVieController<SWTableViewCellDelegate>

@end打开SwipeTableViewController.m文件,然后更新CellForRowAtIndexPath:方法
- (UITableViewCell *)tableView:(UITableView *)tableView cellForRowAtIndexPath:(NSIndexPath *)indexPath
{
    static NSString *cellIdentifier = @"Cell";

    CustomTableViewCell *cell = (CustomTableViewCell *)[tableView dequeueReusableCellWithIdentifier:cellIdentifier forIndexPath:indexPath];

    // Add utility buttons
    NSMutableArray *leftUtilityButtons = [NSMutableArray new];
    NSMutableArray *rightUtilityButtons = [NSMutableArray new];

    [leftUtilityButtons sw_addUtilityButtonWithColor:
     [UIColor colorWithRed:1.0f green:1.0f blue:0.35f alpha:0.7]
                                                icon:[UIImage imageNamed:@"like.png"]];
    [leftUtilityButtons sw_addUtilityButtonWithColor:
     [UIColor colorWithRed:1.0f green:1.0f blue:0.35f alpha:0.7]
                                                icon:[UIImage imageNamed:@"message.png"]];
    [leftUtilityButtons sw_addUtilityButtonWithColor:
     [UIColor colorWithRed:1.0f green:1.0f blue:0.35f alpha:0.7]
                                                icon:[UIImage imageNamed:@"facebook.png"]];
    [leftUtilityButtons sw_addUtilityButtonWithColor:
     [UIColor colorWithRed:1.0f green:1.0f blue:0.35f alpha:0.7]
                                                icon:[UIImage imageNamed:@"twitter.png"]];

    [rightUtilityButtons sw_addUtilityButtonWithColor:
     [UIColor colorWithRed:0.78f green:0.78f blue:0.8f alpha:1.0]
                                                title:@"More"];
    [rightUtilityButtons sw_addUtilityButtonWithColor:
     [UIColor colorWithRed:1.0f green:0.231f blue:0.188 alpha:1.0f]
                                                title:@"Delete"];

    cell.leftUtilityButtons = leftUtilityButtons;
    cell.rightUtilityButtons = rightUtilityButtons;
    cell.delegate = self;

    // Configure the cell...
    cell.patternLabel.text = [patterns objectAtIndex:indexPath.row];
    cell.patternImageView.image = [UIImage imageNamed:[patternImages objectAtIndex:indexPath.row]];

    return cell;
}
现在基本的实现已经完成,现在运行程序,滑动cell你可看到我们刚才创建的"More"和"Delete"。
下面我们要实现 SWTableViewCellDelegate 协议
1.didTriggerLeftUtilityButtonWithIndex:方法 ---当你左滑的时候出现按钮,告诉按钮要做的事情
2.didTriggerRigthUtilityBUttonWithIndex:方法 ---当你右滑的时候出现按钮,并告诉按钮要干啥。
现在我们在SwipeTableViewController.m中添加下面的代码
- (void)swipeableTableViewCell:(SWTableViewCell *)cell didTriggerLeftUtilityButtonWithIndex:(NSInteger)index {

    switch (index) {
        case 0:
        {
            UIAlertView *alertView = [[UIAlertView alloc] initWithTitle:@"Bookmark" message:@"Save to favorites successfully" delegate:nil cancelButtonTitle:@"OK" otherButtonTitles: nil];
            [alertView show];
            break;
        }
        case 1:
        {
            UIAlertView *alertView = [[UIAlertView alloc] initWithTitle:@"Email sent" message:@"Just sent the image to your INBOX" delegate:nil cancelButtonTitle:@"OK" otherButtonTitles: nil];
            [alertView show];
            break;
        }
        case 2:
        {
            UIAlertView *alertView = [[UIAlertView alloc] initWithTitle:@"Facebook Sharing" message:@"Just shared the pattern image on Facebook" delegate:nil cancelButtonTitle:@"OK" otherButtonTitles: nil];
            [alertView show];
            break;
        }
        case 3:
        {
            UIAlertView *alertView = [[UIAlertView alloc] initWithTitle:@"Twitter Sharing" message:@"Just shared the pattern image on Twitter" delegate:nil cancelButtonTitle:@"OK" otherButtonTitles: nil];
            [alertView show];
        }
        default:
            break;
    }
}上面的代码,只是简单的实现弹出分享,但是没有真正的分享,如果你要实现facebook和twitter分享你可以参看这里的代码Facebook and Twitter sharing
接下来,我们继续完善我们的代码,现在我们实现didTriggerRightUtilityBUttonWithIndex方法,来完成右边要干的事情。
   - (void)swipeableTableViewCell:(SWTableViewCell *)cell didTriggerRightUtilityButtonWithIndex:(NSInteger)index {
   switch (index) {
       case 0:        {
        // 点击更多
     UIActionSheet *shareActionSheet = [[UIActionSheet alloc] initWithTitle:@"Share"
          delegate:nil cancelButtonTitle:@"Cancel" destructiveButtonTitle:nil
          otherButtonTitles:@"Share on Facebook", @"Share on Twitter", nil];
           [shareActionSheet showInView:self.view];
            [cell hideUtilityButtonsAnimated:YES];
             break;
        }
       case 1:
     {
                  // 点击删除
         NSIndexPath *cellIndexPath = [self.tableView indexPathForCell:cell];
         [patterns removeObjectAtIndex:cellIndexPath.row];
        [patternImages removeObjectAtIndex:cellIndexPath.row];
     [self.tableView deleteRowsAtIndexPaths:@[cellIndexPath] withRowAnimation:UITableViewRowAnimationLeft];
       break;
           }
  default:
       break;
      }
   }
运行完成后的代码,左右滑动你就会看到如下面的gif所显示的效果。运行看看~

这个项目的完整代码你可以到这里下载:https://www.dropbox.com/s/qmajopkacrido29/SwipeTableCell.zip


 372
372

 被折叠的 条评论
为什么被折叠?


