


Introduction
In this tutorial, you will discover the main tools used for the developement of iOS native applications. Starting off with Objective-C, the programming language, and Xcode, the IDE.
At the end of this tutorial, you will be able to :
- Understand the basics of Objective-C (syntax, memory management, ...)
- Create a project in Xcode
- Create a Hello World iPhone app
- Explore the iOS developer documentation
Objective-C
Class structure
- 4 instance variables
- 2 instance and 1 class methods
It is normal if you don't understand everything after reading this example ! Things are explained one after the other in the next sections.
#import <Foundation/Foundation.h>
#import <UIKit/UIKit.h>
#import "Person.h"
@interface Car : NSObject {
/* Instance variables */
//won't be accessible outside class, applies to all following variables
long serialNumber;
NSString* modelName;
UIColor* paintColor;
Person* owner;
}
/* Properties */
//non thread-safe getters will be generated
@property (nonatomic, readonly) long serialNumber;
@property (nonatomic, readonly) NSString* modelName;
//non thread-safe getter and setter and will be generated. Setter will copy received color
@property (nonatomic, copy) UIColor* paintColor;
//non thread-safe getter and setter and will be generated. Setter will make a strong reference on received owner
@property (nonatomic, strong) Person* owner;
/* Public methods */
//Instance (-) custom constructor method
- (id)initWithSerialNumber:(long)serial modelName:(NSString*)model color:(UIColor*)color;
//Class (+) custom "convenient" constructor
+ (Car*)carWithSerialNumber:(long)serial modelName:(NSString*)model color:(UIColor*)color;
//Instance (-) method
- (void)printHelloWorld;
Car.m - class implementation
#import "Car.h"
@implementation Car
@synthesize serialNumber, paintColor, modelName, owner;
/* Instance (-) custom constructor method */
- (id)initWithSerialNumber:(long)serial modelName:(NSString*)model color:(UIColor*)color {
self = [super init]; //call to default super constructor
if (self) { //check that that construction did not return a nil object.
Equivalent to if (self != nil) { ... }
serialNumber = serial;
modelName = model;
self.paintColor = color; //Because of the "self." we are using here the setter that will copy the value
//we could also have done : paintColor = [color copy];
}
return self;
}
/* Class (+) custom "convenient" constructor */
+ (Car*)carWithSerialNumber:(long)serial modelName:(NSString*)model color:(UIColor*)color {
return [[self alloc] initWithSerialNumber:serial modelName:model color:color];
}
/* Instance method */
- (void)printHelloWorld {
NSLog(@"Hello, world !"); //NSlog(@"<string format>", arguments) is the equivalent to System.out.println(...)
}
/* Overriding description (equivalent to toString in JAVA) */
- (NSString*)description {
return [NSString stringWithFormat:@"<Car> serial number : %ld, model : %@, color : %@, owner : %@", serialNumber, modelName, paintColor, owner];
}
Use of Car class - example
UIColor* red = [UIColor redColor];
Car* car0 = [[Car alloc] initWithSerialNumber:12344 modelName:@"Clio" color:red];
/* OR SIMPLER : use convenient constructur we have defined : */
Car* car = [Car carWithSerialNumber:12345 modelName:@"Clio" color:red];
[car printHelloWorld]; //prints "Hello, world !"
NSLog(@"%@", car); //prints "<Car> serial number : 12345, model : Clio, color : UIDeviceRGBColorSpace 1 0 0 1, owner : (null)"
/* change car attributes */
UIColor* blue = [UIColor blueColor];
car.paintColor = blue; //Important : this line uses the setter ! This is completely equivalent to [car setPaintColor:blue]. Both are correct.
car.serialNumber = 234234; //ERROR : serial number is readonly
car->serialNumber = 234234; //ERROR : serial number is @private
What we can learn from this example :
- Objective-C standard structure uses .h and .m files
- Instance variables are protected (@protected) by default, but one should always use private (@private)
@public is also possible but strongly discouraged. Using a property to generate a getter is the proper way. - @properties are the way to generate getters and setters
- (id) is a simplification for NSObject*. It represents a pointer to any object and disables compiler warning when casting.
- Public methods need to be prototyped in .h file
- - and + represent instance and class (static) methods respectively
- All standard C types can be used, side-by-side with Objective-C/Cocoa types (NSString, UIColor, NSNumber, NSArray, ...)
- Method calls use the following syntax : [instance nameOfTheInstanceMethod] or [Class nameOfTheClassMethod]
- Strings (type NSString*) are preceded by an @. For example : NSString* myString = @"Toto";
- NSLog() is the equivalent of System.out.println() in Java
Before diving into more details, here is a short overview of the 2 most useful collection types.
NSArray : represents an immutable array, on which objects pointers can be retrieved using an index integer.
NSMutableArray : mutable version of NSArray. NSMutableArray subclasses NSArray.
NSDictionary : represent an immutable key-value/object pointer dictionary (hash table).
NSMutableDictionary : mutable version of NSDictionary. NSMutableDictionary subclasses NSDictionary.
Neither arrays or dictionary are typed. Meaning that they can contain multiple types for their values ("id" pointers).
Note : immutable = cannot be modified. New objects cannot be inserted into an NSArray, while they can in an NSMutableArray for example.
A complete guide to all available collections can be found here.
Methods
- (void)insertObject:(id)anObject atIndex:(NSUInteger)index
[array insertObject:myCar atIndex:3]
insertObject and atIndex are called labels.
Labels added to method type (instance (-) or class (+)) define the method. Two methods with the same labels cannot be declared together, even if their type differ.
The previous method minimal, exact and sufficient definition is actually : - insertObject:atIndex:
For example, these three methods are the same for the compiler and fail to compile when declared together :
- (void)insertObject:(id)anObject atIndex:(NSUInteger)index
- (void)insertObject:(Car*)anObject atIndex:(NSUInteger)index
- (void)insertObject:(Car*)aCar atIndex:(NSUInteger)index
Selectors (type "SEL")
The selector type is very important in Objective-C. It is a kind of pointer on a method. You'll see them very often in the documentation.
Imagine for example that you want to call the printHelloWorld method on a car instance with a delay and every 1 second. We use the class NSTimer class for that :
[NSTimer scheduledTimerWithTimeInterval:1.0 target:car selector:@selector(printHelloWorld)userInfo:nil repeats:YES];
We have created a selector by using @selector(<method_signature>).
Memory management
Until last year memory management is Objective-C was manual, using a system called reference counting.
But this management is now automatic since Xcode 4.2 that introduces automatic reference counting (ARC).
Basically, you can see ARC as a mechanism provided by the compiler that will automatically add in the code calls to methodrelease (free memory) on an object A whenever no more pointer are pointing to it.
Nonetheless, it does not prevent retain cycles.
A retain cycle is when to objects A and B have a reference to each other. Meaning A->B and B->A.
Imagine the following case:

Now, if A is freed from memory, it is no longer pointing to B. But as C is pointing to B and vice-versa, they will be both kept in memory.
problem typically appears when implementing a tree : chilldren nodes should not have a strong reference to their parents, so that releasing the root node releases the whole tree.
To prevent this problem, pointers can be strong (default) or weak.
- strong (default)
A strong pointer will make pointed object be kept in memory. This is default for instance variables and properties. - weak
A weak pointer will not be considered as a real pointer in terms of memory management. If A weakly points to B and there is no other (strong )pointer to B, B will be freed from memory.
Specifying a pointer as weak is not the following way :Node* __weak parent;
Note: other pointers types are available, but less used in practice. The complete list is available here.
@property
In the previous Car class example, we have seen that @property is the clean way to generate getters and setters for instance variable.
Now that we have seen how the memory is managed, we can understand how they are defined :
@property(attributes) type name;
The attributes are divided into four groups and can take the following values :
1) Access type
- readwrite (default) : will generate getter and setter
- readonly : will only generate getter
- strong (default) : setter will make a strong reference to received object
- weak : setter will make a weak reference to received object
- copy : setter will copy received object and make a strong reference to it
- getter=... : can rename getter method (default is <nameOfTheProperty>)
- setter=... : can rename setter method (default is set<NameOfTheProperty>)
- nonatomic : the generated setter will not be thread-safe
- not specified (default) : the generated setter will be thread-safe (synchronized in java)
name = @"A name";
/* The instance variable is accessed directly, without using the setter => ignores attributes mentioned above */
self.name = @"A name";
[self setName:@"A name"];
/* These two lines are completely equivalent. The setter is called. */
Property without instance variable : it is totally possible to have a property without a corresponding instance variable. In that case, it is necessary to access the variable using the self. notation.
Protocols
In Objective-C, the protocols are the equivalent of the interfaces in Java and are defined using @protocol keyword. More here.Categories
Xcode
Xcode is the main tool you will use to develop your app. It is the Eclipse for iOS development.
We will use Xcode 4 and iOS 5 SDK, which are installed on INF2 machines.
To use Xcode on your own machine
If you have a Mac on Mac OS X 10.7.4 or later ( -> About this Mac) you can download Xcode 4.5 with iOS 6 SDK for free from the Mac App Store.
Create a project in Xcode
0. Workspace preparation (skip this step if you use your own machine)
- Mount your personal folder, using the shortcut on the desktop
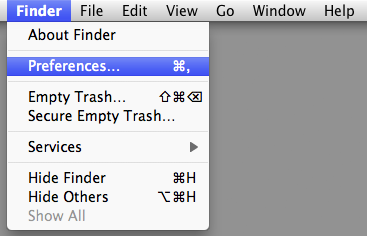
- Go to Finder preferences
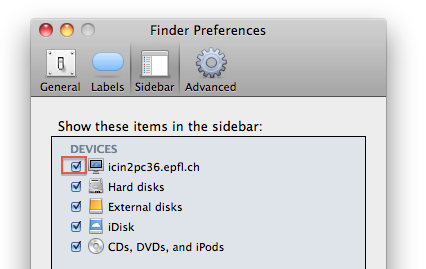
- Go to Sidebar tab and check the first line "icin2pcXX.epfl.ch" and close the window.
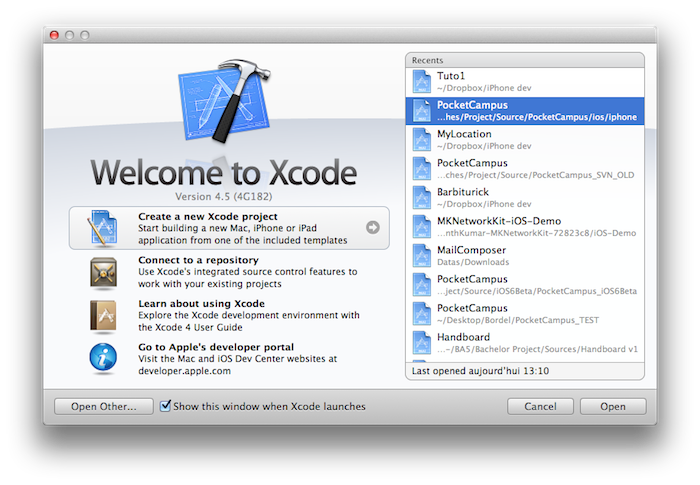
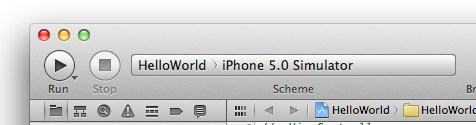
1. Start Xcode

2. Select "Create a new Xcode project".
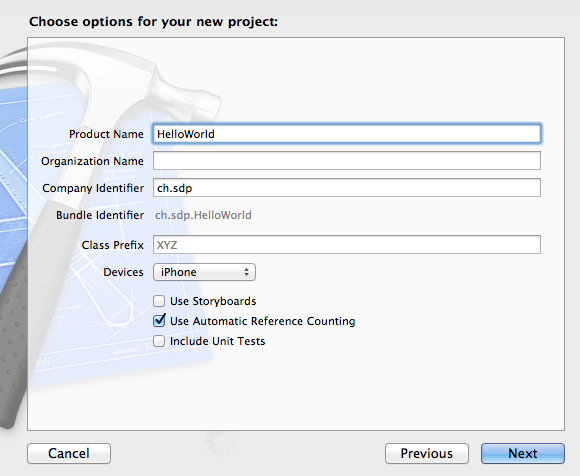
3. Select "Single View Application" and click next. (If this options does not appear, select "View-based Application").

4. Enter the following informations :
5. Click next and save the project to your personal folder, in a new folder named "SDP" :

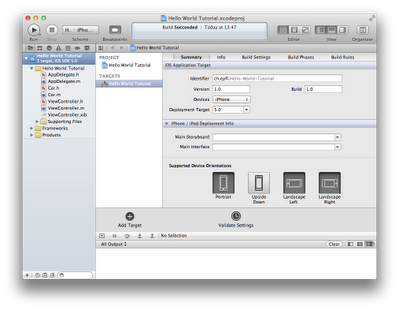
6. The project creation is done and should have a window like this :
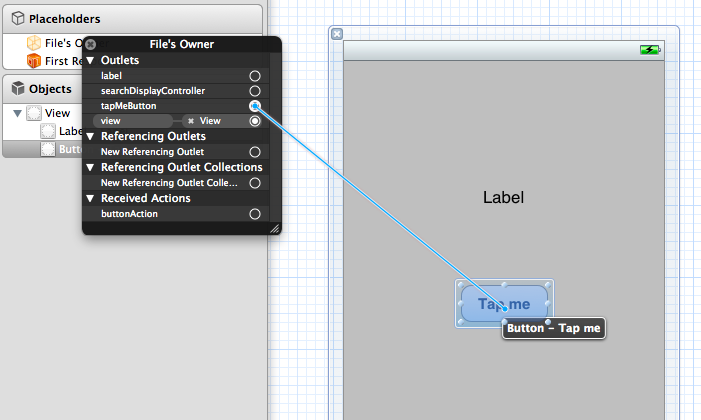
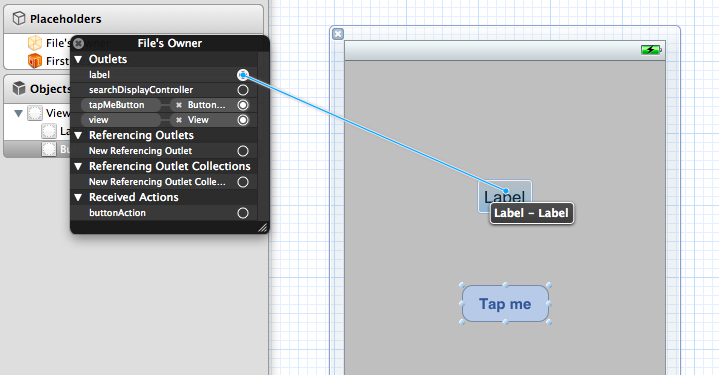
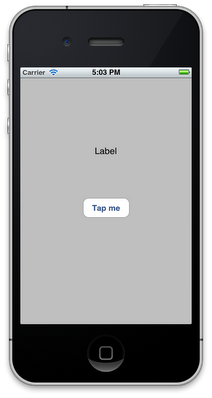
Create a Hello World iPhone App
@property (nonatomic) IBOutlet UILabel* label; // IBOutlet attribute makes this property visible from the interface builder tool
@property (nonatomic) IBOutlet UIButton* tapMeButton;
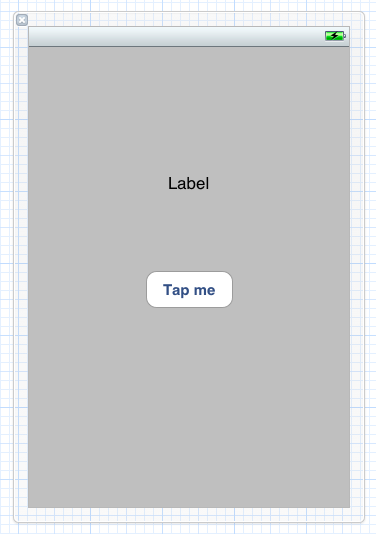
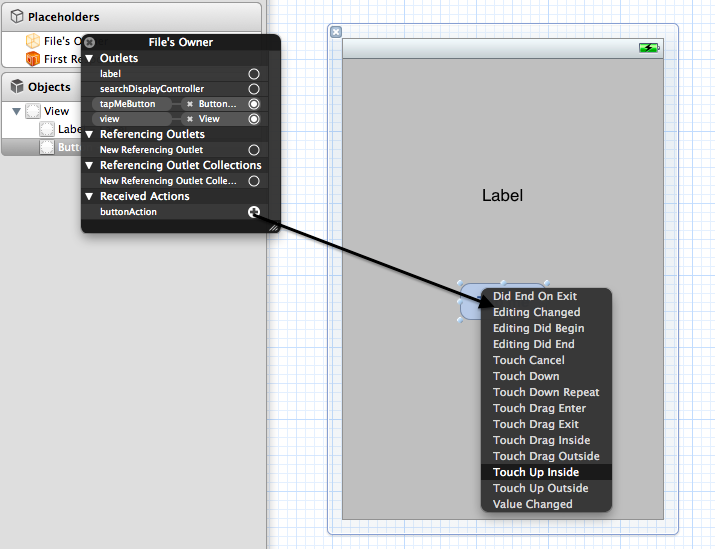
- (IBAction)buttonAction { //return type IBAction makes this method visible as action from the interface builder tool
self.label.text = [NSString stringWithFormat:@"Hello World ! Time : %ld", time(NULL)];
}
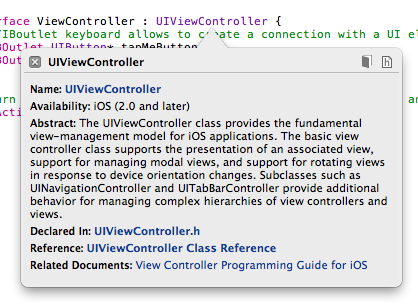
Explore the iOS developer documentation


 7397
7397


 被折叠的 条评论
为什么被折叠?
被折叠的 条评论
为什么被折叠?
 到【灌水乐园】发言


