前言
本文包含以下几部分内容
1.自定义属性和加载
2.参数间的引用
3.使用随机数
4.多环境配置
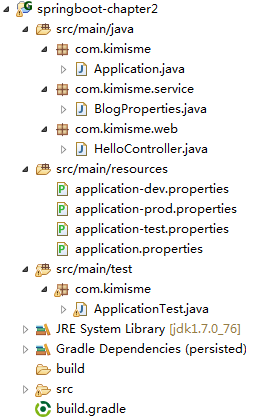
项目结构

自定义属性和加载
在application.properties配置中定义项目使用的属性
com.kimisme.blog.name=Think Different
com.kimisme.blog.title=Spring Boot教程
然后通过@Value("${属性名}")注解加载相应配置属性
@Component
public class BlogProperties {
	@Value("${com.kimisme.blog.name}")
	private String name;

	@Value("${com.kimisme.blog.title}")
	private String title;
通过单元测试验证BlogProperties的属性是否根据配置文件加载
@RunWith(SpringJUnit4ClassRunner.class)
@SpringApplicationConfiguration(Application.class)
public class ApplicationTest {

	@Autowired
	private BlogProperties blogProperties;

	@Test
	public void getHello() {
		Assert.assertEquals("Think Different", blogProperties.getName());
		Assert.assertEquals("Spring Boot教程", blogProperties.getTitle());
参数间的引用
在application.properties中的各个参数之间也可以直接引用来使用
com.kimisme.blog.name=Think Different
com.kimisme.blog.title=Spring Boot教程
com.kimisme.blog.desc=${com.kimisme.blog.name}即非同凡想
使用随机数
# 随机字符串
com.kimisme.blog.value=${random.value}
# 随机int
com.kimisme.blog.number=${random.int}
# 随机long
com.kimisme.blog.bignumber=${random.long}
# 10以内的随机数
com.kimisme.blog.test1=${random.int(10)}
# 10-20的随机数
com.kimisme.blog.test2=${random.int[10,20]}
注入自定义属性
@Component
public class BlogProperties {

	@Value("${com.kimisme.blog.value}")
	private String value;
	@Value("${com.kimisme.blog.number}")
	private Integer number;
	@Value("${com.kimisme.blog.bignumber}")
	private Long bignumber;
	@Value("${com.kimisme.blog.test1}")
	private Integer test1;
	@Value("${com.kimisme.blog.test2}")
	private Integer test2;
测试输出
@RunWith(SpringJUnit4ClassRunner.class)
@SpringApplicationConfiguration(Application.class)
public class ApplicationTest {

	private static final Log log = LogFactory.getLog(Application.class);

	@Autowired
	private BlogProperties blogProperties;

	@Test
	public void getHello() {
		Assert.assertEquals("Think Different", blogProperties.getName());
		Assert.assertEquals("Spring Boot教程", blogProperties.getTitle());
		Assert.assertEquals("Think Different即非同凡想", blogProperties.getDesc());

		log.info("随机数测试输出:");
		log.info("随机字符串 : " + blogProperties.getValue());
		log.info("随机int : " + blogProperties.getNumber());
		log.info("随机long : " + blogProperties.getBignumber());
		log.info("随机10以下 : " + blogProperties.getTest1());
		log.info("随机10-20 : " + blogProperties.getTest2());
	}
}
通过命令行设置属性值
多环境配置
通过配置多份不同环境的配置文件,再通过打包命令指定需要打包的内容之后进行区分打包。
多环境配置文件名需要满足application-{profile}.properties的格式,其中{profile}对应你的环境标识,比如:
- application-dev.properties:开发环境
- application-test.properties:测试环境
- application-prod.properties:生产环境
至于哪个配置文件会被加载,需要在application.properties文件中通过spring.profiles.active属性来设置,其值对应{profile}值
# 多环境配置文件激活属性
spring.profiles.active=dev
其中application-dev.properties文件内容如下
# 服务端口
server.port=10086
参考资料
http://blog.didispace.com/springbootproperties/


 被折叠的 条评论
为什么被折叠?


