由于我之前所在公司使用的代码托管平台是Gitlab,所以以GitLab为例讲解环境搭建与配置方法。
GitHub与此基本相似
预环境(开发环境):
(1)JDK1.7/1.8
(2)tomcat1.7/1.8
(3)MySql5.6及以上
(4)navicat(MySql界面管理工具)
其他(编辑工具):
(1)EditPlus
(2)NotePad++
开始环境搭建:
1.下载maven,解压到你的开发路径,下载地址:http://maven.apache.org/download.cgi
注册并登录你的Gitlab账号!
2.下载Git并安装(一路默认即可):https://git-scm.com/download/win
注:本文以Git-2.10.0-64-bit.exe版本为例介绍
具体安装方法可参考可以参考:http://blog.csdn.net/renfufei/article/details/41647875,其实只需一路默认,可以根据需要修改安装路径。
2.1.git在windows上配置ssh公钥
(1)从程序目录或右键鼠标打开 "Git Bash" ;
(2)查看是否已经有了ssh密钥:cd ~/.ssh,如果没有密钥则不会有此文件夹,有则备份删除;
(3)键入命令:ssh-keygen -t rsa -C aaa@163.com",最后的邮箱是gitlab账号;
(4)键入后回车三次,出现下列内容:
Your identification has been saved in /home/tekkub/.ssh/id_rsa.
Your public key has been saved in /home/tekkub/.ssh/id_rsa.pub.
The key fingerprint is:
………………(本行即为key fingerprint)
如图所示:
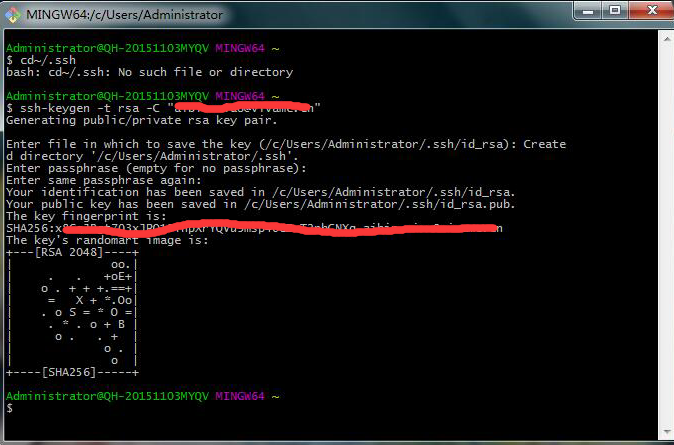
(5)最后在路径下(C:\Users\Administrator\.ssh)生成了两个文件:id_rsa和id_rsa.pub;
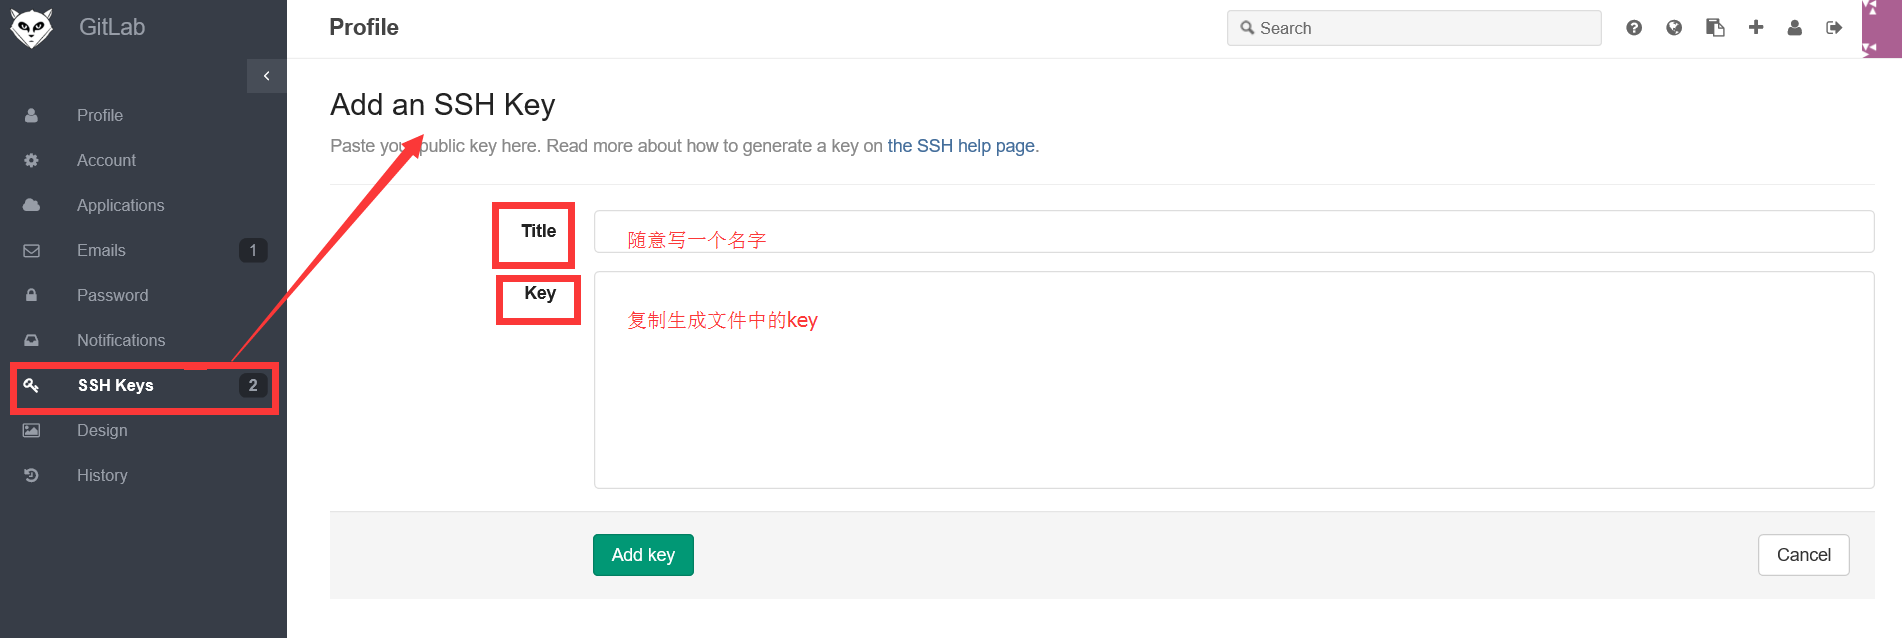
(6)用文本工具打开id_rsa.pub文件即可复制公钥,然后到Gitlab个人中心的SSH keys中
Add SSH keys,其中title随意取名,key即为id_rsa.pub文件中的内容;
如图所示:

3.下载Tortoisegit(git图形化界面工具)并安装(一路默认即可):https://tortoisegit.org/download/
注:本文以TortoiseGit-2.2.0.0-64bit.msi版本为例介绍
配置:(1)右键鼠标选择Tortoisegit,然后选择Settings进行配置;
(2)选择Git,配置User Info;
如图所示:
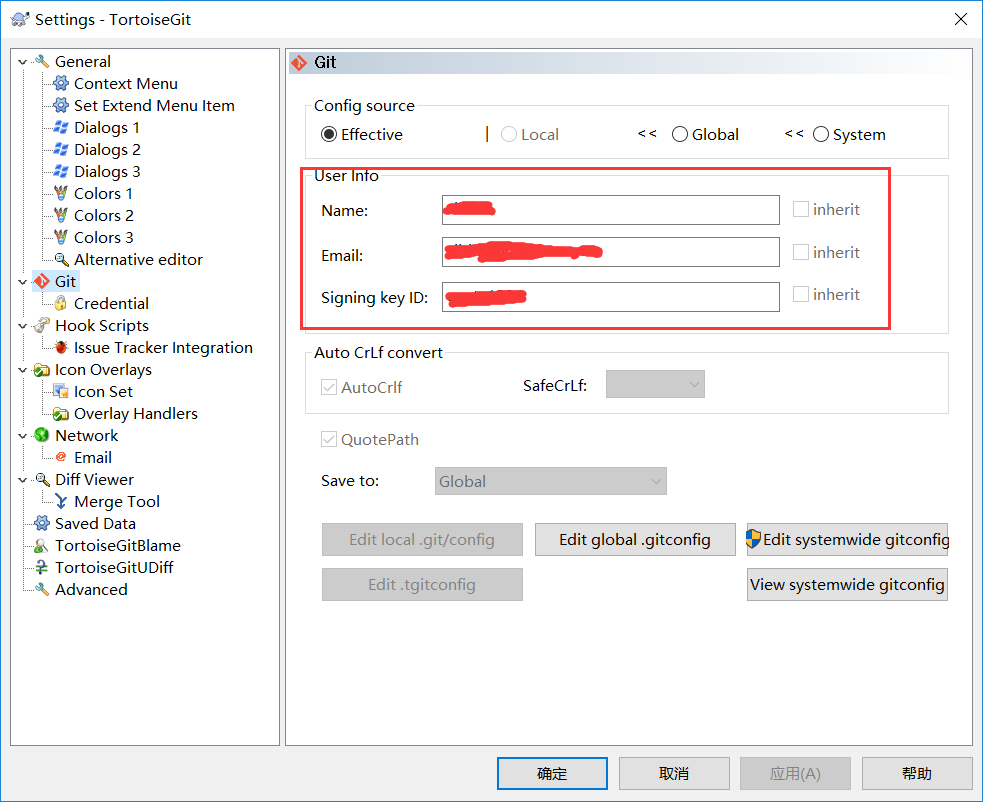
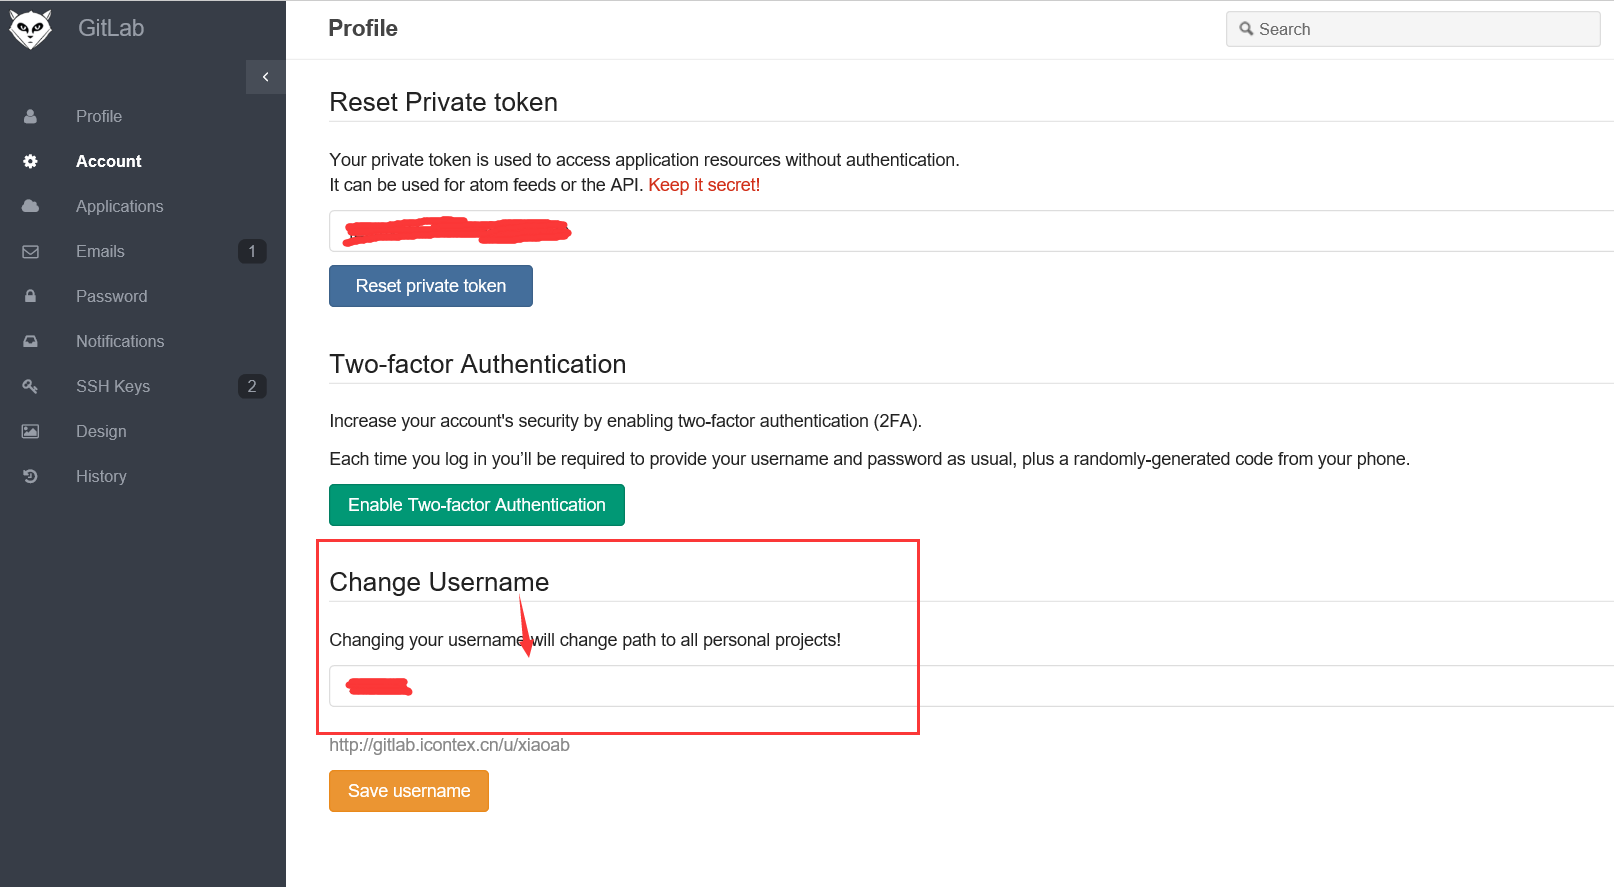
(3)Name即为Gitlab上个人中心Account的UserName,即xiaoab;
如图所示(红框中的UserName):
(4)Email即为Gitlab的登录账户,比如aaa@163.com;
(5)Signing Key即为Gitlab的登录密码,比如1234;
4.下载一个luna(包括Mars,Neon)以上版本的jee版eclipse,解压到你的开发路径
下载路径:http://www.eclipse.org/downloads/packages/eclipse-ide-java-ee-developers/indigosr2/
(然后进行基本的配置包括JDK、Tomcat、编码格式、字体大小、行号及其他,主要是个人习惯问题);
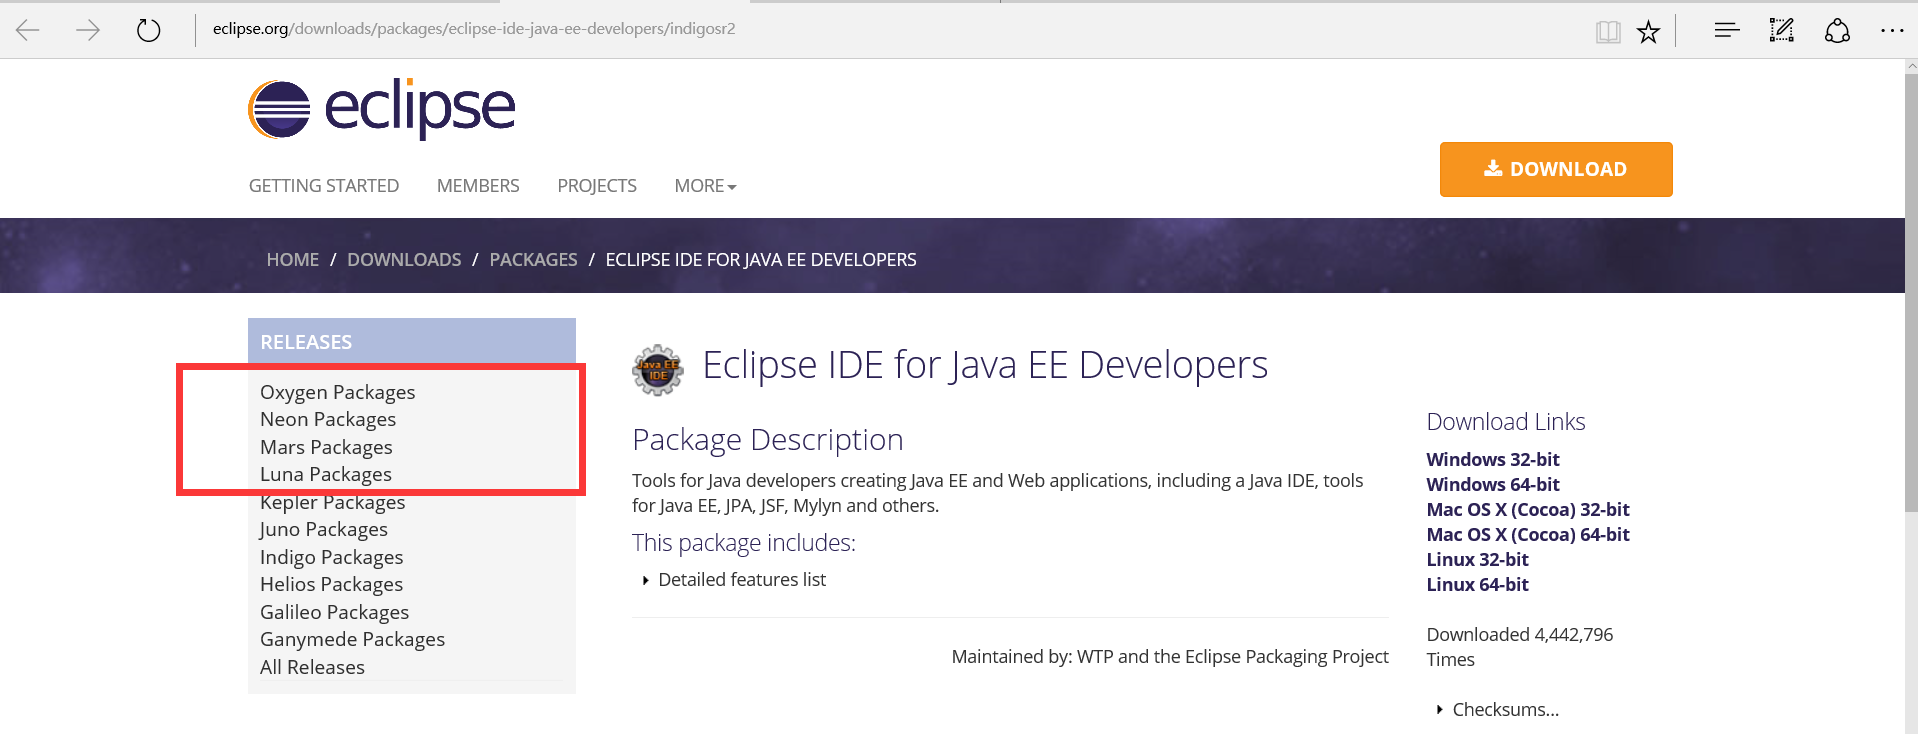
注:luna以上版本的eclipse已经集成了Git,Maven等插件,就不需要在自己安装插件!
5.eclipse基本配置完成后;
5.1.配置maven
maven解压路径下的/conf目录下的settings.xml文件需要进行配置(有4个地方);
(1) 配置本地仓库存储路径,按自己定义;
比如: <localRepository>D:\DeveloperTools\DevEnvironment\maven\repo</localRepository>
(2)配置server;
比如:
<server>
<id>repo.ccso.cn</id>
<username>myusername</username>
<password>mypwd</password>
</server>
(3)配置profile
比如:
<profile>
<id>repo.ccso.cn</id>
<repositories>
<repository>
<id>repo.ccso.cn</id>
<name>repo.ccso.cn</name>
<url>http://repo.ccso.cn:8081/nexus/content/groups/public</url>
<releases><enabled>true</enabled></releases>
<snapshots><enabled>true</enabled></snapshots>
</repository>
</repositories>
<pluginRepositories>
<pluginRepository>
<id>repo.ccso.cn</id>
<name>repo.ccso.cn</name>
<url>http://repo.ccso.cn:8081/nexus/content/groups/public</url>
<releases><enabled>true</enabled></releases>
<snapshots><enabled>true</enabled></snapshots>
</pluginRepository>
</pluginRepositories>
</profile>
(4)激活profie配置
比如:
<activeProfiles>
<activeProfile>nexus</activeProfile>
<activeProfile>repo.ccso.cn</activeProfile>
</activeProfiles>
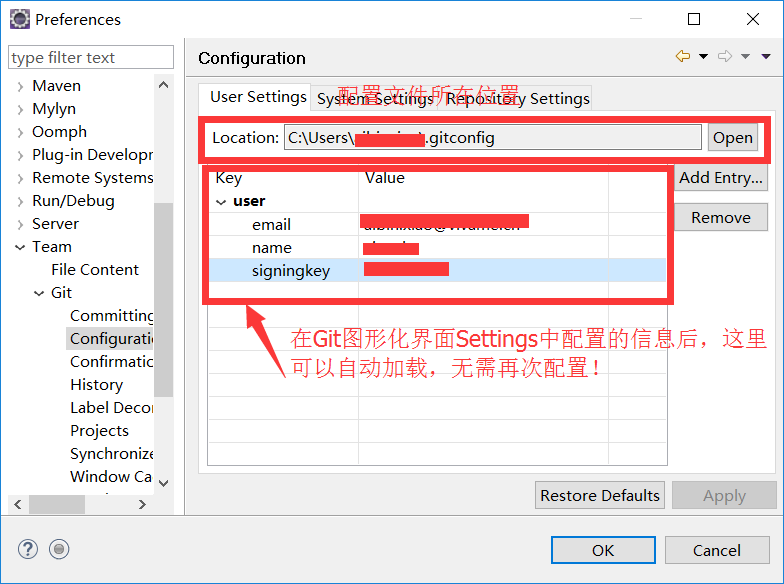
5.2.在eclipse中配置Git
打开eclipse-->Window-->Preferences-->Team-->Git-->Configuration
在Tortoisegit配置以后,这里会自动配置好,但是需要在Tortoisegit这配置好之后再打开eclipse。
如图所示:
6.重启eclipse即可;
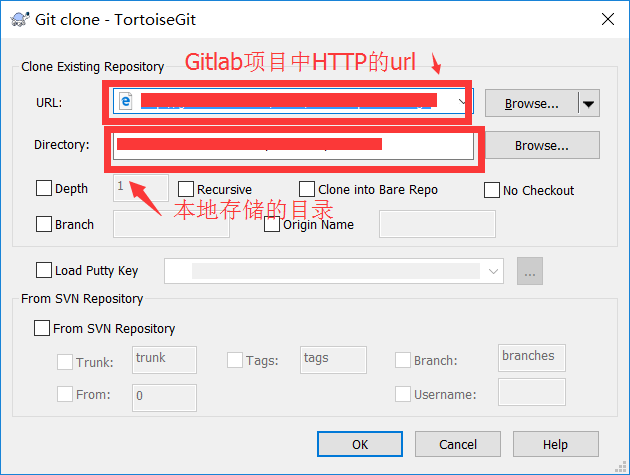
7.把Gitlab中的项目下载本地;
(1)下载,右键鼠标选择Git clone;
(2)输入URL,进入Gitlab的Project,选择你要下载的项目,找到http的url复制粘贴过去;
(3)选择下载到本地目录Directory,自己选择即可;
如图所示:
8.将项目导入到eclipse;
(1)单击File选择Import;
(2)选择Maven,再选择Existing Maven Project;
(3)找到你刚刚Git Clone的项目导入即可。
项目导入后,整个环境搭建与配置就到此结束。
本文为原创文章,如果对你有一点点的帮助,别忘了点赞哦!比心!如需转载,请注明出处,谢谢!


 3227
3227

 被折叠的 条评论
为什么被折叠?


