


git上有个库BabyBluetooth 基于原生CoreBluetooth框架进行了封装,使用起来也很方便,大家可以尝试一下。 那么我们开始吧!
正文
在了解下文内容之前,我已默认你已经了解一些基本概念:
- 什么是中心设备
- 什么是外围设备
- 什么是服务(service)
- 什么是特性(characteristic)
- 什么是订阅(notify)
- 什么是UUID
...
基本了解了以上一些概念,下面的内容将比较好理解。
需要注明,下面的UUID是我的蓝牙设备中的Service和Characteristic的UUID,要注意根据自己的蓝牙
设备提供的Service和Characteristic的UUID来替换
// 蓝牙设备提供的服务的UUID
#define kCGMServiceTwoUUID        @"0000FFF0-0000-1000-8000-00805F9B34FB"

// 蓝牙设备提供的写入特性
#define kCGMCharacteristicOneUUID @"0000FFF1-0000-1000-8000-00805F9B34FB"

// 蓝牙设备提供的notify特性
#define kCGMCharacteristicTwoUUID @"0000FFF2-0000-1000-8000-00805F9B34FB"
那么,先让我们了解下蓝牙交互流程中几个常用的回调。
-
中心设备CBCentralManager更新设备蓝牙状态的回调
- (void)centralManagerDidUpdateState:(CBCentralManager *)central { switch (central.state) { case CBCentralManagerStatePoweredOn: { // 扫描外围设备 [self.centeralManager scanForPeripheralsWithServices:nil options:nil]; } break; default: NSLog(@"设备蓝牙未开启"); break; } } - 中心设备已经发现外围设备回调
这里有几个问题值得注意:
1. 在ios中蓝牙广播信息中通常会包含以下4种类型的信息。ios的蓝牙通信协议中不接受其他类型的广播信息。因此需要注意的是,如果需要在扫描设备时,通 过蓝牙设备的Mac地址来唯一辨别设备,那么需要与蓝牙设备的硬件工程师沟通好:将所需要的Mac地址放到一下几种类型的广播信息中。通常放到 kCBAdvDataManufacturerData这个字段中。
kCBAdvDataIsConnectable = 1;
kCBAdvDataLocalName = XXXXXX;
kCBAdvDataManufacturerData = <XXXXXXXX>;
kCBAdvDataTxPowerLevel = 0;
2. 设备的UUID(peripheral.identifier)是由两个设备的mac通过算法得到的,所以不同的手机连接相同的设备,它的UUID都是不同的,无法标识设备。
3. 苹果与蓝牙设备连接通信时,使用的并不是苹果蓝牙模块的Mac地址,使用的是苹果随机生成的十六进制码作为手机蓝牙的Mac与外围蓝牙设备进行交互。如果 蓝牙设备与手机在一定时间内多次通信,那么使用的是首次连接时随机生成的十六进制码作为Mac地址,超过这个固定的时间段,手机会清空已随机生成的Mac 地址,重新生成。也就是说外围设备是不能通过与苹果手机的交互时所获取的蓝牙Mac地址作为手机的唯一标识的。(这是在与写蓝牙设备的固件工程师联调时根 据问题的现象推测的。至于苹果蓝牙通讯协议的底层是否确实完全像我所说的这样,希望了解的读者能提供帮助。在此先谢过。)
 - (void)centralManager:(CBCentralManager *)central didDiscoverPeripheral:(CBPeripheral *)peripheral advertisementData:(NSDictionary<NSString *,id> *)advertisementData RSSI:(NSNumber *)RSSI
{
NSLog(@"advertisementData.kCBAdvDataManufacturerData = %@", advertisementData[@"kCBAdvDataManufacturerData"]);
    _connectPeripheral = peripheral;
//    [self.centeralManager connectPeripheral:peripheral options:nil];

   if ([advertisementData[@"kCBAdvDataLocalName"] hasPrefix:@"SN"]){
        NSLog(@"已搜索到设备");
        NSLog(@"peripheral.identifier = %@  peripheral.name = %@", peripheral.identifier, peripheral.name);

        [_delegate getAdvertisementData:advertisementData andPeripheral:peripheral];

        [_peripheralArray addObject:peripheral];
    }
}- 中心设备设备连接成功回调
 - (void)centralManager:(CBCentralManager *)central didConnectPeripheral:(CBPeripheral *)peripheral
{
    // 设备停止扫描
    [self.centeralManager stopScan];

    peripheral.delegate = self;

    dispatch_after(2, dispatch_get_main_queue(), ^{

        // 查找服务
        [_connectPeripheral discoverServices:@[[CBUUID UUIDWithString:kCGMServiceTwoUUID]]];
    });
}- 中心设备设备连接失败回调
 - (void)centralManager:(CBCentralManager *)central didFailToConnectPeripheral:(CBPeripheral *)peripheral error:(NSError *)error
{
    [_operationDelegate failToConnect];
}- 中心设备设备连接中断回调
 - (void)centralManager:(CBCentralManager *)central didDisconnectPeripheral:(CBPeripheral *)peripheral error:(NSError *)error
{
    NSLog(@"连接断开 %@", [error localizedDescription]);
    [_operationDelegate disconnected];
}-
外围设备(CBPeripheral)发现服务(service)回调
- (void)peripheral:(CBPeripheral *)peripheral didDiscoverServices:(NSError *)error { if (error) { // 输出错误信息 NSLog(@"discoverServices.error============ %@", [error localizedDescription]); return; } // 遍历设备提供的服务 for (CBService *service in peripheral.services) { NSLog(@"service.UUID = ------------- = %@", service.UUID.UUIDString); // 找到需要的服务,并获取该服务响应的特性 if([service.UUID isEqual:[CBUUID UUIDWithString:kCGMServiceTwoUUID]]) { [service.peripheral discoverCharacteristics:nil forService:service]; NSLog(@"开始查找cgm的characteristic"); } } } - 外围设备发现特性(characteristic)回调
  - (void)peripheral:(CBPeripheral *)peripheral didDiscoverCharacteristicsForService:(CBService *)service error:(NSError *)error
{
    if (error) {
        // 输出错误信息
        NSLog(@"discoverCharacteristics.error=========== %@", [error localizedDescription]);
        return;
    }

    // 遍历服务中的所有特性
    for (CBCharacteristic *characteristic in service.characteristics) {

        if ([characteristic.UUID isEqual:[CBUUID UUIDWithString:kCGMCharacteristicOneUUID]]) {
            // 设置读写的特性
            _readAndWriteCharacteristic = characteristic;
        } else if ([characteristic.UUID isEqual:[CBUUID UUIDWithString:kCGMCharacteristicTwoUUID]]) {
            // 设置需要订阅的特性
            _notifyCharacteristic = characteristic;
            [_connectPeripheral setNotifyValue:YES forCharacteristic:_notifyCharacteristic];
        }
    }
}- 外围设备数据更新回调, 可以在此回调方法中读取信息(无论是read的回调,还是notify(订阅)的回调都是此方法)
  - (void)peripheral:(CBPeripheral *)peripheral didUpdateValueForCharacteristic:(CBCharacteristic *)characteristic error:(NSError *)error
{
    if (error) {
        // 输出错误信息
        NSLog(@"didupadteValueForCharacteristic error ============ %@", [error localizedDescription]);
        return;
    }
    NSLog(@"value ============= %@", characteristic.value);

    // 解析数据
    NSData *data = characteristic.value;

    // 将NSData转Byte数组
    NSUInteger len = [data length];
    Byte *byteData = (Byte *)malloc(len);
    memcpy(byteData, [data bytes], len);
    NSMutableArray *commandArray = [NSMutableArray arrayWithCapacity:0];
    // Byte数组转字符串
    for (int i = 0; i < len; i++) {
        NSString *str = [NSString stringWithFormat:@"%02x", byteData[i]];
        [commandArray addObject:str];
        NSLog(@"byteData = %@", str);
    }
    // 输出数据
    [_operationDelegate dataWithCharacteristic:commandArray];
}- 特性已写入外围设备的回调(如果写入类型为CBCharacteristicWriteWithResponse 回调此方法,如果写入类型为CBCharacteristicWriteWithoutResponse不回调此方法)
 - (void)peripheral:(CBPeripheral *)peripheral didWriteValueForCharacteristic:(CBCharacteristic *)characteristic error:(NSError *)error
{
    if (error) {
        NSLog(@"write.error=======%@",error.userInfo);
    }

    /* When a write occurs, need to set off a re-read of the local CBCharacteristic to update its value */

    // 读数据
    if ([characteristic.UUID isEqual:[CBUUID UUIDWithString:kCGMCharacteristicOneUUID]]) {
        [self readCharacter];
    }
}- 外围设备订阅特征值状态改变成功的回调
需要注意的是这里是对kCGMCharacteristicOneUUID这个特性进行写入,这里之所以这样操作是因为我的蓝牙设备的蓝牙协议是这 样定义的,所以这里不要照抄照搬,要按照你的蓝牙设备的通讯协议来确定,对哪一个特性进行read,对哪个特性进行write,以及对哪个特性进行设置 Notify
  - (void)peripheral:(CBPeripheral *)peripheral didUpdateNotificationStateForCharacteristic:(CBCharacteristic *)characteristic error:(NSError *)error {
    if (error) {
        NSLog(@"error = %@", [error localizedDescription]);
    }
    // 对特性kCGMCharacteristicTwoUUID设置notify(订阅),成功以后回调
    if ([characteristic.UUID.UUIDString isEqualToString:kCGMCharacteristicTwoUUID] && characteristic.isNotifying) {
        // 写数据 回调-didWriteValueForCharacteristic

        NSLog(@"写数据到cgm设备的characteristic = %@", _readAndWriteCharacteristic.UUID.UUIDString);
        [_operationDelegate writeCharacteristic];
    }
}
另外,除了回调以外,还有几个点需要注意:
-
搜索外围设备
- (void)searchlinkDevice { // 实现代理 // 扫描设备 // _centeralManager = [[CBCentralManager alloc] initWithDelegate:self // queue:nil]; if(self.centeralManager.state == CBCentralManagerStatePoweredOff) { // 蓝牙关闭的 } else if(self.centeralManager.state == CBCentralManagerStateUnsupported) { // 设备不支持蓝牙 } else if(self.centeralManager.state == CBCentralManagerStatePoweredOn || self.centeralManager.state == CBCentralManagerStateUnknown) { // 开启的话开始扫描蓝牙设备 [self.centeralManager scanForPeripheralsWithServices:nil options:nil]; double delayInSeconds = 20.0; // 扫描20s后未扫描到设备停止扫描 dispatch_time_t popTime = dispatch_time(DISPATCH_TIME_NOW, (int64_t)(delayInSeconds * NSEC_PER_SEC)); dispatch_after(popTime, dispatch_get_main_queue(), ^(void) { [self stopScan]; }); } } - 对某个特性(characteristic)写入数据
- (void)writeCharacter:(NSData *)data { NSLog(@" characteristic.uuid = %@ data ==== %@", _readAndWriteCharacteristic.UUID.UUIDString, data); if ([_readAndWriteCharacteristic.UUID isEqual:[CBUUID UUIDWithString:kCGMCharacteristicOneUUID]]) { [_connectPeripheral writeValue:data forCharacteristic:_readAndWriteCharacteristic type:CBCharacteristicWriteWithResponse]; } else { [_connectPeripheral writeValue:data forCharacteristic:_readAndWriteCharacteristic type:CBCharacteristicWriteWithoutResponse]; } } - 读数据
需要注意的是这里读取蓝牙信息 (但并不是在返回值中接收,要在
- (void)peripheral:(CBPeripheral *)peripheral didUpdateValueForCharacteristic:(CBCharacteristic *)characteristic error:(NSError *)error;这个回调方法中接收)
 - (void)readCharacter
{
    [_connectPeripheral readValueForCharacteristic:_readAndWriteCharacteristic];
}
简单说说开发蓝牙的步骤
1.当前ios中开发蓝牙所运用的系统库是<CoreBluetooth/CoreBluetooth.h>。
2.蓝牙外设必须为4.0及以上,否则无法开发,蓝牙4.0设备因为低耗电,所以也叫做BLE。
3.CoreBluetooth框架的核心其实是两个东西,peripheral和central, 可以理解成外设和中心,就是你的苹果手机就是中心,外部蓝牙称为外设。
4. 服务和特征(service and characteristic):简而言之,外部蓝牙中它有若干个服务service(服务你可以理解为蓝牙所拥有的能力),而每个服务service下 拥有若干个特征characteristic(特征你可以理解为解释这个服务的属性)。
5.Descriptor(描述)用来描述characteristic变量的属性。例如,一个descriptor可以规定一个可读的描述,或者一个characteristic变量可接受的范围,或者一个characteristic变量特定的单位。
6.跟硬件亲测,Ios蓝牙每次最多接收155字节的数据,安卓5.0以下最大接收20字节,5.0以上可以更改最大接收量,能达到500多字节。
通过以上关键信息的解释,然后看一下蓝牙的开发流程:
- 建立中心管理者
- 扫描外设(discover)
- 连接外设(connect)
- 扫描外设中的服务和特征(discover)
4.1 获取外设的services
4.2 获取外设的Characteristics,获取Characteristics的值,
获取Characteristics的Descriptor和Descriptor的值- 与外设做数据交互(explore and interact)
- 断开连接(disconnect)
具体代码
1.创建一个中心管理者
//只要一触发这句代码系统会自动检测手机蓝牙状态,你必须实现其代理方法,当然得添加<CBCentralManagerDelegate>
CBCentralManager *theManager = [[CBCentralManager alloc]initWithDelegate:self queue:nil];

//从这个代理方法中你可以看到所有的状态,其实我们需要的只有on和off连个状态
- (void)centralManagerDidUpdateState:(CBCentralManager *)central{
        switch (central.state) {
            case CBCentralManagerStateUnknown:
                NSLog(@">>>CBCentralManagerStateUnknown");
                break;
            case CBCentralManagerStateResetting:
                NSLog(@">>>CBCentralManagerStateResetting");
                break;
            case CBCentralManagerStateUnsupported:
                NSLog(@">>>CBCentralManagerStateUnsupported");
                break;
            case CBCentralManagerStateUnauthorized:
                NSLog(@">>>CBCentralManagerStateUnauthorized");
                break;
            case CBCentralManagerStatePoweredOff:
                NSLog(@">>>CBCentralManagerStatePoweredOff");
                break;
             case CBCentralManagerStatePoweredOn:
                NSLog(@">>>CBCentralManagerStatePoweredOn");
                break;
            default:
                break;
        }
当发现蓝牙状态是开启状态,你就可以利用中央设备进行扫描外设,如果为关闭状态,系统会自动弹出让用户去设置蓝牙,这个不需要我们开发者关心。
2.利用中心去扫描外设
//两个参数为nil,默认扫描所有的外设,可以设置一些服务,进行过滤搜索
 [theManager scanForPeripheralsWithServices:nil options:nil];
2.1当扫描到外设,触发以下代理方法
在这里需要说明的是,
一.当扫描到外设,我们可以读到相应外设广播信息,RSSI信号强度(可以利用RSSI计算中心和外设的距离)。
二.我们可以根据一定的规则进行连接,一般是默认名字或者名字和信号强度的规则来连接。
三. 像我现在做的无钥匙启动车辆锁定车辆,就需要加密通讯,不能谁来连接都可以操作车辆,需要和外设进行加密通讯,但是一切的通过算法的校验都是在和外设连接 上的基础上进行,例如连接上了,你发送一种和硬件约定好的算法数据,硬件接收到校验通过了就正常操作,无法通过则由硬件(外设)主动断开。
//这里默认扫到MI,主动连接,当然也可以手动触发连接
- (void)centralManager:(CBCentralManager *)central didDiscoverPeripheral:(CBPeripheral *)peripheral advertisementData:(NSDictionary *)advertisementData RSSI:(NSNumber *)RSSI{
    NSLog(@"扫描连接外设:%@ %@",peripheral.name,RSSI);

    if ([peripheral.name hasSuffix:@"MI"]) {
        //保存外设,并停止扫描,达到节电效果
        thePerpher = peripheral;
        [central stopScan];
       //进行连接
        [central connectPeripheral:peripheral options:nil];
    }

}
3.当连接到外设,会调用以下代理方法
这里需要说明的是
当成功连接到外设,需要设置外设的代理,为了扫描服务调用相应代理方法
- (void)centralManager:(CBCentralManager *)central didConnectPeripheral:(CBPeripheral *)peripheral{

    NSLog(@"连接外设成功!%@",peripheral.name);
    [peripheral setDelegate:self];
    [peripheral discoverServices:nil];
}

//连接外设失败
-(void)centralManager:(CBCentralManager *)central didFailToConnectPeripheral:(CBPeripheral *)peripheral error:(NSError *)error
{
NSLog(@"连接到外设 失败!%@ %@",[peripheral name],[error localizedDescription]);
}
4.扫描外设中的服务和特征
//扫描到服务
-(void)peripheral:(CBPeripheral *)peripheral didDiscoverServices:(NSError *)error{
    if (error)
    {
        NSLog(@"扫描外设服务出错:%@-> %@", peripheral.name, [error localizedDescription]);
        return;
    }
    NSLog(@"扫描到外设服务:%@ -> %@",peripheral.name,peripheral.services);
    for (CBService *service in peripheral.services) {
        [peripheral discoverCharacteristics:nil forService:service];
    }
    NSLog(@"开始扫描外设服务的特征 %@...",peripheral.name);

}
//扫描到特征
- (void)peripheral:(CBPeripheral *)peripheral didDiscoverCharacteristicsForService:(CBService *)service error:(NSError *)error{
    if (error)
    {
        NSLog(@"扫描外设的特征失败!%@->%@-> %@",peripheral.name,service.UUID, [error localizedDescription]);
        return;
    }

    NSLog(@"扫描到外设服务特征有:%@->%@->%@",peripheral.name,service.UUID,service.characteristics);
    //获取Characteristic的值
    for (CBCharacteristic *characteristic in service.characteristics){

  //这里外设需要订阅特征的通知,否则无法收到外设发送过来的数据
  [peripheral setNotifyValue:YES forCharacteristic:characteristic];

//这里以小米手环为例,当我们定义好每个特征是干什么用的,我们需要读取这个特征的值,当特征值更新了会调用
//- (void)peripheral:(CBPeripheral *)peripheral didUpdateValueForCharacteristic:(CBCharacteristic *)characteristic error:(nullable NSError *)error方法
//需要说明的是UUID是硬件定义好给你,如果硬件也是个新手,那你可以先打印出所有的UUID,找出有用的
            //步数
            if ([characteristic.UUID.UUIDString isEqualToString:@"FF06"])
            {
                [peripheral readValueForCharacteristic:characteristic];
            }

            //电池电量
            else if ([characteristic.UUID.UUIDString isEqualToString:@"FF0C"])
            {
                [peripheral readValueForCharacteristic:characteristic];
            }

            else if ([characteristic.UUID.UUIDString isEqualToString:@"2A06"])
            {
                //震动
                theSakeCC = characteristic;
            }

        }
    }


}

//扫描到具体的值->通讯主要的获取数据的方法
- (void)peripheral:(CBPeripheral *)peripheral didUpdateValueForCharacteristic:(CBCharacteristic *)characteristic error:(nullable NSError *)error
{
    if (error) {
        NSLog(@"扫描外设的特征失败!%@-> %@",peripheral.name, [error localizedDescription]);
        return;
    }
    NSLog(@"%@ %@",characteristic.UUID.UUIDString,characteristic.value);
    if ([characteristic.UUID.UUIDString isEqualToString:@"FF06"]) {
        Byte *steBytes = (Byte *)characteristic.value.bytes;
        int steps = bytesValueToInt(steBytes);

    }
    else if ([characteristic.UUID.UUIDString isEqualToString: @"FF0C"])
    {
        Byte *bufferBytes = (Byte *)characteristic.value.bytes;
        int buterys = bytesValueToInt(bufferBytes)&0xff;
        NSLog(@"电池:%d%%",buterys);

    }
    else if ([characteristic.UUID.UUIDString isEqualToString:@"2A06"])
    {
        Byte *infoByts = (Byte *)characteristic.value.bytes;
        //这里解析infoByts得到设备信息

    }

}
5.与外设做数据交互
需要说明的是苹果官方提供发送数据的方法很简单,只需要调用下面的方法
- (void)writeValue:(NSData *)data forCharacteristic:(CBCharacteristic *)characteristic type:(CBCharacteristicWriteType)type我们只需要在搜索每个服务的特征,记录这个特征,然后向这个特征发送数据就可以了。
6.断开连接
调用以下代码,需要说明的是中心断开与外设的连接。
- (void)cancelPeripheralConnection:(CBPeripheral *)peripheral;以上呢是整个蓝牙的开发过程,系统提供的框架api就这么多,开发起来也不是很难,要是你认为这篇文章到这里就结束了,你就大错特错了,这篇文章的精华内容将从这里开始,由于公司项目的保密性,我不能以它为例,那我就以小米手环为实例,主要分享一下数据解析。
精华部分
1.当调用了以下代理方法的时候,我们需要处理接收到的数据
- (void)peripheral:(CBPeripheral *)peripheral didUpdateValueForCharacteristic:(CBCharacteristic *)characteristic error:(nullable NSError *)error小米手环所定义的几个UUID如下:
@"FF06" 这个UUID定义的是步数
@"FF0C" 这个UUID定义的是电量
@"2A06"这个UUID定义的是震动
@"FF01"这个UUID定义的是相关的设备信息
通过以上的UUID,我们可以读取到步数,电量,操作手环震动,并读取手环相应设备的信息,这里需要说明的是我并不清楚设备信息的具体协议,所以这里没法解析。
if ([characteristic.UUID.UUIDString isEqualToString:STEP]) {
        Byte *steBytes = (Byte *)characteristic.value.bytes;
        int steps = bytesValueToInt(steBytes);
        NSLog(@"步数:%d",steps);
    }
当我们读到步数这个UUID时,我们可以拿到value,小米手环所定义的协议是4个字节,我们需要将4个字节转换为int 类型即可
方法如下
//4个字节Bytes 转 int
unsigned int  bytesValueToInt(Byte *bytesValue) {

 unsigned int  intV;
    intV = (unsigned int ) ( ((bytesValue[3] & 0xff)<<24)
                            |((bytesValue[2] & 0xff)<<16)
                            |((bytesValue[1] & 0xff)<<8)
                            |(bytesValue[0] & 0xff));
    return intV;
}
需要说明的是这个方法是C语言的方法,采用位与运算,当然如果项目中需要另一种方式的转换,如:发过来两字节需要你转换为int,如果你不会转换,可以去网上搜索,我会在文章后附一些常用的转换方法。
这里重点说明的是步数读取,剩余类似。
2.当我们给外设发送数据时,我们需要跟硬件定协议,当然这是在开始项目之前做好的事情。
小米手环协议中震动命令的触发,是向硬件发送一个10进制的 2
这里需要说明的是我们发送数据给硬件一般是字节数组,然后将他转换为NSData发送。
      //这里为了严谨起见,需要判断外设和特征是否存在,如果存在发送数据
       if (thePerpher && theSakeCC) {
        Byte zd[1] = {2};
        NSData *theData = [NSData dataWithBytes:zd length:1];
        [thePerpher writeValue:theData forCharacteristic:theSakeCC type:CBCharacteristicWriteWithoutResponse];

    }
这里需要再添加一点,如果协议要求你发ASCII码,例如‘SHAKE’,只需要这么处理
 if (thePerpher && theSakeCC) {
        Byte zd[] = {'S','H','A','K','E'};
        NSData *theData = [NSData dataWithBytes:zd length:1];
        [thePerpher writeValue:theData forCharacteristic:theSakeCC type:CBCharacteristicWriteWithoutResponse];

    }
3.项目中实际开发的运用
当我们面对实际开发时,我们不可能这么直接去在一个控制器中去写这么多代码,如果你说这没多少啊,那我无话可说了 ?。。。当然有人会说运用三方库的啊,babyBluetooth在github上star还是挺高的,我的观点是没有必要去依赖所谓的三方库,有的三 方库高度封装性会致使我们如果遇到错误时无法排查,所以三方库慎用,当然你可以参考一些Star很高的三方库,看大神的代码思想,有利于自己读写代码的能 力。
我的主要思路是封装一个单例类,封装好扫描的方法,读取数据的方法(一般是代理回调),发送指令(例如小米的震动)方法,而在读取数据中我们可以采 用模型的思想,当收到蓝牙外设发送过来的数据时候,我们解析完后包装成模型通过代理回传过去,以后我们在控制器中每次拿到的都是模型数据,这样处理起来方 便大大的。
下面将小米手环demo附上,供需要的朋友参考学习,如果文章中我有什么没有说的很明白,或者什么疑惑可以留言。
demo https://github.com/markdashi/MIBLE
附常用转换方法
@interface NSString (Extension)

//16进制字符串转成int
- (int)convertHexStringToINT;

//16进制字符串转换为2进制的字符串
- (NSString *)getBinaryByhex;
@end

@implementation NSString (Extension)
//不考虑内存溢出
- (int)convertHexStringToINT
{
    UInt64 mac1 =  strtoul([self UTF8String], 0, 16);

    return [[NSString stringWithFormat:@"%llu",mac1] intValue];
}

- (NSString *)getBinaryByhex
{
    NSMutableDictionary  *hexDic = [[NSMutableDictionary alloc] init];

    hexDic = [[NSMutableDictionary alloc] initWithCapacity:16];

    [hexDic setObject:@"0000" forKey:@"0"];

    [hexDic setObject:@"0001" forKey:@"1"];

    [hexDic setObject:@"0010" forKey:@"2"];

    [hexDic setObject:@"0011" forKey:@"3"];

    [hexDic setObject:@"0100" forKey:@"4"];

    [hexDic setObject:@"0101" forKey:@"5"];

    [hexDic setObject:@"0110" forKey:@"6"];

    [hexDic setObject:@"0111" forKey:@"7"];

    [hexDic setObject:@"1000" forKey:@"8"];

    [hexDic setObject:@"1001" forKey:@"9"];

    [hexDic setObject:@"1010" forKey:@"A"];

    [hexDic setObject:@"1011" forKey:@"B"];

    [hexDic setObject:@"1100" forKey:@"C"];

    [hexDic setObject:@"1101" forKey:@"D"];

    [hexDic setObject:@"1110" forKey:@"E"];

    [hexDic setObject:@"1111" forKey:@"F"];

    NSMutableString *binaryString=[[NSMutableString alloc] init];

    for (int i=0; i<[self length]; i++) {

        NSRange rage;

        rage.length = 1;

        rage.location = i;

        NSString *key = [self substringWithRange:rage];

        binaryString = (NSMutableString *)[NSString stringWithFormat:@"%@%@",binaryString,[NSString stringWithFormat:@"%@",[hexDic objectForKey:key]]];

    }

    return binaryString;
}

//NSData转换为16进制字符串,NSData的分类
- (NSString *)dataToHexString
{
    NSUInteger          len = [self length];
    char *              chars = (char *)[self bytes];
    NSMutableString *   hexString = [[NSMutableString alloc] init];

    for(NSUInteger i = 0; i < len; i++ )
        [hexString appendString:[NSString stringWithFormat:@"%0.2hhx", chars[i]]];

    return hexString;
}
2016.8.29补充
由于项目中需要做关于后台持续扫描,类似于常见的蓝牙音箱,打开手机APP连接蓝牙音箱,播放音乐,当手机远离蓝牙音箱后,停止播放,当手机靠近的 时候,蓝牙音箱又开始播放了,对于这中需求的实现我开始很困惑,蓝牙如何后台持续扫描呢,我尝试了很多方法是失败的,经过我多方面查询资料弄清楚如何实现 这个需求:
1.需要后台运行需申请后台权限
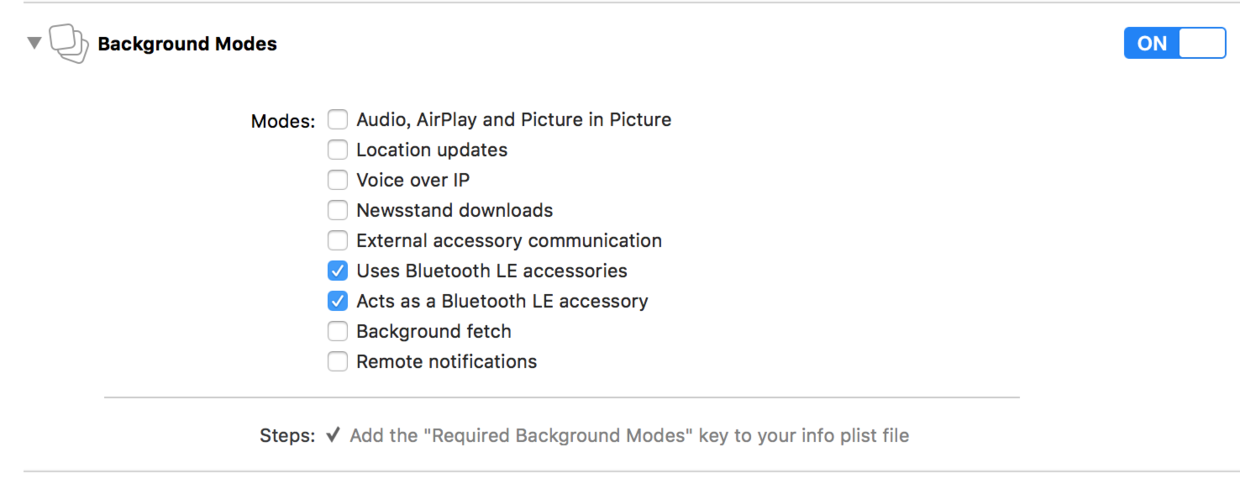
勾选即可拥有后台权限,如果外设持续发送数据,APP端可以接收到数据。
2.扫描时需指定serviceUUID,需外设广播出自己的SeviceUUID,APP端作为扫描的条件。
这是苹果扫描方法的的官方解释:
Applications that have specified the
bluetooth-centralbackground mode are allowed to scan while backgrounded, with two
- caveats: the scan must specify one or more service types in serviceUUIDs, and the
CBCentralManagerScanOptionAllowDuplicatesKey- scan option will be ignored.
显而易见的说的很清楚,后台模式时蓝牙作为central,必须指定serviceUUIDs,scan option忽略。
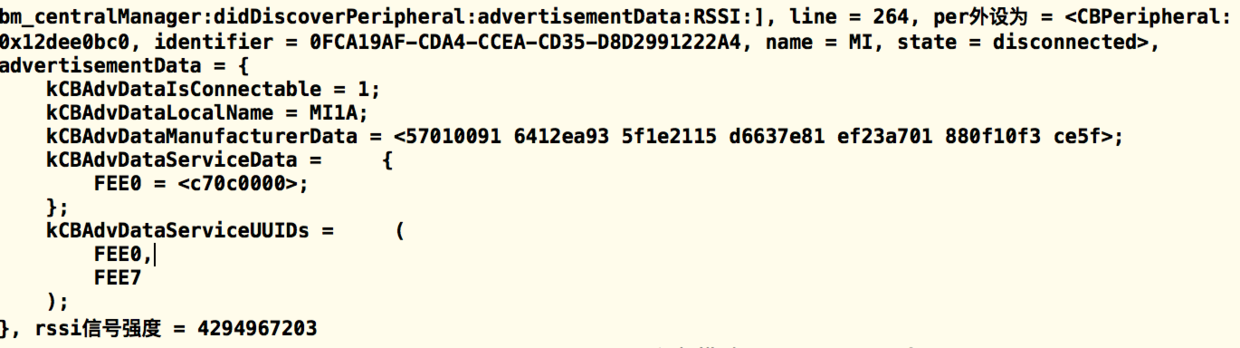
例子
扫描方法:
[self.centralManger scanForPeripheralsWithServices:@[[CBUUID UUIDWithString:@"FEE0"],[CBUUID UUIDWithString:@"FEE7"]] options:nil];这样当在后台的时候是可以持续扫描的。
3.当后台断开连接时候会调用系统方法
- (void)centralManager:(CBCentralManager *)central didDisconnectPeripheral:(CBPeripheral *)peripheral error:(NSError *)error我们需要在这里设置自动重连,即可实现上述的需求。


 1386
1386

 被折叠的 条评论
为什么被折叠?
被折叠的 条评论
为什么被折叠?
 到【灌水乐园】发言


