


集群概要:
redis集群可以解决哨兵模式分布式难以搭建的问题、只需要连接任何一台服务器就可以将分布式存储数据,数据迁移简单
整个集群6台服务器,三主三从,三台物理机,一台物理机一主一从
一、配置redis.conf
1、新建一个目录存放集群的配置文件
cd /home/jionsvolk/proc/redis-4.0.8
mkdir conf-cluster
cp redis.conf conf-cluster/6381.conf
2.编辑6381.conf
#bind xxx全部注掉
bind xxx
#保护模式关闭
protected-mode no
#自定义端口
port 6381
#连接空闲关闭超时时间,根据系统负载考量
timeout 600
#TCP连接Keepalive时间,根据系统负载考量
tcp-keepalive 600
#打开后台运行
daemonize yes
#PID文件名 因为我之前测试了哨兵模式,已经有redis_6381.pid,为了区分加了"_c_"
pidfile /var/run/redis_c_6381.pid
#日志文件
logfile "/home/jionsvolk/proc/redis-4.0.8/logs-cluster/6381.log"
#持久化文件名
dbfilename 6381.rdb
#持久化文件存放目录,千万要去对应目录创建该文件夹
dir /home/jionsvolk/data/redis/cluster/dump
#另外一种持久化方式打开
appendonly yes
#AOF文件名
appendfilename "/home/jionsvolk/data/redis/cluster/aof/appendonly.aof"
#使用集群
cluster-enabled yes
#集群使用到的配置文件名
cluster-config-file nodes-6381.conf
#集群中各服务器通信超时时间
cluster-node-timeout 15000
#最大内存  byte
maxmemory 128*1024*1024
#内存管理策略
maxmemory-policy volatile-lru
3.复制一份配置文件给从服务器用
cp 6381.conf 6382.conf
vi 6382.conf
#下面的命令是将文件中所有6381改成6382
:%s/6381/6382/g
4.把两个服务器的启动脚本写在一个文件中
-
redis-server 6381.conf &
redis-server 6382.conf &
二、配置集群
配置集群需要使用到一个工具,该工具需要下载并编译
1.工具安装
- 到该地址下载ruby的安装包 https://pan.baidu.com/s/1miIkWVrYQlAy6zhPmJaFVQ
- 上传到自己的服务器(用flashFxp ftp工具)
- 解压 tar -xf ruby-2.3.1.tar.gz
- 执行如下命令
cd ruby-2.3.1
./configure
make && make install
- yum -y install rubygems
rubygems是一个用于对 Ruby组件进行打包的 Ruby 打包系统。 它提供一个分发 Ruby 程序和库的标准格式,还提供一个管理程序包安装的工具
- gem install redis
- ruby -v 检查版本
2.redis的安装
按照该网址进行安装https://my.oschina.net/u/3049601/blog/1142841
3.使用redis-trib.rb工具配置集群
因为经常在conf-cluster目录操作,所以在该目录下创建一个硬连接文件指向/home/jionsvolk/proc/redis-4.0.8/src/redis-trib.rb
ln redistool /home/jionsvolk/proc/redis-4.0.8/src/redis-trib.rb
3.1在集群中添加三个主节点
命令:redistool create 192.168.245.111:6381 192.168.245.112:6381 192.168.245.113:6381

执行结果

执行过程中如果出现如下类似错误,需删除所有的rdb、aof、nodes-xxxx.conf文件
/usr/lib64/ruby/gems/1.8/gems/redis-3.3.2/lib/redis/client.rb:121:in `call': ERR Slot 3853 is already busy (Redis::CommandError)3.2 检查集群
登录刚才三台服务器中的任意一台
redis-cli -c -p 6381
127.0.0.1:6381> cluster nodes

可以看到三台服务器都是master
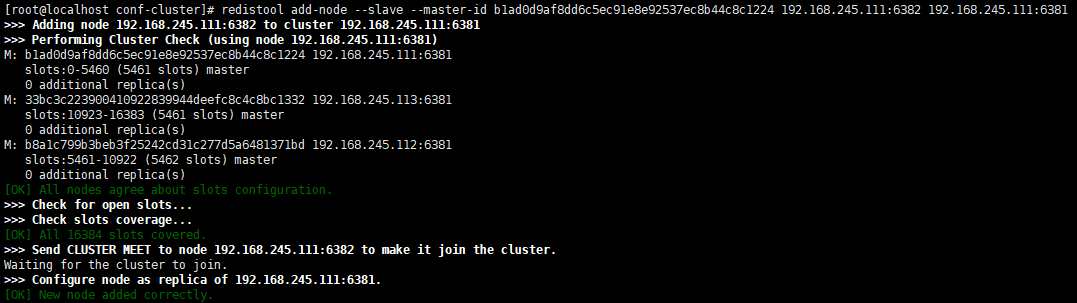
3.3 将三个从节点添加到集群当中
redistool add-node --slave --master-id b1ad0d9af8dd6c5ec91e8e92537ec8b44c8c1224 192.168.245.111:6382 192.168.245.111:6381
redistool add-node --slave --master-id b8a1c799b3beb3f25242cd31c277d5a6481371bd 192.168.245.112:6382 192.168.245.111:6381
redistool add-node --slave --master-id 33bc3c223900410922839944deefc8c4c8bc1332 192.168.245.113:6382 192.168.245.111:6381
执行结果如下:
3.4 检查从节点加入集群情况
登录刚才三台服务器中的任意一台
redis-cli -c -p 6381
127.0.0.1:6381> cluster nodes

可以看到新加的三台服务器已经是各自主服务器的从服务器
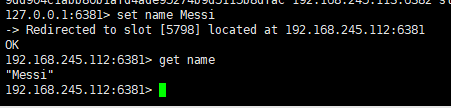
3.5 往集群中添加数据
redis-cli -c -p 6381
set name Messi

集群根据哈希取模定位到槽道5798,而5798操作是分配给192.168.245.112:6381这台服务器的(只有主服务器才能分配到槽道)
三、代码连接集群
1. 普通模式
public static void main(String[] args) {
    JedisPoolConfig poolConfig = new JedisPoolConfig();
    // 最大连接数
    poolConfig.setMaxTotal(1);
    // 最大空闲数
    poolConfig.setMaxIdle(1);
    // 最大允许等待时间,如果超过这个时间还未获取到连接,则会报JedisException异常:
    // Could not get a resource from the pool
    poolConfig.setMaxWaitMillis(1000);
    Set<HostAndPort> nodes = new LinkedHashSet<HostAndPort>();
    //这里可以不把集群所有机器都添加进来,因为连接任何一台都可以往集群正确的地方发送数据并存储
    nodes.add(new HostAndPort("192.168.245.111", 6381));
    nodes.add(new HostAndPort("192.168.245.111", 6382));
    nodes.add(new HostAndPort("192.168.245.112", 6381));
    nodes.add(new HostAndPort("192.168.245.112", 6382));
    nodes.add(new HostAndPort("192.168.245.113", 6381));
    nodes.add(new HostAndPort("192.168.245.114", 6382));
    JedisCluster jedis = new JedisCluster(nodes, poolConfig);
    jedis.set("name", "Messi");
    System.out.println(cluster.get("name"));
    try {
        cluster.close();
    } catch (IOException e) {
        e.printStackTrace();
    }
}
2. Spring boot
POM中导入redis启动器
        <dependency>
           <groupId>org.springframework.boot</groupId>
           <artifactId>spring-boot-starter-redis</artifactId>
           <version>1.4.5.RELEASE</version>
    	</dependency>
在application.properties中配置redis相关属性,该配置只适合集群
###################################  redis 集群配置 ##########################################
# REDIS(RedisProperties)
# (普通集群,不使用则不用开启)在群集中执行命令时要遵循的最大重定向数目。
# spring.redis.cluster.max-redirects=
# (普通集群,不使用则不用开启)以逗号分隔的“主机:端口”对列表进行引导。
spring.redis.cluster.nodes=192.168.245.111:6381,192.168.245.111:6382,192.168.245.112:6381,192.168.245.112:6382,192.168.245.113:6381,192.168.245.113:6382
# 连接工厂使用的数据库索引。
spring.redis.database=0
# 连接URL,将覆盖主机,端口和密码(用户将被忽略),例如:redis://user:password@example.com:6379
# spring.redis.url=
# Redis服务器主机。
#spring.redis.host=localhost
# 登录redis服务器的密码。
#spring.redis.password=
# 启用SSL支持。
spring.redis.ssl=false
# 池在给定时间可以分配的最大连接数。使用负值无限制。
spring.redis.pool.max-active=8
# 池中“空闲”连接的最大数量。使用负值表示无限数量的空闲连接。
spring.redis.pool.max-idle=8
# 连接分配在池被耗尽时抛出异常之前应该阻塞的最长时间量(以毫秒为单位)。使用负值可以无限期地阻止。
spring.redis.pool.max-wait=10000
# 目标为保持在池中的最小空闲连接数。这个设置只有在正面的情况下才有效果。
spring.redis.pool.min-idle=0
# Redis服务器端口。
#spring.redis.port=6379
# (哨兵模式,不使用则不用开启)Redis服务器的名称。
# spring.redis.sentinel.master=
# (哨兵模式,不使用则不用开启)主机:端口对的逗号分隔列表。
# spring.redis.sentinel.nodes=
# 以毫秒为单位的连接超时。
spring.redis.timeout=10000
在controller中配置使用redis
@Controller
@RequestMapping("/web/itemcat")
public class WebItemCatController {
	@Autowired
	private ItemCatService itemCatService;

	@Autowired
	private RedisTemplate redisTemplate;

	//jsonp格式传递三级结构数据
	@RequestMapping("/all")
	@ResponseBody
	public JSONPObject queryItemCatList(String callback){
		ItemCatResult result = itemCatService.queryItemCatsNew();
		System.out.println(result);
		redisTemplate.opsForValue().set("name", "Havi");
		System.out.println("redisTemplate.opsForValue().get(\"name\"):"+redisTemplate.opsForValue().get("name"));
		JSONPObject jsonpResult=new JSONPObject(callback, result);
		return jsonpResult;
		}
}
RedisTemplate是spring boot自动实例化到容器中,并注入到我的controller
3.spring boot 自己写代码注入redis集群对象
配置共享上面的内容
@ConfigurationProperties("spring.redis")
public class RedisConfig {
	@Value("cluster.nodes:null")
	private String nodes;
	@Value("pool.max-active:10")
	private Integer maxActive;
	@Value("pool.max-idle:5")
	private Integer maxIdle;
	@Value("pool.max-wait:10000")
	private Integer maxWait;
	@Value("pool.min-idle:0")
	private Integer minIdle;
	@Value("timeout:10000")
	private Integer timeout;

	/**
	 * 初始化Jedis配置对象
	 * @return
	 */
	public JedisPoolConfig getConfig(){
		JedisPoolConfig config = new JedisPoolConfig();
		config.setMaxTotal(maxActive);
		config.setMaxIdle(maxIdle);
		config.setMaxWaitMillis(maxWait);
		config.setMinIdle(minIdle);
		return config;
	}

	/*
	 * 初始化连接池,并通过@Bean将连接池放入到容器中
	 *
	 * 为了让开发人员更方便的使用,还需要对方法进一步封装
	 */
	@Bean
	public JedisCluster initCluster(){
		Set<HostAndPort> set  = new HashSet<>();

		String[] hps = nodes.split(",");
		for(String hp : hps) {
			HostAndPort hpConfig = new HostAndPort(hp.split(":")[0], Integer.parseInt(hp.split(":")[1]));
			set.add(hpConfig);
		}

		JedisCluster cluster = new JedisCluster(set,timeout);

		return cluster;
	}
}
既然Spring Boot已经给咱们封装好了,直接用就行了,不用这么麻烦再自己搞代码放入容器,如果是使用原生的spring和spring mvc可以使用这种方式


 176
176

 被折叠的 条评论
为什么被折叠?
被折叠的 条评论
为什么被折叠?
 到【灌水乐园】发言


