


1 介绍
1.1 MVC框架是什么
模型-视图-控制器(MVC)是一个众所周知的以设计界面应用程序为基础的设计模式。它主要通过分离模型、视图及控制器在应用程序中的角色将业务逻辑从界面中解耦。通常,模型负责封装应用程序数据在视图层展示。视图仅仅只是展示这些数据,不包含任何业务逻辑。控制器负责接收来自用户的请求,并调用后台服务(manager或者dao)来处理业务逻辑。处理后,后台业务层可能会返回了一些数据在视图层展示。控制器收集这些数据及准备模型在视图层展示。MVC模式的核心思想是将业务逻辑从界面中分离出来,允许它们单独改变而不会相互影响。

在Spring MVC应用程序中,模型通常由POJO对象组成,它在业务层中被处理,在持久层中被持久化。视图通常是用JSP标准标签库(JSTL)编写的JSP模板。控制器部分是由dispatcher servlet负责,在本教程中我们将会了解更多它的相关细节。
一些开发人员认为业务层和DAO层类是MVC模型组件的一部分。我对此持有不同的意见。我不认为业务层及DAO层类为MVC框架的一部分。通常一个web应用是3层架构,即数据-业务-表示。MVC实际上是表示层的一部分。

Dispatcher Servlet(Spring控制器)
在最简单的Spring MVC应用程序中,控制器是唯一的你需要在Java web部署描述文件(即web.xml文件)中配置的Servlet。Spring MVC控制器 ——通常称作Dispatcher Servlet,实现了前端控制器设计模式。并且每个web请求必须通过它以便它能够管理整个请求的生命周期。
当一个web请求发送到Spring MVC应用程序,dispatcher servlet首先接收请求。然后它组织那些在Spring web应用程序上下文配置的(例如实际请求处理控制器和视图解析器)或者使用注解配置的组件,所有的这些都需要处理该请求。

在Spring3.0中定义一个控制器类,这个类必须标有@Controller注解。当有@Controller注解的控制器收到一个请求时,它会寻找一个合适的handler方法去处理这个请求。这就需要控制器通过一个或多个handler映射去把每个请求映射到handler方法。为了这样做,一个控制器类的方法需要被@RequestMapping注解装饰,使它们成为handler方法。
handler方法处理完请求后,它把控制权委托给视图名与handler方法返回值相同的视图。为了提供一个灵活的方法,一个handler方法的返回值并不代表一个视图的实现而是一个逻辑视图,即没有任何文件扩展名。你可以将这些逻辑视图映射到正确的实现,并将这些实现写入到上下文文件,这样你就可以轻松的更改视图层代码甚至不用修改请求handler类的代码。
为一个逻辑名称匹配正确的文件是视图解析器的责任。一旦控制器类已将一个视图名称解析到一个视图实现。它会根据视图实现的设计来渲染对应对象。
1.2 SpringMVC和Spring有什么关系?
-
首先,对于一个web应用,其部署在web容器中, web容器提供其一个全局的上下文环境,这个上下文就是ServletContext ,其为后面的spring IoC容器提供宿主环境;
-
其次, 在web.xml中会提供有contextLoaderListener 。在web容器启动时,会触发容器初始化事件,此时contextLoaderListener会监听到这个事件,其contextInitialized方法会被调用, 在这个方法中,spring会初始化一个启动上下文,这个上下文被称为根上下文,即WebApplicationContext,这是一个接口类,确切的说,其实际的实现类是XmlWebApplicationContext。 这个就是spring的IoC容器,其对应的Bean定义的配置由web.xml中的context-param标签指定。在这个IoC容器初始化完毕后,spring以WebApplicationContext.ROOTWEBAPPLICATIONCONTEXTATTRIBUTE为属性Key,将其存储到ServletContext中,便于获取;
-
再次,contextLoaderListener监听器初始化完毕后,开始初始化web.xml中配置的Servlet,这个servlet可以配置多个,以最常见的DispatcherServlet为例,这个servlet实际上是一个标准的前端控制器,用以转发、匹配、处理每个servlet请求。 DispatcherServlet上下文在初始化的时候会建立自己的IoC上下文,用以持有spring mvc相关的bean 。在建立DispatcherServlet自己的IoC上下文时,会利用WebApplicationContext.ROOTWEBAPPLICATIONCONTEXTATTRIBUTE先从ServletContext中获取之前的根上下文(即WebApplicationContext)作为自己上下文的parent上下文。有了这个parent上下文之后,再初始化自己持有的上下文。这个DispatcherServlet初始化自己上下文的工作在其initStrategies方法中可以看到,大概的工作就是初始化处理器映射、视图解析等。 这个servlet自己持有的上下文默认实现类也是mlWebApplicationContext。初始化完毕后,spring以与servlet的名字相关(此处不是简单的以servlet名为Key,而是通过一些转换,具体可自行查看源码)的属性为属性Key,也将其存到ServletContext中,以便后续使用。这样每个servlet就持有自己的上下文,即拥有自己独立的bean空间,同时各个servlet共享相同的bean,即根上下文(第2步中初始化的上下文)定义的那些bean 。
1.3 dispatcherServlet创建的ApplicationContext和Spring容器的ApplicationContext有关系吗?
ContextLoaderListener中创建ApplicationContext主要用于整个Web应用程序需要共享的一些组件 ,比如DAO,数据库的ConnectionFactory等。而 由DispatcherServlet创建的ApplicationContext主要用于和该Servlet相关的一些组件 ,比如Controller、ViewResovler等。
对于作用范围而言, 在DispatcherServlet中可以引用由ContextLoaderListener所创建的ApplicationContext ,而反过来不行。
在Spring的具体实现上,这两个ApplicationContext都是通过ServletContext的setAttribute方法放到ServletContext中的。但是, ContextLoaderListener会先于DispatcherServlet创建ApplicationContext,DispatcherServlet在创建ApplicationContext时会先找到由ContextLoaderListener所创建的ApplicationContext,再将后者的ApplicationContext作为参数传给DispatcherServlet的ApplicationContext的setParent()方法 ,在Spring源代码中,你可以在FrameServlet.java中找到如下代码:
wac.setParent(parent);其中, wac即为由DisptcherServlet创建的ApplicationContext,而parent则为有ContextLoaderListener创建的ApplicationContext 。此后,框架又会调用ServletContext的setAttribute()方法将wac加入到ServletContext中。
当Spring在执行ApplicationContext的getBean时, 如果在自己context中找不到对应的bean,则会在父ApplicationContext中去找 。这也解释了为什么我们可以在DispatcherServlet中获取到由ContextLoaderListener对应的ApplicationContext中的bean。
2 项目依赖
<project xmlns="http://maven.apache.org/POM/4.0.0" xmlns:xsi="http://www.w3.org/2001/XMLSchema-instance"
	xsi:schemaLocation="http://maven.apache.org/POM/4.0.0 http://maven.apache.org/xsd/maven-4.0.0.xsd">
	<modelVersion>4.0.0</modelVersion>
	<groupId>SpringmvcREST</groupId>
	<artifactId>Springmvc</artifactId>
	<version>0.0.1-SNAPSHOT</version>
	<packaging>war</packaging>
	<name>Springmvc</name>
	<description />
	 <properties>
        <springframework.version>4.2.0.RELEASE</springframework.version>

    </properties>

    <dependencies>
        <dependency>
            <groupId>org.springframework</groupId>
            <artifactId>spring-webmvc</artifactId>
            <version>${springframework.version}</version>
        </dependency>
        <dependency>
            <groupId>org.springframework</groupId>
            <artifactId>spring-tx</artifactId>
            <version>${springframework.version}</version>
        </dependency>
        <dependency>
            <groupId>javax.servlet</groupId>
            <artifactId>javax.servlet-api</artifactId>
            <version>3.1.0</version>
        </dependency>

    </dependencies>
	<build>
		<finalName>Springmvc</finalName>
	</build>
</project>
3 配置文件
3.1 web.xml
<?xml version="1.0" encoding="UTF-8"?>
<web-app xmlns:xsi="http://www.w3.org/2001/XMLSchema-instance" xmlns="http://java.sun.com/xml/ns/javaee" xsi:schemaLocation="http://java.sun.com/xml/ns/javaee http://java.sun.com/xml/ns/javaee/web-app_3_0.xsd" id="WebApp_ID" version="3.0">
  <display-name>SpringMVC_HelloWorld</display-name>
  <welcome-file-list>
    <welcome-file>index.html</welcome-file>
    <welcome-file>index.htm</welcome-file>
    <welcome-file>index.jsp</welcome-file>
    <welcome-file>default.html</welcome-file>
    <welcome-file>default.htm</welcome-file>
    <welcome-file>default.jsp</welcome-file>
  </welcome-file-list>

  <!-- spring mvc 的servlet -->
  <!-- DispatcherServlet在初始化后会直接在/WEB-INF/下找springmvc-servlet.xml文件,
               servlet-name标签的参数定义要和XML文件对应 -->
  <servlet>
        <servlet-name>springmvc</servlet-name>
        <servlet-class>
            org.springframework.web.servlet.DispatcherServlet
        </servlet-class>
        <load-on-startup>1</load-on-startup>
  </servlet>
  <servlet-mapping>
        <servlet-name>springmvc</servlet-name>
        <url-pattern>/</url-pattern>
  </servlet-mapping>

  <context-param>
       <param-name>contextConfigLocation</param-name>
       <param-value>classpath:applicationContext.xml</param-value>
  </context-param>

  <listener>
       <listener-class>org.springframework.web.context.ContextLoaderListener</listener-class>
  </listener>
</web-app>
3.2 springmvc-servlet.xml
这个文件的名字是由web.xml里面配置的DispatcherServlet的<servlet-name></servlet-name>决定的,路径在上下文/WEB-INF/里面,主要是配置控制器返回的逻辑视图名和物理视图的对应关系
<?xml version="1.0" encoding="UTF-8"?>
<beans xmlns="http://www.springframework.org/schema/beans"
    xmlns:xsi="http://www.w3.org/2001/XMLSchema-instance" xmlns:aop="http://www.springframework.org/schema/aop"
    xmlns:tx="http://www.springframework.org/schema/tx" xmlns:context="http://www.springframework.org/schema/context"
    xsi:schemaLocation="http://www.springframework.org/schema/beans
                     http://www.springframework.org/schema/beans/spring-beans.xsd
                     http://www.springframework.org/schema/tx
                     http://www.springframework.org/schema/tx/spring-tx.xsd
                     http://www.springframework.org/schema/aop
                     http://www.springframework.org/schema/aop/spring-aop.xsd
                     http://www.springframework.org/schema/context
                       http://www.springframework.org/schema/context/spring-context-3.0.xsd">

    <!-- 自动扫描的包 -->
    <context:component-scan base-package="com.lin.helloworld.controller" />

    <bean id="viewResolver"
        class="org.springframework.web.servlet.view.UrlBasedViewResolver">
        <property name="viewClass"
            value="org.springframework.web.servlet.view.JstlView" />
        <!-- controller 返回的一个逻辑视图名经过前后缀的处理返回物理视图 -->
        <property name="prefix" value="/WEB-INF/jsp/" />
        <property name="suffix" value=".jsp" />
    </bean>

</beans>
4 编写一个domain类
用来封装一些提交数据
package com.lin.helloworld.domain;

public class HelloWorld {

    private String data;

    public HelloWorld() {
        super();
    }

    public HelloWorld(String data) {
        super();
        this.data = data;
    }

    public String getData() {
        return data;
    }

    public void setData(String data) {
        this.data = data;
    }

    @Override
    public String toString() {
        return "HelloWorld [data=" + data + "]";
    }

}
5 编写controller
这个是MVC中的控制器,和struts2不一样的是他是方法级的拦截,struts2是类级的拦截.
package com.lin.helloworld.controller;

import org.springframework.stereotype.Controller;
import org.springframework.web.bind.annotation.ModelAttribute;
import org.springframework.web.bind.annotation.RequestMapping;
import org.springframework.web.servlet.ModelAndView;

import com.lin.helloworld.domain.HelloWorld;

@Controller
public class HelloWorldController {

    //这里的/hello相当于struts2里的一个action
    //返回一个字符串给视图
    @RequestMapping("/hello")
    public ModelAndView sayHello()
    {
        //modelAndView的构造方法的第一个参数相当于Struts2里的一个result的name
        ModelAndView modelAndView = new ModelAndView("helloworld", "msg", "HelloWorld!!!");
        return modelAndView;
    }

    //返回一个对象给视图
    //@ModelAttribute("obj")的作用相当于Struts2的action类里面的一个field,
    //用于表单提交的数据放进一个对象里面
    //这里和struts2的区别:
    //struts2处理表单提交的方式是:<input name="obj.data"/> 提交的数据封装在obj对象的data里面
    //springmvc的方式是:<input name="data"/> 提交的数据封装在obj对象的data里面,
    //前提是要使用@ModelAttribute注解
    @RequestMapping("/helloObj")
    public ModelAndView sayHelloWorld(@ModelAttribute("obj") HelloWorld obj)
    {
        System.out.println(obj.toString());
        ModelAndView modelAndView = new ModelAndView("helloworld", "obj", obj);
        return modelAndView;
    }

}
6 视图
<%@ page language="java" import="java.util.*" pageEncoding="UTF-8"%>
<%
String path = request.getContextPath();
String basePath = request.getScheme()+"://"+request.getServerName()+":"+request.getServerPort()+path+"/";
%>

<!DOCTYPE HTML PUBLIC "-//W3C//DTD HTML 4.01 Transitional//EN">
<html>
  <head>
    <base href="<%=basePath%>">

    <title>My JSP 'helloworld.jsp' starting page</title>

    <meta http-equiv="pragma" content="no-cache">
    <meta http-equiv="cache-control" content="no-cache">
    <meta http-equiv="expires" content="0">
    <meta http-equiv="keywords" content="keyword1,keyword2,keyword3">
    <meta http-equiv="description" content="This is my page">
    <!--
    <link rel="stylesheet" type="text/css" href="styles.css">
    -->

  </head>

  <body>
    HelloWorld! This is a spring mvc framework example.<br>
    ${msg}
    <hr/>
    <form action="helloObj" method="post">
        <!-- 这里的表单提交和struts2不同的是name="data"会自动对应上对象的filed -->
        <input type="text" name="data" size="30"/><br/>
        <input type="submit" value="Submit"/>
    </form>
    <hr/>
    ${obj.data}
  </body>
</html>
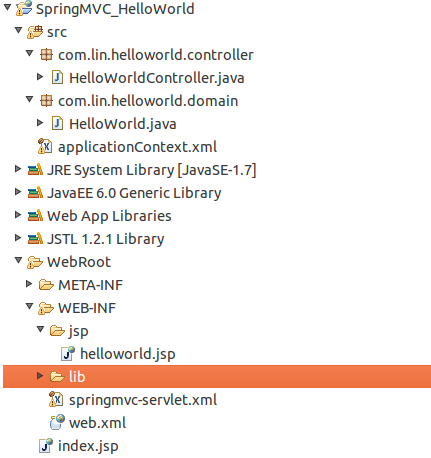
7 目录结构
8 自定义一个拦截器
8.1 需求
假设现在用户发出请求时,系统需要判断该用户是否已经登录,如果用户已经登录,则请求继续被处理;如果用户没有登录,则拦截器需要拦截该请求,并且为用户跳转到登录页面。但是会有一个问题,拦截器不应该拦截所有请求,我们只需要她拦截我们要她拦截的请求,比如,如果拦截器拦截登录请求的话,那么用户永远也登陆不了。
8.2 用户登录拦截器
package com.lin.helloworld.interceptor;

import javax.servlet.http.HttpServletRequest;
import javax.servlet.http.HttpServletResponse;
import javax.servlet.http.HttpSession;

import org.springframework.web.servlet.HandlerInterceptor;
import org.springframework.web.servlet.ModelAndView;

public class LoginInterceptor implements HandlerInterceptor {

    private String[] allow;//允许不拦截的请求

    public String[] getAllow() {
        return allow;
    }

    public void setAllow(String[] allow) {
        this.allow = allow;
    }

    @Override
    public void afterCompletion(HttpServletRequest arg0,
            HttpServletResponse arg1, Object arg2, Exception arg3)
            throws Exception {
        System.out.println("ServletDispatcher 完成处理时执行");
    }

    @Override
    public void postHandle(HttpServletRequest arg0, HttpServletResponse arg1,
            Object arg2, ModelAndView arg3) throws Exception {

        System.out.println("处理请求后执行");
    }

    @Override
    public boolean preHandle(HttpServletRequest request, HttpServletResponse response,
            Object object) throws Exception {

        String currentRequestURI = request.getRequestURI();

        currentRequestURI = currentRequestURI.substring(currentRequestURI.lastIndexOf("/")+1, currentRequestURI.length());

        if(currentRequestURI.equals("login")){//如果当前请求是登录请求,则把用户登录信息放进session

            if(request.getParameter("userName").equals("lin")){//判断用户登录信息是否正确
                HttpSession session = request.getSession();
                session.setAttribute("userName", request.getParameter("userName"));

                return true;
            }
            else{
                request.getRequestDispatcher("/login.jsp").forward(request, response);//回到登录页面,并且提示用户登录信息错误
                return false;
            }
        }

        if(allow != null && allow.length != 0){//如果当前请求不是登录,则看该请求是否需要被拦截
            for(String allowURI : allow){

                if(allowURI.equals(currentRequestURI)){

                    return true;//如果不需要拦截,则让请求通过,继续处理请求
                }
            }
        }

        HttpSession session = request.getSession();

        if(session.getAttribute("userName") == null){//判断用户是否已经登录,如果没有登录,跳转到登录页面

            response.sendRedirect("http://localhost:8080/SpringMVC_HelloWorld/login.jsp");
            return false;
        }
        else {
            return true;
        }
    }
}
自定义的拦截器只需要实现 HandlerInterceptor 接口即可。
8.3 配置拦截器
需要先导入MVC的命名空间。
<?xml version="1.0" encoding="UTF-8"?>
<beans xmlns="http://www.springframework.org/schema/beans"
    xmlns:xsi="http://www.w3.org/2001/XMLSchema-instance" xmlns:aop="http://www.springframework.org/schema/aop"
    xmlns:tx="http://www.springframework.org/schema/tx" xmlns:context="http://www.springframework.org/schema/context"
    xmlns:mvc="http://www.springframework.org/schema/mvc"
    xsi:schemaLocation="http://www.springframework.org/schema/beans
                     http://www.springframework.org/schema/beans/spring-beans.xsd
                     http://www.springframework.org/schema/tx
                     http://www.springframework.org/schema/tx/spring-tx.xsd
                     http://www.springframework.org/schema/aop
                     http://www.springframework.org/schema/aop/spring-aop.xsd
                     http://www.springframework.org/schema/context
                       http://www.springframework.org/schema/context/spring-context-3.0.xsd
                       http://www.springframework.org/schema/mvc
                     http://www.springframework.org/schema/mvc/spring-mvc-3.0.xsd">

    <mvc:interceptors>
        <mvc:interceptor>
            <mvc:mapping path="/*"/>
            <!-- 自定义拦截器 -->
            <bean class="com.lin.helloworld.interceptor.LoginInterceptor">
                <!-- 允许哪些请求不需要被拦截 -->
                <property name="allow">
                    <array>
                        <value>login</value>
                    </array>
                </property>
            </bean>
        </mvc:interceptor>
    </mvc:interceptors>

</beans>
8.4 登录控制器
/**
     * 处理登录请求
     * @param userName 用户登录信息
     * @return
     */
    @RequestMapping("/login")
    public ModelAndView login(@FormParam("userName") String userName)
    {
        return new ModelAndView("helloworld");
    }
8.5 登录页面
<body>
    <form action="login" method="post">
        <input type="text" name="userName"><input type="submit" value="login">
    </form>
  </body>
8.6 测试
向服务器提交一个请求:http://localhost:8080/SpringMVC_HelloWorld/hello,跳出一个登录页面,登录后再请求,正常处理hello请求。。。
9 SpringMVC开发REST式的WEB服务
9.1 项目依赖
修改pom.xml文件
<project xmlns="http://maven.apache.org/POM/4.0.0" xmlns:xsi="http://www.w3.org/2001/XMLSchema-instance"
	xsi:schemaLocation="http://maven.apache.org/POM/4.0.0 http://maven.apache.org/xsd/maven-4.0.0.xsd">
	<modelVersion>4.0.0</modelVersion>
	<groupId>SpringmvcREST</groupId>
	<artifactId>SpringmvcREST</artifactId>
	<version>0.0.1-SNAPSHOT</version>
	<packaging>war</packaging>
	<name>SpringmvcREST</name>
	<description />
	 <properties>
        <springframework.version>4.2.0.RELEASE</springframework.version>
        <jackson.version>2.5.3</jackson.version>
    </properties>

    <dependencies>
        <dependency>
            <groupId>org.springframework</groupId>
            <artifactId>spring-webmvc</artifactId>
            <version>${springframework.version}</version>
        </dependency>
        <dependency>
            <groupId>org.springframework</groupId>
            <artifactId>spring-tx</artifactId>
            <version>${springframework.version}</version>
        </dependency>

        <dependency>
            <groupId>com.fasterxml.jackson.core</groupId>
            <artifactId>jackson-databind</artifactId>
            <version>${jackson.version}</version>
        </dependency>
        <dependency>
            <groupId>javax.servlet</groupId>
            <artifactId>javax.servlet-api</artifactId>
            <version>3.1.0</version>
        </dependency>

    </dependencies>
	<build>
		<finalName>SpringmvcREST</finalName>
	</build>
</project>
9.2 怎么让SpringMVC既能展示JSP又能展示JSON
修改mvc配置文件,springmvc-servlet.xml
<?xml version="1.0" encoding="UTF-8"?>
<beans xmlns="http://www.springframework.org/schema/beans"
	xmlns:xsi="http://www.w3.org/2001/XMLSchema-instance" xmlns:context="http://www.springframework.org/schema/context"
	xmlns:mvc="http://www.springframework.org/schema/mvc"
	xsi:schemaLocation="http://www.springframework.org/schema/beans http://www.springframework.org/schema/beans/spring-beans.xsd
    http://www.springframework.org/schema/context http://www.springframework.org/schema/context/spring-context.xsd
    http://www.springframework.org/schema/mvc http://www.springframework.org/schema/mvc/spring-mvc.xsd">

	<!-- 自动扫描的包 -->
	<context:component-scan base-package="com.lin.rest.controller" />
        <context:component-scan base-package="com.lin.helloworld.controller" />


	<mvc:annotation-driven />

	<!-- Resolves views selected for rendering by @Controllers to .jsp resources in the /WEB-INF/views directory -->
	<bean class="org.springframework.web.servlet.view.InternalResourceViewResolver">
		<property name="prefix" value="/WEB-INF/views/" />
		<property name="suffix" value=".jsp" />
	</bean>

	<!-- Configure to plugin JSON as request and response in method handler -->
	<bean class="org.springframework.web.servlet.mvc.method.annotation.RequestMappingHandlerAdapter">
		<property name="messageConverters">
			<list>
				<ref bean="jsonMessageConverter"/>
			</list>
		</property>
	</bean>

	<!-- Configure bean to convert JSON to POJO and vice versa -->
	<bean id="jsonMessageConverter" class="org.springframework.http.converter.json.MappingJackson2HttpMessageConverter">
	</bean>

</beans>
9.3 model类
package com.lin.rest.domain;

public class User {

	private int id;
	private String email;
	private String password;

	public User() {
	}

	public User(int id, String email, String password) {
		this.id = id;
		this.email = email;
		this.password = password;
	}

	public int getId() {
		return id;
	}

	public void setId(int id) {
		this.id = id;
	}

	public String getEmail() {
		return email;
	}

	public void setEmail(String email) {
		this.email = email;
	}

	public String getPassword() {
		return password;
	}

	public void setPassword(String password) {
		this.password = password;
	}

	@Override
	public String toString() {
		return "User [id=" + id + ", email=" + email + ", password=" + password
				+ "]";
	}

}
9.4 资源类
package com.lin.rest.controller;

import java.util.ArrayList;
import java.util.List;

import org.springframework.http.HttpHeaders;
import org.springframework.http.HttpStatus;
import org.springframework.http.MediaType;
import org.springframework.http.ResponseEntity;
import org.springframework.web.bind.annotation.PathVariable;
import org.springframework.web.bind.annotation.RequestBody;
import org.springframework.web.bind.annotation.RequestMapping;
import org.springframework.web.bind.annotation.RequestMethod;
import org.springframework.web.bind.annotation.RequestParam;
import org.springframework.web.bind.annotation.ResponseBody;
import org.springframework.web.bind.annotation.RestController;
import org.springframework.web.util.UriComponentsBuilder;

import com.lin.rest.domain.User;

@RestController
public class MyResource {

	//------------------------------------get all users-------------------------------------
	@RequestMapping(value="/user/all",method=RequestMethod.GET)
	public List<User> getAllUser()
	{
		List<User> users = new ArrayList<User>();
		for(int i=0;i<10;i++)
		{
			User user = new User();
			user.setId(i);
			user.setEmail("xx"+i+"@163.com");
			user.setPassword("password"+i);

			users.add(user);
		}
		return users;
	}

	//---------------------------------------get user by id-----------------------------------
	@RequestMapping(value = "/user/{id}", method = RequestMethod.GET, produces = MediaType.APPLICATION_JSON_VALUE)
	public ResponseEntity<User> getUserById(@PathVariable int id)
	{
		User user = new User();
		user.setId(id);
		user.setEmail("xx"+id+"@163.com");
		user.setPassword("password");

		return new ResponseEntity<User>(user, HttpStatus.OK);
	}

	//---------------------------------get user by query parameters
	@RequestMapping(value = "/user/", method = RequestMethod.GET, produces = MediaType.APPLICATION_JSON_VALUE)
	public ResponseEntity<User> getUserByQueryParam(@RequestParam("email") String email,@RequestParam("password") String password)
	{
		User user  = new User();
		user.setId(1);
		user.setEmail(email);
		user.setPassword(password);

		return new ResponseEntity<User>(user,HttpStatus.OK);
	}

	//------------------------------------create a user------------------------------------------
	@RequestMapping(value = "/user/", method = RequestMethod.POST)
	public ResponseEntity<Void> createUser(@RequestBody User user,UriComponentsBuilder ucBuilder)
	{
		System.out.println("add a user:"+user.toString());
		HttpHeaders headers = new HttpHeaders();
        headers.setLocation(ucBuilder.path("/user/{id}").buildAndExpand(user.getId()).toUri());
        return new ResponseEntity<Void>(headers, HttpStatus.CREATED);
	}

	//--------------------------------update user by id------------------------------------
	@RequestMapping(value = "/user/{id}", method = RequestMethod.PUT)
	public ResponseEntity<User> updateUser(@PathVariable int id,@RequestBody User user)
	{
		if(user == null)
		{
			return new ResponseEntity<User>(HttpStatus.NOT_FOUND);
		}
		System.out.println("update user by id:"+id);
		System.out.println("update as new user:"+user.toString());

		return new ResponseEntity<User>(user, HttpStatus.OK);
	}

	//----------------------------------delete user by id--------------------------------------
	@RequestMapping(value = "/user/{id}", method = RequestMethod.DELETE)
	public ResponseEntity<Void> deleteUserById(@PathVariable int id)
	{
		System.out.println("delete user by id:"+id);
		return new ResponseEntity<Void>(HttpStatus.NO_CONTENT);
	}

	//---------------------------------------delete all users------------------------------------------
	@RequestMapping(value = "/user/", method = RequestMethod.DELETE)
	public ResponseEntity<Void> deleteAllUsers()
	{
		System.out.println("Deleting All Users");
        return new ResponseEntity<Void>(HttpStatus.NO_CONTENT);
	}

}
9.5 测试REST WebService接口
在各种浏览器有一些REST插件可以测试,比如FireFox的RESTClient等等,,,测试就省略喇,,,,
9.6 REST客户端
Spring提供RestTemplate能够很方便的访问REST资源
package com.lin.rest.client;

import java.util.LinkedHashMap;
import java.util.List;

import org.junit.Test;
import org.springframework.web.client.RestTemplate;

import com.lin.rest.domain.User;

public class RESTCilent {

	private static final String BASE_URI = "http://localhost:8080//SpringmvcREST/user/";

	/**
	 * get all users
	 */
	@Test
	@SuppressWarnings("unchecked")
	public void getAllUser()
	{
		RestTemplate restTemplate = new RestTemplate();
		List<LinkedHashMap<String, Object>> userMapping = restTemplate.getForObject(BASE_URI+"all", List.class);

		for(LinkedHashMap<String, Object> user : userMapping)
		{
			System.out.println(user.get("id"));
			System.out.println(user.get("email"));
			System.out.println(user.get("password"));
		}
	}

	/**
	 * get user by id
	 */
	@Test
	public void getUserById()
	{
		RestTemplate restTemplate = new RestTemplate();
		User user = restTemplate.getForObject(BASE_URI+"1", User.class);
		System.out.println(user.toString());
	}

	/**
	 * get user by query parameters
	 */
	@Test
	public void getUserByParameters()
	{
		RestTemplate restTemplate = new RestTemplate();
//		Map<String,Object> parameters = new HashMap<String, Object>();
//		parameters.put("email", "XXX@163,com");
//		parameters.put("password", "password");
		User user = restTemplate.getForObject(BASE_URI+"?email=XXX@163.com&password=password", User.class);

		System.out.println(user.toString());
	}

	/**
	 * create a user
	 */
	@Test
	public void createUser()
	{
		RestTemplate restTemplate = new RestTemplate();
		User user = new User();
		user.setId(1);
		user.setEmail("xx1@163.com");
		user.setPassword("password");

		restTemplate.postForEntity(BASE_URI, user, User.class);
	}

	/**
	 * update user by id
	 */
	@Test
	public void updateUser()
	{
		RestTemplate restTemplate = new RestTemplate();
		User user = new User();
		user.setId(1);
		user.setEmail("xx1@163.com");
		user.setPassword("password");
		restTemplate.put(BASE_URI+"1", user);
	}

	/**
	 * delete user by id
	 */
	@Test
	public void deleteUserById()
	{
		RestTemplate restTemplate = new RestTemplate();
		restTemplate.delete(BASE_URI+"1");
	}

	/**
	 * delete all users
	 */
	@Test
	public void deleteAllUsers()
	{
		RestTemplate restTemplate = new RestTemplate();
		restTemplate.delete(BASE_URI);
	}

}
9.7 单元测试
略


 4593
4593


 被折叠的 条评论
为什么被折叠?
被折叠的 条评论
为什么被折叠?
 到【灌水乐园】发言


