


This article aims at explaining what exactly is a Kubernetes (a.k.a K8S) cluster and what are the important resources present in it. It also talks about the the basic K8S resource hierarchy, and Kubernetes release 1.5.2 is used reference here.
Deployment Components of K8S:
K8S Master
Also known as the ‘control plane’ it is a single node (at the time of this writing) which hosts the following list of components:
- etcd: All persistent master state is stored in an instance of etcd. This provides a great way to store configuration data reliably.
- Kubernetes API Server: The API server serves up the K8S APIs. It is intended to be a CRUD-y server, with most/all business logic implemented in separate components or in plug-ins. It mainly processes REST operations, validates them, and updates the corresponding objects in etcd (and eventually other stores).
- Scheduler: The scheduler binds unscheduled pods to nodes via the ‘/binding’ API.
- Controller Manager Server: All other cluster-level functions are currently performed by the Controller Manager. For instance, endpoints objects are created and updated by the endpoints controller, and nodes are discovered, managed, and monitored by the node controller.
K8S Worker
K8S Workers (or minions as they were referred previously) are responsible for hosting the below list of components:
- kubelet: The kubelet manages Pods and their containers, their images, their volumes, etc.
- kube-proxy: Each node also runs a simple network proxy and load balancer. This reflects services as defined in the Kubernetes API on each node and can do simple TCP and UDP stream forwarding (round robin) across a set of backends.
An important point to note is that all components present on the worker node are also running and present on the master node.
Various Components of a K8S Cluster are:
Service components are the basic set of executables that allow an user to interact with the K8S cluster.
- Kubeadm: The command to bootstrap the cluster.
- Kubectl: The command to control the cluster once it’s running. You will only need this on the master, but it can be useful to have on the other nodes as well.
- Kublet: The most core component of K8S. It runs on all of the machines in your cluster and does things like starting the pods and containers.
Logical resources of a K8S Cluster include:
- Pods: It models a group of applications or services that are used to run on the same server in the pre-container world. In a containerized world these applications or services are nothing but running containers. Containers inside a pod share the same network namespace and can share data volumes as well.
- Deployment: From version 1.5.x on-wards K8S creates and manages sets of replicated containers (actually, replicated Pods) using Deployments. A Deployment simply ensures that a specified number of pod “replicas” are running at any one time. If there are too many, it will kill some. If there are too few, it will start more.
- Replication Controllers: A RC ensures that a number of pods of a given service is always running across the cluster.
- Labels: They are key-value metadata that can be attached to any K8S resource (pods, RCs, services, nodes, etc).
- Services: A K8S service provides a stable endpoint (fixed virtual IP + port binding to the host servers) for a group of pods managed by a replication controller.
- Volumes: A Volume is a directory on disk or in another container. A volume outlives any containers that run within the Pod, and the data is preserved across container restarts. The directory, the medium that backs it, and the contents within it are determined by the particular volume type used.
- Selector: A selector is an expression that matches labels in order to identify related resources, such as which pods are targeted by a load-balanced service.
- Name: A user- or client-provided name for a resource.
- Namespace: A namespace is like a prefix to the name of a resource. Namespaces help different projects, teams, or customers to share a cluster, such as by preventing name collisions between unrelated teams.
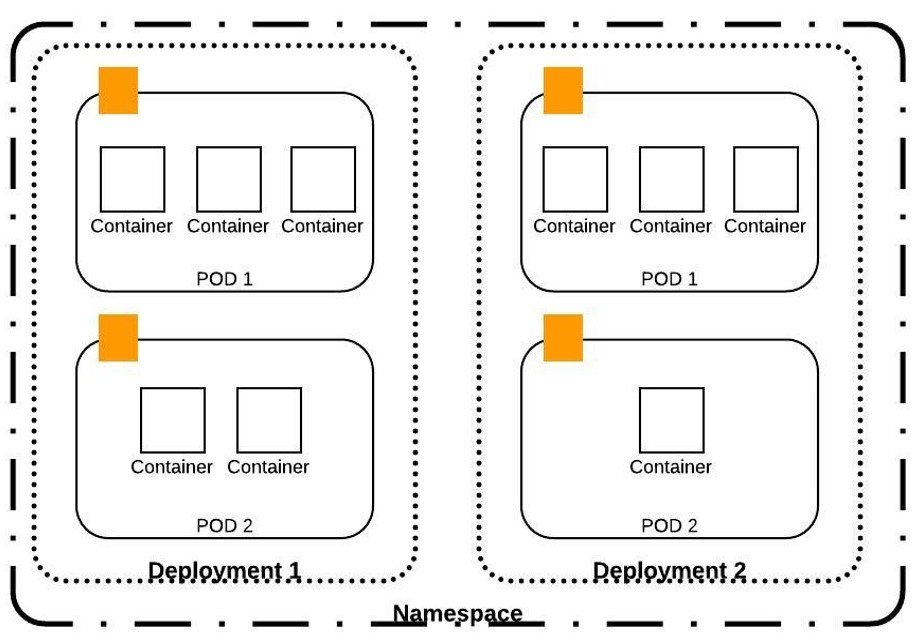
Resource Hierarchy for K8S Resources
The below image captures the way in which few of the K8S resources can be deployed and shows how they relate to each other.
K8S Cluster Creation/ Installation
Finalize what is the infrastructure that you would like to use for K8S cluster. Below is the setup that I used for my testing:
- VirtualBox 5.1.14 – to create different VMs.
- 1 CentOS 7 VM – to be configured as K8S master node.
- 2 CentOS 7 VMs – to be configured as K8S nodes.
Installation Steps
-
Installing kubelet and kubeadm on your hosts:
kubelet is the most core component of K8S. It runs on all of the machines in your cluster and does things like starting pods and containers. kubeadm is the command to bootstrap the cluster. For both of these components to work you would also need to install – docker, kubectl, kubernetes-cni. Login to your host and become a root user by giving ‘su’ command. Following is the list of commands that you can give to install all these packages:
cat <<EOF > /etc/yum.repos.d/kubernetes.repo
[kubernetes]
name=Kubernetes
baseurl=http://yum.kubernetes.io/repos/kubernetes-el7-x86_64
enabled=1
gpgcheck=1
repo_gpgcheck=1
gpgkey=https://packages.cloud.google.com/yum/doc/yum-key.gpg
https://packages.cloud.google.com/yum/doc/rpm-package-key.gpg
EOF
setenforce 0
yum install -y docker kubelet kubeadm kubectl kubernetes-cni
systemctl enable docker && systemctl start docker
systemctl enable kubelet && systemctl start kubelet-
Initializing your Master:
To initialize the master, pick one of the machines you previously installed kubelet and kubeadm on, and run:
$ getenforce # returns the mode of SELinux. E.g. ‘Enforcing’ by default
$ setenforce 0 # sets the SELinux mode to ‘Permissive’
$ kubeadm init  # initialize and start the master
By default the Security-Enhanced Linux (i.e. SELinux) feature is enabled on CentOS 7.2. Commands ‘getenforce’ and ‘setenforce’ allow you to change the ‘SELinux’ mode so that ‘kubeadm init’ could start properly.
Note: ‘kubeadm init’ will auto-detect the network interface to advertise the master on as the interface with the default gateway.
‘kubeadm init’ will download and install the cluster database and “control plane” components. This may take several minutes. The output should look like:
[token-discovery] kube-discovery is ready after 3.002745 seconds
[addons] Created essential addon: kube-proxy
[addons] Created essential addon: kube-dns
Your Kubernetes master has initialized successfully!
You should now deploy a pod network to the cluster.
Run “kubectl apply -f [podnetwork].yaml” with one of the options listed at:
http://kubernetes.io/docs/admin/addons/
You can now join any number of machines by running the following on each node:
kubeadm join –token=6cb263.fbb4386199596a92
Make a record of the kubeadm join command that kubeadm init outputs. You will need this to register the worker nodes with master. The key included here is secret, keep it safe — anyone with this key can add authenticated nodes to your cluster.
There are times when ‘kubeadm init’ just won’t complete on CentOS 7 version 7.2.1511 (Core). To resolve this check whether the ‘setenforce 0’ command is executed before ‘kubeadm init’.
-
Installing a pod network:
You must install a pod network add-on so that your pods can communicate with each other. It is necessary to do this before you try to deploy any applications to your cluster, and before kube-dns will start up. Note also that kubeadm only supports CNI based networks and therefore kubenet based networks will not work. Following are a few learnings:
- You should install a CNI based virtual network implementation e.g. flannel before you try and start the POD network. For this I ended up building the latest flannel GitHub (https://github.com/coreos/flannel) code. You can also install flannel using rpms (http://cbs.centos.org/repos/virt7-docker-common-release/x86_64/os/).
- Once installed you need to start the flannel daemon. If this is the first time you are running flannel and have not configured it you would keep getting errors “Failed to retrieve network config: client: etcd cluster is unavailable or misconfigured” on the console. The errors won’t stop until you start the “etcd” component for K8S and add basic network configuration against key “/coreos.com/network/config“. More details on this in coming points.
- Execute command “kubectl create -f https://raw.githubusercontent.com/coreos/flannel/master/Documentation/kube-flannel.yml”. For me the command “kubectl apply -f <add-on.yaml>” given on the official site did not worked as I kept getting validation error for the kube-flannel.yml.
- The ‘etcdctl’ utility was not installed by default using the ‘kubeadm’ tool hence instead of using ‘etcdctl’ for adding the network configuration value to ‘etcd’ component I ended up using ‘curl’ commands. Following is the list of commands:$ curl -L -X PUT http://127.0.0.1:2379/v2/keys/coreos.com/network/config -d value=”{\”Network\”: \”10.0.0.0/8\”, \”SubnetLen\”: 20,\”SubnetMin\”: \”10.10.0.0\”,\”SubnetMax\”: \”10.99.0.0\”,\”Backend\”: {\”Type\”: \”udp\”, \”Port\”: 7890}}”
$ curl -L http://127.0.0.1:2379/v2/keys/coreos.com/network/configThe first command creates the key ‘coreos.com/network/config’ with provided values in JSON format. The second command retrieves the key value on command prompt to verify whether the value is set properly.
After execution of above ‘curl’ commands the flannel daemon would fetch the added configuration from ‘etcd’ and would start watching for new subnet leases. Note, you might need to restart the master by executing ‘kubeadm reset’ and ‘kubeadm init –pod-network-cidr <subnet range>’ commands if you have not initialized the master with the subnet range initially. For my setup I had used the subnet range of 10.244.0.0/16.
You can verify whether all the master PODs have started or not by giving command ‘kubctl get pods –all-namespaces‘. You should be able to see the ‘kube-dns’ pod status.
-
Joining the nodes:
For any new machine that needs to be added as node to your cluster, for each such machine: SSH to that machine, become root (e.g. sudo su -) and run the command that was output by kubeadm init. For example:
$ kubeadm join –token <token> <master-ip>
[kubeadm] WARNING: kubeadm is in alpha, please do not use it for production clusters.
[preflight] Running pre-flight checks
[preflight] Starting the kubelet service
[tokens] Validating provided token
…
Node join complete:
* Certificate signing request sent to master and response
received.
* Kubelet informed of new secure connection details.
Run ‘kubectl get nodes’ on the master to see this machine join
If you are interested in learning about how REAN Cloud can support your container requirements and implement a DevOps transformation methodology, please contact us at info@reancloud.com
References:
- https://kubernetes.io/docs/user-guide/
- https://dzone.com/storage/assets/2316499-dzone-refcardz233-kubernetes.pdf
- https://www.vultr.com/docs/getting-started-with-kubernetes-on-centos-7
- https://blog.couchbase.com/2016/march/kubernetes-namespaces-resource-quota-limits-qos-cluster
- http://sharadchhetri.com/2013/02/27/how-to-disable-selinux-in-red-hat-or-centos/
- http://webplay.pro/linux/change-hostname-permanently-centos-7.html


 1391
1391


 被折叠的 条评论
为什么被折叠?
被折叠的 条评论
为什么被折叠?
 到【灌水乐园】发言


