


Debatching(Splitting) XML Message in Orchestration using DefaultPipeline - BizTalk 2010
In this post we will walk through the process of
debatching an xml message in Orchestration using pipeline in Biztalk.
I have used the Default XML Receive pipeline to achieve it, but it can also be done by creating a custom pipeline which uses XML disassembler (where you can set the Envelope and Document Schema).
Pipeline is not available in Orchestration like other shapes, thus to use it we need to add reference to following assemblies(which will allow us to use methods in those assemblies) :
You can browse to the location BizTalk Installation Directory to find above dll's.
Most of the part of this post is borrowed from my earlier post which talks about debatching xml at receive port:
http://tech-findings.blogspot.in/2013/07/debatchingsplitting-xml-message-biztalk.html
We receive many item information but its wrapped (Enveloped) , so to process each item we need to unwrap it (remove the envelope and split individual Item message).
Below is what we receive (Input) :
<ns0:Items xmlns:ns0="http://TestingSchemas.ItemEnvelope">
<ns1:Product xmlns:ns1="http://TestingSchemas.Item">
<ID>ID_0</ID>
<Name>Name_0</Name>
<Quantity>100</Quantity>
<UnitPrice>100</UnitPrice>
</ns1:Product>
<ns1:Product xmlns:ns1="http://TestingSchemas.Item">
<ID>ID_0</ID>
<Name>Name_1</Name>
<Quantity>200</Quantity>
<UnitPrice>100</UnitPrice>
</ns1:Product>
<ns1:Product xmlns:ns1="http://TestingSchemas.Item">
<ID>ID_2</ID>
<Name>Name_2</Name>
<Quantity>300</Quantity>
<UnitPrice>100</UnitPrice>
</ns1:Product>
<ns1:Product xmlns:ns1="http://TestingSchemas.Item">
<ID>ID_3</ID>
<Name>Name_2</Name>
<Quantity>300</Quantity>
<UnitPrice>100</UnitPrice>
</ns1:Product>
<ns1:Product xmlns:ns1="http://TestingSchemas.Item">
<ID>ID_4</ID>
<Name>Name_2</Name>
<Quantity>300</Quantity>
<UnitPrice>100</UnitPrice>
</ns1:Product>
<ns1:Product xmlns:ns1="http://TestingSchemas.Item">
<ID>ID_5</ID>
<Name>Name_2</Name>
<Quantity>300</Quantity>
<UnitPrice>100</UnitPrice>
</ns1:Product>
<ns1:Product xmlns:ns1="http://TestingSchemas.Item">
<ID>ID_6</ID>
<Name>Name_2</Name>
<Quantity>300</Quantity>
<UnitPrice>100</UnitPrice>
</ns1:Product>
<ns1:Product xmlns:ns1="http://TestingSchemas.Item">
<ID>ID_7</ID>
<Name>Name_2</Name>
<Quantity>300</Quantity>
<UnitPrice>100</UnitPrice>
</ns1:Product>
<ns1:Product xmlns:ns1="http://TestingSchemas.Item">
<ID>ID_8</ID>
<Name>Name_2</Name>
<Quantity>300</Quantity>
<UnitPrice>100</UnitPrice>
</ns1:Product>
<ns1:Product xmlns:ns1="http://TestingSchemas.Item">
<ID>ID_9</ID>
<Name>Name_2</Name>
<Quantity>300</Quantity>
<UnitPrice>100</UnitPrice>
</ns1:Product>
</ns0:Items>
But we want (Output) :
I have used the Default XML Receive pipeline to achieve it, but it can also be done by creating a custom pipeline which uses XML disassembler (where you can set the Envelope and Document Schema).
Pipeline is not available in Orchestration like other shapes, thus to use it we need to add reference to following assemblies(which will allow us to use methods in those assemblies) :
- Microsoft.XLANGs.Pipeline.dll
- Microsoft.BizTalk.Pipeline.dll
You can browse to the location BizTalk Installation Directory to find above dll's.
Most of the part of this post is borrowed from my earlier post which talks about debatching xml at receive port:
http://tech-findings.blogspot.in/2013/07/debatchingsplitting-xml-message-biztalk.html
Scenario:
We receive many item information but its wrapped (Enveloped) , so to process each item we need to unwrap it (remove the envelope and split individual Item message).
Below is what we receive (Input) :
<ns0:Items xmlns:ns0="http://TestingSchemas.ItemEnvelope">
<ns1:Product xmlns:ns1="http://TestingSchemas.Item">
<ID>ID_0</ID>
<Name>Name_0</Name>
<Quantity>100</Quantity>
<UnitPrice>100</UnitPrice>
</ns1:Product>
<ns1:Product xmlns:ns1="http://TestingSchemas.Item">
<ID>ID_0</ID>
<Name>Name_1</Name>
<Quantity>200</Quantity>
<UnitPrice>100</UnitPrice>
</ns1:Product>
<ns1:Product xmlns:ns1="http://TestingSchemas.Item">
<ID>ID_2</ID>
<Name>Name_2</Name>
<Quantity>300</Quantity>
<UnitPrice>100</UnitPrice>
</ns1:Product>
<ns1:Product xmlns:ns1="http://TestingSchemas.Item">
<ID>ID_3</ID>
<Name>Name_2</Name>
<Quantity>300</Quantity>
<UnitPrice>100</UnitPrice>
</ns1:Product>
<ns1:Product xmlns:ns1="http://TestingSchemas.Item">
<ID>ID_4</ID>
<Name>Name_2</Name>
<Quantity>300</Quantity>
<UnitPrice>100</UnitPrice>
</ns1:Product>
<ns1:Product xmlns:ns1="http://TestingSchemas.Item">
<ID>ID_5</ID>
<Name>Name_2</Name>
<Quantity>300</Quantity>
<UnitPrice>100</UnitPrice>
</ns1:Product>
<ns1:Product xmlns:ns1="http://TestingSchemas.Item">
<ID>ID_6</ID>
<Name>Name_2</Name>
<Quantity>300</Quantity>
<UnitPrice>100</UnitPrice>
</ns1:Product>
<ns1:Product xmlns:ns1="http://TestingSchemas.Item">
<ID>ID_7</ID>
<Name>Name_2</Name>
<Quantity>300</Quantity>
<UnitPrice>100</UnitPrice>
</ns1:Product>
<ns1:Product xmlns:ns1="http://TestingSchemas.Item">
<ID>ID_8</ID>
<Name>Name_2</Name>
<Quantity>300</Quantity>
<UnitPrice>100</UnitPrice>
</ns1:Product>
<ns1:Product xmlns:ns1="http://TestingSchemas.Item">
<ID>ID_9</ID>
<Name>Name_2</Name>
<Quantity>300</Quantity>
<UnitPrice>100</UnitPrice>
</ns1:Product>
</ns0:Items>
But we want (Output) :
<ns0:Product xmlns:ns0="http://TestingSchemas.Item">
<ID>ID_0</ID>
<Name>Name_0</Name>
<Quantity>100</Quantity>
<UnitPrice>100</UnitPrice>
</ns0:Product>
.
.
.
.
.
<ns0:Product xmlns:ns0="http://TestingSchemas.Item">
<ID>ID_9</ID>
<Name>Name_9</Name>
<Quantity>100</Quantity>
<UnitPrice>100</UnitPrice>
</ns0:Product>
All right, let's see how we do it:
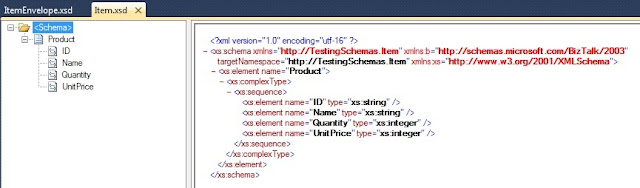
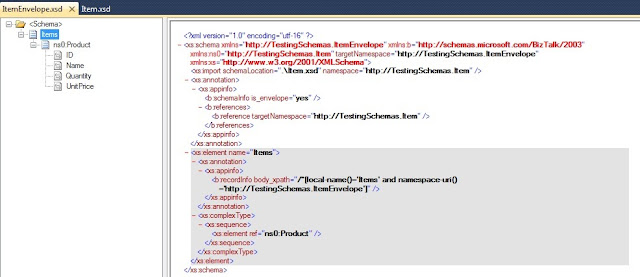
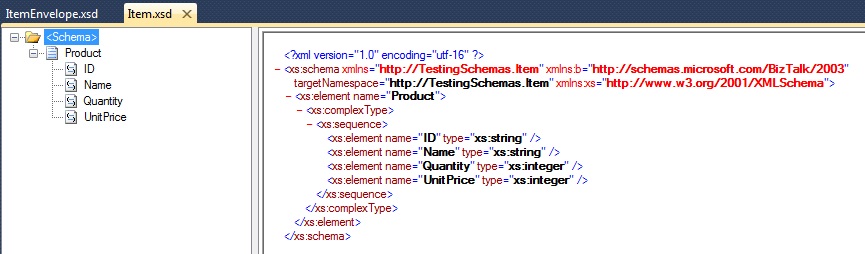
1. Create schema - document schema
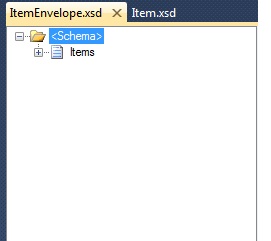
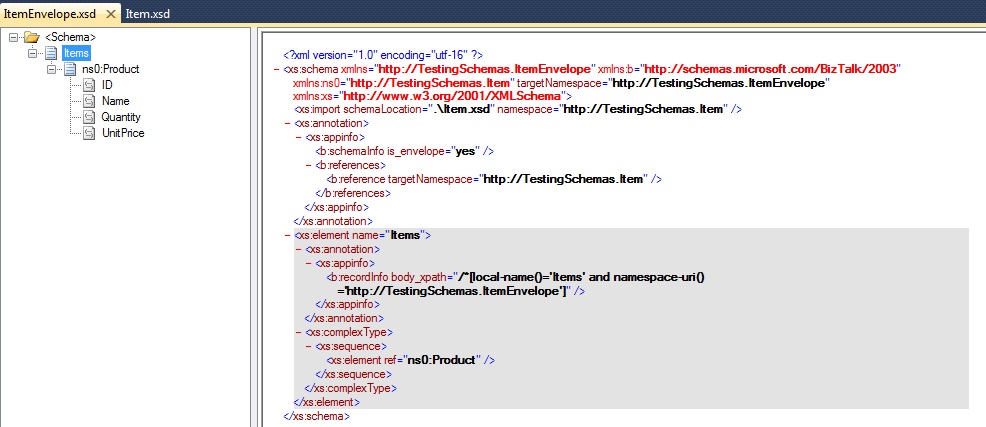
2. Create the wrapper - Envelope Schema
- Name the root node, I have named it Items.
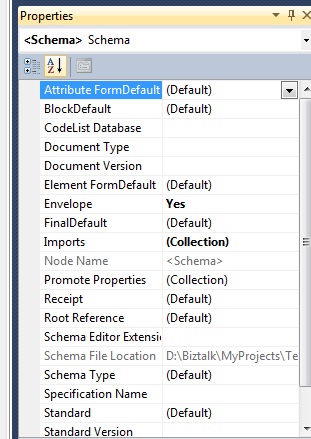
- Click on "Schema" and go to Properties Window
- Set the property "Envelope" as Yes, as this schema will be used as envelope and this is the property which helps disassembler to recognize it.
- So far good, envelope schema is ready but what about the document which will be wrapped.
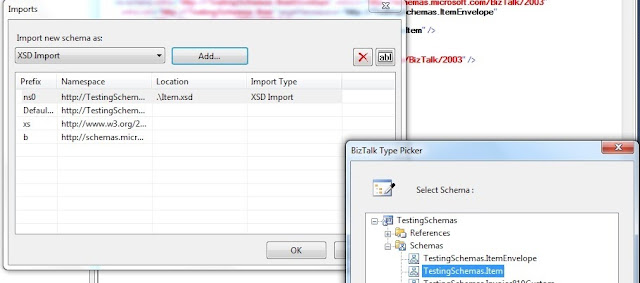
- In the Property window select "Imports" and click on the ellipsis
- You will get Imports wizard pop-ed out .
- Click on add and select the document schema which we created in step 1.(Here it is Item schema)

- Click on the "Items" and go to property window and select the property Body XPath and set it to /*[local-name()='Items' and namespace-uri()='http://TestingSchemas.ItemEnvelope']. Doing so allows an Items node to contain any number of Item Document.
- Cool... Now we are ready with the resources, next is to validate schema, build it, sign it and deploy.
3. Now lets create Orchestration which will receive the enveloped item and
debatch/split it using the pipeline.

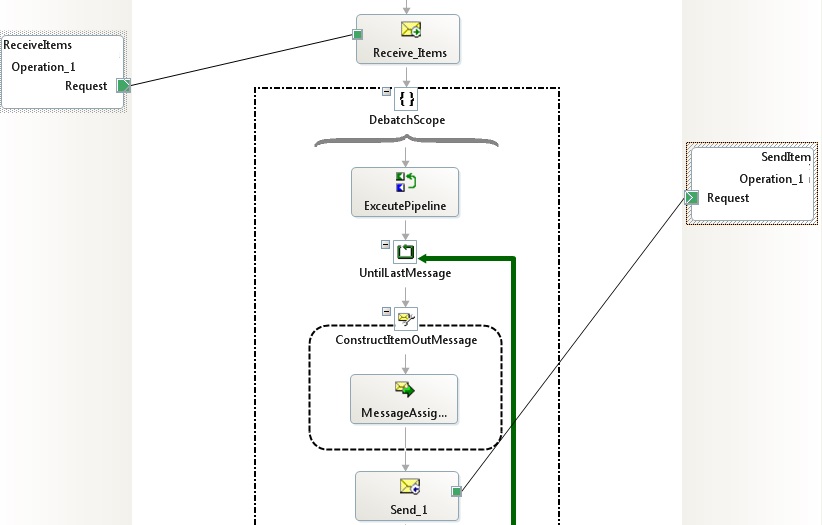
- Receive shape is configured to receive untyped message i.e. of type System.Xml.XmlDocument (which will receive enveloped message -ItemEnvelope Type) .
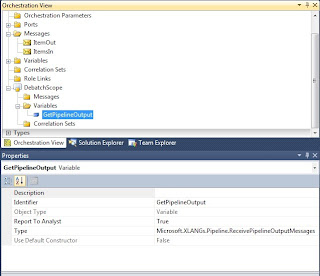
- Then we have a "DebatchScope" which is of type "Atomic" and Orchestration is of type Long running. Why Atomic scope? Because we will be calling/executing Pipeline within it and the pipeline is of non- serializable type.
- Next we have Expression shape named as "Execute Pipeline". It is here where we make call to pipeline and execute it which results in splitted messages.
- It contains following line: GetPipelineOutput=Microsoft.XLANGs.Pipeline.XLANGPipelineManager.ExecuteReceivePipeline(typeof(Microsoft.BizTalk.DefaultPipelines.XMLReceive),ItemsIn);
- GetPipelineOutput is a DebatchScope variable of type: Microsoft.XLANGS.Pipeline.ReceivePipelineOutputMessages
- So we are executing the method ExecuteReceivePipeline() method of XLANGPipelineManager class which belongs to Microsoft.XLANGs.Pipeline and its output assigned to GetPipelineOutput.
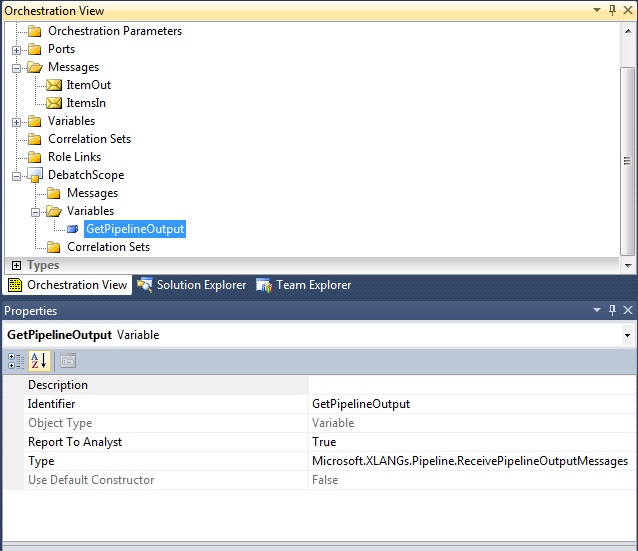
- Then we have a loop shape "UntilLastMessage" and its same as while loop, below is the condition(tillspillited messages are available) : GetPipelineOutput.MoveNext()
- Next is Construct shape with Message Assignment within it, which has following code:
ItemOut = null;
GetPipelineOutput.GetCurrent(ItemOut);
It is here where the
splitted single message is assigned to ItemOut , where ItemOut is a Message variable which is of type Item.xsd
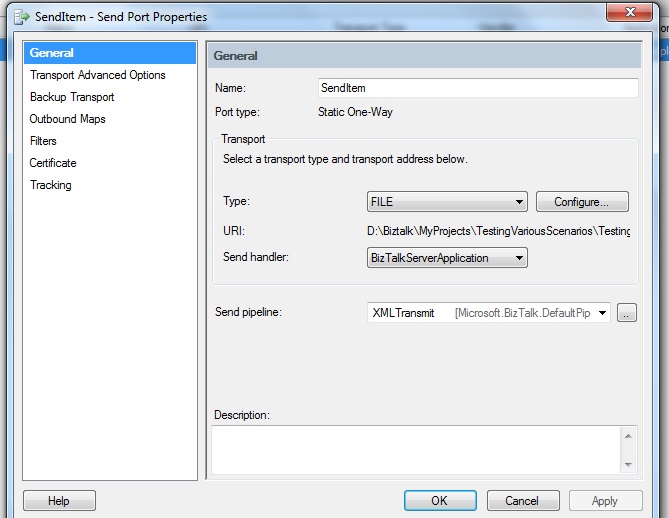
- At last we have Send shape which accepts message of type ItemOut and sends it .
- Now what, build the project , sign it and deploy .
4.Now create a Receive and Send port :

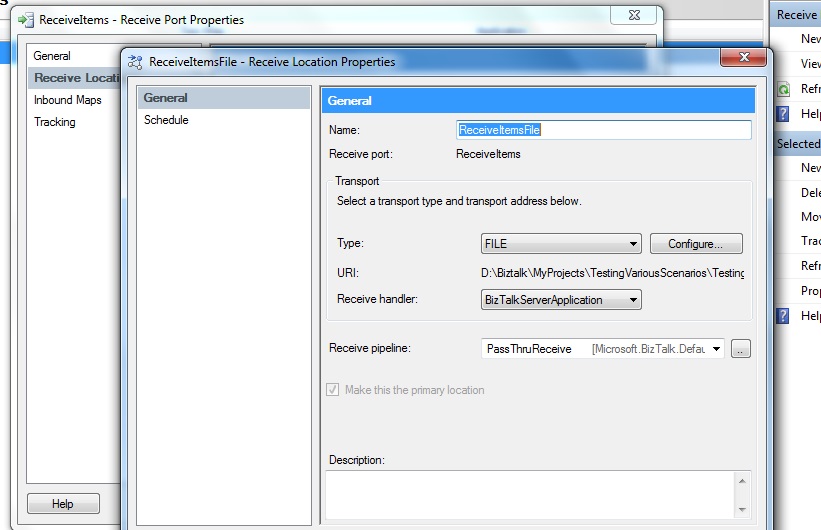
- Receive Pipeline is PassThruReceive as we don't want its message type to be detected until the message reaches to ExecutePipeline shape in Orchestration.
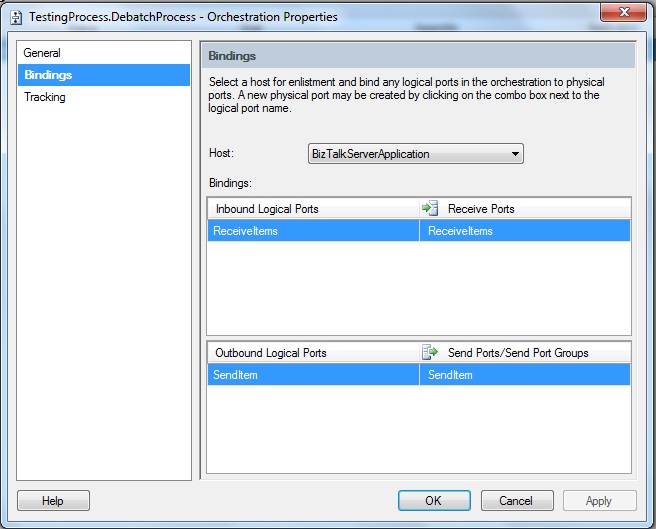
- Now after both the ports are ready, it's time to bind it to the logical ports of our orchestration:
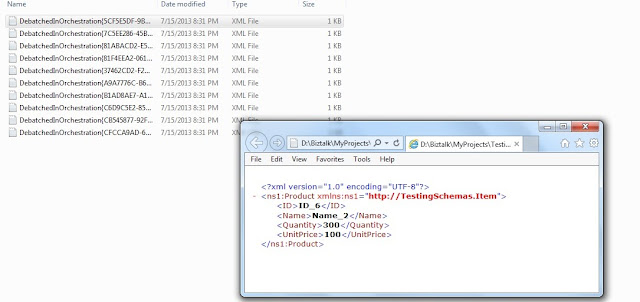
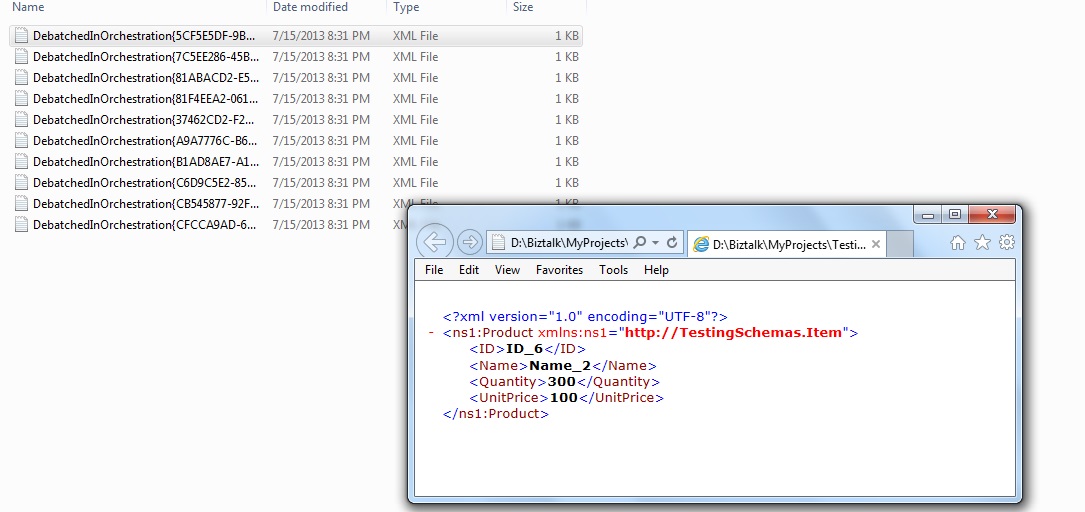
5. Start the application and test it, I will drop
a envelope message at receive location which we saw at start . So I should be getting 10 individual xml message at the destination location:
Will keep on posting as an when I find something to share!!!!!!!!!!!!


 被折叠的 条评论
为什么被折叠?
被折叠的 条评论
为什么被折叠?
 到【灌水乐园】发言


