


我们在项目中可能会出现这样的需求,使用ftp上传很大的文件后对需要对文件进行相应的逻辑处理,这时我们可以使用apache ftpServer来处理这段逻辑,只要我们做相应的部署和编写我们的逻辑代码,这样通过ftp上传的文件会自动经过ftpServer来执行我们的逻辑判断,实现我们相应的功能!ftpServer是apache提供的纯java编写的Ftp服务器,能够方便的集成到J2EE项目中。采用这种集成方式无需在服务器端配置专门的FTP服务器。至于为什么要采用FTP服务器,是应一些大数据的上传所需。下面带领大家进入FtpServer的学习之旅
1、下载相应的jar包,任选一种方式
apache官网版本包下载:http://mina.apache.org/ftpserver-project/downloads.html
本人博客jar包整理版下载:http://download.csdn.net/detail/harderxin/6319669
2、将相应的jar包部署到我们的web projects中
3、将log4j.properties和users.properties放到我们项目的src目录下
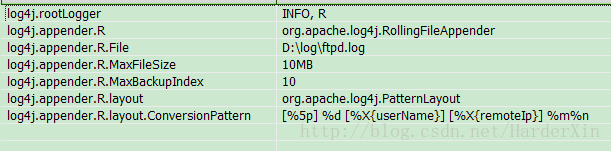
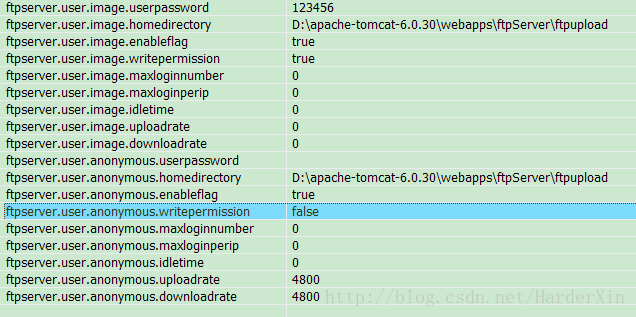
上面只是ftp自带的一些配置
4、配置spring以及数据库连接池
<?xml version="1.0" encoding="UTF-8"?> <!DOCTYPE beans PUBLIC "-//SPRING//DTD BEAN//EN" "http://www.springframework.org/dtd/spring-beans.dtd"> <beans> <!-- 读取配置文件 --> <bean id="propertyConfigurer" class="org.springframework.beans.factory.config.PropertyPlaceholderConfigurer"> <property name="location" value="classpath:jdbc.properties"/> </bean> <!-- 数据库连接池 --> <bean id="dataSource" class="com.mchange.v2.c3p0.ComboPooledDataSource"> <property name="driverClass"> <value>${jdbc_driver}</value> </property> <property name="jdbcUrl"> <value>${jdbc_url}</value> </property> <property name="user"> <value>${jdbc_user}</value> </property> <property name="password"> <value>${jdbc_password}</value> </property> <property name="minPoolSize"> <value>2</value> </property> <property name="maxStatements" value="1000"></property> <property name="maxPoolSize" value="5"></property> <property name="idleConnectionTestPeriod" value="120"></property> <property name="maxIdleTime" value="300"></property> </bean> <!-- JdbcTemplate --> <bean id="jdbcTemplate" class="org.springframework.jdbc.core.JdbcTemplate"> <property name="dataSource"> <ref bean="dataSource" /> </property> </bean> <bean id="ftpDao" class="com.ftp.service.FtpDaoImpl"> <property name="dataSource" ref="dataSource"></property> </bean> </beans>5、在application.xml(spring配置文件)添加Apache Ftpserver属性
<?xml version="1.0" encoding="UTF-8"?> <server xmlns="http://mina.apache.org/ftpserver/spring/v1" xmlns:beans="http://www.springframework.org/schema/beans" xmlns:xsi="http://www.w3.org/2001/XMLSchema-instance" xsi:schemaLocation=" http://www.springframework.org/schema/beans http://www.springframework.org/schema/beans/spring-beans-2.5.xsd http://mina.apache.org/ftpserver/spring/v1 http://mina.apache.org/ftpserver/ftpserver-1.0.xsd " id="myServer"> <listeners> <nio-listener name="default" port="21"> <ssl> <keystore file="ftpserver.jks" password="password" /> </ssl> </nio-listener> </listeners> <ftplets> <ftplet name="ftpService"> <beans:bean class="com.ftp.service.FtpService"> <beans:property name="ftpDao" ref="ftpDao"></beans:property> </beans:bean> </ftplet> </ftplets> <file-user-manager file="users.properties" encrypt-passwords="clear"/> </server>
6、编写我们的监听器,目的是操作FtpServer
package com.ftp.util; import javax.servlet.ServletContextEvent; import javax.servlet.ServletContextListener; import org.apache.ftpserver.impl.DefaultFtpServer; import org.springframework.web.context.WebApplicationContext; import org.springframework.web.context.support.WebApplicationContextUtils; public class FtpServerListener implements ServletContextListener { public void contextDestroyed(ServletContextEvent contextEvent) { System.out.println("Stopping FtpServer"); DefaultFtpServer server = (DefaultFtpServer) contextEvent.getServletContext() .getAttribute("FTPSERVER_CONTEXT_NAME"); if (server != null) { server.stop(); contextEvent.getServletContext().removeAttribute("FTPSERVER_CONTEXT_NAME"); System.out.println("FtpServer stopped"); } else { System.out.println("No running FtpServer found"); } } public void contextInitialized(ServletContextEvent contextEvent) { System.out.println("Starting FtpServer"); WebApplicationContext ctx = WebApplicationContextUtils.getWebApplicationContext(contextEvent.getServletContext()); DefaultFtpServer server = (DefaultFtpServer) ctx.getBean("myServer"); contextEvent.getServletContext().setAttribute("FTPSERVER_CONTEXT_NAME", server); try { server.start(); System.out.println("FtpServer started"); } catch (Exception e) { throw new RuntimeException("Failed to start FtpServer", e); } } }
7、在web.xml中配置Spring和我们编写的监听器
<?xml version="1.0" encoding="UTF-8"?> <web-app version="2.5" xmlns="http://java.sun.com/xml/ns/javaee" xmlns:xsi="http://www.w3.org/2001/XMLSchema-instance" xsi:schemaLocation="http://java.sun.com/xml/ns/javaee http://java.sun.com/xml/ns/javaee/web-app_2_5.xsd"> <context-param> <param-name>contextConfigLocation</param-name> <param-value>classpath:applicationContext-*.xml</param-value> </context-param> <listener> <listener-class>org.springframework.web.context.ContextLoaderListener</listener-class> </listener> <listener> <listener-class>com.ftp.util.FtpServerListener</listener-class> </listener> <welcome-file-list> <welcome-file>index.jsp</welcome-file> </welcome-file-list> </web-app> 这样我们的初步部署工作就完成了,如果启动不报错,说明我们配置成功!!接下来我们就要进行相应的逻辑监听处理了,见下篇文章--apache FtpServer 整合spring逻辑处理!!
转载于:https://blog.51cto.com/8786457/1389923


 1808
1808

 被折叠的 条评论
为什么被折叠?
被折叠的 条评论
为什么被折叠?
 到【灌水乐园】发言


