


一、什么是SHELL
可Shell终端解释器当作人与计算机硬件之间的“翻译官”,它作为用户与Linux系统内部的通信媒介。Shell脚本命令的工作方式有两种:交互式和批处理。
交互式(Interactive):用户每输入一条命令就立即执行。
批处理(Batch):由用户事先编写好一个完整的Shell脚本,Shell会一次性执行脚本中诸多的命令。
二、shell基础知识
1、命令编辑快捷方式
ctrl+a:光标回到行首
ctrl+e:光标移动到行尾
ctrl+d:删除光标处内容
ctrl+u:删除光标到行首内容
ctrl+k:删除光标到行尾内容
ctrl+l:清屏
2、历史命令history
history:查看历史命令
history -c:清空历史命令
history -w:保存历史命令到历史文件中
!!:连续2个!!表示执行上一条命令
!n:执行历史命令中的第n条命令
!-n:执行历史命令中的倒数第n条命令
!word:执行历史命令中最近一次以word开头的命令。
!$:引用上一条命令的最后一个参数,此命令有时用不了
Esc + . :引用上一条命令的最后一个参数
Alt + . :引用上一条命令的最后一个参数
·查看历史命令最大存放条数:
[root@node5 ~]# echo $HISTSIZE
1000
[root@node5 ~]#
·清空内存中的历史命令:
[root@node5 ~]# history -c·修改历史命令参数。
修改HISTSIZE
[root@node5 ~]# vim /etc/profile

HISTSIZE=5000
修改历史命令显示格式:
[root@node5 ~]# HISTTIMEFORMAT="%Y/%m/%d  %H:%M:%S "
[root@node5 ~]# history
    1  2018/05/31  20:13:38 vim /etc/profile
    2  2018/05/31  20:17:08 HISTIMEFORMAT="%F %H:%M:%S"
    3  2018/05/31  20:17:16 LS
    4  2018/05/31  20:17:17 ls
    5  2018/05/31  20:17:20 history
    6  2018/05/31  20:18:00 HISTIMEFORMAT="%Y/%m/%d  %H:%M:%S "
    7  2018/05/31  20:18:05 ls
    8  2018/05/31  20:18:07 history
    9  2018/05/31  20:18:53 echo $HISTIMEFORMAT
   10  2018/05/31  20:18:55 history
   11  2018/05/31  20:19:11 HISTTIMEFORMAT="%Y/%m/%d  %H:%M:%S "
   12  2018/05/31  20:19:28 LS
   13  2018/05/31  20:19:31 history
[root@node5 ~]#
如果要永久生效,则在/etc/profile中定义即可
[root@node5 ~]# vim /etc/profile

HISTTIMEFORMAT="%Y/%m/%d  %H:%M:%S "

[root@node5 ~]# source /etc/profile
·永久保存,防止别删除,设置隐藏权限:
[root@node5 ~]# chattr +a ~/.bash_history ·运行历史命令中的某一条:
[root@node5 ~]# history
    1  2018/05/31  20:13:38 vim /etc/profile
    2  2018/05/31  20:17:08 HISTIMEFORMAT="%F %H:%M:%S"
    3  2018/05/31  20:17:16 LS
    4  2018/05/31  20:17:17 ls
    5  2018/05/31  20:17:20 history
    6  2018/05/31  20:18:00 HISTIMEFORMAT="%Y/%m/%d  %H:%M:%S "
    7  2018/05/31  20:18:05 ls
    8  2018/05/31  20:18:07 history
    9  2018/05/31  20:18:53 echo $HISTIMEFORMAT
   10  2018/05/31  20:18:55 history
   11  2018/05/31  20:19:11 HISTTIMEFORMAT="%Y/%m/%d  %H:%M:%S "
   12  2018/05/31  20:19:28 LS
   13  2018/05/31  20:19:31 history
   14  2018/05/31  20:20:49 vim /etc/profile
   15  2018/05/31  20:21:58 cource /etc/profile
   16  2018/05/31  20:22:04 source /etc/profile
   17  2018/05/31  20:22:45 chattr +a ~/.bash_history
   18  2018/05/31  20:27:57 history
比如要运行第7条,执行!7即可
[root@node5 ~]# !7
运行最后一次以vim开头的命令:
[root@node5 ~]# !vim
history n:n为数字,显示最近n条记录:
[root@node5 ~]# history 2
  914  cd
  915  history 2
[root@node5 ~]# history 3
  914  cd
  915  history 2
  916  history 3
[root@node5 ~]# history 10
  908  w
  909  echo $SSH_TTY
  910  init 0
  911  history 2
  912  ls
  913  cd /etc/
  914  cd
  915  history 2
  916  history 3
  917  history 10
[root@node5 ~]# history 1
  918  history 1
[root@node5 ~]#
3、别名、命令补全
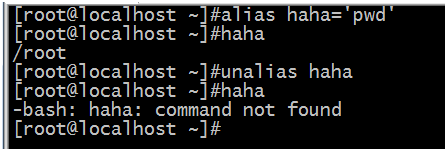
命令别名: 使用alias定义命令别名
用户家目录下的.bashrc有定义命令别名:
[root@node5 ~]# cat ~/.bashrc
# .bashrc

# User specific aliases and functions

alias rm='rm -i'
alias cp='cp -i'
alias mv='mv -i'

# Source global definitions
if [ -f /etc/bashrc ]; then
	. /etc/bashrc
fi
[root@node5 ~]#
此外,在/etc/profile.d/目录下有各种定义别名的文件:
root@node5 ~]# ls /etc/profile.d/
256term.csh         colorgrep.csh  colorls.sh  lang.sh   mysql.sh  vim.sh
256term.sh          colorgrep.sh   csh.local   less.csh  sh.local  which2.csh
bash_completion.sh  colorls.csh    lang.csh    less.sh   vim.csh   which2.sh
[root@node5 ~]#
取消某个命令的别名:unalias 命令名
命令补全:
安装bash-completion可以使用Tab键补全。
[root@node5 ~]# yum install bash-completion -y
Loaded plugins: product-id, search-disabled-repos, subscription-manager
This system is not registered with an entitlement server. You can use subscription-manager to register.
Resolving Dependencies
--> Running transaction check
---> Package bash-completion.noarch 1:2.1-6.el7 will be installed
--> Finished Dependency Resolution
...

Installed:
  bash-completion.noarch 1:2.1-6.el7

Complete!
[root@node5 ~]#
安装完之后重启系统即可。
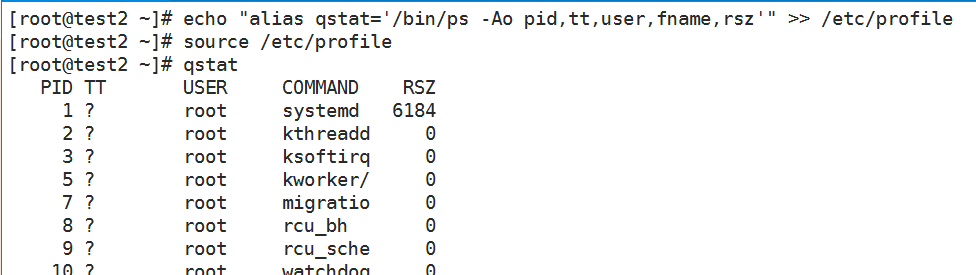
命令别名-RHCE7.0真题:
[root@test2 ~]# # echo "alias qstat='/bin/ps -Ao pid,tt,user,fname,rsz'" >> /etc/profile
[root@test2 ~]# source /etc/profile
4、命令替换
``:反引号的内容会当做命令执行
"":弱引用,可以实现变量替换
'':强引用,可以实现变量替换
双引号:

单引号:

反引号:

5、通配符
*:0个或多个任意字符
?:1个任意字符
[]:指定范围内
[^]:指定范围外
[[:space:]]:空白字符
[:punct:]:所有标点
[:lower:]:小写字母
[:upper:]:大写字母
[:alpha:]:大、小字母
[:digit:]:数字
[:almun:]:数字和大小写字母
例:查看/etc/目中以字母开头、中间空格、字母结尾的文件

*:使用举例
[root@node5 ~]# touch 1.txt  2.txt a.txt cc.txt x.txt.1
[root@node5 ~]# ls *.txt
1.txt  2.txt  a.txt  cc.txt  ipvs.txt
[root@node5 ~]#
[root@node5 ~]# ls *.txt*
1.txt  2.txt  a.txt  cc.txt  ipvs.txt  x.txt.1
[root@node5 ~]#
?使用举例
[root@node5 ~]# ls ?.txt
1.txt  2.txt  a.txt
[root@node5 ~]#
[]方括号使用举例
[root@node5 ~]# ls [0-9a-z].txt
1.txt  2.txt  a.txt
[root@node5 ~]#
{}花括号使用举例,跟[]类似
[root@node5 ~]# ls {1,2}.txt
1.txt  2.txt
[root@node5 ~]#
6、输入输出重定向
标准输入:keyborad(键盘),文件描述符:0
标准输出:monitor(显示器),文件描述符:1
标准错误输出:monitor(显示器),文件描述符:2
I/O重定向:改变标准位置。重定向分为输入重定向和输出重定向。
输出重定向:将本来要输出到屏幕的内容保存到文件中。
>:标准输出重定向(覆盖输出)
>>:标准输出追加重定向
2>:错误输出重定向(覆盖输出)
2>>:错误输出追加重定向
&>:标准或错误输出重定向
&>>:标准或错误输出追加重定向
>:标准输出重定向,会覆盖原来的内容
[root@node5 ~]# echo 123 > 1.txt
[root@node5 ~]# cat 1.txt
123
[root@node5 ~]# echo 456 > 1.txt
[root@node5 ~]# cat 1.txt
456
[root@node5 ~]#
>>:标准输出追加重定向,追加输出,不会覆盖原来的内容
[root@node5 ~]# echo aaa >> 1.txt
[root@node5 ~]# cat 1.txt
456
aaa
[root@node5 ~]#
2>错误输出:会覆盖原来的内容
[root@node5 ~]# LSLSL 2> 2.txt
[root@node5 ~]# cat 2.txt
-bash: LSLSL: command not found
[root@node5 ~]# lldddd 2> 2.txt
[root@node5 ~]# cat 2.txt
-bash: lldddd: command not found
[root@node5 ~]#
2>>错误追加重定向,不会覆盖原来的内容:
[root@node5 ~]# ooooo 2>> 2.txt
[root@node5 ~]# cat 2.txt
-bash: lldddd: command not found
-bash: ooooo: command not found
[root@node5 ~]#
标准或错误输出重定向:
标准或错误追加输出重定向,不会覆盖原内容:

输入重定向:将文件中的内容输入给命令去执行。
<:输入重定向
<< 文件名:将文件内容输入
假设,输入重定向查看文件内容:
[root@node5 ~]# echo 123 > a.txt
[root@node5 ~]# cat < a.txt
123
[root@node5 ~]#
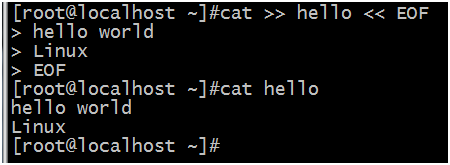
>><<EOF组合,将键盘输入的内容重定向到一个文件中,比如:
7、管道符|
命令1 | 命令2 | 命令3 ...
前一个命令的输出作为后一个命令的输入。例如:
[root@node5 ~]# cat /etc/passwd | wc -l
20
[root@node5 ~]#
使用多个管道符连接多个命令:
[root@node5 ~]# ifconfig | awk -F ':' 'NR==2{print}' |awk '{print $2}'
192.168.10.205
[root@node5 ~]#
8、作业控制
Ctrl +Z 组合键:可以暂停正在运行的进程
fg(foreground的简写):恢复进程,也就是将后台的进程调回前台运行
bg(background的简写):将前台运行的进程调到后台运行。
Ctrl + C:终止进程。
jobs:查看后台的进程

上图,有一个停止的作业(vim haha),输入fg 1则调回前台继续运行vim haha操作。
kill [pid]:杀死一个进程
kill -9 [pid]:杀死一个进程
用法举例:
&:将命令放到后台执行,例如:
[root@node5 ~]# sleep 1000 &
[1] 1620
[root@node5 ~]# jobs
[1]+  Running                 sleep 1000 &
[root@node5 ~]#
fg:调到前台运行
[root@node5 ~]# fg 1
sleep 1000
Ctrl+Z:暂停
[root@node5 ~]# fg 1
sleep 1000
^Z
[1]+  Stopped                 sleep 1000
[root@node5 ~]# jobs
[1]+  Stopped                 sleep 1000
[root@node5 ~]#
bg:将任务放到后台执行
[root@node5 ~]# bg 1
[1]+ sleep 1000 &
[root@node5 ~]#
杀死进程:
要杀死进程,得找到进程的pid:
root@node5 ~]# ps aux | grep sleep
root       1636  0.0  0.0 107948   348 pts/0    S    23:18   0:00 sleep 1000
root       1639  0.0  0.0 112704   968 pts/0    R+   23:18   0:00 grep --color=auto sleep
[root@node5 ~]#
sleep进程pid:1636
下面杀死进程:
[root@node5 ~]# kill 1636
[1]+  Terminated              sleep 1000
[root@node5 ~]# jobs
[root@node5 ~]#
杀死sleep进程成功。
9、变量
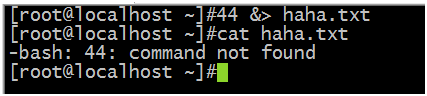
1、变量命名规则:以字母、数字、下划线组成变量名,但不能以数字开头,自定义变量名不建议以下划线开头。
变量值中有特殊符号时要用单引号括起来。
2、部分系统变量:
HOME:用户的主目录(即家目录)
SHELL:用户在使用的Shell解释器名称
HISTSIZE:输出的历史命令记录条数
HISTFILESIZE:保存的历史命令记录条数
MAIL:邮件保存路径
LANG:系统语言、语系名称
RANDOM:生成一个随机数字
PS1:Bash解释器的提示符
PATH:定义解释器搜索用户执行命令的路径
EDITOR:用户默认的文本编辑器

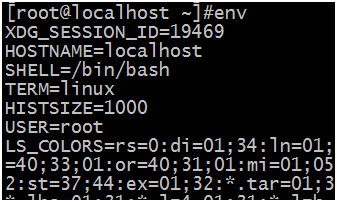
env命令:可以查看系统预设的全部系统变量,只显示系统预设的。
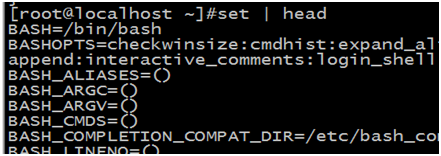
set命令:跟env 类似,不但显示系统预设的,还显示用户自定义的。
自定义变量:变量名=变量值,等号“=”两边不能有空格,这跟其他的编程语不同。
变量名命名规则:变量名只能由字母、数字及下划线组成,且不能以数字开头,自定义变量名不建议以下划线开头。
自定义一个变量haha:
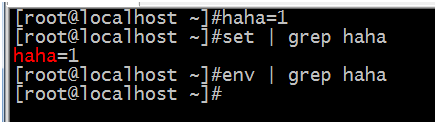
上图所示,set可以显示自己定义的变量,但env不可以。
取消haha这个自定义变量:[root@localhost ~]#unset haha
变量叠加:
[root@node5 ~]# a=1
[root@node5 ~]# b=2
[root@node5 ~]# echo $a$b
12
[root@node5 ~]#
export 变量名:将局部变量提升为全局变量
10、环境变量
1、全局配置:/etc/profile、/etc/profile.d/*.sh、/etc/bashrc
2、用户个人配置:~/.bash_profile、~/.bashrc、~/.bash_history、~/.bash_logout
profile类文件:
1、设定环境变量
2、运行命令或脚本
bashrc类文件:
1、设定本地变量
2、定义命令别名
例如:个人配置

11、配置文件读取顺序
登录式shell读取配置文件的顺序:
/etc/profile ---> /etc/profile.d/*.sh ---> ~/.bash_profile
---> ~/.bashrc ---> /etc/bashrc
非登录式shell读取配置文件的顺序:
~/.bashrc ---> /etc/bashrc ---> /etc/profile.d/*.sh
登录式shell:
1、正常通过终端登录
2、su - 用户名
3、su -l 用户名
非登录式shell:
1、su 用户名
2、图形界面命令窗口
3、自动执行的shell脚本
全局配置(对所有用户生效):
/etc/profile /etc/profile.d/*.sh /etc/bashrc
个人配置(某个用户):
~/.bash_profile ~/.bashrc


 被折叠的 条评论
为什么被折叠?
被折叠的 条评论
为什么被折叠?
 到【灌水乐园】发言


