


Maven dependency
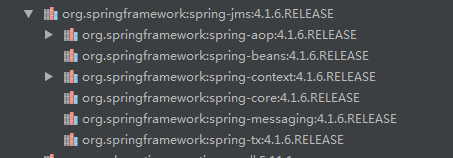
maven的dependency用着 隐形的依赖传递性,如果只是用到 JMS这部分功能 引用一下Maven坐标即可
<dependency>
    <groupId>org.springframework</groupId>
    <artifactId>spring-jms</artifactId>
    <version>${project.dependency.spring.core}</version>
</dependency>
依赖传递关系,可见SpringJMS 会隐形的导入其他的依赖包
Spring Namespace
Spring-config.xml 支持 Spring-jms的命名空间,使用namespace 可以简化spring的配置
<?xml version="1.0" encoding="UTF-8"?>
<beans xmlns="http://www.springframework.org/schema/beans"
        xmlns:xsi="http://www.w3.org/2001/XMLSchema-instance"
        xmlns:context="http://www.springframework.org/schema/context"
        xmlns:jms="http://www.springframework.org/schema/jms"
        xsi:schemaLocation="
            http://www.springframework.org/schema/beans
            http://www.springframework.org/schema/beans/spring-beans.xsd
            http://www.springframework.org/schema/context
            http://www.springframework.org/schema/context/spring-context.xsd
            http://www.springframework.org/schema/jms
            http://www.springframework.org/schema/jms/spring-jms.xsd">

            <!-- bean definitions here -->
</beans>
Spring beans
使用 Spring JMS 最基本的需要构建2个类, 一个是JMS Template 一个是JMS 客户端
JMS Template: 是Spring 自身提供,只需向Spring 容器内 注册这个类即可
JMS 客户端 : 这个是需要自己编写的, 会使用到JMS Template类,如果需要 spring 托管 也需要向容器内 注册
构建JMS 客户端类
使用@Service 注解将 类注册到spring 容器中, 使用Autowire注解 自动装填 JMS Template。
定义 JmsTemplate的setter方法 主要是为了解耦,脱离spring 容器的时候 需要自行set 一个 JMS template 实例
@Service("JMSDemo")
public class JMSDemo{

    private JmsTemplate jmsTemplate;

    @Autowired
    public void setJmsTempalte(JmsTemplate jmsTemplate){
        this.jmsTemplate = jmsTemplate;
    }

    public void send(final String argQueueName, final String argObject) throws JMSException {

        jmsTemplate.send(argQueueName, new MessageCreator() {
            public Message createMessage(Session session) throws JMSException {
                return session.createObjectMessage(argObject);
            }
        });
    }

    public Message consumee(String queueName) throws JMSException {
        Message message = jmsTemplate.receive(queueName);
        return message;
    }
}
Spring Config
spring的配置文件中 首先需要 componet-scan 去扫描package 将带有@component @Service 等注解的类 注册到spring的容器中。
<!-- =============================================== -->
<!--             component Scanning                  -->
<!-- =============================================== -->
<context:component-scan base-package="com.*"/>
其次需要需要定义 Jms template Bean
Jms Template 需要额外配置 connectionFactory 和defaultDestination 属性 messageConverter 是可选项,后面后续的系列会提到。
这里使用了 spring的 cacheConnectionFactory去池化connection。
最终 我们需要向spring 提供 2个实现类 分别是 connectionFacotry和defaultDestination
<!-- =============================================== -->
<!--             JMS Template                        -->
<!-- =============================================== -->
<bean id="jmsTemplate" class="org.springframework.jms.core.JmsTemplate">
    <property name="connectionFactory" ref="cachingConnectionFactory"/>
    <property name="defaultDestination" ref="jmsDestination"/>
    <property name="messageConverter">
        <bean class="org.springframework.jms.support.converter.SimpleMessageConverter"/>
    </property>
</bean>
<!-- Pooled Spring connection factory -->
<bean id="cachingConnectionFactory" class="org.springframework.jms.connection.CachingConnectionFactory">
    <property name="targetConnectionFactory" ref="jmsConnectionFactory" />
</bean>
如果需要到 JNID 里面去寻找 JMS 供应, 使用 jee:jndi-lookup 去寻找即可
前提是 需要加上 jee 的name space
xmlns:jee="
xsi:schemaLocation="
http://www.springframework.org/schema/jee
http://www.springframework.org/schema/jee/spring-jee.xsd"
<jee:jndi-lookup id="jmsConnectionFactory" jndi-name="amqConnectionFactory" />
<jee:jndi-lookup id="jmsDestination" jndi-name="amqDestination" />如果需要到 自己定义实现类 需要额外定义 connectFactory 的实际类(各供应商可能各不相同),这里以ActiveMQ为例
<bean id="amqConnectionFactory" class="org.apache.activemq.ActiveMQConnectionFactory">
    <!-- brokerURL, You may have different IP or port -->
    <property name="brokerURL" value="tcp://localhost:61616" />
</bean>
<bean id="defaultDestination" class="org.apache.activemq.command.ActiveMQQueue">
    <!--<property name="compositeDestinations" value="testQueue"/>-->
    <constructor-arg index="0" value="testQueue" />
</bean>
测试
简单测试 发送消息到队列
准备工作需要 引入依赖包 ActiveMq ,Spring-test 和 开启 JMS服务器 。
<dependency>
    <groupId>org.apache.activemq</groupId>
    <artifactId>activemq-all</artifactId>
    <version>${project.dependency.apache.activemq}</version>
</dependency>
<dependency>
    <groupId>org.springframework</groupId>
    <artifactId>spring-test</artifactId>
    <version>${project.dependency.spring.core}</version>
    <scope>test</scope>
</dependency>
public static void main(String[] arg){
ConnectionFactory connectionFactory = new ActiveMQConnectionFactory("tcp://localhost:61616");
// creates an JNDI Context and combine resources
SimpleNamingContextBuilder builder = null;
try {
builder = SimpleNamingContextBuilder.emptyActivatedContextBuilder();
} catch (NamingException e) {
e.printStackTrace();
}
builder.bind("amqConnectionFactory", connectionFactory);
builder.bind("amqDestination", new ActiveMQQueue("testQueue") );
// Initialize Spring Context
ApplicationContext context = new ClassPathXmlApplicationContext("spring-config.xml");
JMSDemo jmsDemo = context.getBean(JMSDemo.class);
try {
jmsDemo.send("testQueue","Test");
} catch (JMSException e) {
e.printStackTrace();
}
}


 702
702

 被折叠的 条评论
为什么被折叠?
被折叠的 条评论
为什么被折叠?
 到【灌水乐园】发言


