


iOS 商城类 app 首页的实现
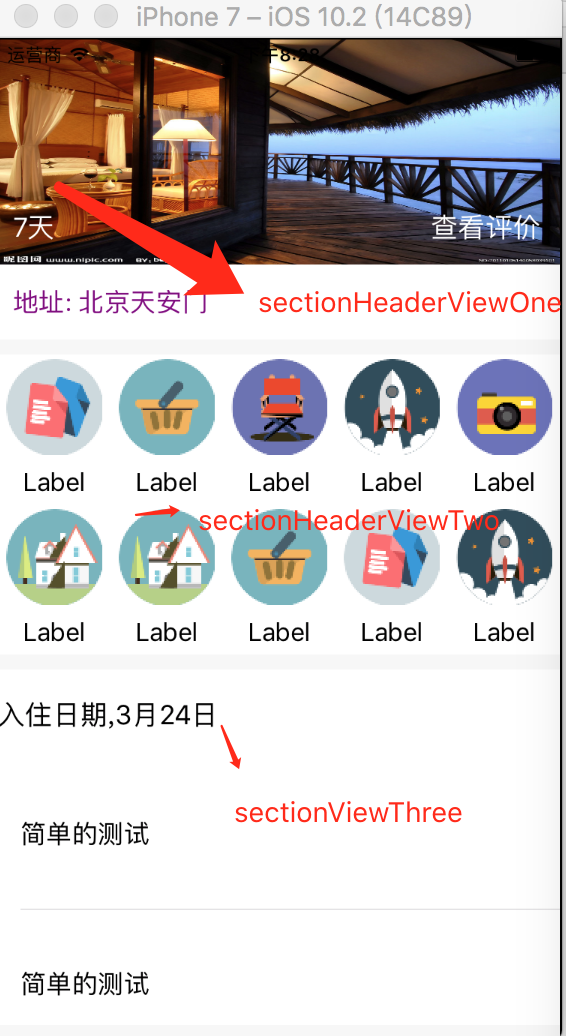
很多人做 iOS开发的人员都应该写过这样的界面,但是呢,具体怎么去优化写这样的界面是我们需要考虑的,对于这样的界面动辄上千行代码在控制器里面"活跃"着,后期维护成本大大增加,现在我简单的说一下我的实现思路,这样的界面无非就是 collectionView 或者 tableView. 举个简单的例子,以 tableView 为例吧,绝大数 app 首页基本都是第一个分区是个 bannar, 其实是分类,其次可能还是分类,最后是列表,一般这个时候,我的习惯是将每一块自定义 view, 然后当做 tableView 的 sectionHeaderView, 最后一个是 cell,当然你也可以将每一块携程 cell 也是可以的,因为 sectionHeaderView 也是可以复用的,当然,如果就是三四个分区是否复用其实差不多(如果大家觉得有必要复用,请记得在下面留言,然后我们一起探讨一下嘛). 上个图,很丑,简单的看一下就好了,不要介意
1.第一部分代码:
#import "SectionHeaderViewOne.h"

@interface SectionHeaderViewOne ()

@property (nonatomic,strong) UIImageView *hotel_image;
@property (nonatomic,strong) UILabel *hotel_type;
@property (nonatomic,strong) UIButton *hotel_rate;
@property (nonatomic,strong) UIButton *hotel_address;

@end

@implementation SectionHeaderViewOne

- (instancetype)initWithFrame:(CGRect)frame
{
    self = [super initWithFrame:frame];
    if (self) {
        [self setupUI];
    }
    return self;
}

- (void)setupUI {
    [self addSubview:self.hotel_image];
    [self addSubview:self.hotel_type];
    [self addSubview:self.hotel_rate];
    [self addSubview:self.hotel_address];
}

#pragma mark --- 懒加载 ----
- (UIImageView *)hotel_image {
    if (!_hotel_image) {
        _hotel_image = [[UIImageView alloc] init];
        [_hotel_image setFrame:CGRectMake(0, 0, self.frame.size.width, self.frame.size.height - 50)];
        _hotel_image.image = [UIImage imageNamed:@"timg.jpg"];
        _hotel_image.contentMode =  UIViewContentModeScaleToFill;
    }
    return _hotel_image;
}

-(UILabel *)hotel_type {
    if (!_hotel_type) {
        _hotel_type = [[UILabel alloc] init];
        [_hotel_type setFrame:CGRectMake(10, self.frame.size.height - 100, 100, 50)];
        _hotel_type.font = [UIFont systemFontOfSize:18];
        _hotel_type.text = @"7天";
        _hotel_type.textColor = [UIColor whiteColor];
    }
    return _hotel_type;
}

- (UIButton *)hotel_rate {
    if (!_hotel_rate) {
        _hotel_rate = [UIButton buttonWithType:UIButtonTypeCustom];
        [_hotel_rate setFrame:CGRectMake(self.frame.size.width - 100, self.hotel_type.frame.origin.y, 100, 50)];
        [_hotel_rate setTitleColor:[UIColor whiteColor] forState:UIControlStateNormal];
        _hotel_rate.titleLabel.font = [UIFont systemFontOfSize:18];
        [_hotel_rate setTitle:@"查看评价" forState:UIControlStateNormal];
    }
    return _hotel_rate;
}

- (UIButton *)hotel_address {
    if (!_hotel_address) {
        _hotel_address = [UIButton buttonWithType:UIButtonTypeCustom];
        [_hotel_address setFrame:CGRectMake(10, CGRectGetMaxY(self.hotel_image.frame), self.frame.size.width - 20, 50)];
        [_hotel_address setTitle:@"地址: 北京天安门" forState:UIControlStateNormal];
        [_hotel_address setContentHorizontalAlignment:UIControlContentHorizontalAlignmentLeft];
        [_hotel_address setTitleColor:[UIColor purpleColor] forState:UIControlStateNormal];
        _hotel_address.titleLabel.font = [UIFont systemFontOfSize:17];
    }
    return _hotel_address;
}
2.第二部分的话,就稍微麻烦点,因为上面嵌套了一个 collectionView
先自定义 collectionView, 在自定义 collectionViewCell, 最后也可以自定义一个 view, 将其作为 collectionView 的父视图 (我是这样写的,我个人觉得没有多大的必要, 简单事物复杂化了)
collectiomView.m 的代码
#import "CollectionView.h"
#import "CollectionViewCell.h"


@interface CollectionView () <UICollectionViewDelegate,UICollectionViewDataSource,UICollectionViewDelegateFlowLayout>

@end

static NSString *kIdentify = @"CollectionViewCell";

@implementation CollectionView

-(instancetype)initWithFrame:(CGRect)frame collectionViewLayout:(UICollectionViewLayout *)layout {
    if (self = [super initWithFrame:frame collectionViewLayout:layout]) {
        self.delegate = self;
        self.dataSource = self;
        self.alwaysBounceVertical = YES;
        [self registerNib:[UINib nibWithNibName:kIdentify bundle:[NSBundle mainBundle]] forCellWithReuseIdentifier:kIdentify];
    }
    return self;
}


#pragma mark --- 代理 ----
#pragma mark  设置CollectionView的组数
- (NSInteger)numberOfSectionsInCollectionView:(UICollectionView *)collectionView{
    return 1;
}

#pragma mark  设置CollectionView每组所包含的个数
- (NSInteger)collectionView:(UICollectionView *)collectionView numberOfItemsInSection:(NSInteger)section
{
    return self.imgArrays.count;
}

#pragma mark  设置CollectionCell的内容
// The cell that is returned must be retrieved from a call to -dequeueReusableCellWithReuseIdentifier:forIndexPath:
- (__kindof UICollectionViewCell *)collectionView:(UICollectionView *)collectionView cellForItemAtIndexPath:(NSIndexPath *)indexPath {
        CollectionViewCell *cell = [collectionView dequeueReusableCellWithReuseIdentifier:kIdentify forIndexPath:indexPath];
    cell.type_img.image = [UIImage imageNamed:(self.imgArrays[indexPath.row])];
        return cell;
}


#pragma mark  定义每个UICollectionView的大小
- (CGSize)collectionView:(UICollectionView *)collectionView layout:(UICollectionViewLayout *)collectionViewLayout sizeForItemAtIndexPath:(NSIndexPath *)indexPath{
    return CGSizeMake([UIScreen mainScreen].bounds.size.width / 5, 100);
}


#pragma mark  定义整个CollectionViewCell与整个View的间距
- (UIEdgeInsets)collectionView:(UICollectionView *)collectionView layout:(UICollectionViewLayout *)collectionViewLayout insetForSectionAtIndex:(NSInteger)section
{
    return UIEdgeInsetsMake(0, 0, 0, 0);//(上、左、下、右)
}


#pragma mark  定义每个UICollectionView的横向间距
- (CGFloat)collectionView:(UICollectionView *)collectionView layout:(UICollectionViewLayout *)collectionViewLayout minimumInteritemSpacingForSectionAtIndex:(NSInteger)section
{
    return 0;
}

#pragma mark  定义每个UICollectionView的纵向间距
- (CGFloat)collectionView:(UICollectionView *)collectionView layout:(UICollectionViewLayout*)collectionViewLayout minimumLineSpacingForSectionAtIndex:(NSInteger)section
{
    return 0;
}

#pragma mark  点击CollectionView触发事件
-(void)collectionView:(UICollectionView *)collectionView didSelectItemAtIndexPath:(NSIndexPath *)indexPath{


}

#pragma mark  设置CollectionViewCell是否可以被点击
- (BOOL)collectionView:(UICollectionView *)collectionView shouldSelectItemAtIndexPath:(NSIndexPath *)indexPath{
    return YES;
}
collectionViewCell 用 xib 就好了,这个就不再啰嗦了
3. 自定义 tableView
#import "HotelTableView.h"
#import "SectionHeaderViewOne.h"
#import "SectionHeaderViewTwo.h"
#import "CollectionView.h"


@interface HotelTableView () <UITableViewDelegate,UITableViewDataSource>

@end

@implementation HotelTableView

- (instancetype)init
{
    self = [super init];
    if (self) {
        self.dataSource = self;
        self.delegate = self;
        UIView *footerView = [[UIView alloc] init];
        footerView.backgroundColor = [UIColor lightGrayColor];
        self.tableFooterView = footerView;
    }
    return self;
}


- (NSInteger) tableView:(UITableView *)tableView numberOfRowsInSection:(NSInteger)section {
    if (section == 0) {
        return 0;
    }else if (section == 1){
        return 0;
    }else {
        return 10;
    }
}

- (NSInteger)numberOfSectionsInTableView:(UITableView *)tableView {
    return 3;
}

- (UITableViewCell *)tableView:(UITableView *)tableView cellForRowAtIndexPath:(NSIndexPath *)indexPath {
    static NSString *cell_id = @"cell_id";
    UITableViewCell *cell = [tableView dequeueReusableCellWithIdentifier:cell_id];
    if (!cell) {
        cell = [[UITableViewCell alloc] initWithStyle:UITableViewCellStyleDefault reuseIdentifier:cell_id];
    }
    cell.textLabel.text = @"简单的测试";
    return cell;
}

- (UIView *)tableView:(UITableView *)tableView viewForHeaderInSection:(NSInteger)section {
    if (section == 0) {
        SectionHeaderViewOne *headerView = [[SectionHeaderViewOne alloc] initWithFrame:CGRectMake(0, 0, [UIScreen mainScreen].bounds.size.width, 200)];
        return headerView;
    }else if (section == 1){
        SectionHeaderViewTwo *headerView = [[SectionHeaderViewTwo alloc] initWithFrame:CGRectMake(0, 0, [UIScreen mainScreen].bounds.size.width, 200)];
        headerView.imgArrays = @[@"04",@"10",@"42",@"51",@"70",@"80-2",@"80",@"10",@"04",@"51"];
        return headerView;
    }else {
        UILabel *label = [[UILabel alloc] init];
        [label setFrame:CGRectMake(0, 0, [UIScreen mainScreen].bounds.size.width, 60)];
        label.text = @"入住日期,3月24日";
        label.font = [UIFont systemFontOfSize:18];
        return label;
    }
}


- (CGFloat) tableView:(UITableView *)tableView heightForRowAtIndexPath:(NSIndexPath *)indexPath {
    return 100;
}


- (CGFloat )tableView:(UITableView *)tableView heightForHeaderInSection:(NSInteger)section {
    if (section == 2) {
        return 60;
    }else {
        return 200;
    }
}

- (CGFloat)tableView:(UITableView *)tableView heightForFooterInSection:(NSInteger)section {
    return 10;
}
4. 将 tableView 添加到控制器上面就好了
#import "ViewController.h"
#import "HotelTableView.h"

@interface ViewController ()

@property (nonatomic,strong) HotelTableView *tableView;


@end

@implementation ViewController

-(HotelTableView *)tableView {
    if (!_tableView) {
        _tableView = [[HotelTableView alloc] init];
        [_tableView setFrame:self.view.bounds];
    }
    return _tableView;
}

- (void)viewDidLoad {
    [super viewDidLoad];
    // Do any additional setup after loading the view, typically from a nib.
    [self.view addSubview:self.tableView];
}


- (void)didReceiveMemoryWarning {
    [super didReceiveMemoryWarning];
    // Dispose of any resources that can be recreated.
}
以上就可以简单实现上面图的界面了,这样控制器里面看起来是不是很简洁,因为逻辑处理可以相应的分散到 tableView 以及子视图当中, 哪怕界面逻辑修改,维护起来成本也不至于太高,这是我的想法,欢迎各路大神拍砖


 2758
2758


 被折叠的 条评论
为什么被折叠?
被折叠的 条评论
为什么被折叠?
 到【灌水乐园】发言


