


轮播图现在基本已经是app的标准配件之一了。一个实用的轮播图控件无疑能在很大程度上提高我们的开发效率。撸主自己封装了一个简易的bannerView。
使用sd加载图片,支持 horizontal 和 vertical 两个滚动方向,可以设置 isAutoScroll 和自动滚动的duration 。
这里将思路和关键代码分享给大家。
循环滚动的思路如下图:
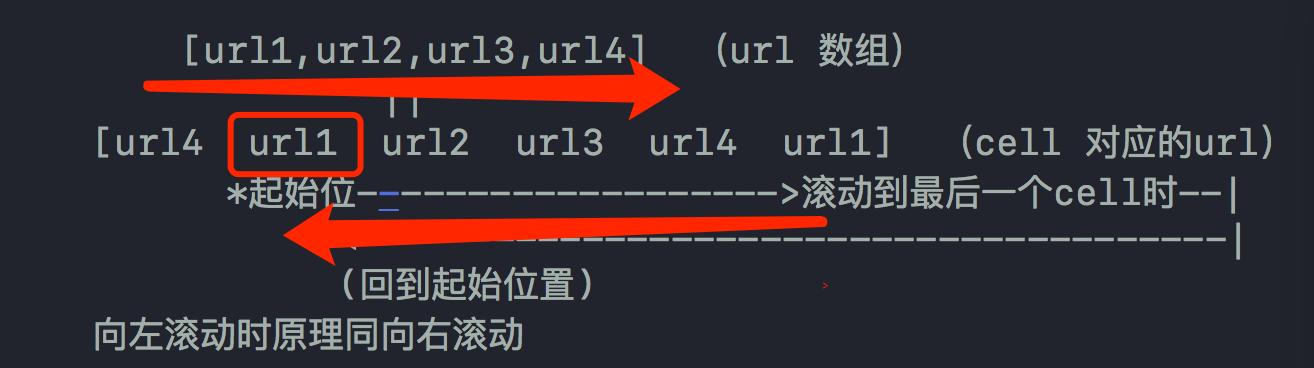
1.如果只有一张图,返回一个cell并展示这张图
2.如果有多个图,cell的个数=图片个数+2.
3.展示的时候 第一个cell 展示最后一张图 最后一个cell 展示第一张图,其他的cell按顺序展示图片。
4.collectionView的起始偏移量设置为collectionView的width (滚动到第二个cell的位置)。
5.向右滑动collectionView,当滚动到(最后一个cell完全展示出来)最后一个cell时无动画滚回第二个cell,向左滑动,当滚动到第一个cell时,无动画滚动到倒数第二个cell。
6.如果设置的是自动滚动,则添加定时器,每隔一段时间自动滚动到下一页。
1.2.对应code:
    func collectionView(_ collectionView: UICollectionView, numberOfItemsInSection section: Int) -> Int {
        if (self.imgArr?.count)! > 1 {
           return (self.imgArr?.count)! + 2
        }
        return 1
    }
3.对应code:
    func collectionView(_ collectionView: UICollectionView, cellForItemAt indexPath: IndexPath) -> UICollectionViewCell {
        let cell = collectionView.dequeueReusableCell(withReuseIdentifier: cellID, for: indexPath) as! BannerCollectionCell
        cell.placeholder = self.placeholder
        if indexPath.row == 0 {
            cell.imgUrl = self.imgArr?.last
        } else if indexPath.row == (self.imgArr?.count)! + 1 {
            cell.imgUrl = self.imgArr?.first
        } else {
            cell.imgUrl = self.imgArr?[indexPath.row - 1]
        }
        return cell
    }
4.对应code:
    override func willMove(toSuperview newSuperview: UIView?) {
        guard newSuperview != nil else {
            return
        }
        super.willMove(toSuperview: newSuperview)
        // 如果imgArr 为 nil return
        if self.imgArr == nil {
            return
        }
        guard (self.imgArr?.count)! > 1 else {
            self.collectionView.isScrollEnabled = false
            return
        }
        scrollTo(crtPage: 0 + 1 , animated: false)
        if self.isAutoScroll == true {
            addTimer()
        }
    }
我这里将滚动到第二个cell的时机设置到了 willMove(toSuperview newSuperview: UIView?)
5.对应code
    func scrollViewDidScroll(_ scrollView: UIScrollView) {
        var offset = CGFloat(0)
        if self.mode == .horizontal {
            offset = scrollView.contentOffset.x
        } else {
            offset = scrollView.contentOffset.y
        }

        let x = self.mode == .horizontal ? self.frame.size.width : self.frame.size.height

        if offset == 0 {
            scrollTo(crtPage: (self.imgArr?.count)!, animated: false)
            self.pageControl.currentPage = (self.imgArr?.count)! - 1
        } else if offset == CGFloat((self.imgArr?.count)! + 1) * x {
            scrollTo(crtPage: 1, animated: false)
            self.pageControl.currentPage = 0
        } else {
           self.pageControl.currentPage = lroundf(Float(offset/self.frame.size.width)) - 1
        }
    }
6.对应code:
    fileprivate func addTimer() {
        if self.timer == nil {
            self.timer = Timer.scheduledTimer(timeInterval: self.duration, target: self, selector: #selector(nextPage), userInfo: nil, repeats: true)
            RunLoop.current.add(self.timer!, forMode: RunLoopMode.commonModes)
        }
    }

    @objc fileprivate func nextPage() {
        if (self.imgArr?.count)! > 1 {
            var crtPage = 0
            if self.mode == .horizontal {
                crtPage = lroundf(Float(self.collectionView.contentOffset.x/self.frame.size.width))
            } else {
                crtPage = lroundf(Float(self.collectionView.contentOffset.y/self.frame.size.height))
            }
            scrollTo(crtPage: crtPage + 1, animated: true)
        }
    }
添加定时器后需要在scrollVIew的代理方法里实现:
开始拖拽collectionView时停止计时器,停止拖拽后重新启动定时器。
    func scrollViewWillBeginDragging(_ scrollView: UIScrollView) {
        // pause
        self.timer?.fireDate = Date.distantFuture
    }

    func scrollViewDidEndDragging(_ scrollView: UIScrollView, willDecelerate decelerate: Bool) {
        // resume
        self.timer?.fireDate = Date.init(timeIntervalSinceNow: self.duration)
    }
以上就实现循环滚动的思路。
撸主这里使用的是collectionView,使用起来比较方便简洁 。还有一种方法是使用 scrollView里面添加3个子view,通过子view的循环使用来达到类似的效果,其实现思路也类似以上。
完整代码请移步github:https://github.com/zh-ios/BannerView-Swift.git
如有问题欢迎指出 。
在code 测试过程发现一个有意思现象:
// 注意:下面这两个属性有冲突(hidesForSinglePage优先级比较高),当设置了pageControl.hidesForSinglePage = true 时,如果不止有一页那么再设置pageControl.isHidden = true 没有卵用!!!。反之,如果不设置这个属性则可以通过 isHidden 这个属性控制pageControll的显示和隐藏。
self.pageControl.hidesForSinglePage = true
// self.pageControl.isHidden = true
这就是所谓的“就近原则”吧。具体可以参照 https://my.oschina.net/zhxx/blog/663226 这篇控件对齐方式的博客。


 1970
1970


 被折叠的 条评论
为什么被折叠?
被折叠的 条评论
为什么被折叠?
 到【灌水乐园】发言


