


学习目标
掌握在生产环境中安装配置solr
掌握solr的安全配置
掌握solr的集合管理
应用于生产
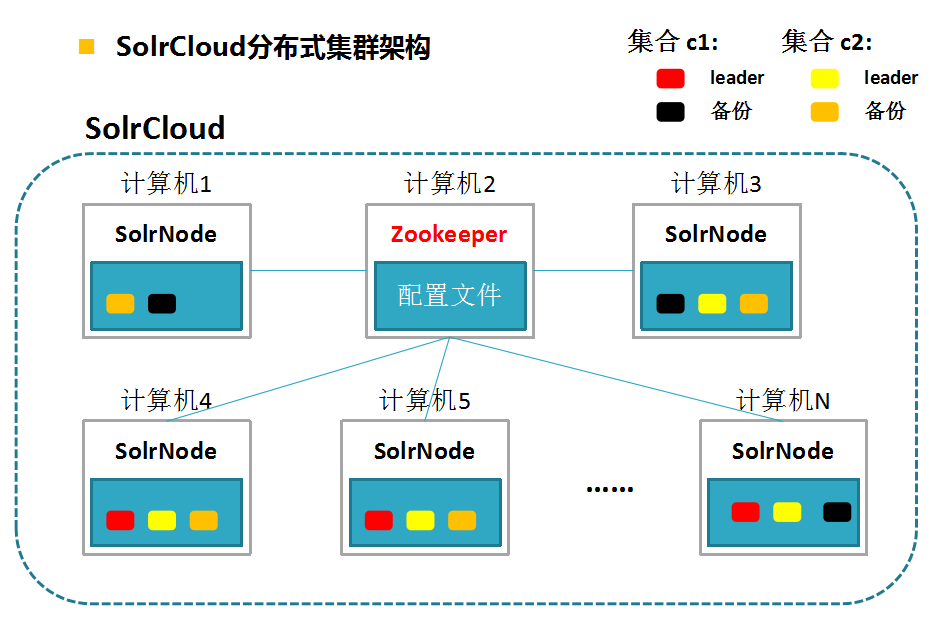
在linux系统上安装solrCloud
1.依赖:
JRE solr7.3 需要 java1.8
独立的zookeeper服务 ,zookeeper安装请参考:
http://zookeeper.apache.org/doc/current/zookeeperStarted.html
2.上传solr安装包
3.从安装包中解出安装脚本
tar xzf solr-7.3.0.tgz solr-7.3.0/bin/install_solr_service.sh --strip-components=2
安装脚本可用于:CentOS, Debian, Red Hat, SUSE and Ubuntu Linux distributions
4.安装脚本参数说明:
./install_solr_service.sh -help

-i  指定软件安装目录。默认 /opt
-d 指定数据目录(solr主目录):内核存储目录 。默认 /var/solr
-u  指定要创建的拥有solr的用户名,出于安全考虑,不应以root来运行。默认 solr
-s  指定系统服务名。默认 solr
-p  指定端口。默认 8983
5.目录规划
6.以root身份运行安装脚本进行安装
./install_solr_service.sh solr-7.3.0.tgz
等同:
./install_solr_service.sh solr-7.3.0.tgz -i /opt -d /var/solr -u solr -s solr -p 8983
配置solr服务实例
1.认识solr服务的配置文件
问:如何启动一个solr服务实例?
1,系统服务脚本: /etc/init.d/solr 请查看该脚本内容,看系统启动时是如何启动solr服务实例的。 可看到使用了如下三个变量:

2.环境参数配置文件(官方叫法:include file)。它将覆盖 bin/solr启停控制脚本中的配置参数。我们通过该文件来配置修改solr服务实例的运行配置。
请查看 /etc/default/solr.in.sh ,看我们可以在该文件中进行哪些配置。
在 /etc/default/solr.in.sh 中可看到它配置了如下参数:
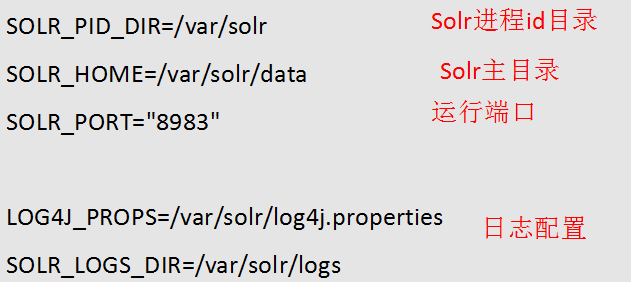
2.在/etc/default/solr.in.sh中配置如下参数
1.调整solr实例的内存,默认solr使用512M的堆内存,生产环境下肯定需要调大。
SOLR_JAVA_MEM="-Xms10g -Xmx10g"
2.配置ZK_HOST,让服务实例以solrCloud模式运行
ZK_HOST=zk1,zk2:2182,zk3:2188
3.设置chroot。Solr默认使用zookeeper的/为其根目录,在多应用共用zookeeper的情况下,为避免冲突,应该在单独的子节点(如/solr)下来存储solr的配置信息。这个节点需事先创建好,然后配置如下:
ZK_HOST=zk1,zk2:2182,zk3:2188/solr
bin/solr zk mkroot /solr -z <ZK_node>:<ZK_PORT> 创建znode的命令4.设置SOLR服务的主机名,在solrCloud模式下强烈建议配置。不设置则使用的是ip。
SOLR_HOST=solr1.example.com5.为solrconfig.xml中用到的动态参数提供值
<autoSoftCommit>
  <maxTime>${solr.autoSoftCommit.maxTime:-1}</maxTime>
</autoSoftCommit>
启动时给入参数值
bin/solr start -Dsolr.autoSoftCommit.maxTime=10000
在solr.in.sh中配置参数值
SOLR_OPTS="$SOLR_OPTS -Dsolr.autoSoftCommit.maxTime=10000"
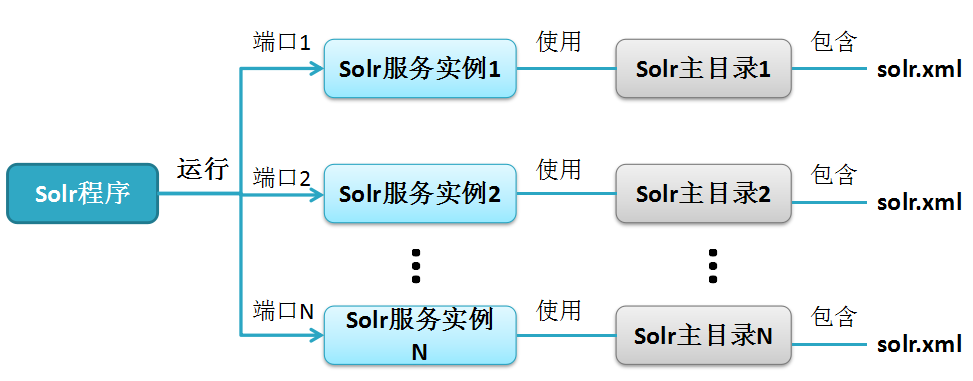
在一台机器上运行多个solr服务
生产环境下,不要在一台机器上运行多个solr服务。如果确要在一台机器上运行多个solr服务实例,可以启动脚本加 –s 选项指定不同的solr主目录。还可以简单直接地安装多个solr系统服务(不同的服务名、端口):
./install_solr_service.sh solr-7.3.0.tgz -s solr2 -p 8984
请看solr2装在什么位置了。请查看目录: /etc/init.d /etc/default
了解solr主目录配置文件 solr.xml
solr.xml : solr服务实例配置文件
solr.xml中配置服务实例的参数及内核通用配置参数。
在独立服务器模式下,主目录下必需有solr.xml。而在solrCloud模式下,如果zookeeper中放置有solr.xml ,则会从zookeeper中复制到主目录。
在早期solr版本中,需要在solr.xml中通过<core>元素来配置内核,服务实例才能发现内核。现在则不需要了,服务实例通过查询主目录下的子目录中是否包含core.properties来发现内核。
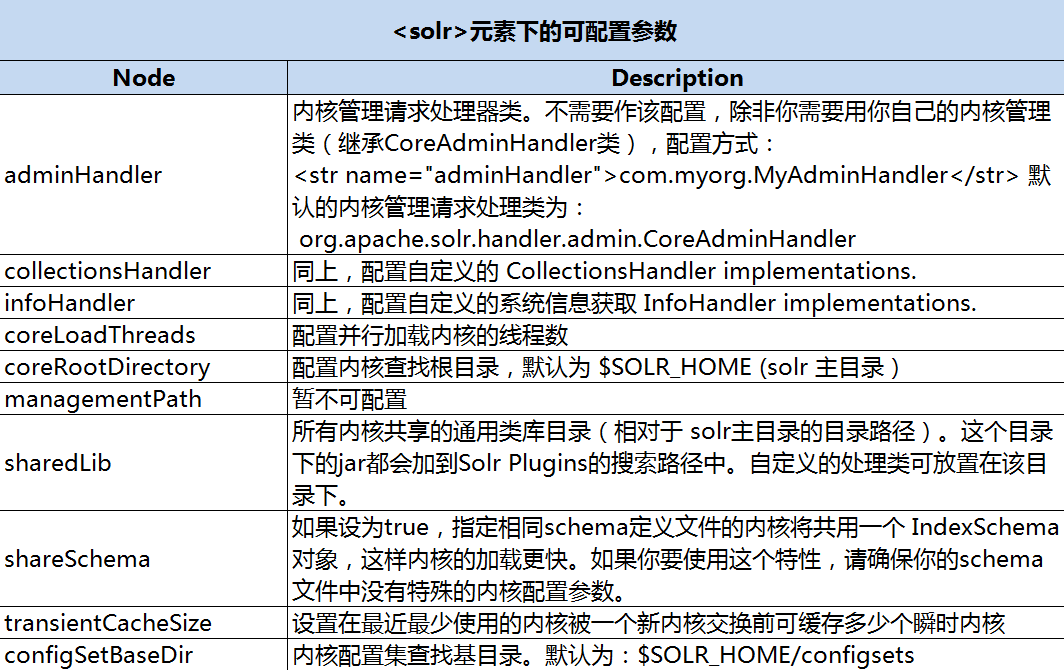
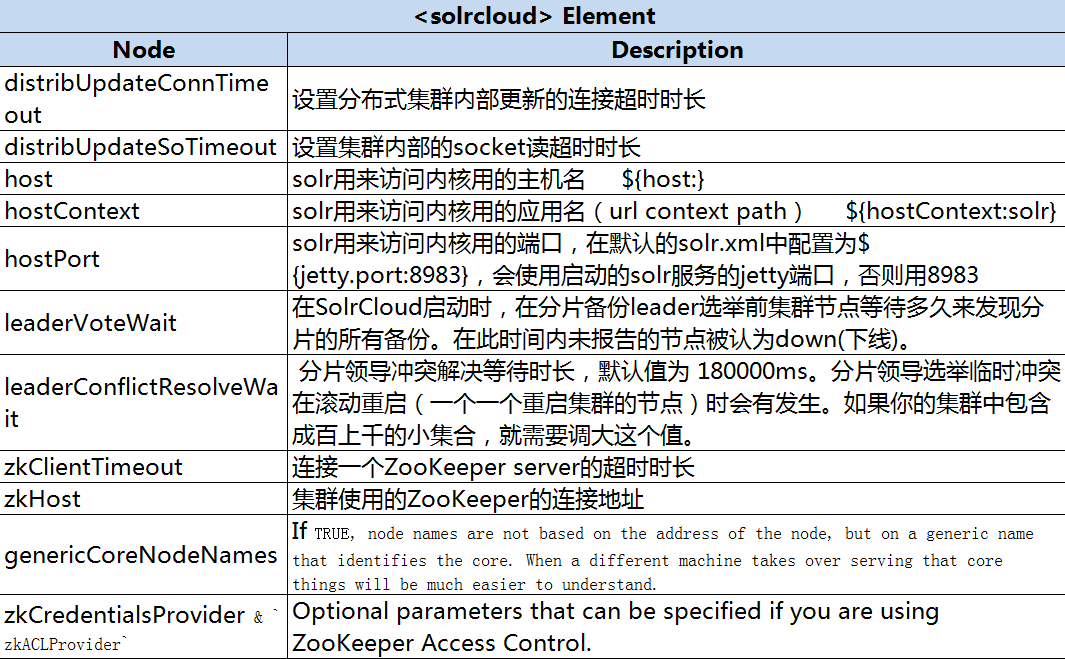
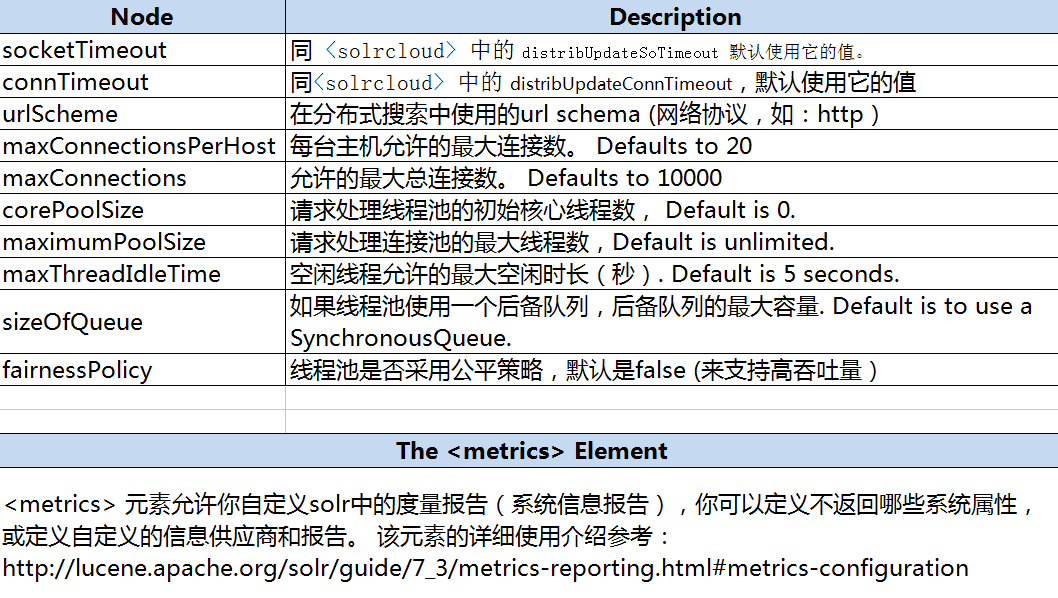
solr.xml 中的可配置项
    The <solr> Element
    The <solrcloud> Element
    The <logging> Element
    The <shardHandlerFactory> Element
    The <metrics> Element
Solr是配置良好的,我们基本不需要去做什么配置。但需要了解都有什么配置参数,可以来改变solr的运行行为。
solr.xml配置参数说明

集合管理
回顾
集合是什么?
分片是什么?
备份是什么?
内核是什么?
集合、分片、备份、内核是什么关系?每个备份对应一个物理内核

如何通过bin/solr脚本创建一个集合?
bin/solr create –c collection01 –d _default –shards 2 –replicationFactor 2 –p 8983
bin/solr create –c collection02 –d sample_techproducts_configs –shards 2 –replicationFactor 2 –p 8983
如何通过 bin/solr脚本删除一个集合?
bin/solr delete –c collectonname –p port
思考
集合的分片数可以修改吗?集合的备份数可以修改吗?
集合管理API
详细请浏览:https://lucene.apache.org/solr/guide/7_3/collections-api.html
创建集合
http://localhost:8983/solr/admin/collections?action=CREATE&name=newCollection&numShards=2&replicationFactor=2&wt=xml
常用参数说明:
name:指定集合名
numShards:初始分片数
replicationFactor:分片备份因子
collection.configName:参照的配置集名称(zookeeper的/configs下的子)
maxShardsPerNode:每个节点上允许的最大分片数,默认1
autoAddReplicas:true/false,在共享文件系统中可自动增加备份,默认false
拆分分片
/admin/collections?action=SPLITSHARD&collection=name&shard=shardID删除备份
http://localhost:8983/solr/admin/collections?action=DELETEREPLICA&collection=test2&shard=shard2&replica=core_node3&wt=xml
添加备份
http://localhost:8983/solr/admin/collections?action=ADDREPLICA&collection=test2&shard=shard2&node=192.167.1.2:8983_solr&wt=xml
内核的主要配置文件
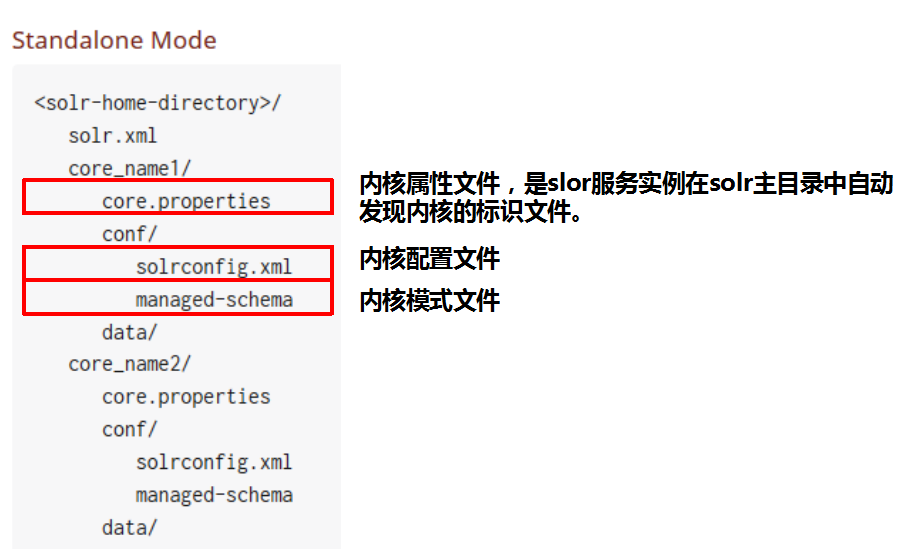
core.properties
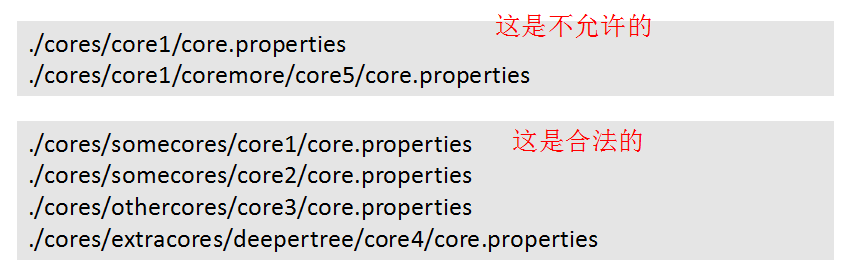
内核属性文件,是slor服务实例在solr主目录中自动发现内核的标识文件。发现的规则:遍历主目录下的子目录树来查找core.properties,直到在一支上找到core.properties文件。
它是一个属性文件,能在里面定义什么属性呢?
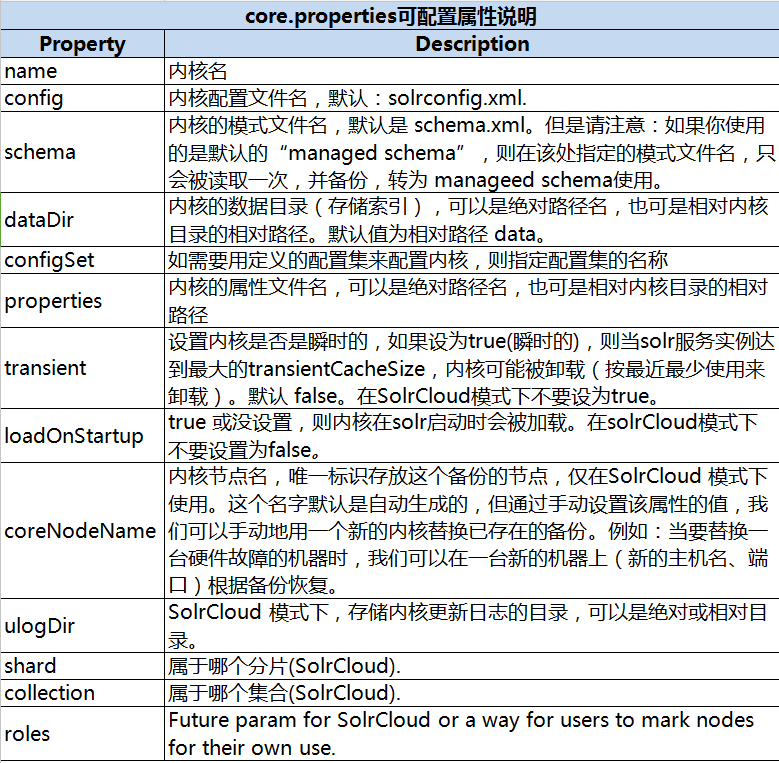
core.properties 中可以配置的属性
最简单的core.properties
name=my_core_name
安全配置
Solr安全涉及的方面
Authentication or authorization 认证鉴权
Enabling SSL 使用 https 协议
If using SolrCloud, ZooKeeper Access Control zookeeper的访问控制
Solr提供了多种认证鉴权插件的实现:
Kerberos Authentication Plugin
Basic Authentication Plugin
Rule-Based Authorization Plugin
Custom authentication or authorization plugin
以 Basi Authentication 为例来了解如何应用。
如何启用安全?
Solr要求以在solr主目录下加入security.json 文件来启用安全控制,在solrCloud模式下,如在zookeeper中加入/security.json 。在security.json中定义认证、鉴权安全插件,如:
{
"authentication":{
   "blockUnknown": true,
   "class":"solr.BasicAuthPlugin",
   "credentials":{"solr":"IV0EHq1OnNrj6gvRCwvFwTrZ1+z1oBbnQdiVC3otuq0= Ndd7LKvVBAaZIF0QAVi1ekCfAJXr1GGfLtRUXhgrF8c="}
},
"authorization":{
   "class":"solr.RuleBasedAuthorizationPlugin",
   "permissions":[{"name":"security-edit",
      "role":"admin"}],
   "user-role":{"solr":"admin"}
}}
如何往zookeeper中加入security.json?
方式一:直接通过zk的客户端来添加节点
方式二:用 solr提供的操作脚本
>server/scripts/cloud-scripts/zkcli.sh -zkhost localhost:2181 -cmd put /security.json '{"authentication": {"class": "org.apache.solr.security.KerberosPlugin"}}'
方式三:用 bin/solr zk 来操作
bin/solr zk cp file:path_to_local_security.json zk:/security.json -z localhost:9983
Basic Authentication Plugin
基于用户名密码的认证插件,官网参考:
https://lucene.apache.org/solr/guide/7_3/basic-authentication-plugin.htm
Rule-Based Authorization Plugin
基于用户、角色、权限规则的鉴权插件,官网参考:
https://lucene.apache.org/solr/guide/7_3/rule-based-authorization-plugin.html
用户管理
API
v1: http://localhost:8983/solr/admin/authentication
v2: http://localhost:8983/api/cluster/security/authentication
新增或修改密码
curl --user solr:SolrRocks http://localhost:8983/api/cluster/security/authentication -H 'Content-type:application/json' -d '{"set-user": {"tom":"tom", "harry":"harry"}}'
删除用户
curl --user solr:SolrRocks http://localhost:8983/api/cluster/security/authentication -H 'Content-type:application/json' -d '{"delete-user": ["tom", "harry"]}'
在SolrJ中使用基本认证
在每个请求中都需要带上用户名密码
SolrRequest req ;//create a new request object
req.setBasicAuthCredentials(userName, password);
solrClient.request(req);
查询示例
QueryRequest req = new QueryRequest(new SolrQuery("*:*"));
req.setBasicAuthCredentials(userName, password);
QueryResponse rsp = req.process(solrClient);
使用 bin/solr 脚本也需要安全认证了,在solr.in,sh环境参数文件中加入
SOLR_AUTH_TYPE="basic"
SOLR_AUTHENTICATION_OPTS="-Dbasicauth=solr:SolrRocks"
启用SSL
请参考:
https://lucene.apache.org/solr/guide/7_3/enabling-ssl.html
启用zookeeper ACL
请参考:
https://lucene.apache.org/solr/guide/7_3/zookeeper-access-control.html


 117
117


 被折叠的 条评论
为什么被折叠?
被折叠的 条评论
为什么被折叠?
 到【灌水乐园】发言


