


欢迎大家关注我的微博 http://weibo.com/hotbain 会将发布的开源项目技术贴通过微博通知大家,希望大家能够互勉共进!谢谢!也很希望能够得到大家对我博文的反馈,写出更高质量的文章!!
Netty是对Nio的一个封装,关于网络的所有操作都是通过事件的方式完成的。例如连接创建、read事件、write事件都是通过Nio来完成的。那netty是怎么启动监听的呢? 在什么地方启动的呢?此处不为大家设置悬念,一次性告诉大家。通过循环扫描的方式来实现监听的。具体的方法类位于NioEventLoop的run方法中(赶紧进去看看吧!! 浅显易懂)。
下面是netty的acceptor线程创建连接的代码。位于类NioEventLoop的processSelectedKey中(至于processSelectedKey是怎么被调用的,自己看看调用链就行了(eclipse用ctrl+Shift+H就可以查看到选中方法的调用链))。
private static void processSelectedKey(SelectionKey k, AbstractNioChannel ch) {
        final NioUnsafe unsafe = ch.unsafe();
        if (!k.isValid()) {
            // close the channel if the key is not valid anymore
            unsafe.close(unsafe.voidPromise());
            return;
        }

        try {
            //得到当前的key关注的事件
            int readyOps = k.readyOps();
            // Also check for readOps of 0 to workaround possible JDK bug which may otherwise lead
            // to a spin loop
            //一个刚刚创建的NioServersocketChannel感兴趣的事件是0。
            if ((readyOps & (SelectionKey.OP_READ | SelectionKey.OP_ACCEPT)) != 0 || readyOps == 0) {//可以读取操作  --对于serverSocket来说就是acceptor事件、对于socketChannel来说就是read事件
                //INFO: channel类型为io.netty.channel.socket.nio.NioSocketChannel unsafe类型为io.netty.channel.nio.AbstractNioByteChannel$NioByteUnsafe
                Object obj = k.attachment();//得到NioServerSocketChannel或者NioSocketChannel
                if(obj instanceof NioServerSocketChannel){
                    System.out.println(obj.getClass().getName()+ " 开始接收连接");
                }else{
                    System.out.println(obj.getClass().getName()+ " 开始接收字节");
                }
                //不同的socketChannel对于那个的unsafe是不同的。例如Server端的是messageUnsafe 而 clinet端是byteUnsafe
                unsafe.read();//对于接受链接或者read兴趣都会添加进入read操作调用serverSocket->NioMessageUnsafe
                if (!ch.isOpen()) {
                    // Connection already closed - no need to handle write.
                    return;
                }
            }
            if ((readyOps & SelectionKey.OP_WRITE) != 0) {//对于半包消息进行输出操作
                // Call forceFlush which will also take care of clear the OP_WRITE once there is nothing left to write
                ch.unsafe().forceFlush();
            }
            if ((readyOps & SelectionKey.OP_CONNECT) != 0) {
                // remove OP_CONNECT as otherwise Selector.select(..) will always return without blocking
                // See https://github.com/netty/netty/issues/924
                int ops = k.interestOps();
                ops &= ~SelectionKey.OP_CONNECT;
                k.interestOps(ops);

                unsafe.finishConnect();
            }
        } catch (CancelledKeyException e) {
            unsafe.close(unsafe.voidPromise());
        }
    }[object Object]
这里我们以连接的建立(NioMessageUnsafe)为线索进行讲解。后续会有基于byte的unsafe进行讲解的(Unsafe不知道为啥要这么叫,本人也感到挺费解的,不过现在看来感觉就是一个工具对象。不要从名称上惧怕它)。下面来看NioMessageUnsafe的read方法进行讲解。直接讲代码(后面也会有图形讲解,方便大家理解):
 @Override
        public void read() {
            assert eventLoop().inEventLoop();
            if (!config().isAutoRead()) {
                removeReadOp();
            }

            final ChannelConfig config = config();
            //得到本次方法调用可以接收的连接数目
            final int maxMessagesPerRead = config.getMaxMessagesPerRead();
            final boolean autoRead = config.isAutoRead();
            final ChannelPipeline pipeline = pipeline();
            boolean closed = false;
            Throwable exception = null;
            try {
                for (;;) {
                    //将msg从读取出来(SocketChannel-(common msg); serverSocketChannel(socketChannel msg))
                    int localRead = doReadMessages(readBuf);//readBuf仅仅是在本方法中起到缓冲统计的作用。不要多想哦!!
                    if (localRead == 0) {
                        break;
                    }
                    if (localRead < 0) {
                        closed = true;
                        break;
                    }
                    //每次读取的message的个数---
                    if (readBuf.size() >= maxMessagesPerRead | !autoRead) {
                        break;//避免一次性创建过多的连接个数
                    }
                }
            } catch (Throwable t) {
                exception = t;
            }

            int size = readBuf.size();
            for (int i = 0; i < size; i ++) {
                //对于server端来说,第一个handler为io.netty.bootstrap.ServerBootstrap$ServerBootstrapAcceptor
                针对所有的channel都会执行一个read操作;对于ServerSocketChannel ServerSocketChannel对应的pipeline的fireChannelRead方法
                //因为ServerSocketChannel的pipeline的第一个handler
                pipeline.fireChannelRead(readBuf.get(i));//1.1 代码
            }
            readBuf.clear();//清空到的连接缓存
            pipeline.fireChannelReadComplete();

            if (exception != null) {
                if (exception instanceof IOException) {
                    // ServerChannel should not be closed even on IOException because it can often continue
                    // accepting incoming connections. (e.g. too many open files)
                    closed = !(AbstractNioMessageChannel.this instanceof ServerChannel);
                }

                pipeline.fireExceptionCaught(exception);
            }

            if (closed) {
                if (isOpen()) {
                    close(voidPromise());
                }
            }
        }
    }
下面让我们来看看上面这段代码中提到的
int localRead = doReadMessages(readBuf);//doReadMessages是个抽象方法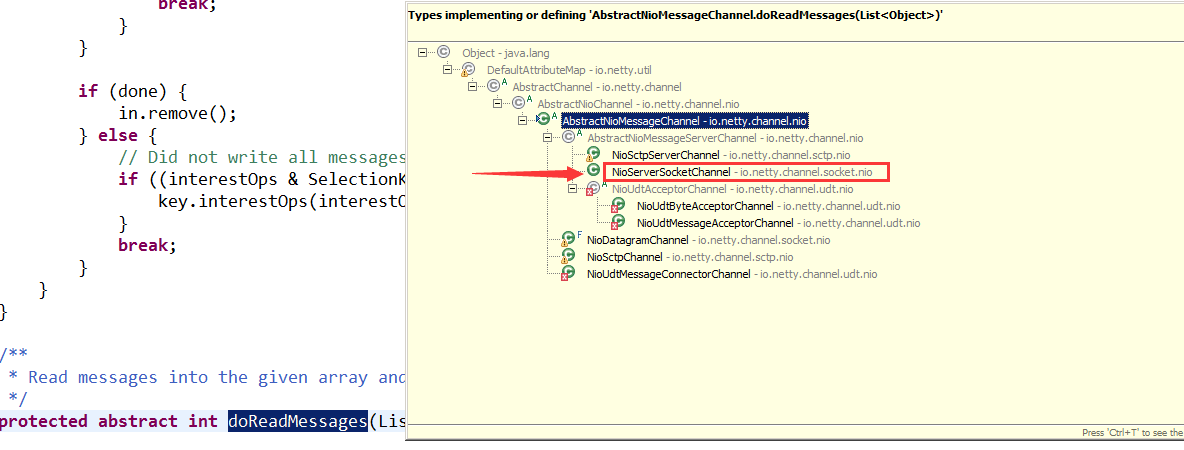
上代码:
 @Override
    protected int doReadMessages(List<Object> buf)
throws Exception
{//对于NioServerSocketChannel,它的读取操作,就是接受客户端的链接和创建NioSocketChannel
        SocketChannel ch = javaChannel().accept();//得到java远程的socketChannel对象。不要认为此处会阻塞,不会的因为connec事件发生了。所以会立即返回
        try {
            if (ch != null) {
                //对javachannel().accept()返回的java原生socket进行包装,包装成netty的NioSocketChannel对象-将所有绑定socketChannel的处理线程
                buf.add(new NioSocketChannel(this, childEventLoopGroup().next(), ch));
                return 1;//每次仅仅处理一个,并且将得到连接对象放入到buf列表对象中进行保存
            }
        } catch (Throwable t) {
            logger.warn("Failed to create a new channel from an accepted socket.", t);
            try {
                ch.close();
            } catch (Throwable t2) {
                logger.warn("Failed to close a socket.", t2);
            }
        }
        return 0;
    }
在上面我们看到将java原声的socket包装成了NioSocketChannel。下面我们粘贴一下NioSocketChannel的构造方法。
 public NioSocketChannel(Channel parent, EventLoop eventLoop, SocketChannel socket) {
        super(parent, eventLoop, socket);//使用到了AbstractNioByteChannel构造方法
        config = new DefaultSocketChannelConfig(this, socket.socket());
    }
//下面代码是父类AbstractNioByteChannel的构造方法:
  protected AbstractNioByteChannel(Channel parent, EventLoop eventLoop, SelectableChannel ch) {
        super(parent, eventLoop, ch, SelectionKey.OP_READ);//注意此处关注的事件为read事件哦。
    }
//在往上走,看看是怎样的一种情况
protected AbstractChannel(Channel parent, EventLoop eventLoop) {
        this.parent = parent;
        this.eventLoop = validate(eventLoop);//注意  此处代码意味着初始化socketChannel的时候,就已经对将来的work thread进行绑定了哦
        unsafe = newUnsafe();//此处为抽象方法,深入到具体实现为new NioByteUnsafe();
        pipeline = new DefaultChannelPipeline(this);//由此可以看出,在当发生message read事件的时候,就会为每一个socketChannel创建
    }
到此我们已经讲解完了一个NioSocketChannel的创建过程。
不管对应一个NioServerSocketChanel还是NioSocketChannel,对他们的pipeline进行初始化是很重要的。对于NioServerSocketChanel来说,其pipeline可以用来对刚刚创建出来的NioSocketChannel进行初始化(后面立即会讲到).对于NioSocketChannel来说,其pipeline,会对接收到bytes进行解码转换成业务层可以完全解析的对象。那么什么时候将必要的NioSocketChannel的pipeline进行操作,添加必要的handler呢。这个我们就要回到上面的代码'1.1 代码' 处。我们再粘贴一下代码:
  for (int i = 0; i < size; i ++) {
                //对于server端来说,第一个handler为io.netty.bootstrap.ServerBootstrap$ServerBootstrapAcceptor
                针对所有的channel都会执行一个read操作;对于ServerSocketChannel ServerSocketChannel对应的pipeline的fireChannelRead方法
                //因为ServerSocketChannel的pipeline的第一个handler
                pipeline.fireChannelRead(readBuf.get(i));//1.1 代码
            }
上面的这个pipeline是NioServerSocketChanel的pipeline。其handler和 普通的为NioSocketChannel准备的pipeline是不同的。NioServerSocketChanel的pipeline填充是在serverBootstrap bind的时候进行创建并且填充的(以后我们会讲解)。在这里我们就来看看
pipeline.fireChannelRead(readBuf.get(i));//1.1 代码这一行代码是怎么操作的。搭配ide工具(我使用的是eclipse)。可以追踪到该方法调用追踪会调用到接口pipeline的channelRead的方法上。该接口实现有很多。但是我们此处只需要关注ServerBootstrapAcceptor(至于为什么关注它,自己可以看一下serverBootstrap的bind方法的实现,因为对于NioServerSocketChanel的pipeline的第一个handler就是ServerBootstrapAcceptor)。上代码:
public void channelRead(ChannelHandlerContext ctx, Object msg) {
            //得到传递过来的channel对象
            Channel child = (Channel) msg;
            //每一个child对应的管道都应该是一样的,将启动时传入的childHandler加入到客户端SocketChannel的Pipeline中
            child.pipeline().addLast(childHandler);//代码 1.3 在此处对刚刚创建出来的socketChannel添加netty服务端的常用代码的'childHandler(new ChannelInitializer<SocketChannel>()’哦

            for (Entry<ChannelOption<?>, Object> e: childOptions) {
                try {
                    if (!child.config().setOption((ChannelOption<Object>) e.getKey(), e.getValue())) {
                        logger.warn("Unknown channel option: " + e);//设置客户端SocketChannel的TCP参数
                    }
                } catch (Throwable t) {
                    logger.warn("Failed to set a channel option: " + child, t);
                }
            }

            //设置每一个SocketChannel的属性设置
            for (Entry<AttributeKey<?>, Object> e: childAttrs) {
                child.attr((AttributeKey<Object>) e.getKey()).set(e.getValue());
            }

            //调用注册复用器  --注意调用的child的的unsafe方法哦。也就是调用的是Channel 的unsafe方法哦!!
            child.unsafe().register(child.newPromise());//注册socektChannel到多路复用器  代码 1.2
        }
此处仅仅重点关注一下register方法。查看调用链会发现最终调用到如下代码段:
 public final void register(final ChannelPromise promise) {
            if (eventLoop.inEventLoop()) {//如果由其它线程发起,则封装成一个Task放入消息队列中异步执行
                register0(promise);
            } else {
                try {//因为是服务器/客户端第一次执行,所以会执行到这里
                    eventLoop.execute(new Runnable() {

                        public void run() {
                            register0(promise);
                        }
                    });
                } catch (Throwable t) {
                    logger.warn(
                            "Force-closing a channel whose registration task was not accepted by an event loop: {}",
                            AbstractChannel.this, t);
                    closeForcibly();
                    closeFuture.setClosed();
                    promise.setFailure(t);
                }
            }
        }
register0(promise); 此处重点关注,至于这么多if else是为啥,我们会出一个特别的章节进行讲解private void register0(ChannelPromise promise) {
try {
// check if the channel is still open as it could be closed in the mean time when the register
// call was outside of the eventLoop
if (!ensureOpen(promise)) {
return;
}
doRegister();
registered = true;
promise.setSuccess();
//开始接收连接---用来将初始化serverSocketChannel()的pipeline
pipeline.fireChannelRegistered();
if (isActive()) {//是否主动读取,在unsafe中设置自己感兴趣的事件 此处也很重要哦!!
pipeline.fireChannelActive();//开始读取操作 刚刚接收的socketChannel是自动读取的话,那就就会用该socketchanneld对应的eventLoop里的selector对读事件进行监听了
}
} catch (Throwable t) {
// Close the channel directly to avoid FD leak.
closeForcibly();
closeFuture.setClosed();
if (!promise.tryFailure(t)) {
logger.warn(
"Tried to fail the registration promise, but it is complete already. " +
"Swallowing the cause of the registration failure:", t);
}
}
}注意:上面代码的pipeline是NioServerSocketchannel的pipeline哦。搭配ide工具(我使用的是eclipse)。可以追踪到fireChannelRegistered调用会调用到如下图的调用中

如果大家写过netty的服务端的代码模版的话,会ChanneInitailer是很熟悉的(至于说为什么ChannelInitializer,请大家查看代码1.3处)这个serverChannel的pipeline里的handler就是用来初始化socketChannel的pipeline的(可以用来初始化handler是哪些、Allocator等,后面会有特定章节(也会有视频)进行讲解)。粘贴一下ChannelInitializer的channelRegistered方法:
public final void channelRegistered(ChannelHandlerContext ctx) throws Exception {
        ChannelPipeline pipeline = ctx.pipeline();
        boolean success = false;
        try {
            //ServerSocket会对应pipeline,其中只一个一个handler就是用来接收连接
            initChannel((C) ctx.channel());
            pipeline.remove(this);//从SocketChannel中删除频道初始化器--为啥说是从SocketChannel删除啊?去看看上面代码 1.2吧!!特别是调用链.
            ctx.fireChannelRegistered();//移除后再去调用一下
            success = true;
        } catch (Throwable t) {
            logger.warn("Failed to initialize a channel. Closing: " + ctx.channel(), t);
        } finally {
            if (pipeline.context(this) != null) {//查看是否含有指定的初始化handler,如果pipeline中还是含有的话,那么就移除 context()方法类似于contains方法
                pipeline.remove(this);
            }
            if (!success) {
                ctx.close();
            }
        }
    }
这里我们关注一下initChannel实现(netty在此处使用到了模版模式)。大家对这个很熟悉的。这里仅仅粘贴一下大家已经很熟悉的代码模版。
public static void main(String[] args) throws Exception {
final ByteBufAllocator allocator =new PooledByteBufAllocator(true) ;
//处理网络连接---接受请求
EventLoopGroup bossGroup = new NioEventLoopGroup(1);
//进行socketChannel的网络读写
EventLoopGroup workerGroup = new NioEventLoopGroup(2);
try {
ServerBootstrap b = new ServerBootstrap();
b.group(bossGroup, workerGroup)
.channel(NioServerSocketChannel.class)
// .option(ChannelOption.ALLOCATOR, )//设置内存分配器
.option(ChannelOption.SO_SNDBUF, 1024)//发送缓冲器
.option(ChannelOption.SO_RCVBUF, 1024)
.option(ChannelOption.RCVBUF_ALLOCATOR, AdaptiveRecvByteBufAllocator.DEFAULT)//接收缓冲器
.handler(new LoggingHandler(LogLevel.INFO))//serverSocketChannel对应的ChannelPipeline的handler
.childHandler(new ChannelInitializer<SocketChannel>() {//客户端新接入的连接socketChannel对应的ChannelPipeline的Handler
@Override
public void initChannel(SocketChannel ch) {
SocketChannelConfig config=ch.config();
//设置缓存的分配器--每一个socket都对应一个Allocator
// config.setAllocator(AllocatorContext.getInstance());
//一个Allocator有多个threadCache,但是一个thread只能与一个threadCache进行绑定,绑定成功后,就不能再次改变了
//是否会出现一个Allocator下的treadCache个数不能被所有的thread 平均分配
//ThreadCache --用来针对某个线程下的内存分配,如果所有的线程对象共用一个
config.setAllocator(allocator);
ChannelPipeline p = ch.pipeline();
p
// .addLast(new LineBasedFrameDecoder(30))//也会将回车符删除掉--是以换行符作为分隔的
//如果在读取了maxLength个字符之后还是没有读取到结束分隔符的话就会跑出异常(防止异常码流确实分隔符导致的内存溢出,这是netty解码器的可好性保护)
.addLast(new DelimiterBasedFrameDecoder(Integer.MAX_VALUE, Unpooled.copiedBuffer("$".getBytes())))
// .addLast(new FixedLengthFrameDecoder(10))
// .addLast(new LineBasedFrameDecoder(2000))
//
.addLast(new DiscardServerHandler());
}
});
// Bind and start to accept incoming connections.
ChannelFuture f = b.bind(PORT).sync();
System.out.println("ChannelFuture f = b.bind(PORT).sync();");
// Wait until the server socket is closed.
// In this example, this does not happen, but you can do that to gracefully
// shut down your server.
f.channel().closeFuture().sync();
} finally {
workerGroup.shutdownGracefully();
bossGroup.shutdownGracefully();
}
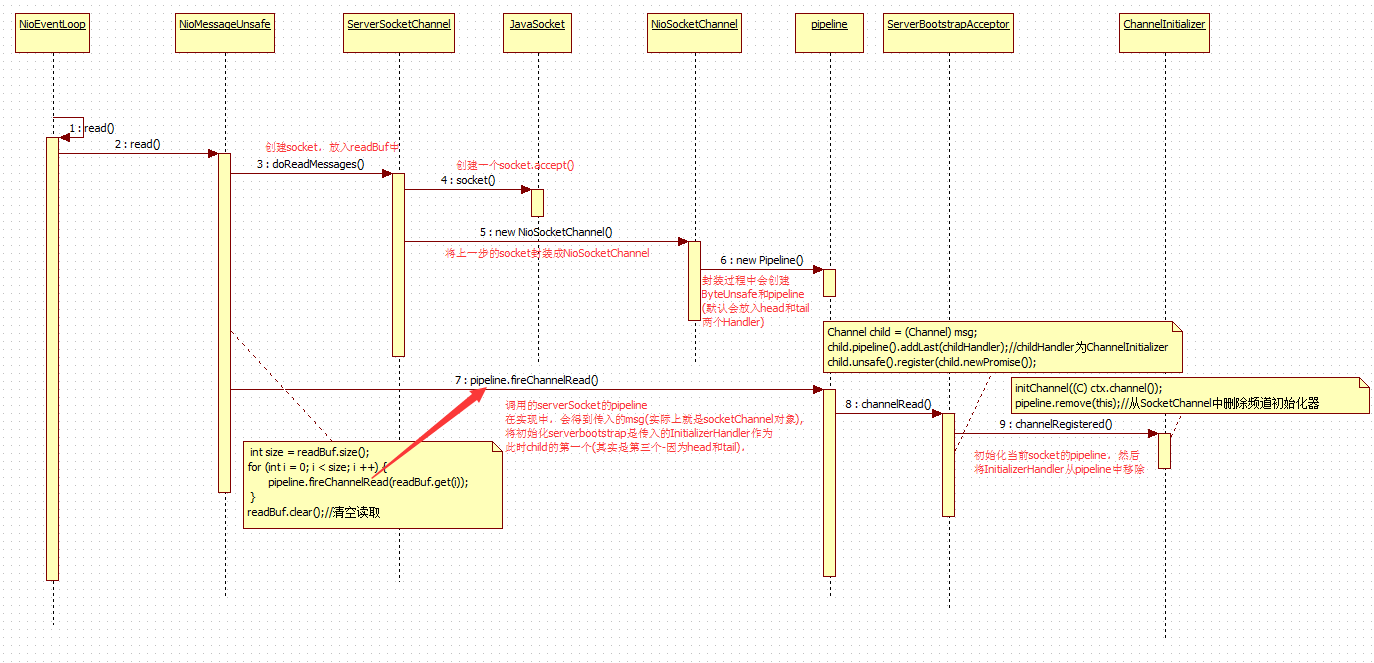
}讲到这里我们都讲完了连接的建立过程主要就是pipeline的初始化还有就是事件的监听情况。
为了大家更好的理解,特意绘制连接建立的流程图,会有少量代码的哦!!
本文是本人学习Netty后的个人总结的分享,需要说明的是本人仅仅代表个人的看法,不是什么官方权威的版本,如果有不当之处,还请赐教!!欢迎吐槽!!


 716
716

 被折叠的 条评论
为什么被折叠?
被折叠的 条评论
为什么被折叠?
 到【灌水乐园】发言


