


有两种方法,一种是两个入口文件,另一种可以把后台做为一个模块。
一,两个入口文件方法:
项目目录结构(图):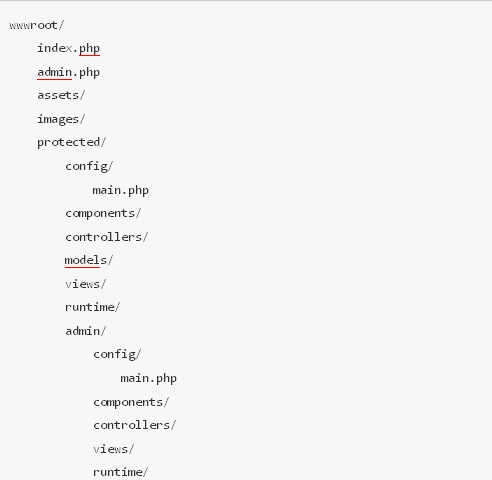
前后台引导文件分别如下:
// index.php:
require('path/to/yii.php');
Yii::app()->createWebApplication('protected/config/main.php')->run();
// admin.php:
require('path/to/yii.php');
Yii::app()->createWebApplication('protected/admin/config/main.php')->run();
这样配置比较麻烦一些,我们可以采用覆盖的方法,参考了一个贴子的方法,我又做了一些修改.
protected/admin/config/main.php的代码如下:
<?php
$backend=dirname(dirname(__FILE__));
$frontend=dirname($backend);
Yii::setPathOfAlias('backend', $backend);
$frontendArray=require($frontend.'/config/main.php');
$backendArray=array(
    'name'=>'网站后台管理系统',
    'basePath' => $frontend,
    'controllerPath' => $backend.'/controllers',
    'viewPath' => $backend.'/views',
    'runtimePath' => $backend.'/runtime',
    // autoloading model and component classes
    'import'=>array(
        'application.models.*',
        'application.components.*',
        'application.extensions.*',
        'application.extensions.nestedset.*',
        'backend.models.*',
        'backend.components.*', //这里的先后顺序一定要搞清
    ),
    'components'=>array(
                'user'=>array(
                        // enable cookie-based authentication
                        'allowAutoLogin'=>true,
                ),
    ),
    // main is the default layout
    //'layout'=>'main',
    // alternate layoutPath
    'layoutPath'=>dirname(dirname(__FILE__)).DIRECTORY_SEPARATOR.'views'.DIRECTORY_SEPARATOR.'layouts'.DIRECTORY_SEPARATOR,
);
if(!function_exists('w3_array_union_recursive'))
{
    /**
     * This function does similar work to $array1+$array2,
     * except that this union is applied recursively.
     *
@param
  array $array1 - more important array
     *
@param
  array $array2 - values of this array get overwritten
     *
@return
  array
     */
    function w3_array_union_recursive($array1,$array2)
    {
        $retval=$array1+$array2;
        foreach($array1 as $key=>$value)
        {
            if(is_array($array1[$key]) && is_array($array2[$key]))
                $retval[$key]=w3_array_union_recursive($array1[$key],$array2[$key]);
        }
        return $retval;
    }
}
return w3_array_union_recursive($backendArray,$frontendArray);
这里我们的model是公用的,controller和view是分开的,我们还可以通过命令行对后台进行model和crud,方法如下:
>yiic shell path/to/site/admin.php
>model Article
>crud Article
这样后台对应的controller和view就生成了!
如果只对后台的变量进行配置的话,只需要修改protected/admin下的配置文件就可以了!
大家如果有不明白的地方,欢迎讨论!
二,把后台做为一个模块方法:
第一步:用GII会成一个admin的模块;
第二步:打开(模块名+Module.php)的文件,我这里是oldweeklyadminModule.php文件进行编辑里面有一个OldweeklyadminModule的类继承于CWebModule首先我们调用init的方法:
public function init()
{
parent::init();//这步是调用main.php里的配置文件
//当Module创建时这个方法就会被调用
// 我们可以修改代码来定制Module
// import the module-level models and components
$this->setImport(array(
'oldweeklyadmin.models.*',
'oldweeklyadmin.components.*',
));
//这里重写父类里的组件
//如有需要还可以参考API添加相应组件
Yii::app()->setComponents(array(
'errorHandler'=>array(
'class'=>'CErrorHandler',
'errorAction'=>'oldweeklyadmin/default/error',
),
'user'=>array(
'class'=>'CWebUser',
'stateKeyPrefix'=>'oldweeklyadmin',
'loginUrl'=>Yii::app()->createUrl('oldweeklyadmin/default/login'),
),
), false);
$this->generatorPaths[]='oldweeklyadmin.generators';
$this->controllerMap=$this->findGenerators();
}
如果进入module的时候要进行密码验证并且和前台登录分开
就要进行设置对执行的动作进行识别
public function beforeControllerAction($controller, $action)
{
if(parent::beforeControllerAction($controller, $action))
{
$route=$controller->id.'/'.$action->id;
if(!$this->allowIp(Yii::app()->request->userHostAddress) && $route!=='default/error')
throw new CHttpException(403,"You are not allowed to access this page.");
$publicPages=array(
'default/login',
'default/error',
);
if(Yii::app()->user->isGuest && !in_array($route,$publicPages))
Yii::app()->user->loginRequired();
else
return true;
}
return false;
}
protected function allowIp($ip)
{
if(empty($this->ipFilters))
return true;
foreach($this->ipFilters as $filter)
{
if($filter==='*' || $filter===$ip || (($pos=strpos($filter,'*'))!==false && !strncmp($ip,$filter,$pos)))
return true;
}
return false;
}
设置资源文件路径
public function getAssetsUrl()
{
if($this->_assetsUrl===null)
$this->_assetsUrl=Yii::app()->getAssetManager()->publish(Yii::getPathOfAlias('oldweeklyadmin.assets'));
return $this->_assetsUrl;
}
public function setAssetsUrl($value)
{
$this->_assetsUrl=$value;
}
总结:最近用yii框架开发项目,遇到了很多问题,把遇到的这些问题记下来分享给大家,大家一起讨论和学习。


 1107
1107

 被折叠的 条评论
为什么被折叠?
被折叠的 条评论
为什么被折叠?
 到【灌水乐园】发言


