Things we are gonna need are
- Blender 2.7x www.blender.org/
- XPS tools addon for Blender
- A Model for XPS/XNALara (Binary or ASCII)
For Mac Users
Safari automatically unzips downloaded files and deletes the original ZIP file.
Try disabling this function (I don't know how, I never used a Mac) or download using another browser like Firefox.
Go to the provided link and download the latest version of the addon. DO NOT UNZIP IT.
Open Blender and go to File > User Preferences
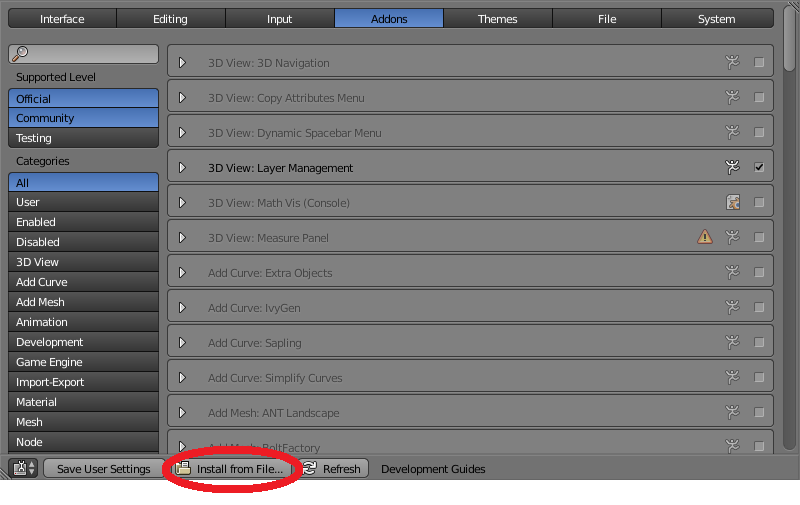
Select the Addons tab and click the "Install fom File..." button

Find the downloaded addon zip file and click the "Install fom File..." button
The XPS tools addon should be de only addon diplayed on the list, if not type "XPS" in the search dialog.
Now Check the checkbox to the right to enable the addon.
Click the "Save User Settings" button and close the window.

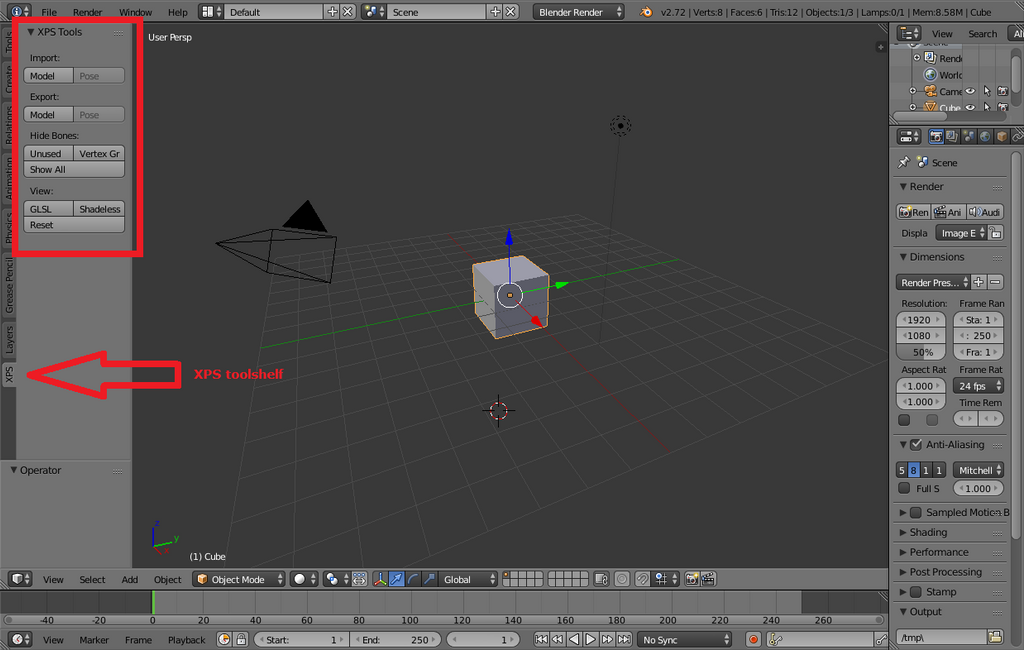
A new tab called XPS should have appeared in the toolshelf


We are ready to import the XPS/XNALara model. In the 3DView show the toolshelf (Shrotcut: T) and go to the XPS tab. Select the Import Model Button an import the model.
The addon will create all the materials and import the armature of the model.

To preview the model without having to setup lighting, click the Shadeless button in the XPS toolshelf.

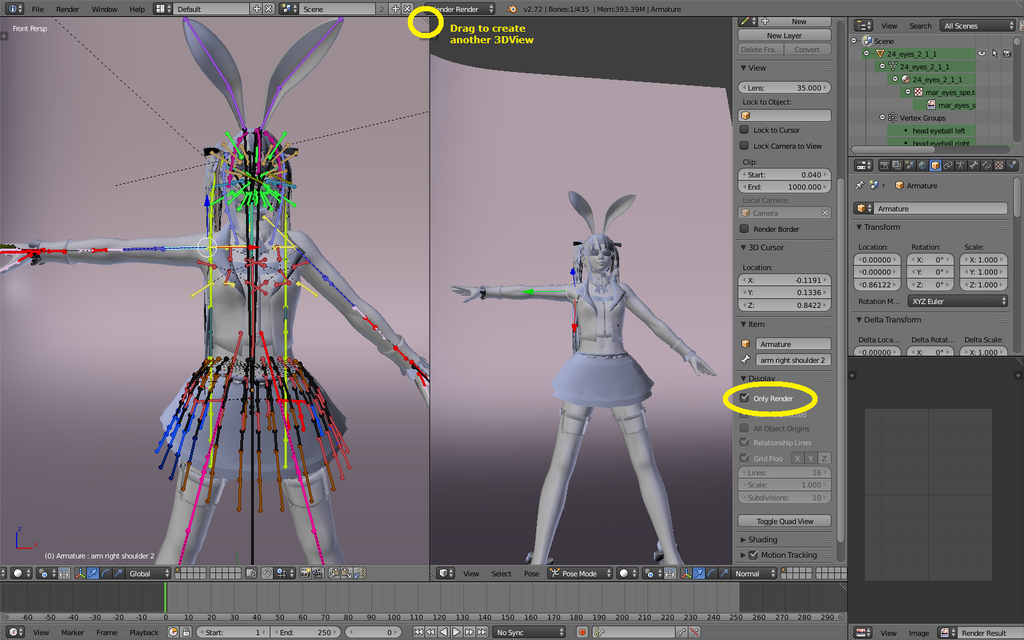
To manualy pose the model select the armature. Change to Pose mode. You can make a second 3Dview and set its display mode to "Render Only" to make the results easier to see. The CheckBox "Render Only" will hide fom the view ani object that is not displayed in the render.

To import a pose: Select the armature. In the XPS toolshelf click the Import: Pose button. Select the pose file and... done.


If you have trouble selecting the light or any object in your scene hold ALT while selecting. Blender will display a list of all the objects under the cursor for you to elect from.
Position the light.
Now we are going to aim the light. With the light selected press CTRL 0 (Zero, Insert from the keypad). This will set the light as the active camera and the view will change to the lamps perspective.
Press SHIFT F to enter Walk navigation mode. In this mode you can move just like in a FPS game
Look around with the mouse.
Walk with WASD.
Q and E go up and down.
SHIFT sprint.
ALT walk.
Mouse scroll wheel up and down control the movement speed.
SPACE or middle mouse button teleport to the cursor position.
WARNING: TAB will activate gravity and the camera will fall down if there nothing under it.
Aim the lamp to the model then left click or hit enter to end the Walk navigation mode.
Safari automatically unzips downloaded files and deletes the original ZIP file.
Try disabling this function (I don't know how, I never used a Mac) or download using another browser like Firefox.
Preparation
First thing we have to do is to installing the addon.Go to the provided link and download the latest version of the addon. DO NOT UNZIP IT.
Open Blender and go to File > User Preferences
Select the Addons tab and click the "Install fom File..." button

Find the downloaded addon zip file and click the "Install fom File..." button
The XPS tools addon should be de only addon diplayed on the list, if not type "XPS" in the search dialog.
Now Check the checkbox to the right to enable the addon.
Click the "Save User Settings" button and close the window.

A new tab called XPS should have appeared in the toolshelf

Importing the model
Now open your backdrop.
We are ready to import the XPS/XNALara model. In the 3DView show the toolshelf (Shrotcut: T) and go to the XPS tab. Select the Import Model Button an import the model.
The addon will create all the materials and import the armature of the model.

To preview the model without having to setup lighting, click the Shadeless button in the XPS toolshelf.

Posing
If your model had a armature in XPS/XNALara, the addon created an armature in Blender and you can pose it or import a pose just like in XPS.To manualy pose the model select the armature. Change to Pose mode. You can make a second 3Dview and set its display mode to "Render Only" to make the results easier to see. The CheckBox "Render Only" will hide fom the view ani object that is not displayed in the render.

To import a pose: Select the armature. In the XPS toolshelf click the Import: Pose button. Select the pose file and... done.

Lighting the scene
Create a Area Light (SHIFT A). This will be out main light, it will provide most of the light to our model.
If you have trouble selecting the light or any object in your scene hold ALT while selecting. Blender will display a list of all the objects under the cursor for you to elect from.
Position the light.
Now we are going to aim the light. With the light selected press CTRL 0 (Zero, Insert from the keypad). This will set the light as the active camera and the view will change to the lamps perspective.
Press SHIFT F to enter Walk navigation mode. In this mode you can move just like in a FPS game
Look around with the mouse.
Walk with WASD.
Q and E go up and down.
SHIFT sprint.
ALT walk.
Mouse scroll wheel up and down control the movement speed.
SPACE or middle mouse button teleport to the cursor position.
WARNING: TAB will activate gravity and the camera will fall down if there nothing under it.
Aim the lamp to the model then left click or hit enter to end the Walk navigation mode.
To exit camera perspective mode press 0 (Zero, Insert from the keypad). Adjust the distance of the light so the dotted line ends when touching the model. At this point the light is at mid intensity. Set its Energy to 0.5

Duplicate the light by pressing SHIFT D. The new light will be our "Fill light". It's purpose is to make the shadows of the main light not so dark but allowing some shading so the model doesn't look flat. Set it's energy to 0.2. Position the same way that the main light.

Camera Positioning
Select the camera and position it just like you did with the lightsCTRL 0 (Zero, Insert from the keypad): set the camera as the active camera
SHIFT F: Walk Navigation mode.
You can also press CTRL ALT 0 (Zero, Insert from the keypad) to place the active camera at the same position as the current 3DView.
Change the resolution to the desired size. The percentage under the resolution will reduce the resolution to make preview renders faster. We will change this to 100% when we make the final render.

Rendering
We are ready to see our creation in all it's glory, press F12This render is not our final render. It's a little lower quality but a lot faster.
Now you can tweak the pose of the model, the lights, etcs. Once you are happy with the results we are ready for the final render.
Increase the fill light Samples to 5 and the main light to 10.

set the resolution to 100%.

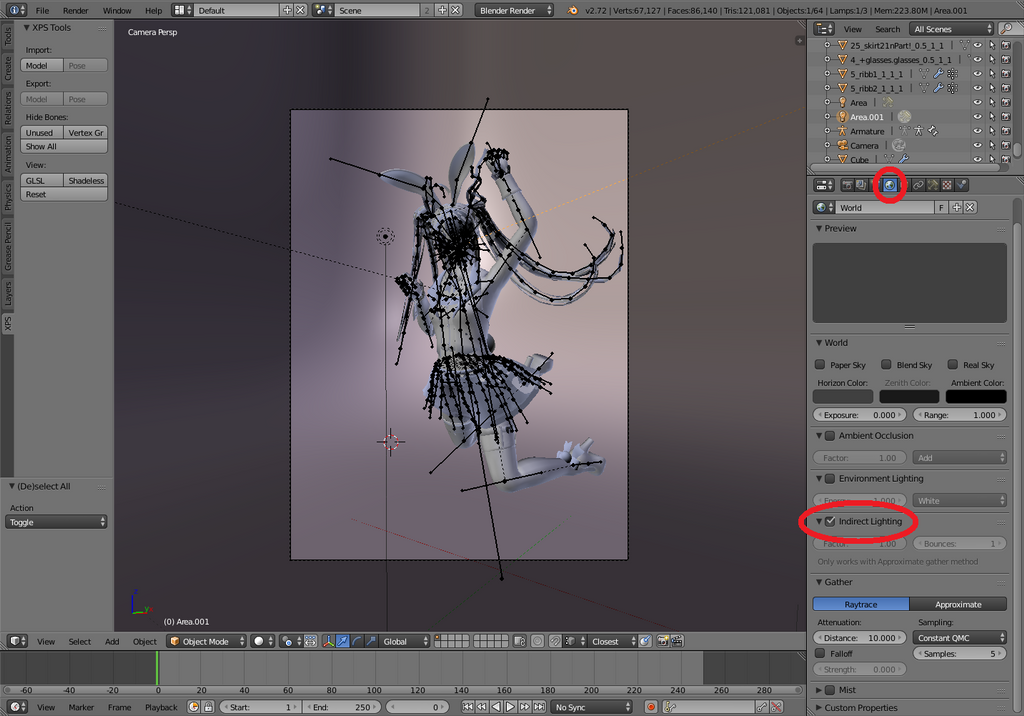
enable indirect lighting.

All is ready for the final render, Press F12 again. Depending on your machine and the complexity of the scene this may take a while. Once the render is ready save it. Go to Image > Save as Image.
Enjoy your work and don't forget to share!


 被折叠的 条评论
为什么被折叠?


