


Now, it's time to make the web page dynamic — with AngularJS. We will also add a test that verifies the code for the controller we are going to add.
There are many ways to structure the code for an application. For Angular applications, we encourage the use of the Model-View-Controller (MVC) design pattern to decouple the code and separate concerns. With that in mind, let's use a little Angular and JavaScript to add models, views, and controllers to our app.
- The list of three phones is now generated dynamically from data
Workspace Reset Instructions ➤
The most important changes are listed below. You can see the full diff on GitHub.
View and Template
In Angular, the view is a projection of the model through the HTML template. This means that whenever the model changes, Angular refreshes the appropriate binding points, which updates the view.
The view is constructed by Angular from this template.
app/index.html:
<html ng-app="phonecatApp">
<head>
  ...
  <script src="bower_components/angular/angular.js"></script>
  <script src="app.js"></script>
</head>
<body ng-controller="PhoneListController">

  <ul>
    <li ng-repeat="phone in phones">
      <span>{{phone.name}}</span>
      <p>{{phone.snippet}}</p>
    </li>
  </ul>

</body>
</html>
We replaced the hard-coded phone list with the ngRepeat directive and two Angular expressions:
- The
ng-repeat="phone in phones"attribute on the<li>tag is an Angular repeater directive. The repeater tells Angular to create a<li>element for each phone in the list, using the<li>tag as the template. - The expressions wrapped in curly braces (
{{phone.name}}and{{phone.snippet}}) will be replaced by the values of the expressions.
We have also added a new directive, called ngController, which attaches a PhoneListController controller to the <body> tag. At this point:
PhoneListControlleris in charge of the DOM sub-tree under (and including) the<body>element.- The expressions in curly braces (
{{phone.name}}and{{phone.snippet}}) denote bindings, which are referring to our application model, which is set up in ourPhoneListControllercontroller.
Note: We have specified an Angular Module to load using ng-app="phonecatApp", where phonecatApp is the name of our module. This module will contain the PhoneListController.
Model and Controller
The data model (a simple array of phones in object literal notation) is now instantiated within the PhoneListController controller. The controller is simply a constructor function that takes a $scope parameter:
app/app.js:
// Define the `phonecatApp` module
var phonecatApp = angular.module('phonecatApp', []);

// Define the `PhoneListController` controller on the `phonecatApp` module
phonecatApp.controller('PhoneListController', function PhoneListController($scope) {
  $scope.phones = [
    {
      name: 'Nexus S',
      snippet: 'Fast just got faster with Nexus S.'
    }, {
      name: 'Motorola XOOM™ with Wi-Fi',
      snippet: 'The Next, Next Generation tablet.'
    }, {
      name: 'MOTOROLA XOOM™',
      snippet: 'The Next, Next Generation tablet.'
    }
  ];
});
Here we declared a controller called PhoneListController and registered it in an Angular module, phonecatApp. Notice that our ngAppdirective (on the <html> tag) now specifies the phonecatApp module name as the module to load when bootstrapping the application.
Although the controller is not yet doing very much, it plays a crucial role. By providing context for our data model, the controller allows us to establish data-binding between the model and the view. We connected the dots between the presentation, data, and logic components as follows:
-
The ngController directive, located on the
<body>tag, references the name of our controller,PhoneListController(located in the JavaScript fileapp.js). -
The
PhoneListControllercontroller attaches the phone data to the$scopethat was injected into our controller function. This scope is a prototypal descendant of the root scope that was created when the application was defined. This controller scope is available to all bindings located within the<body ng-controller="PhoneListController">tag.
Scope
The concept of a scope in Angular is crucial. A scope can be seen as the glue which allows the template, model, and controller to work together. Angular uses scopes, along with the information contained in the template, data model, and controller, to keep models and views separate, but in sync. Any changes made to the model are reflected in the view; any changes that occur in the view are reflected in the model.
To learn more about Angular scopes, see the angular scope documentation.
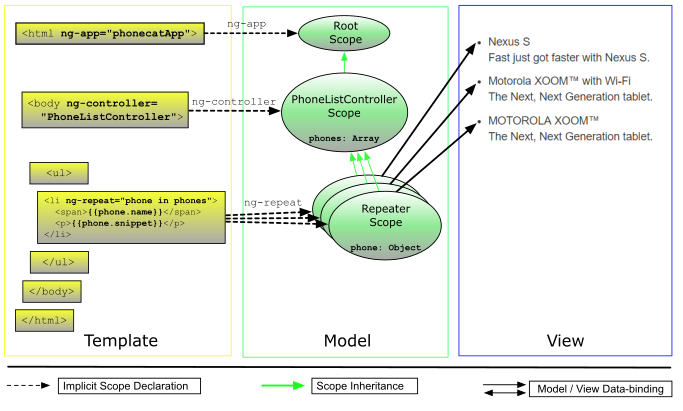
Angular scopes prototypically inherit from their parent scope, all the way up to the root scope of the application. As a result, assigning values directly on the scope makes it easy to share data across different parts of the page and create interactive applications. While this approach works for prototypes and smaller applications, it quickly leads to tight coupling and difficulty to reason about changes in our data model.
In the next step, we will learn how to better organize our code, by "packaging" related pieces of application and presentation logic into isolated, reusable entities, called components.
Testing
The "Angular way" of separating controller from the view, makes it easy to test code as it is being developed. If our controller were available on the global namespace, we could simply instantiate it with a mock scope object:
describe('PhoneListController', function() {

  it('should create a `phones` model with 3 phones', function() {
    var scope = {};
    var ctrl = new PhoneListController(scope);

    expect(scope.phones.length).toBe(3);
  });

});
The test instantiates PhoneListController and verifies that the phones array property on the scope contains three records. This example demonstrates how easy it is to create a unit test for code in Angular. Since testing is such a critical part of software development, we make it easy to create tests in Angular so that developers are encouraged to write them.
Testing non-global Controllers
In practice, you will not want to have your controller functions in the global namespace. Instead, you can see that we have registered it via a constructor function on the phonecatApp module.
In this case Angular provides a service, $controller, which will retrieve your controller by name. Here is the same test using $controller:
app/app.spec.js:
describe('PhoneListController', function() {

  beforeEach(module('phonecatApp'));

  it('should create a `phones` model with 3 phones', inject(function($controller) {
    var scope = {};
    var ctrl = $controller('PhoneListController', {$scope: scope});

    expect(scope.phones.length).toBe(3);
  }));

});- Before each test we tell Angular to load the
phonecatAppmodule. - We ask Angular to
injectthe$controllerservice into our test function. - We use
$controllerto create an instance of thePhoneListController. - With this instance, we verify that the phones array property on the scope contains three records.
A note on file naming:
As already mentioned in the introduction, the unit test files (specs) are kept side-by-side with the application code. We name our specs after the file containing the code to be tested plus a specific suffix to distinguish them from files containing application code. Note that test files are still plain JavaScript files, so they have a .js file extension.
In this tutorial, we are using the .spec suffix. So the test file corresponding to something.js would be called something.spec.js. (Another common convention is to use a _spec or _test suffix.)
Writing and Running Tests
Many Angular developers prefer the syntax of Jasmine's Behavior-Driven Development (BDD) framework, when writing tests. Although Angular does not require you to use Jasmine, we wrote all of the tests in this tutorial in Jasmine v2.4. You can learn about Jasmine on the Jasmine home page and at the Jasmine docs.
The angular-seed project is pre-configured to run unit tests using Karma, but you will need to ensure that Karma and its necessary plugins are installed. You can do this by running npm install.
To run the tests, and then watch the files for changes execute: npm test
- Karma will start new instances of Chrome and Firefox browsers automatically. Just ignore them and let them run in the background. Karma will use these browsers for test execution.
-
If you only have one of the browsers installed on your machine (either Chrome or Firefox), make sure to update the karma configuration file (
karma.conf.js), before running the test. Locate the configuration file in the root directory and update thebrowsersproperty.E.g. if you only have Chrome installed:
...
  browsers: ['Chrome'],
  ...
-
You should see the following or similar output in the terminal:
INFO [karma]: Karma server started at http://localhost:9876/
  INFO [launcher]: Starting browser Chrome
  INFO [Chrome 49.0]: Connected on socket ... with id ...
  Chrome 49.0: Executed 1 of 1 SUCCESS (0.05 secs / 0.04 secs)
Yay! The test passed! Or not...
-
To rerun the tests, just change any of the source or test
.jsfiles. Karma will notice the change and will rerun the tests for you. Now isn't that sweet?
Make sure you don't minimize the browser that Karma opened. On some OS, memory assigned to a minimized browser is limited, which results in your karma tests running extremely slow.
Experiments
-
Add another binding to
index.html. For example:<p>Total number of phones: {{phones.length}}</p> -
Create a new model property in the controller and bind to it from the template. For example:
$scope.name = 'world';Then add a new binding to
index.html:<p>Hello, {{name}}!</p>Refresh your browser and verify that it says 'Hello, world!'.
-
Update the unit test for the controller in
app/app.spec.jsto reflect the previous change. For example by adding:expect(scope.name).toBe('world'); -
Create a repeater in
index.htmlthat constructs a simple table:<table> <tr><th>Row number</th></tr> <tr ng-repeat="i in [0, 1, 2, 3, 4, 5, 6, 7]"><td>{{i}}</td></tr> </table>Now, make the list 1-based by incrementing
iby one in the binding:<table> <tr><th>Row number</th></tr> <tr ng-repeat="i in [0, 1, 2, 3, 4, 5, 6, 7]"><td>{{i+1}}</td></tr> </table>Extra points: Try and make an 8x8 table using an additional
ng-repeat. -
Make the unit test fail by changing
expect(scope.phones.length).toBe(3)to instead usetoBe(4).
Summary
We now have a dynamic application which separates models, views, and controllers, and we are testing as we go. Let's go to step 3 to learn how to improve our application's architecture, by utilizing components.


 464
464


 被折叠的 条评论
为什么被折叠?
被折叠的 条评论
为什么被折叠?
 到【灌水乐园】发言


