


在服务器上创建用户并设置密码:
[root@wuchao ~]# useradd wu1
[root@wuchao ~]# useradd wu2
[root@wuchao ~]# useradd wu3
[root@wuchao ~]# passwd wu1
Changing password for user wu1.
New UNIX password:
BAD PASSWORD: it is WAY too short
Retype new UNIX password:
passwd: all authentication tokens updated successfully.
[root@wuchao ~]# passwd wu2
Changing password for user wu2.
New UNIX password:
BAD PASSWORD: it is WAY too short
Retype new UNIX password:
passwd: all authentication tokens updated successfully.
[root@wuchao ~]# passwd wu3
Changing password for user wu3.
New UNIX password:
BAD PASSWORD: it is WAY too short
Retype new UNIX password:
passwd: all authentication tokens updated successfully.
[root@wuchao ~]# tail -n 3 /etc/passwd
wu1:x:501:501::/home/wu1:/bin/bash
wu2:x:502:502::/home/wu2:/bin/bash
wu3:x:503:503::/home/wu3:/bin/bash
[root@wuchao ~]#
搭建nis服务器:
安装:[root@wuchao ~]# yum install portmap ypserv -y
添加启动参数:
[root@wuchao ~]# vim /etc/sysconfig/network
添加nis域并指定端口808:
NETWORKING=yes
NETWORKING_IPV6=no
HOSTNAME=wuchao.wu.com
YPSERV_ARGS="-p 808"
NISDOMAIN=wuchao.wu.com
重启nis服务,并设置开机启动:
[root@wuchao ~]# service ypserv restart
停止 YP 服务器的服务: [失败]
设置 NIS 域名 wuchao.wu.com: [确定]
启动 YP 服务器的服务: [确定]
[root@wuchao ~]# service ypserv restart
停止 YP 服务器的服务: [确定]
启动 YP 服务器的服务: [确定]
[root@wuchao ~]# chkconfig ypserv on
[root@wuchao ~]#
初始化nis的数据库:
[root@wuchao ~]# /usr/lib/yp/ypinit -m
At this point, we have to construct a list of the hosts which will run NIS
servers. wuchao is in the list of NIS server hosts. Please continue to add
the names for the other hosts, one per line. When you are done with the
list, type a <control D>.
next host to add: wuchao
next host to add:
这一步按ctrl+D
The current list of NIS servers looks like this:
wuchao
Is this correct? [y/n: y] y
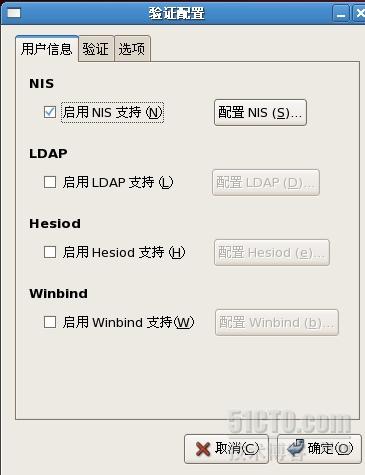
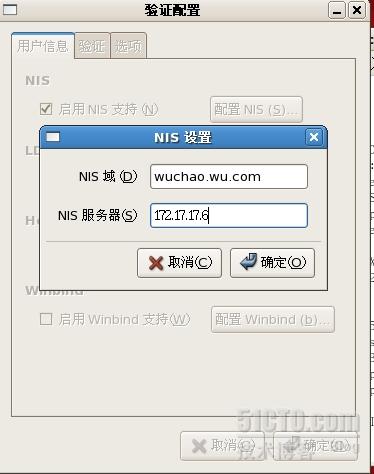
设置客户端:
设置完之后,输入getent passwd 验证是否能获得刚才建立的
wu1到wu3这些帐号.
[root@localhost ~]# getent passwd
wu1:$1$BBzc3SZ5$VyuqNI0Nlx9QRFhmDOtwl1:501:501::/home/wu1:/bin/bash
wu2:$1$iOmPLmG8$hujG/a2Llscq.m4T6QGqY/:502:502::/home/wu2:/bin/bash
wu3:$1$m0Pmk9j0$oZKFZuSjEUNe.nV3sQtUc1:503:503::/home/wu3:/bin/bash
wu:$1$CRC.Cb.z$i***RaZoG5rRu9HK7f5Rk.:500:500::/home/wu:/bin/bash
可以看出设置成功。
设置nis自动挂载,在服务器端设置:
[root@wuchao ~]# vim /etc/exports
/home/wu 172.17.17.6(rw,sync)
重启NFS并设置NFS开机自启动
[root@wuchao ~]# service nfs restart
关闭 NFS mountd: [失败]
关闭 NFS 守护进程: [失败]
关闭 NFS quotas: [失败]
关闭 NFS 服务: [失败]
启动 NFS 服务: [确定]
关掉 NFS 配额: [确定]
启动 NFS 守护进程: [确定]
启动 NFS mountd: [确定]
[root@wuchao ~]# service nfs restart
关闭 NFS mountd: [确定]
关闭 NFS 守护进程: [确定]
关闭 NFS quotas: [确定]
关闭 NFS 服务: [确定]
启动 NFS 服务: [确定]
关掉 NFS 配额: [确定]
启动 NFS 守护进程: [确定]
启动 NFS mountd: [确定]
[root@wuchao ~]# chkconfig nfs on
[root@wuchao ~]#
查看/home目录是否已经被共享出来了
[root@wuchao ~]# showmount -e 172.17.17.6
Export list for 172.17.17.6:
/home 172.17.17.6
[root@wuchao ~]#
设置自动挂载的客户端:
安装autofs,默认是已经安装的:
[root@localhost ~]# mount /dev/cdrom /mnt
mount: block device /dev/cdrom is write-protected, mounting read-only
[root@localhost ~]# yum install autofs -y
设置开机启动并重启服务:
[root@localhost ~]# chkconfig autofs on
[root@localhost ~]# service autofs restart
停止 automount: [确定]
启动 automount: [确定]
[root@localhost ~]#
修改autofs的配置文件
[root@wuch wu]# vim /etc/auto.master
/home/wu /etc/auto.wu --timeout=10
创建/etc/auto.wu文件:
[root@wuch wu]# vim /etc/auto.wu
nfs --fstype=nfs,ro 172.17.17.6:/home/wu
重启autofs服务,并进行验证。
service autofs restart
[root@wuch ~]# ssh wu1@wuch.wu.com
The authenticity of host 'wuch.wu.com (172.17.17.6)' can't be established.
RSA key fingerprint is f7:a5:9e:2f:86:57:a5:17:f4:ad:2b:3a:a8:55:0f:76.
Are you sure you want to continue connecting (yes/no)? y
Please type 'yes' or 'no': yes
Warning: Permanently added 'wuch.wu.com,172.17.17.6' (RSA) to the list of known hosts.
wu1@wuch.wu.com's password:
[wu1@wuchao ~]$
[root@wuchao ~]# mount -t nfs 172.17.17.6:/home/wu/wu1 /home/wu/wu1
mount.nfs: mount point /home/wu/wu1 does not exist
[root@wuchao ~]# mkdir -pv /home/wu/wu1
mkdir: 已创建目录 “/home/wu/wu1”
[root@wuchao ~]# mount -t nfs 172.17.17.6:/home/wu/wu1 /home/wu/wu1
[root@wuchao ~]# su - wu1
[wu1@wuchao ~]$
[wu1@wuchao ~]$ mount
/dev/mapper/VolGroup00-LogVol00 on / type ext3 (rw)
proc on /proc type proc (rw)
sysfs on /sys type sysfs (rw)
devpts on /dev/pts type devpts (rw,gid=5,mode=620)
/dev/sda1 on /boot type ext3 (rw)
tmpfs on /dev/shm type tmpfs (rw)
none on /proc/sys/fs/binfmt_misc type binfmt_misc (rw)
none on /proc/fs/vmblock/mountPoint type vmblock (rw)
sunrpc on /var/lib/nfs/rpc_pipefs type rpc_pipefs (rw)
/dev/hdc on /media/RHEL_5.5 i386 DVD type iso9660 (ro,noexec,nosuid,nodev,uid=0)
/dev/hdc on /mnt type iso9660 (ro)
nfsd on /proc/fs/nfsd type nfsd (rw)
172.17.17.6:/home/wu/wu1 on /home/wu/wu1 type nfs (rw,addr=172.17.17.6)
[wu1@wuchao ~]$
转载于:https://blog.51cto.com/wuseven/1119124


 2096
2096


 被折叠的 条评论
为什么被折叠?
被折叠的 条评论
为什么被折叠?
 到【灌水乐园】发言


