


搭建linux环境下的FDFS文件服务器,用于图片文件、视频文件、音频文件的存储管理。

测试环境:
tracker server 和 storage server 在同一台机器121.42.25.134上
nginx 与 storage server 对接
所需主要软件包:

pcre-8.36安装
tar -zxvf pcre-8.36.tar.gz
cd pcre-8.36
./configure
make
make install
zlib-1.2.8安装
1> tar -xvf zlib-1.2.8.tar.gz
2> ./configure --prefix=/usr/local/zlib-1.2.8
3> make
4> make install
libevent-2.0.21-stable.tar.gz 安装
1> tar -xvf libevent-2.0.21-stable.tar.gz
2> ./configure --prefix=/usr/local/libevent-2.0.21 (指定安装目录)
3> make
4> make install
FastDFS_v4.06.tar.gz 安装
1> tar -xvf FastDFS_v4.06.tar.gz
2> cd FastDFS
3>vi make.sh
#指定fastdfs安装路径
TARGET_PREFIX=/usr/local/FastDFS
#指定fastdfs配置文件路径
TARGET_CONF_PATH=/etc/fdfs
WITH_LINUX_SERVICE=1
4> ./make.sh C_INCLUDE_PATH=(libevent指定的安装目录)/usr/local/libevent-2.0.21/include LIBRARY_PATH=(libevent指定的安装目录)/usr/local/libevent-2.0.21/lib
5> ./make.sh install
6> 设置软连接(否则编译nginx时会出错)
ln -sv /usr/local/FastDFS/include/fastcommon /usr/local/include/fastcommon
ln -sv /usr/local/FastDFS/include/fastdfs /usr/local/include/fastdfs
ln -sv /usr/local/FastDFS/lib/libfastcommon.so /usr/local/lib/libfastcommon.so
ln -sv /usr/local/FastDFS/lib/libfastcommon.so.1 /usr/local/lib/libfastcommon.so.1
ln -sv /usr/local/FastDFS/lib/libfdfsclient.so /usr/local/lib/libfdfsclient.so
ln -sv /usr/local/FastDFS/lib/libfdfsclient.so.1 /usr/local/lib/libfdfsclient.so.1
nginx-1.7.7.tar.gz + fastdfs-nginx-module_v1.15.tar.gz 安装
1> tar -xvf nginx-1.7.7.tar.gz
2> tar -xvf fastdfs-nginx-module_v1.15.tar.gz
3> cd nginx-1.7.7
4> ./configure --prefix=/usr/local/nginx --add-module=/fastdfs-nginx-module所在路径/fastdfs-nginx-module/src
如果安装nginx出错时可指定安装模块和不安装的模块,确保安装nginx不出错(./configure --prefix=/usr/local/nginx --add-module=/usr/local/software/fastdfs-nginx-module/src/ --with-pcre=/usr/local/software/pcre-8.36 --with-openssl=/usr/local/software/openssl-1.0.2h --with-zlib=/usr/local/software/zlib-1.2.8)
5> make
6> make install
注意:安装nginx 确保系统有 gcc、 openssl-devel、 pcre-devel和zlib-devel软件库
(安装:yum install gcc
yum install openssl-devel
yum install pcre-devel
yum install zlib-devel)
5. tracker server
1> vi /etc/fdfs/tracker.conf
#bind_addr=
base_path=/home/tracker/fastdfs
2> 启动 tracker
/usr/local/FastDFS/bin/fdfs_trackerd /etc/fdfs/tracker.conf
3> netstat -ntpl | grep fdfs
tcp 00121.42.25.134:221220.0.0.0:* LISTEN /fdfs_trackerd
6. storage server
1> vi /etc/fdfs/storage.conf
group_name=group1
#bind_addr=
base_path=/home/storage1/fastdfs
store_path0=/home/storage1/fastdfs
tracker_server=121.42.25.134:22122
2> cp /路径/fastdfs-nginx-module/src/mod_fastdfs.conf 至 /etc/fdfs/
3> vi /etc/fdfs/mod_fastdfs.conf
base_path=/home/storage1/fastdfs
group_name=group1
url_have_group_name=true
store_path0=/home/stroage1/fastdfs
tracker_server=121.42.25.134:22122
#HTTP settings
http.tracker_server_port=80
4>配置访问路径和nginx-fastdfs模块: vi /usr/local/nginx/conf/nginx.conf
location /group1/M00 {
root /home/storage1/fastdfs/data;
ngx_fastdfs_module;
}
5> 启动 storage
/usr/local/FastDFS/bin/fdfs_storaged /etc/fdfs/storage.conf
6> ln -s /home/storage1/fastdfs/data /home/storage1/fastdfs/data/M00
7> 启动 nginx
/usr/local/nginx/sbin/nginx
8> netstat -ntl
此时应该有3个监听端口,分别是:
80 -> nginx
22122 -> tracker server
23000 -> storage server
7. 测试
1> vi /etc/fdfs/client.conf
base_path=/home/storage1/fastdfs
tracker_server=121.42.25.134:22122
2> /usr/local/bin/fdfs_test /etc/fdfs/client.conf upload header.png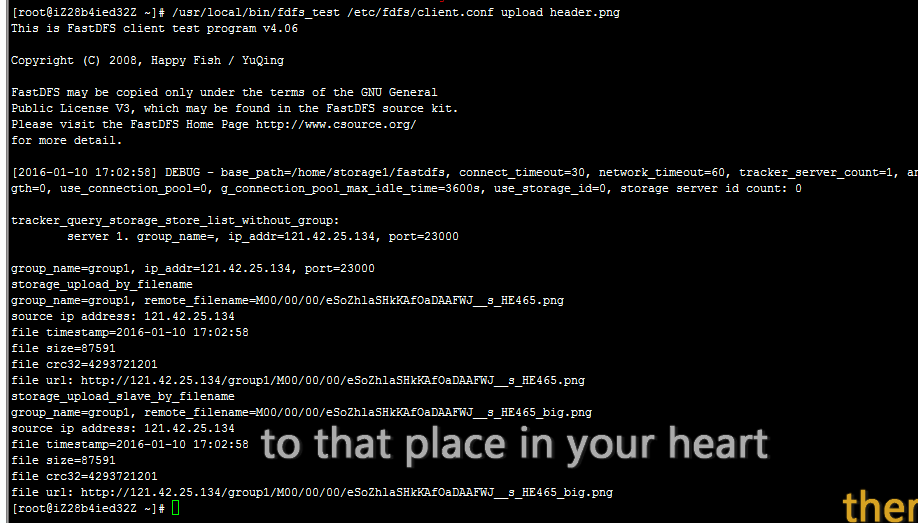
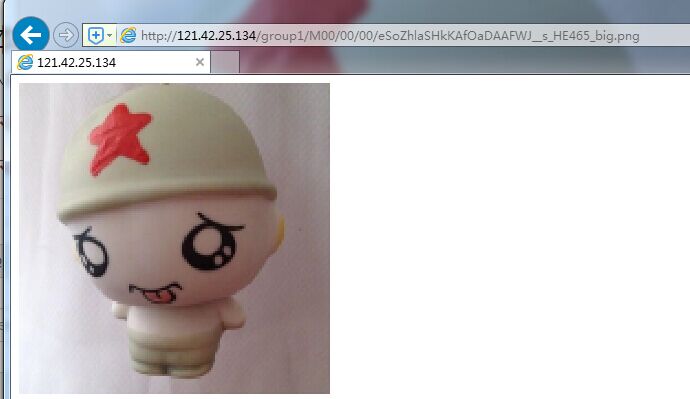
游览器输入:
http://121.42.25.134/group1/M00/00/00/eSoZhlaSHkKAfOaDAAFWJ__s_HE465_big.png
正常来说按上面配置下来是可以正常访问,如图
如果不能正常访问,请检查:
-
以上每步没有出错
-
检查nginx路径配置是否正确,nginx模块是否有加载
-
服务器的防火墙是否已关闭
-
文件访问权限
========================常用命令============================
启动storage: ./fdfs_storaged /etc/fdfs/storage.conf
启动stracker: ./fdfs_trackerd /etc/fdfs/tracker.conf
关闭storage: ./stop.sh /etc/fdfs/storage.conf
关闭tracker: ./stop.sh /etc/fdfs/tracker.conf
查看tracker和storage进程: netstat -unltp|grep fdfs
查看nginx进程: ps -ef|grep nginx
测试上传: ./fdfs_test /etc/fdfs/client.conf upload /usr/local/head.png
查看存储节点: ./fdfs_monitor /etc/fdfs/storage.conf
./fdfs_monitor /etc/fdfs/client.conf
移除某一集群分组节点:
fdfs_monitor /etc/fdfs/client.conf delete group1 192.168.1.106
启动顺序:tracker-->storage-->nginx
==========================================================
1、tracker
A、启动命令 :/usr/local/bin/fdfs_trackerd /etc/fdfs/tracker.conf(tracker的配置文件路径)
B、重启命令:/usr/local/bin/restart.sh /usr/local/bin/fdfs_trackerd /usr/local/config/tracker.conf (tracker的配置文件路径)
2、storage
A、启动命令:/usr/local/bin/fdfs_storaged /etc/fdfs/storage.conf (storage配置文件路径)
B、重启命令:/usr/local/bin/restart.sh :/usr/local/bin/fdfs_storaged /etc/fdfs/storage.conf (storage配置文件路径)
3、重启nginx: /usr/local/nginx/sbin/nginx -s reload
4、参考:
http://www.cnblogs.com/zhoulf/archive/2013/02/09/2909653.html
http://blog.csdn.net/yl_wh/article/details/8784569
http://blog.chinaunix.net/uid-20196318-id-4058561.html
http://baike.sogou.com/h60583131.htm?sp=l60583132
查看文件依赖关系:

=================================================================
遇到问题:

./fdfs_trackerd: error while loading shared libraries: libevent-2.0.so.5: cannot open shared object file: No such file or directory解决办法:
1 >whereis libevent-2.0.so.5
/usr/local/lib/libevent-2.0.so.5
2>ln -s /usr/local/lib/libevent-2.0.so.5 /lib64
参考:http://blog.sina.com.cn/s/blog_6d09b5750100vqow.html

====================================================================
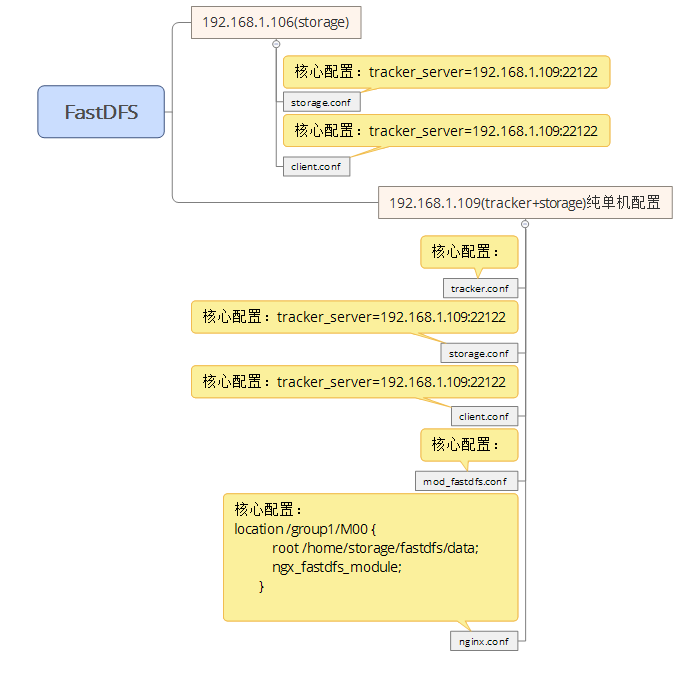
双storage,单tracker时,如下图:大部分场景下,单tracker+多storage足够满足大部分需求了
===================================================================
多tracker+多storage集群参考:http://my.oschina.net/xiejunbo/blog/726192


 200
200

 被折叠的 条评论
为什么被折叠?
被折叠的 条评论
为什么被折叠?
 到【灌水乐园】发言


