


一、前言
react.js和vue.js无疑是当下最火的js框架了,它们为组件式的开发传统前端页面、SPA页面、前后端分离等带来了有力的支持。react.js源码实现较为复杂(据说FaceBook的react团队目前正在全面重写react实现),如果直接通过阅读react源码理解其原理还是比较有难度的,因此,通过把react核心概念自己手动实现一遍,那么既可以避开react源码的复杂性又可以加深自己的理解。其实,react核心概念并不多:
- 虚拟dom对象(Virtual DOM)
- 虚拟dom差异化算法(diff algorithm)
- 单向数据流渲染(Data Flow)
- 组件生命周期
- 事件处理
声明:
- 本文假定你已经对reactjs有了一定的了解,如果没有至少看下ruanyifeng老师的入门demo。
- jsx不在本文的讨论范围,所有的例子原理都是使用原生的javascript。
- 篇幅限制,服务器端的reactjs也不在本文讨论范围内(服务端渲染)。
- 为了演示方便,本文以jQuery作为基本工具库。
- 为了更清晰的演示原理,本文会忽略很多细节的东西,千万不要用于生产环境。
所有实例源码都托管在github。点这里里面有分步骤的例子,可以一边看一边运行例子。
二、入门实例
以向div渲染一个“hello world”文本开始:
<script type="text/javascript">
React.render('hello world',document.getElementById("container"))
</script>

<div id="container"></div>

/**
生成后的html为:

<div id="container">
    <span data-reactid="0">hello world</span>
</div>

*/
可以看到,上面最关键的代码就是:React.render,下面看其实现:
// component类,用来表示文本在渲染,更新,删除时应该做些什么事情
function ReactDOMTextComponent(text) {
// 存下当前的字符串(该component绑定的element)
this._currentElement = '' + text;
// 用来标识当前component的Id
this._rootNodeID = null;
}
// component渲染时生成的dom结构
ReactDOMTextComponent.prototype.mountComponent = function(rootID) {
this._rootNodeID = rootID;
// 生成dom
return '<span data-reactid="' + rootID + '">' + this._currentElement + '</span>';
}
// component工厂 用来根据element类型返回一个相应的component实例
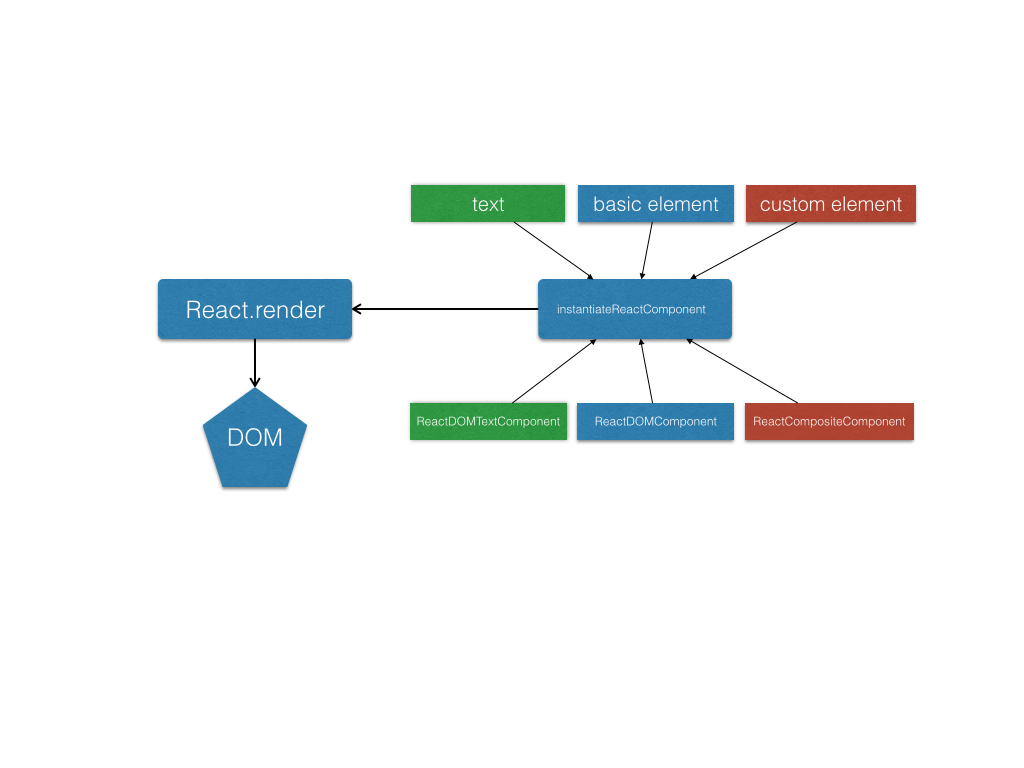
function instantiateReactComponent(node){
// 如果传进来的node是字符串或者是一个数值
if(typeof node === 'string' || typeof node === 'number'){
// 就创建并返回一个文本component
return new ReactDOMTextComponent(node)
}
}
React = {
nextReactRootIndex:0,
render:function(element,container){
// 根据element返回一个component
var componentInstance = instantiateReactComponent(element);
// 渲染生成dom结构
var markup = componentInstance.mountComponent(React.nextReactRootIndex++);
// 插入到容器中
$(container).html(markup);
// 触发完成mount的事件
$(document).trigger('mountReady'); }
}代码主要分为三个部分:
1、React.render 作为渲染的入口
2、引入了component类的概念,ReactDOMTextComponent是一个component类定义,它是一个文本类型的component。component提供了在渲染,更新,删除时应该对element做什么操作,由于目前只用到渲染,另外两个可以先忽略。
3、instantiateReactComponent用来根据element的类型(现在只有一种string类型),返回一个component的实例。其实就是个类工厂。
nextReactRootIndex作为每个component的标识id,不断加1,确保唯一性。这样我们以后可以通过这个标识找到这个元素。
可以看到我们把逻辑分为几个部分,主要的渲染逻辑放在了具体的componet类去定义(只有component自己最清楚如何渲染自己)。React.render负责调度整个流程,这里是调用instantiateReactComponent生成一个对应component类型的实例对象,然后调用此对象的mountComponent获取生成的内容(dom结构)。最后插入到对应的container节点中。
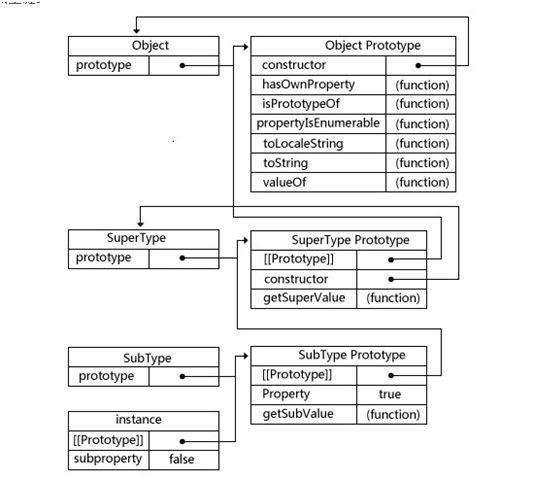
插播:上面的代码使用了javascript原型链,不熟悉原型链的可以看下面这张图:
三、基本元素类型element
reactjs最大的卖点就是它的虚拟dom概念,一般使用React.createElement来创建一个虚拟dom元素。虚拟dom元素分为两种,一种是浏览器自带的基本元素比如 div p input form 这种,一种是自定义的元素。理论上文本节点不算虚拟dom,但是reac.js为了保持渲染的一致性,在文本节点外面包了一层span标记,也给它配了个简化版component(ReactDOMTextComponent)。
本节只讨论基本元素(element)。
在reactjs里,当我们希望在hello world外面包一层div,并且带上一些属性,甚至事件时我们可以这么写:
//演示事件监听怎么用
function hello(){
    alert('hello')
}

// 创建一个基本元素element
var element = React.createElement('div',{id:'test',onclick:hello},'click me')

React.render(element,document.getElementById("container"))


/**

生成的html为:

<div data-reactid="0" id="test">
    <span data-reactid="0.0">click me</span>
</div>


点击文字,会弹出hello的对话框

*/上面使用React.createElement创建了一个基本元素,下面来看看简易版本React.createElement的实现:
//ReactElement就是虚拟dom的概念,具有一个type属性代表当前的节点类型,还有节点的属性props
//比如对于div这样的节点type就是div,props就是那些attributes
//另外这里的key,可以用来标识这个element,用于优化以后的更新,这里可以先不管,知道有这么个东西就好了
function ReactElement(type,key,props){
  this.type = type;
  this.key = key;
  this.props = props;
}


React = {
    nextReactRootIndex:0,
    // createElement函数定义
    createElement:function(type,config,children){
        var props = {},propName;
        config = config || {}
        // 看有没有key,用来标识element的类型,方便以后高效的更新,这里可以先不管
        var key = config.key || null;

        // 复制config里的内容到props
        for (propName in config) {
            if (config.hasOwnProperty(propName) && propName !== 'key') {
                props[propName] = config[propName];
            }
        }

        // 处理children,全部挂载到props的children属性上
        // 支持两种写法,如果只有一个参数,直接赋值给children,否则做合并处理
        var childrenLength = arguments.length - 2;
        if (childrenLength === 1) {
            props.children = $.isArray(children) ? children : [children] ;
        } else if (childrenLength > 1) {
            var childArray = Array(childrenLength);
            for (var i = 0; i < childrenLength; i++) {
                childArray[i] = arguments[i + 2];
            }
            props.children = childArray;
        }

        // 创建新的ReactElement
        return new ReactElement(type,key,props);

    },
    render:function(element,container){
        var componentInstance = instantiateReactComponent(element);
        var markup = componentInstance.mountComponent(React.nextReactRootIndex++);
        $(container).html(markup);
        //触发完成mount的事件
        $(document).trigger('mountReady');
    }
}
createElement只是做了简单的参数修正,最终返回一个ReactElement实例对象也就是我们说的虚拟元素的实例。这里注意key的定义,主要是为了以后更新时优化效率,这边可以先不管忽略。
有了元素实例,得把他渲染出来,此时render接受的是一个ReactElement而不是文本,先改造下instantiateReactComponent:
function instantiateReactComponent(node){
    //文本节点的情况
    if(typeof node === 'string' || typeof node === 'number'){
        return new ReactDOMTextComponent(node);
    }
    //浏览器基本element,注意基本类型element的type一定是字符串,可以和自定义element时对比
    if(typeof node === 'object' && typeof node.type === 'string'){
        //注意这里,使用了一种新的component
        return new ReactDOMComponent(node);
    }
}这里增加了一个判断,这样当render的不是文本而是浏览器的基本元素时。就使用另外一种component(ReactDOMComponent)来处理它渲染时应该返回的内容。这里就体现了工厂方法instantiateReactComponent的好处了,不管来了什么类型的node,都可以负责生产出一个负责渲染的component实例。这样render完全不需要做任何修改,只需要再做一种对应的component类型(这里是ReactDOMComponent)就行了。
所以重点我们来看看ReactDOMComponent的具体实现:
//component类,用来表示文本在渲染,更新,删除时应该做些什么事情
function ReactDOMComponent(element){
    //存下当前的element对象引用
    this._currentElement = element;
    this._rootNodeID = null;
}

//component渲染时生成的dom结构
ReactDOMComponent.prototype.mountComponent = function(rootID){
    // 标识
    this._rootNodeID = rootID;
    // element属性
    var props = this._currentElement.props;
    // 开始构造dom结构的开始和结束标签
    var tagOpen = '<' + this._currentElement.type;
    var tagClose = '</' + this._currentElement.type + '>';

    // 加上reactid标识,reactid=_rootNodeID
    tagOpen += ' data-reactid=' + this._rootNodeID;

    // 拼凑出属性
    for (var propKey in props) {
        // 这里要做一下事件的监听,就是从属性props里面解析拿出on开头的事件属性的对应事件监听
        if (/^on[A-Za-z]/.test(propKey)) {
            // 事件类型
            var eventType = propKey.replace('on', '');
            // 针对当前的节点添加事件代理,代理了reactid=_rootNodeID子节点的事件
            $(document).delegate('[data-reactid="' + this._rootNodeID + '"]', eventType + '.' + this._rootNodeID, props[propKey]);
        }

        // 对于children属性以及事件属性不需要进行字符串拼接
        // 事件会代理到全局。这边不能拼到dom上不然会产生原生的事件监听
        // children属性会在下面递归处理
        if (props[propKey] && propKey != 'children' && !/^on[A-Za-z]/.test(propKey)) {
            tagOpen += ' ' + propKey + '=' + props[propKey];
        }
    }
    // 获取子节点渲染出的内容
    var content = '';
    var children = props.children || [];

    // 用于保存所有的子节点的componet实例,以后会用到
    var childrenInstances = [];
    var that = this;
    $.each(children, function(key, child) {
        // 这里再次调用了instantiateReactComponent实例化子节点component类,拼接好返回
        var childComponentInstance = instantiateReactComponent(child);
        childComponentInstance._mountIndex = key;
        // 将子节点实例缓存到childrenInstances
        childrenInstances.push(childComponentInstance);
        // 子节点的rootId是父节点的rootId加上新的key也就是顺序的值拼成的新值
        var curRootId = that._rootNodeID + '.' + key;
        // 得到子节点的渲染内容
        var childMarkup = childComponentInstance.mountComponent(curRootId);
        // 拼接在一起
        content += ' ' + childMarkup;
    })

    // 留给以后更新时用的这边先不用管
    this._renderedChildren = childrenInstances;

    // 拼出整个html内容
    return tagOpen + '>' + content + tagClose;
}
增加了虚拟dom reactElement的定义,增加了一个新的componet类ReactDOMComponent。这样我们就实现了渲染浏览器基本元素的功能了。
对于虚拟dom的渲染逻辑,本质上是使用了递归,reactElement会递归渲染自己的子节点。可以看到我们通过instantiateReactComponent屏蔽了子节点的差异,只需要使用不同的componet类,这样都能保证通过mountComponent最终拿到渲染后的内容。
另外这边的事件也要说下,可以在传递props的时候传入{onClick:function(){}}这样的参数,这样就会在当前元素上添加事件,代理到document。由于reactjs本身全是在写js,所以监听的函数的传递变得特别简单。
这里很多东西没有考虑,比如一些特殊的类型input select等等,再比如img不需要有对应的tagClose等。这里为了保持简单就不再扩展了。另外reactjs的事件处理其实很复杂,实现了一套标准的w3c事件。这里偷懒直接使用jQuery的事件代理到document上了。
四、自定义类型element
本节来看看自定义类型element的渲染原理。
下面先来看看在React中如何定义一个自定义元素element:
// 自定义元素element
var HelloMessage = React.createClass({
  // 初始状态
  getInitialState: function() {
    return {type: 'say:'};
  },
  // 生命周期:将要挂载时调用
  componentWillMount: function() {
    console.log('我就要开始渲染了。。。')
  },
  // 生命周期:已经挂载之后调用
  componentDidMount: function() {
    console.log('我已经渲染好了。。。')
  },
  // 渲染并返回一个虚拟dom(包括element和text)
  render: function() {
    return React.createElement("div", null,this.state.type, "Hello ", this.props.name);
  }
});


React.render(React.createElement(HelloMessage, {name: "John"}), document.getElementById("container"));

/**
结果为:

html:
<div data-reactid="0">
    <span data-reactid="0.0">say:</span>
    <span data-reactid="0.1">Hello </span>
    <span data-reactid="0.2">John</span>
</div>

console:
我就要开始渲染了。。。
我已经渲染好了。。。

*/
可以看到,这里的createElement函数第一个参数的类型不再是字符串,而是一个class,
React.createClass生成一个自定义标记类,带有基本的生命周期:
- getInitialState :获取最初的属性值this.state
- componentWillmount :在组件准备渲染时调用
- componentDidMount :在组件渲染完成后调用
下面就来看看React.createClass的实现吧:
// 定义ReactClass类,所有自定义的超级父类
var ReactClass = function(){
}
// 留给子类去继承覆盖
ReactClass.prototype.render = function(){}


React = {
    nextReactRootIndex:0,
    // 创建自定义类
    createClass:function(spec){
        // 生成一个子类
        var Constructor = function (props) {
            this.props = props;
            this.state = this.getInitialState ? this.getInitialState() : null;
        }
        // 原型继承,继承超级父类
        Constructor.prototype = new ReactClass();
        Constructor.prototype.constructor = Constructor;
        // 混入spec到原型
        $.extend(Constructor.prototype,spec);
        return Constructor;

    },
    createElement:function(type,config,children){
        ...
    },
    render:function(element,container){
        ...
    }
}
可以看到createClass生成了一个继承ReactClass的子类,在构造函数里调用this.getInitialState获得最初的state。
为了演示方便,我们这边的ReactClass相当简单,实际上原始的代码处理了很多东西,比如类的mixin的组合继承支持,比如componentDidMount等可以定义多次,需要合并调用等等,有兴趣的去翻源码吧,不是本文的主要目的,这里就不详细展开了。
我们这里只是返回了一个继承类的定义,那么具体的componentWillmount,这些生命周期函数在哪里调用呢。
看看我们上面的两种类型就知道,我们是时候为自定义元素也提供一个componet类了,在那个类里我们会实例化ReactClass,并且管理生命周期,还有父子组件依赖。
好,我们老规矩先改造instantiateReactComponent
function instantiateReactComponent(node){
    // 文本节点的情况
    if(typeof node === 'string' || typeof node === 'number'){
        return new ReactDOMTextComponent(node);
    }
    // 浏览器默认节点的情况
    if(typeof node === 'object' && typeof node.type === 'string'){
        //注意这里,使用了一种新的component
        return new ReactDOMComponent(node);

    }
    // 自定义的元素节点,类型为构造函数
    if(typeof node === 'object' && typeof node.type === 'function'){
        // 注意这里,使用新的component,专门针对自定义元素
        return new ReactCompositeComponent(node);

    }
}
很简单我们增加了一个判断,使用新的component类形来处理自定义的节点。我们看下ReactCompositeComponent的具体实现:
function ReactCompositeComponent(element){
    //存放元素element对象
    this._currentElement = element;
    //存放唯一标识
    this._rootNodeID = null;
    //存放对应的ReactClass的实例
    this._instance = null;
}

//用于返回当前自定义元素渲染时应该返回的内容
ReactCompositeComponent.prototype.mountComponent = function(rootID){
    this._rootNodeID = rootID;
    //拿到当前元素对应的属性值
    var publicProps = this._currentElement.props;
    //拿到对应的ReactClass
    var ReactClass = this._currentElement.type;
    // Initialize the public class
    var inst = new ReactClass(publicProps);
    this._instance = inst;
    //保留对当前comonent的引用,下面更新会用到
    inst._reactInternalInstance = this;

    // 如果自定义元素设置了componentWillMount生命周期
    if (inst.componentWillMount) {
        inst.componentWillMount();
        //这里在原始的reactjs其实还有一层处理,就是  componentWillMount调用setstate,不会触发rerender而是自动提前合并,这里为了保持简单,就略去了
    }
    //调用ReactClass的实例的render方法,返回一个element或者一个文本节点
    var renderedElement = this._instance.render();
    //得到renderedElement对应的component类实例
    var renderedComponentInstance = instantiateReactComponent(renderedElement);
    this._renderedComponent = renderedComponentInstance; //存起来留作后用

    //拿到渲染之后的字符串内容,将当前的_rootNodeID传给render出的节点
    var renderedMarkup = renderedComponentInstance.mountComponent(this._rootNodeID);

    //之前我们在React.render方法最后触发了mountReady事件,所以这里可以监听,在渲染完成后会触发。
    $(document).on('mountReady', function() {
        //调用inst.componentDidMount
        inst.componentDidMount && inst.componentDidMount();
    });

    return renderedMarkup;
}
实现并不难,ReactClass的render一定是返回一个虚拟节点(包括element和text),这个时候我们使用instantiateReactComponent去得到实例,再使用mountComponent拿到结果作为当前自定义元素的结果。
应该说本身自定义元素不负责具体的内容,他更多的是负责生命周期。具体的内容是由它的render方法返回的虚拟节点来负责渲染的。
本质上也是递归的去渲染内容的过程。同时因为这种递归的特性,父组件的componentWillMount一定在某个子组件的componentWillMount之前调用,而父组件的componentDidMount肯定在子组件之后,因为监听mountReady事件,肯定是子组件先监听的。
需要注意的是自定义元素并不会处理我们createElement时传入的子节点,它只会处理自己render返回的节点作为自己的子节点。不过我们在render时可以使用this.props.children拿到那些传入的子节点,可以自己处理。其实有点类似webcomponents里面的shadow dom的作用。
上面实现了三种类型的元素,其实我们发现本质上没有太大的区别,都是有自己对应component类来处理自己的渲染过程。
本文源码实现以及参考内容来自于: http://purplebamboo.github.io/2015/09/15/reactjs_source_analyze_part_one/


 979
979

 被折叠的 条评论
为什么被折叠?
被折叠的 条评论
为什么被折叠?
 到【灌水乐园】发言


