


日常运维(Ⅲ)
十六、iptables备份和恢复
设定的防火墙规则只保存在内存中,并没有保存到某个文件中。 也就是说,当系统重启后以前设定的规则就没有了,所以设定号的规则后要先保存一下
- service iptables save //会把规则保存到/etc/sysconfig/iptables里
- iptables-save > 指定文件 //保存规则到指定的文件
- iptables-restore < 备份文件 //恢复备份文件中的规则
第一步,先清除nat表的所有规则,并查看;
[root@damozhiying ~]# iptables -t nat -F
[root@damozhiying ~]# iptables -t nat -nvL                  //查看nat表的规则
Chain PREROUTING (policy ACCEPT 0 packets, 0 bytes)
 pkts bytes target     prot opt in     out     source               destination

Chain INPUT (policy ACCEPT 0 packets, 0 bytes)
 pkts bytes target     prot opt in     out     source               destination

Chain OUTPUT (policy ACCEPT 4 packets, 304 bytes)
 pkts bytes target     prot opt in     out     source               destination

Chain POSTROUTING (policy ACCEPT 4 packets, 304 bytes)
 pkts bytes target     prot opt in     out     source               destination
第二步,给nat表写入2条规则,并查看;
[root@damozhiying ~]# iptables -t nat -A POSTROUTING -s 192.168.100.100 -j SNAT --to 192.168.112.136
[root@damozhiying ~]# iptables -t nat -A PREROUTING -d 192.168.112.136 -p tcp --dport 1122 -j DNAT --to 192.168.100.100:22
[root@damozhiying ~]# iptables -t nat -nvL
Chain PREROUTING (policy ACCEPT 0 packets, 0 bytes)
pkts bytes target     prot opt in     out     source               destination
   0     0 DNAT       tcp  --  *      *       0.0.0.0/0            192.168.112.136      tcp dpt:1122 to:192.168.100.100:22

Chain INPUT (policy ACCEPT 0 packets, 0 bytes)
pkts bytes target     prot opt in     out     source               destination

Chain OUTPUT (policy ACCEPT 0 packets, 0 bytes)
pkts bytes target     prot opt in     out     source               destination

Chain POSTROUTING (policy ACCEPT 0 packets, 0 bytes)
pkts bytes target     prot opt in     out     source               destination
   0     0 SNAT       all  --  *      *       192.168.100.100      0.0.0.0/0            to:192.168.112.136
第三步,用service iptables save保存规则,并查看配置文件**/etc/sysconfig/iptables**是否已经保存;
[root@damozhiying ~]# service iptables save
iptables: Saving firewall rules to /etc/sysconfig/iptables:[  确定  ]
[root@damozhiying ~]# cat /etc/sysconfig/iptables
# Generated by iptables-save v1.4.21 on Thu Jun 14 21:38:06 2018
*nat
:PREROUTING ACCEPT [0:0]
:INPUT ACCEPT [0:0]
:OUTPUT ACCEPT [4:304]
:POSTROUTING ACCEPT [4:304]
-A PREROUTING -d 192.168.112.136/32 -p tcp -m tcp --dport 1122 -j DNAT --to-destination 192.168.100.100:22
-A POSTROUTING -s 192.168.100.100/32 -j SNAT --to-source 192.168.112.136
COMMIT
# Completed on Thu Jun 14 21:38:06 2018
# Generated by iptables-save v1.4.21 on Thu Jun 14 21:38:06 2018
*filter
:INPUT ACCEPT [365:27812]
:FORWARD ACCEPT [0:0]
:OUTPUT ACCEPT [243:33388]
COMMIT
# Completed on Thu Jun 14 21:38:06 2018
第四步,用命令: iptables-save > 备份文件 备份配置文件
[root@damozhiying ~]# iptables-save > /tmp/ipt.txt
[root@damozhiying ~]# cat /tmp/ipt.txt
# Generated by iptables-save v1.4.21 on Thu Jun 14 21:42:21 2018
*nat
:PREROUTING ACCEPT [0:0]
:INPUT ACCEPT [0:0]
:OUTPUT ACCEPT [18:1368]
:POSTROUTING ACCEPT [18:1368]
-A PREROUTING -d 192.168.112.136/32 -p tcp -m tcp --dport 1122 -j DNAT --to-destination 192.168.100.100:22
-A POSTROUTING -s 192.168.100.100/32 -j SNAT --to-source 192.168.112.136
COMMIT
# Completed on Thu Jun 14 21:42:21 2018
# Generated by iptables-save v1.4.21 on Thu Jun 14 21:42:21 2018
*filter
:INPUT ACCEPT [495:37552]
:FORWARD ACCEPT [0:0]
:OUTPUT ACCEPT [337:43492]
COMMIT
# Completed on Thu Jun 14 21:42:21 2018
第五步,清除nat表规则,并查看nat表规则
[root@damozhiying ~]# iptables -t nat -F
[root@damozhiying ~]# iptables -t nat -nvL
Chain PREROUTING (policy ACCEPT 0 packets, 0 bytes)
 pkts bytes target     prot opt in     out     source               destination

Chain INPUT (policy ACCEPT 0 packets, 0 bytes)
 pkts bytes target     prot opt in     out     source               destination

Chain OUTPUT (policy ACCEPT 0 packets, 0 bytes)
 pkts bytes target     prot opt in     out     source               destination

Chain POSTROUTING (policy ACCEPT 0 packets, 0 bytes)
 pkts bytes target     prot opt in     out     source               destination
第六步,恢复备份文件;命令:iptables-restore < 备份文件
[root@damozhiying ~]# iptables-restore < /tmp/ipt.txt
[root@damozhiying ~]# iptables -t nat -nvL                       //规则已经恢复
Chain PREROUTING (policy ACCEPT 0 packets, 0 bytes)
 pkts bytes target     prot opt in     out     source               destination
    0     0 DNAT       tcp  --  *      *       0.0.0.0/0            192.168.112.136      tcp dpt:1122 to:192.168.100.100:22

Chain INPUT (policy ACCEPT 0 packets, 0 bytes)
 pkts bytes target     prot opt in     out     source               destination

Chain OUTPUT (policy ACCEPT 2 packets, 152 bytes)
 pkts bytes target     prot opt in     out     source               destination

Chain POSTROUTING (policy ACCEPT 2 packets, 152 bytes)
 pkts bytes target     prot opt in     out     source               destination
    0     0 SNAT       all  --  *      *       192.168.100.100      0.0.0.0/0            to:192.168.112.136
十七、firewalld的9个zone
开启firewalld步骤
systemctl disable iptables //开机关闭netfilter
systemctl stop iptables //停止netfilter服务
systemctl enable firewalld //开机启动firewalld
systemctl start firewalld //开启firewalld服务
开启firewalld防火墙
[root@damozhiying ~]# systemctl disable iptables
Removed symlink /etc/systemd/system/basic.target.wants/iptables.service.
[root@damozhiying ~]# systemctl stop iptables
[root@damozhiying ~]# systemctl enable firewalld
Created symlink from /etc/systemd/system/dbus-org.fedoraproject.FirewallD1.service to /usr/lib/systemd/system/firewalld.service.
Created symlink from /etc/systemd/system/multi-user.target.wants/firewalld.service to /usr/lib/systemd/system/firewalld.service.
[root@damozhiying ~]# systemctl start firewalld
[root@damozhiying ~]#
firewalld默认有9个zone(zone是firewalld的单位),默认zone为public
- drop(丢弃):任何接受的网络数据包都被丢弃,没有任何恢复,仅能有发送出去的网络连接(数据包不能进来,但是可以出去)
- block(限制):任何接受的网络连接都被IPv4的icmp-host-prohibited信息和IPv6的icmp6-adm-prohibited信息所拒绝。(和drop相比,比较宽松一些,主要是为了针对icmp)
- piblic(公共):在公共区域内使用,不能相信网络内其他计算机不会对你造成危害,只能接受经过选取的连接。
- external(外部):特别是为路由器启用了伪装功能的外部网,你不能信任来自网络的其他计算,不能相信他们不会对你造成伤害,只能接受经过选择的连接。
- dmz(非军事区):用于你的非军事区内的电脑,此区域可公开访问,可以有限的进入你的内部网络,仅仅接受经过选择的连接。
- work(工作):用于工作区,你可以基本信任网络内的其他电脑不会对你造成危害,仅仅接收经过选择的连接。
- home(家庭):用于内部网络,你可以基本上信任网络内其他电脑不会对你造成危害,仅仅接收经过选择的连接。
- internal(内部):用于内部网络,你可以基本上信任网络内其他电脑不会对你造成危害,仅仅接收经过选择的连接。
- trusted(信任):可接受所有的网络连接。
查看所有zone命令: firewall-cmd --get-zones
[root@damozhiying ~]# firewall-cmd --get-zones
block dmz drop external home internal public trusted work
[root@damozhiying ~]# firewall-cmd --get-default-zone
public
我们知道每个zone就是一套规则集,但是有那么多zone,对于一个具体的请求来说应该使用哪个zone(哪套规则)来处理呢?这个问题至关重要,如果这点不弄明白其他的都是空中楼阁,即使规则设置的再好,不知道怎样用、在哪里用也不行,在/usr/lib/iptables/zone,保存着zone的配置文件 对于一个接受到的请求具体使用哪个zone,firewalld是通过三种方法来判断的:
1、source,也就是源地址
2、interface,接收请求的网卡
3、firewalld.conf中配置的默认zone
这三个的优先级按顺序依次降低,也就是说如果按照source可以找到就不会再按interface去查找,如果前两个都找不到才会使用第三个。
针对网卡zones的一些常用命令
[root@damozhiying ~]# firewall-cmd --get-active-zones                   //查看素有网卡所拥有的zone
work
  interfaces: ens33
[root@damozhiying ~]# firewall-cmd --get-zone-of-interface=ens33        //查看指定网卡的zone
work
[root@damozhiying ~]# firewall-cmd --zone=public --add-interface=lo     //给指定网卡设置zone
success
[root@damozhiying ~]# firewall-cmd --get-zone-of-interface=lo           //查看zone
public
[root@damozhiying ~]# firewall-cmd --zone=home --change-interface=lo    //给指定网卡更改zone
success
[root@damozhiying ~]# firewall-cmd --get-zone-of-interface=lo           //查看zone
home
[root@damozhiying ~]# firewall-cmd --zone=home  --remove-interface=lo   //指定网卡删除zone,会恢复到默认网卡zone
success
[root@damozhiying ~]# firewall-cmd --get-zone-of-interface=lo           //指定的网卡:no zone
no zone
使用以下命令更改默认zone:
[root@damozhiying ~]# firewall-cmd --get-default-zone              //查看默认zones
work
[root@damozhiying ~]# firewall-cmd --set-default-zone=dmz          //设置默认zones
success
[root@damozhiying ~]# firewall-cmd --get-zone-of-interface=ens33   //查看指定网卡的zones
dmz
十八、关于service的操作
关于之所以有9种zone,是因为每一个zone里面都使用了不同的service,而service就是针对一个服务(端口)做的iptables规则。zone就是一个规则集合
- firewall-cmd --get-service //把系统文件内所有的service列出来
- firewall-cmd --get-default-zone //查看系统当前的默认zone
- firewall-cmd --list-service //把默认zone下的service列出来
- firewall-cmd --zone=(zone名) --list-service //把指定的zone下的service列出来
- firewall-cmd --zone=(zone名) --add-service=(service名) //把service加入到指定zone下(只是暂时写入内存中)
- firewall-cmd --zone=(zone名) --add-service=(service名) --permanent //修改配置文件,把service永久的加入到指定Zone下面
下面举例说明以上命令用法:
[root@damozhiying ~]# firewall-cmd --get-default-zone
dmz
[root@damozhiying ~]# firewall-cmd --list-service                       //列出当前服务
ssh
[root@damozhiying ~]# firewall-cmd --zone=home --list-service           //列出home的服务
ssh mdns samba-client dhcpv6-client
[root@damozhiying ~]# firewall-cmd --zone=home --add-service=http       //给home增加服务
success
[root@damozhiying ~]# firewall-cmd --zone=home --list-service           //此时http已经添加到home
ssh mdns samba-client dhcpv6-client http
但是只是把http加入到home下,只是暂时写入内存中;要想永久生效那么就要修改配置文件;
[root@damozhiying ~]# ls /etc/firewalld/zones/                                    //列出zones的配置文件
public.xml  public.xml.old
[root@damozhiying ~]# firewall-cmd --zone=home --add-service=http --permanent     //把http添加到home配置文件中
success
[root@damozhiying ~]# ls /etc/firewalld/zones/                                    //此时发现有home.xml配置文件生成
home.xml  public.xml  public.xml.old
[root@damozhiying ~]# cat /etc/firewalld/zones/home.xml                           //查看其配置文件
<?xml version="1.0" encoding="utf-8"?>
<zone>
  <short>Home</short>
  <description>For use in home areas. You mostly trust the other computers on networks to not harm your computer. Only selected incoming connections are accepted.</description>
  <service name="ssh"/>
  <service name="mdns"/>
  <service name="samba-client"/>
  <service name="dhcpv6-client"/>
  <service name="http"/>                                                          //里面有http服务,说明添加成功
</zone>
zones模板路径:/usr/lib/firewalld/zones (9种zones的模板)
[root@damozhiying ~]# ls /usr/lib/firewalld/zones/                //zones模板
block.xml  drop.xml      home.xml      public.xml   work.xml
dmz.xml    external.xml  internal.xml  trusted.xml
[root@damozhiying ~]# ls /etc/firewalld/zones/                   //firewalld系统用到的
home.xml  public.xml  public.xml.old
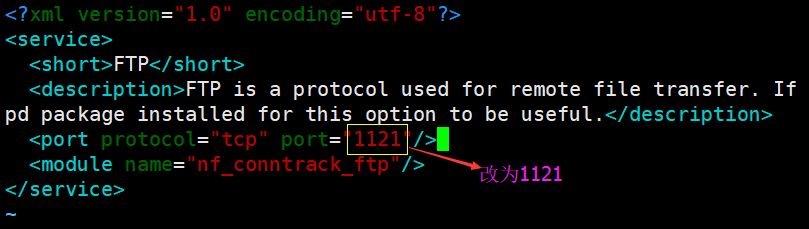
小实验:ftp服务自定义端口改为1121,在work,zone下面放行ftp
第一步:ftp.xml模板复制到到/etc/firewalld/services/目录下
[root@damozhiying ~]# ls /etc/firewalld/services/                                         //此时services无配置文件
[root@damozhiying ~]# cp /usr/lib/firewalld/services/ftp.xml  /etc/firewalld/services/    //把模板复制到services
[root@damozhiying ~]# ls /etc/firewalld/services/                                         //ftp.xml模板已复制好
ftp.xml
[root@damozhiying ~]# vim /etc/firewalld/services/ftp.xml                                 //编辑ftp.xml文件
第二步:按下图更改port(1121)
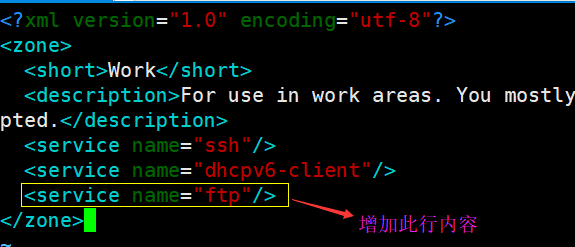
第三步:work.xml模板复制到到/etc/firewalld/zones/目录下
[root@damozhiying ~]# cp /usr/lib/firewalld/zones/work.xml  /etc/firewalld/zones/
[root@damozhiying ~]# ls /etc/firewalld/zones/
home.xml  public.xml  public.xml.old  work.xml
[root@damozhiying ~]# vim /etc/firewalld/zones/work.xml
第四步:按下图新增一行;
第五步:重新加载服务;
[root@damozhiying ~]# firewall-cmd --reload                       //重新加载服务
success
[root@damozhiying ~]# firewall-cmd --zone=work --list-service     //此时配置好的ftp已经在work zone下
ssh dhcpv6-client ftp
十九、linux任务计划cron
在LINUX中,周期执行的任务一般由cron这个守护进程来处理[ps -ef|grep cron]。cron读取一个或多个配置文件,这些配置文件中包含了命令行及其调用时间。
- cron的配置文件称为“crontab”,是“cron table”的简写。
- crond 和 cron 在linux_ubuntu 系统中进程名叫cron 在大多数系统中进程名叫crond。
cat /etc/crontab,查看到的数字左到右依次为:分、时、日、月、周和命令行
[root@damozhiying ~]# cat /etc/crontab
SHELL=/bin/bash                                    //定义shell
PATH=/sbin:/bin:/usr/sbin:/usr/bin                 //定义环境变量
MAILTO=root                                        //发送邮件

# For details see man 4 crontabs

# Example of job definition:
# .---------------- minute (0 - 59)                               //分范围0-59
# |  .------------- hour (0 - 23)                                 //时范围0-23
# |  |  .---------- day of month (1 - 31)                         //天范围0-31
# |  |  |  .------- month (1 - 12) OR jan,feb,mar,apr ...         //月范围1-12
# |  |  |  |  .---- day of week (0 - 6) (Sunday=0 or 7) OR sun,mon,tue,wed,thu,fri,sat    //周范围 0-6  0表示周日
# |  |  |  |  |
# *  *  *  *  * user-name  command to be executed                //格式为:分 时 日 月 周 user command
用crontab -e来编写任务计划;
[root@damozhiying ~]# crontab -e
no crontab for root - using an empty one
crontab: no changes made to crontab
实际上crontab -e 是打开了/var/spool/cron/username
注意: 不要编辑里面的文件,直接crontab -e 编辑(一般备份任务计划时用到直接cp这个目录即可)
示例每天凌晨三点执行命令
0 3 * * * command //root省略,每天凌晨3点执行命令
编写的格式:分范围0-59,时范围0-23,日范围1-31,月范围1-12,周1-7;可用格式1-5表示一个范围1到5;可用格式1,2,3表示1或者2或者3; 可用格式*/2表示被2整除的数字,比如小时,那就是每隔2小时
crontab -l 查询计划
[root@damozhiying ~]# crontab -l
no crontab for root
crontab -r 删除任务
[root@damozhiying ~]# crontab -r
no crontab for root
crontab -u 指定用户
[root@damozhiying ~]# crontab -u root -l
no crontab for root
cron(crond)是一个linux下 的定时执行工具,可以在无需人工干预的情况下运行作业。
- service crond start //启动服务
- service crond stop //关闭服务
- service crond restart //重启服务
- service crond reload //重新载入配置
- service crond status //查看服务状态
- 开始启动计划:systemctl start crond
[root@damozhiying ~]# systemctl start crond                       //开始启动计划
[root@damozhiying ~]# ps aux |grep cron计划                       //查看计划是否启动
root       587  0.0  0.0 126276  1616 ?        Ss   09:29   0:00 /usr/sbin/crond -n
root      2867  0.0  0.0 112720   984 pts/0    S+   13:06   0:00 grep --color=auto cron
- 开始启动的另一种方法:systemctl status crond
[root@damozhiying ~]# systemctl status crond
● crond.service - Command Scheduler
   Loaded: loaded (/usr/lib/systemd/system/crond.service; enabled; vendor preset: enabled)
   Active: active (running) since 四 2018-06-14 09:29:29 CST; 3h 38min ago
 Main PID: 587 (crond)
   CGroup: /system.slice/crond.service
           └─587 /usr/sbin/crond -n

6月 14 09:29:29 damozhiying systemd[1]: Started Command Scheduler.
6月 14 09:29:29 damozhiying systemd[1]: Starting Command Scheduler...
6月 14 09:29:29 damozhiying crond[587]: (CRON) INFO (RANDOM_DELAY will be scaled with factor 89% if used.)
6月 14 09:29:29 damozhiying crond[587]: (CRON) INFO (running with inotify support)
- 停止计划: systemctl stop crond
[root@damozhiying ~]# systemctl stop crond
扩展学习内容: Linux下的crontab定时执行任务命令详解
二十、chkconfig工具
chkconfig是在centos6上的服务管理工具,注意:在centos7已经不使用这种工具;但是目前目前企业大多还是centos6
20.1 chkconfig用法
- chkconfig --list查看服务
[root@damozhiying ~]# chkconfig --list

注:该输出结果只显示 SysV 服务,并不包含
原生 systemd 服务。SysV 配置数据
可能被原生 systemd 配置覆盖。

      要列出 systemd 服务,请执行 'systemctl list-unit-files'。
      查看在具体 target 启用的服务请执行
      'systemctl list-dependencies [target]'。

netconsole     	0:关	1:关	2:关	3:关	4:关	5:关	6:关
network        	0:关	1:关	2:开	3:开	4:开	5:开	6:关
- CentOS6用到的服务管理都是SysV,而7换成了systemd;
top - 13:22:16 up  3:52,  1 user,  load average: 0.00, 0.01, 0.05
Tasks:  94 total,   1 running,  93 sleeping,   0 stopped,   0 zombie
%Cpu(s):  0.0 us,  0.2 sy,  0.0 ni, 99.8 id,  0.0 wa,  0.0 hi,  0.0 si,  0.0 st
KiB Mem :  1875504 total,  1556448 free,   148200 used,   170856 buff/cache
KiB Swap:  3905532 total,  3905532 free,        0 used.  1553128 avail Mem

  PID USER      PR  NI    VIRT    RES    SHR S  %CPU %MEM     TIME+ COMMAND
    1 root      20   0  125268   3796   2532 S   0.0  0.2   0:01.58 systemd       //服务管理为 systemd
    2 root      20   0       0      0      0 S   0.0  0.0   0:00.01 kthreadd
    3 root      20   0       0      0      0 S   0.0  0.0   0:00.04 ksoftirqd/0
    5 root       0 -20       0      0      0 S   0.0  0.0   0:00.00 kworker/0:0H
    6 root      20   0       0      0      0 S   0.0  0.0   0:00.31 kworker/u128:0
    7 root      rt   0       0      0      0 S   0.0  0.0   0:00.04 migration/0
    8 root      20   0       0      0      0 S   0.0  0.0   0:00.00 rcu_bh
- 查看Linux所有的预设服务:ls /etc/init.d/
[root@damozhiying ~]# ls /etc/init.d/
functions  netconsole  network  README
- chkconfig network off
[root@damozhiying ~]# chkconfig network off
[root@damozhiying ~]# chkconfig --list

注:该输出结果只显示 SysV 服务,并不包含
原生 systemd 服务。SysV 配置数据
可能被原生 systemd 配置覆盖。

      要列出 systemd 服务,请执行 'systemctl list-unit-files'。
      查看在具体 target 启用的服务请执行
      'systemctl list-dependencies [target]'。

netconsole     	0:关	1:关	2:关	3:关	4:关	5:关	6:关
network        	0:关	1:关	2:关	3:关	4:关	5:关	6:关
- chkconfig network on
[root@damozhiying ~]# chkconfig network on
[root@damozhiying ~]# chkconfig --list

注:该输出结果只显示 SysV 服务,并不包含
原生 systemd 服务。SysV 配置数据
可能被原生 systemd 配置覆盖。

      要列出 systemd 服务,请执行 'systemctl list-unit-files'。
      查看在具体 target 启用的服务请执行
      'systemctl list-dependencies [target]'。

netconsole     	0:关	1:关	2:关	3:关	4:关	5:关	6:关
network        	0:关	1:关	2:开	3:开	4:开	5:开	6:关
回顾这里7个系统启动级别的知识,现在CnetOS7已经不再严格区分,但6之前是有规定的:
级别 释义 0 shutdown, 1 作为重启至单用户 2 无NFS服务支持的多用户模式 3 完全多用户模式,但不带图形 4 保留用户自定义 5 图形登入模式 6 表示重启
- 更改某个级别下的状态:chkconfig --level 3 network off
[root@damozhiying ~]# chkconfig --level 3 network off
[root@damozhiying ~]# chkconfig --list |grep network

注:该输出结果只显示 SysV 服务,并不包含
原生 systemd 服务。SysV 配置数据
可能被原生 systemd 配置覆盖。

      要列出 systemd 服务,请执行 'systemctl list-unit-files'。
      查看在具体 target 启用的服务请执行
      'systemctl list-dependencies [target]'。

network        	0:关	1:关	2:开	3:关	4:开	5:开	6:关
- 也可以关闭多个级别
[root@damozhiying ~]# chkconfig --level 345 network off
[root@damozhiying ~]# chkconfig --list |grep network

注:该输出结果只显示 SysV 服务,并不包含
原生 systemd 服务。SysV 配置数据
可能被原生 systemd 配置覆盖。

      要列出 systemd 服务,请执行 'systemctl list-unit-files'。
      查看在具体 target 启用的服务请执行
      'systemctl list-dependencies [target]'。

network        	0:关	1:关	2:开	3:关	4:关	5:关	6:关
- 增加服务 chkconfig --add 服务名
[root@damozhiying ~]# cd /etc/init.d/
[root@damozhiying init.d]# ls
functions  netconsole  network  README
[root@damozhiying init.d]# cp network 111          //备份network为111
[root@damozhiying init.d]# ls
111  functions  netconsole  network  README
[root@damozhiying init.d]# chkconfig --add 111     //增加111服务
[root@damozhiying init.d]# chkconfig --list

注:该输出结果只显示 SysV 服务,并不包含
原生 systemd 服务。SysV 配置数据
可能被原生 systemd 配置覆盖。

      要列出 systemd 服务,请执行 'systemctl list-unit-files'。
      查看在具体 target 启用的服务请执行
      'systemctl list-dependencies [target]'。

111            	0:关	1:关	2:开	3:开	4:开	5:开	6:关       //可以看到111服务
netconsole     	0:关	1:关	2:关	3:关	4:关	5:关	6:关
network        	0:关	1:关	2:开	3:关	4:关	5:关	6:关
- 删除某个服务chkconfig --del 服务名
[root@damozhiying init.d]# chkconfig --del 111                            //删除111服务
[root@damozhiying init.d]# chkconfig --list

注:该输出结果只显示 SysV 服务,并不包含
原生 systemd 服务。SysV 配置数据
可能被原生 systemd 配置覆盖。

      要列出 systemd 服务,请执行 'systemctl list-unit-files'。
      查看在具体 target 启用的服务请执行
      'systemctl list-dependencies [target]'。

netconsole     	0:关	1:关	2:关	3:关	4:关	5:关	6:关
network        	0:关	1:关	2:开	3:关	4:关	5:关	6:关
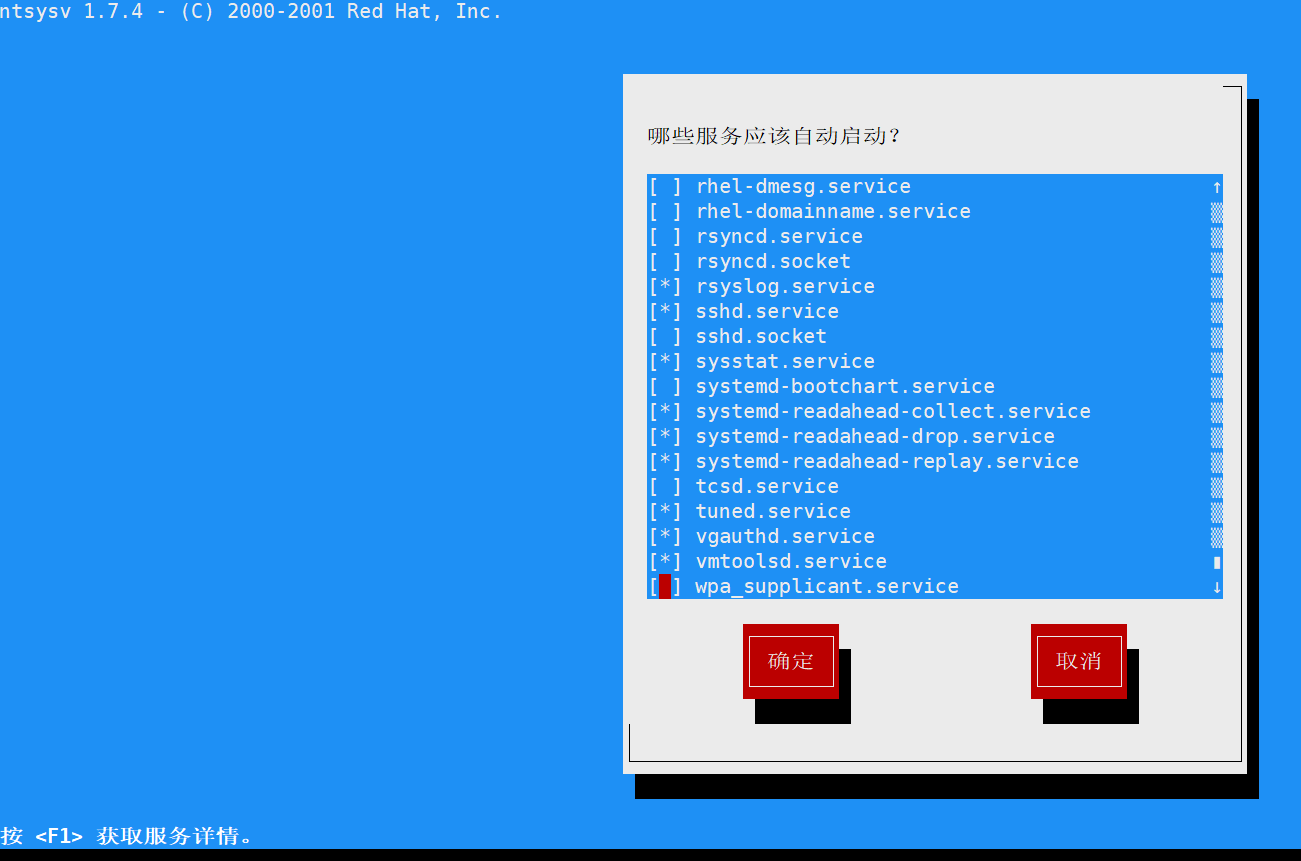
20.2 ntsysv:设置系统服务
作用:ntsysv是Red Hat公司遵循GPL规则所开发的,类图形界面管理模式程序,它具有交互式操作界面,可以轻易地利用方向键和空格键等,开启、关闭操作系统在每个执行等级中所要执行的系统服务。
总结一下功能按钮:
- 上下键:可以在中间的方框当中,在各个服务之间移动;
- 空格键:可以用来选择你所需要的服务,
- [**]表示开起启动;
- tab键:可以在方框、OK、Cancel之间移动;
- [F1]键:可以显示该服务的说明。
安装方法: yum install ntsysv
[root@damozhiying ~]# yum install ntsysv
已加载插件:fastestmirror
然后直接命令:ntsysv 此时出现如下界面可以配置启动、停止的服务了。
二十一、systemd管理服务
列出系统所有的服务
[root@damozhiying ~]# systemctl list-units --all --type=service|tail
  tuned.service                                         loaded    active   running Dynamic System Tuning Daemon
  vgauthd.service                                       loaded    active   running VGAuth Service for open-vm-tools
  vmtoolsd.service                                      loaded    active   running Service for virtual machines hosted on VMware

LOAD   = Reflects whether the unit definition was properly loaded.
ACTIVE = The high-level unit activation state, i.e. generalization of SUB.
SUB    = The low-level unit activation state, values depend on unit type.

94 loaded units listed.
To show all installed unit files use 'systemctl list-unit-files'.
[root@damozhiying ~]#
[root@damozhiying ~]# systemctl list-units --all --type=service|tail
  tuned.service                                         loaded    active   running Dynamic System Tuning Daemon
  vgauthd.service                                       loaded    active   running VGAuth Service for open-vm-tools
  vmtoolsd.service                                      loaded    active   running Service for virtual machines hosted on VMware

LOAD   = Reflects whether the unit definition was properly loaded.
ACTIVE = The high-level unit activation state, i.e. generalization of SUB.
SUB    = The low-level unit activation state, values depend on unit type.

94 loaded units listed.
To show all installed unit files use 'systemctl list-unit-files'.
几个常用的服务相关的命令
- systemctl enable crond.service //让服务开机启动
- systemctl disable crond //不让开机启动
- systemctl status crond //查看状态
- systemctl stop crond //停止服务
- systemctl start crond //启动服务
- systemctl restart crond //重启服务
- systemctl is-enabled crond //检查服务是否开机启动
二十二、 unit介绍
/usr/lib/systemd/system下的文件类型:
类型 释义 service 系统服务 target 多个unit组成的组 device 硬件设备 mount 文件系统挂载点 automount 自动挂载点 path 文件或路径 scope 不是由systemd启动的外部进程 slice 进程组 snapshot systemd 快照 socket 进程间通信套接字 swap swap文件 timer 定时器 以上每种文件类型的文件都为一个unit,正是这些unit才组成了系统的各个资源(各个服务,各个设备等)
unit相关命令:
-
systemctl list-units //列出正在运行的unit
-
systemctl -list-units --all //列出所有,包括识别的或者inactive的
-
systemctl list-units --al --state=inactive //列出inactive的unit
-
systemctl list-units --type=service //列出状态为active的service
-
systemctl is-active crond.service //查看某个服务是否为active
二十三、target介绍
target支持target同时启动,target其实是一个unit的组合,系统启动说白了就是启动多个unit,为了管理方便,就是要target来管理哲学unit。
- 查看当前系统的所有target:systemctl list-unit-files --type=target
[root@damozhiying ~]# systemctl list-unit-files --type=target |head
UNIT FILE                 STATE
basic.target              static
bluetooth.target          static
cryptsetup-pre.target     static
cryptsetup.target         static
ctrl-alt-del.target       disabled
default.target            enabled
emergency.target          static
final.target              static
getty.target              static
- 查看一个target包含的所有unit : systemctl list-dependencies multi-user.target
[root@damozhiying ~]# systemctl list-dependencies multi-user.target|head
multi-user.target
● ├─auditd.service
● ├─brandbot.path
● ├─chronyd.service
● ├─crond.service
● ├─dbus.service
● ├─firewalld.service
● ├─irqbalance.service
● ├─kdump.service
● ├─network.service
- 查看指定target下面有哪些unit:systemctl list-dependencies basic.target
[root@damozhiying ~]# systemctl list-dependencies basic.target|head
basic.target
● ├─microcode.service
● ├─rhel-autorelabel-mark.service
● ├─rhel-autorelabel.service
● ├─rhel-configure.service
● ├─rhel-dmesg.service
● ├─rhel-loadmodules.service
● ├─selinux-policy-migrate-local-changes@targeted.service
● ├─paths.target
● ├─slices.target
- 查看系统默认的target: systemctl get-default
[root@damozhiying ~]# systemctl get-default
multi-user.target
- 设置默认的target: systemctl set-default multi-user.target
[root@damozhiying ~]# systemctl set-default multi-user.target
Removed symlink /etc/systemd/system/default.target.
Created symlink from /etc/systemd/system/default.target to /usr/lib/systemd/system/multi-user.target.
注意:多个unit组成了一个target;一个target里面包含了多个service
- 查看sshd.service属于哪个target
[root@damozhiying ~]# cat /usr/lib/systemd/system/sshd.service
[Unit]
Description=OpenSSH server daemon
Documentation=man:sshd(8) man:sshd_config(5)
After=network.target sshd-keygen.service
Wants=sshd-keygen.service

[Service]
Type=notify
EnvironmentFile=/etc/sysconfig/sshd
ExecStart=/usr/sbin/sshd -D $OPTIONS
ExecReload=/bin/kill -HUP $MAINPID
KillMode=process
Restart=on-failure
RestartSec=42s

[Install]
WantedBy=multi-user.target                     //看此处,可以看到


 385
385

 被折叠的 条评论
为什么被折叠?
被折叠的 条评论
为什么被折叠?
 到【灌水乐园】发言


