This page is part of my virtualization context i.e. from my point of view talking/doing virtualization includes
- the OS (Operating System) part e.g. LXC
- the storage part e.g. LVM (Logical Volume Manager), a world-class solution for doing storage virtualization.
-
For anyone who has never heard about LVM (Logical Volume Manager), what it is, what it enables us to do and why many wish they had chosen to install their system the LVM way — once they understood how cool LVM is — instead of choosing to go with old-school partitions...
go LVM! Seriously, it is the future and provides us with anything old-school partitioning provides us with plus a whole truck load of more things should we need it later on...

-
Beginners respectively those who are not a hundred percent familiar with the concepts of LVM should go and take a look at the images below,
here, and read up on
LVM terms in parallel — otherwise a reader is unable to understand the following article.
Introduction Most volume manager implementations share the same basic design and start with PVs (Physical Volumes), which can be entire HDDs (Hard Disk Drives), HDD partitions, RAID devices (hard or software RAID) or a LUN (Logical Unit Number) mounted from some SAN (Storage Area Network).
-
LVM on top of RAID — This is very simple to achieve and mostly means that instead of running
pvcreate /dev/hda .. we would use
pvcreate /dev/md0 .. instead.
PVs are split into chunks called PEs (Physical Extents). Some volume managers (such as that in HP-UX and Linux) will have PEs of a uniform size (mostly 4 MiB these days (August 2008)). Others (such as that in Veritas) will have variably-sized PEs that can be split and merged at will. The image below shows how a usual LVM setup may look like. It shows anything except PEs and LEs — those can be seen here, picturing not just the same as the image below plus PEs and LEs but also showing another intermediate layer (encryption) between LVs and some file system e.g. ext3, XFS, reiserfs, etc. 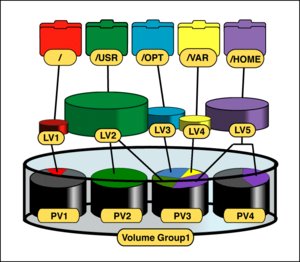
Mapping Usually, PEs are simply mapped one-to-one to LEs (Logical Extents). With mirroring, two or more PEs can be mapped onto one LE. These PEs are drawn from a VG (Volume Group), a set of PVs which act similarly to HDDs in a RAID 1 array. VGs are usually laid out so that they are formed from different HDDs and/or data buses for maximum redundancy.
The LEs are pooled into a VG (Volume Group). The pooled LEs can then be concatenated together into virtual partitions called LVs (Logical Volumes). LVs are usable as raw block devices just as physical HDD partitions are i.e. mountable file systems can be created on them, they can be used as swap storage etc. Furthermore, we can setup and intermediate layer between some LV and a file system e.g. set up block-layer encryption atop the LV and below the file system. On striped LVs (let us think of RAID 0 here), each successive LE is allocated from a different PV. Depending on the size of the LE, this can improve performance on large sequential reads by bringing to bear the combined read throughput of multiple PVs. Resizing LVs can be grown or shrunk by concatenating more LEs from or returning them to the pool. The concatenated LEs do not have to be contiguous. This allows LVs to be grown without having to move already-allocated LEs. Some volume managers allow LVs to be resized in either direction (we think of two dimensions and thereforeforwards and backwards; LBA (Logical Block Addressing)) while online. Changing the size of the LV does not necessarily change the size of a file system on top — it merely changes the size of its containing space. A file system that can be resized online (ext3 for example allows online resizing) is recommended because it allows the system to adjust its storage on-the-fly without interrupting applications. Snapshots PVs and LVs cannot be shared between or span different VGs (although some volume managers may allow them to be moved at will between VGs on the same host). Snapshots allow for VGs to be conveniently brought online, taken offline or moved between host systems as a single administrative unit. In short: Linux LVM implements a feature called snapshots that does exactly what the name says: It is like taking a picture of a LV at a given moment in time. With a Snapshot, we are provided with two copies of the same LV.
VGs can grow their storage pool by absorbing new PVs — as I already mentioned, PV might be formed/resized from/in various sources/ways e.g.
- adding another HDD to provide a new PV for inclusion into an existing VG
- growing the RAID array, providing a new/bigger PV by switching from RAID 6 to RAID 5. As an existing PV within the VG grows, the VG itself grows.
- adding another HDD to the RAID array providing the PV. Again, the PV grows and so does the VG containing the PV.
- assuming a HDD has two partitions whereas one is already made into a PV which happens to be part of the VG already. Making the second partition into a PV as well and adding it to the VG grows the VG.
- etc.
or shrink by retracting from PVs. The latter however may involve moving already-allocated LEs out of the PV. Most volume managers can perform this movement online i.e. transparent for the user and all sorts of processes — this allows storage (if the underlying hardware is hot-pluggable) to be upgraded or replaced without systemdowntime. Copy on Write Many volume managers — as for example LVM — implement snapshots by applying copy-on-write to each LE.
-
CoW is an optimization strategy used in computer programming. The fundamental idea is that if multiple callers ask for resources which are initially indistinguishable, you can give them pointers to the same resource. This function can be maintained until a caller tries to modify its copy of the resource, at which point a true private copy is created to prevent the changes becoming visible to everyone else. All of this happens transparently to the callers. The primary advantage is that if a caller never makes any modifications, no private copy need ever be created.
In this scheme, the volume manager will copy the LE to a copy-on-write table just before it is written to. This preserves an old version of the LV — the snapshot — which can later be reconstructed by overlaying the copy-on-write table atop the current LV. Snapshots which are read-write are branching snapshots because they implicitly allow diverging versions of an LV. Snapshots can be useful for backing up self-consistent versions of volatile data like table files from a busy database, or for rolling back large changes in one swoop, such as an operating system upgrade. Theory This section explains and discusses the LVM implementation as it is shipped with Linux. LVM Terms This is VERY important to understand. Please go here, read, and return afterwards. Components As already mentioned, logical volume management is a way systems can abstract physical volume management into a higher-level and usually simpler paradigm. By using LVM, all physical HDDs and HDD partitions, no matter what size and how scattered they are, can be abstracted and viewed as a single storage source. For example, in the layout of physical-to-logical mapping shown below, how could the user create a file system of, say 150 GiB, since the biggest HDD is 80 GiB large? 
By aggregating partitions and whole HDDs into a virtual disk, LVM can sum small storage spaces into a bigger, consolidated one. This virtual disk, in LVM terms, is called VG (Volume Group). The possibility of having a filesystem bigger than our biggest physical HDD is not the only magic feature of this high-level paradigm of storage management. With LVM, we can also:
- Add HDDs and HDD partitions to our disk-pool and extend existing filesystems online.
- Replace two 80 GiB HDDs with one 160 GiB HDD without the need to bring the system off-line or manually move data between HDDs.
- Shrink filesystems and remove HDDs from the pool when their storage space is no longer necessary.
- Perform consistent backups using snapshots.
LVM Components With Linux, the LVM is structured in three elements:
- Volumes: physical and logical volumes and volume groups
- Extents: physical and logical extents
- Device mapper: the Linux kernel module
Volumes Linux LVM is organized into PVs, VGs, and LVs. Physical volumes are physical HDDs, physical HDD partitions (as in /dev/sda or /dev/sdb1; see Linux & Partition Types). A VG is an aggregation of PVs. A VG can be logically partitioned into LVs. 
All four partitions in physical HDD 0 (/dev/hda[1-4]), as well as the whole of physical HDD 1 (/dev/hdb) and physical HDD 2 (/dev/hdd), were added as PVs to volume group VG0. The VG is where the magic of n-to-m mapping is done (as in, n PVs can be seen as m LVs). So after the assignment of PVs to the VG, we can create a LV of any size (to the maximum of the VG size). In the example, a LV named LV0 was created, leaving some free-space for other LVs (or for posterior LV0 growth).
LVs are the LVM equivalent of physical HDD partitions — for all practical purposes, they are physical HDD partitions.
So, after the creation of an LV, we can use it with whatever file system we prefer and mount it to some mount point and start using it The image below shows a LV, namelyLV0, mounted into the file system tree at /var. 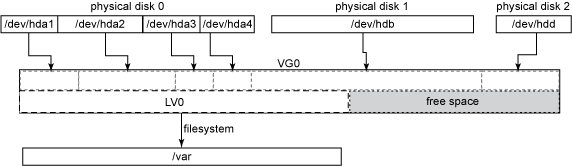
Extents In order to do the n-to-m (physical-to-logical) volumes mapping, PVs and VGs must share a common quantum size for their basic blocks — these are called PEs (Physical Extents) and LEs (Logical Extents). Despite the n-physical to m-logical volume mapping, PEs and LEs always map 1-to-1. With LVM2, there is no limit on the maximum numbers of extents per PV respectively LV. The default extent size is 4 MiB, and there is no need to change this for most configurations, because there is no I/O (Input/Output) performance penalty for smaller/bigger extent sizes. LVM tools usage, however, can suffer from high extent count, so using bigger extents can keep the extent count low. We need to be aware, that different extent sizes can not be mixed in a single VG, and changing the extent size is the single unsafe operation with the LVM i.e. it can destroy data. The best advice is to stick with the extent size chosen in the initial setup. Different extent sizes means different VG granularity. For instance, if we choose an extent size of 4 GiB, we can only shrink/extend LVs in steps of 4 GiBs. The figure below shows the same layout used in previous examples with the PEs and LEs shown. The free space inside VG0 is also formed of free LEs, even though they are not shown. 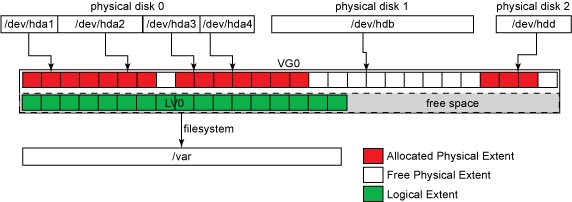
What can also be seen from the image above is the extent allocation policy. LVM2 does not always allocate PEs contiguously (more information can be found with man 8 lvm). The system administrator can set different allocation policies, but that is not normally necessary, since the default one (called the normal allocation policy) uses common-sense rules such as not placing parallel stripes on the same physical volume. If we decide to create a second LV (LV1), the final PE distribution may look like the one shown below. 
Features This subsection is to quickly tell about what can/cannot be done with LVM... Let us start with what features are provided by LVM:
- Resizing of VGs online by absorbing new PVs or ejecting existing ones.
- Resizing LVs online by concatenating LEs onto them or truncating LEs from them.
- Create read-only snapshots of LVS (LVM1).
- Create read-write snapshots of LVs (LVM2).
- Stripe whole or parts of LVs across multiple PVs, in a fashion similar to RAID 0.
- Mirror whole or parts of LVs, in a fashion similar to RAID 1.
- online moving LVs between PVs.
- Split or merge VGs (as long as no LVs span the split). This can be useful when migrating whole LVs to or from off-line storage.
The LVM will also work in a shared-storage environment e.g. a cluster with more than one node (where HDDs holding the PVs are shared between multiple nodes), but requires an additional daemon to propagate state changes between cluster nodes. And now something that does not work with LVM: LVM does not provide parity-based redundancy across LVs as with RAID 4, RAID 5 or RAID 6. This functionality is instead provided by Linux metadisks, Hardware RAID arrays or LUNs (Logical Unit Numbers) mounted from some SAN, which can be used as LVM PVs. Implementation LVM keeps a metadata header at the start of every PV, each of which is uniquely identified by a UUID (Universally Unique Identifier). Each PV's header is a complete copy of the entire VGs layout, including the UUIDs of all other PVs, the UUIDs of all LVs and an allocation map of PEs to LEs. This simplifies data recovery in the event of loss of one or more PVs.
In the 2.6-series Linux kernels, the LVM is implemented in terms of the device mapper, a simple block-level scheme for creating virtual block devices and mapping their contents onto other block devices. This minimizes the amount of relatively hard-to-debug kernel code needed to implement the LVM. It also allows its I/O redirection services to be shared with other volume managers (such as EVMS). Any LVM-specific code is pushed out into its userspace tools, which merely manipulate these mappings and reconstruct their state from on-disk metadata upon each invocation. Device Mapper In the Linux kernel, the device-mapper is a generic framework to map one block device into another. It forms the foundation of virtual block devices such as LVM2, EVMS, software RAID and dm-crypt for block-layer encryption. It also offers additional features such as file system snapshots. Device-mapper works by processing data passed in from a virtual block device, performing some actions specific to that particular virtual block device in action and then passing it on to another virtual block device if there is another one — if not, the last virtual block device is used as any other normal HDD partition (one can put a file system on top, mount it into the file system tree, etc.). Applications, like LVM2 and EVMS, that want to create new mapped devices talk to the Device-mapper via the libdevmapper.so shared library, which in turn issues ioctls to the /dev/mapper/control device node. Device-mapper is also accessible from shell scripts via the dmsetup tool.
In most major distributions like for example Debian, device mapper comes installed by default, and it is usually loaded automatically at boot time or when LVM2/EVMS/dm-crypt/etc. packages are installed or enabled. When creating VGs and LVs, we can give them a meaningful name — as opposed to names like VG0, LV0, and LV1. It is the device mapper's job to map these names correctly to the physical devices. The standard mapping works like this: /dev/<vg_name>/<lv_name> -> /dev/mapper/<vg_name>-<lv_name>. As opposed to a physical HDD, there is no raw access to a volume group (meaning there is no such thing as a /dev/mapper/VG0 file or we can not dd if=/dev/VG0 of=dev/VG1. Instead, we deal with these using the LVM toolset. Is our system ready for LVM2? We need to verify whether our system is LVM ready. Therefore, the LVM2 package needs to be installed which is the case with my subnotebook already as we can see below. sa@sub:~$ type dpl
dpl is aliased to `dpkg -l'
sa@sub:~$ dpl lvm2 | grep ^ii
ii lvm2 2.02.39-2 The Linux Logical Volume Manager
sa@sub:~$
The device mapper Kernel module must be loaded at system startup. To check if it is currently loaded we can issue sa@sub:~$ lsmod | grep dm_mod
dm_mod 58864 11 dm_crypt,dm_mirror,dm_log,dm_snapshot
sa@sub:~$
As can be seen, it is loaded. However, it might also be statically built-in with our Linux Kernel.
If we plan to put the root file system i.e. / onto an LV, we need to take extra care with the initial-ramdisk image. The initial-ramdisk image usually activates LVM only when it detects that the root file system is onto an LV. That is usually done by parsing the root= kernel parameter. Most Linux distributions usually take care of this i.e. when installing the LVM2 package, they usually rebuild or update the initrd image with the appropriate kernel modules and activation scripts. Debian takes care of this... LVM Toolset There are a few packages directly related to LVM on DebianGNU/Linux sa@sub:~$ acsn lvm | egrep Logical\|lvm2
clvm - Cluster LVM Daemon for lvm2
liblinux-lvm-perl - Perl extension for accessing Logical Volume Manager(LVM)
lvm2 - The Linux Logical Volume Manager
system-config-lvm - A utility for graphically configuring Logical Volumes
sa@sub:~$
system-config-lvm This one is a GUI (Graphical User Interface) for LVM. To be honest, I just played around for a few minutes simply because I am nosy. Here is how it looks like 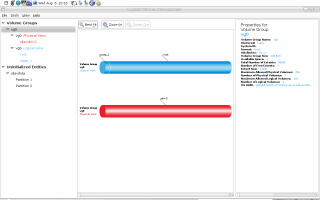
I fond of the CLI simply because time matters and therefore the GUI tool with lvm is not what I want anyway... from what I figured its also very limited in what can be done compared to all the CLI tools in the lvm2 package (see below). clvm and liblinux-lvm-perl Well, never used them... here is what the package description says about them:
-
clvm: This package provides the clustering interface for lvm2, when used with Red Hat's
cman cluster infrastructure. It allows logical volumes to be created on shared storage devices (eg Fibre Channel, or iSCSI).
-
liblinux-lvm-perl: Perl extension for accessing Logical Volume Manager(LVM) data structures on Linux.
lvm2 LVM2 refers to a new userspace toolset that provides logical volume management facilities in Linux. It is fully backwards-compatible with the original LVM toolset also known as LVM1. In this article, I will show the most useful features of LVM2 as well as some other possible uses to simplify our system administration tasks. The lvm2 package contains a bunch of tools, some of which are used on a daily basis and many very specific to some special use cases. Usually I would issue afl lvm2 | grep bin/
but this time man lvm | sed -n '/^COMMANDS/,/^OPTIONS/p' | grep .
and a few keystrokes with mighty GNU Emacs (e.g. align-regex) reveals The following commands implement the core LVM functionality.
pvchange - Change attributes of a physical volume.
pvck - Check physical volume metadata.
pvcreate - Initialize a disk or partition for use by LVM.
pvdisplay - Display attributes of a physical volume.
pvmove - Move physical extents.
pvremove - Remove a physical volume.
pvresize - Resize a disk or partition in use by LVM2.
pvs - Report information about physical volumes.
pvscan - Scan all disks for physical volumes.
vgcfgbackup - Backup volume group descriptor area.
vgcfgrestore - Restore volume group descriptor area.
vgchange - Change attributes of a volume group.
vgck - Check volume group metadata.
vgconvert - Convert volume group metadata format.
vgcreate - Create a volume group.
vgdisplay - Display attributes of volume groups.
vgexport - Make volume groups unknown to the system.
vgextend - Add physical volumes to a volume group.
vgimport - Make exported volume groups known to the system.
vgmerge - Merge two volume groups.
vgmknodes - Recreate volume group directory and logical volume special files
vgreduce - Reduce a volume group by removing one or more physical volumes.
vgremove - Remove a volume group.
vgrename - Rename a volume group.
vgs - Report information about volume groups.
vgscan - Scan all disks for volume groups and rebuild caches.
vgsplit - Split a volume group into two, moving any logical volumes from one volume group to another by moving entire physical volumes.
lvchange - Change attributes of a logical volume.
lvconvert - Convert a logical volume from linear to mirror or snapshot.
lvcreate - Create a logical volume in an existing volume group.
lvdisplay - Display attributes of a logical volume.
lvextend - Extend the size of a logical volume.
lvmchange - Change attributes of the logical volume manager.
lvmdiskscan - Scan for all devices visible to LVM2.
lvmdump - Create lvm2 information dumps for diagnostic purposes.
lvreduce - Reduce the size of a logical volume.
lvremove - Remove a logical volume.
lvrename - Rename a logical volume.
lvresize - Resize a logical volume.
lvs - Report information about logical volumes.
lvscan - Scan (all disks) for logical volumes.
The following commands are not implemented in LVM2 yet (August 2008) but might be in the future:
lvmsadc
lvmsar
pvdata
Using LVM This section is all about getting to grips with LVM stuff i.e. setting up LVs, managing PVs, VGs, LVs etc. Aside from those two basic actions I am also going to cover some more advanced stuff like for example
- using snapshots as a prerequisite for backups, snapshots to create and manage OpenVZ VEs (Virtual Environments), snapshots to make a fallback after we nuked our lovely sid (still in development) with
aptitude update && aptitude full-upgrade although we used apt-listbugs and apt-listchanges... yes, once or twice a year I do nuke stuff ;-] - better fault tolerance and/or improved I/O (Input/Output) to storage by simulating RAID (Redundancy Arrays of Independent Disks)
- Block-layer encryption with LVM in order to ensure a few VERY important things like for example self-determination...
Prerequisites As already mentioned above, using LVM starts with some sort of physical media. We are now going to use our favorite partitioner e.g. cfdisk, fdisk, sfdisk, parted, gparted etc. to create new partitions for LVM usage. I am going to use cfdisk for this example — line 3 in the screendump below. Although supported by LVM, using LVM on top of an entire disk (e.g. /dev/sda) is not recommended simply because some operating systems out there may see this HDD as uninitialized and wipe it out. It is better to create a physical partition covering the entire HDD (e.g. create /dev/sda1, spanning the whole HDD) and then make it into a PV.
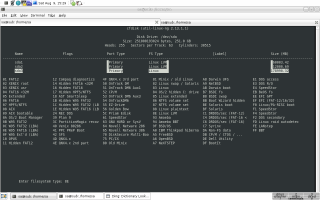
Most partitioners usually default to create new partitions using the 0x83 (Linux) partition ID (see Linux & Partition Types). We could use the default, but for organization purposes, it is better to change it to 0x8e (Linux LVM) as can be seen in the middle image below. 1 sa@sub:~$ su
2 Password:
3 sub:/home/sa# cfdisk /dev/sda
[here I am working with cfdisk; see images...]
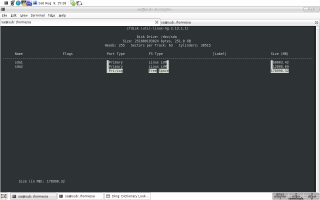  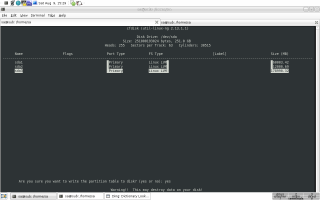
After we have created some new partitions, we can verify things (lines 4 to 15). As can be seen, I made 3 new physical partitions on top of one physical HDD. Instead of just 3 block devices, all of the same flavor (no mixed setup of RAID, physical partitions, LUNs etc.) steaming from one physical device, this could be a crazy mixture of all sorts of block devices — pvcreate does not care... more on that later... 4
5 sub:/home/sa# fdisk -l /dev/sda
6
7 Disk /dev/sda: 251.0 GB, 251000193024 bytes
8 255 heads, 63 sectors/track, 30515 cylinders
9 Units = cylinders of 16065 * 512 = 8225280 bytes
10 Disk identifier: 0x00000000
11
12 Device Boot Start End Blocks Id System
13 /dev/sda1 1 7295 58597056 8e Linux LVM
14 /dev/sda2 7296 8754 11719417+ 8e Linux LVM
15 /dev/sda3 8755 30515 174795232+ 8e Linux LVM
Creating Volumes Now that we have our block devices, we can make them into PVs using pvcreate. After that, we are going to create VG(s), assembling from PV(s). Subsequently, we are going to use the VG(s) to create LV(s). LV(s) can then be used as... well, I already mentioned that but since its very important to keep at least that in mind, here it is again:
LVs are the LVM equivalent of physical HDD partitions — for all practical purposes, they are physical HDD partitions. The LV is like a block device for all purposes, including but not limited to using it as a raw partition for databases. This is, in fact, a standard best practice if we want to perform consistent backups over a database using LVM snapshots.
Since humans are sort of visual animals, the sketches below plus the images onto another page, should make it quite clear what we are talking about respectively doing right now — stuff between [ and ] determines optional steps and * determines made of single physical HDD, hard/software RAID, LUN, etc.
Without LVM
block device(s)* --> [encryption] --> file system
With LVM (LVM layer below encryption layer)
block device(s)* --> PV --> [LVM based fault tolerance and/or increased I/O] --> VG --> LV --> [encryption] --> file system
With LVM (LVM layer on top of encryption layer; Debian installer does this)
block device(s)* --> [encryption] --> PV --> [LVM based fault tolerance and/or increased I/O] --> VG --> LV --> file system
As can be seen with the three examples above, all three are encrypted using dm-crypt and LUKS (Linux Unified Key Setup) but only two of them use LVM. Those two using LVM have the LVM and encryption layers in different order i.e. the Debian installer (some call this also The Debian way because the Debian installer sets up a newly installed system in this order of layers i.e. encryption layer below LVM layer) puts the LVM layer on top of the encryption layer. In practice it does not really matter from a technical point of view i.e. growing and shrinking works either ways as long as the file system allows for it. Personally I think for most folks The Debian way might be less work and easier to handle in the long run but for complex setups I can tell from experience, that putting the LVM layer below the encryption layer provides for more flexibility and is easier to handle with day to day tasks in some enterprise environment and the like. Therefore, for something simple like a subnotebook using the Debian installer also known as The Debian way is straight forward and in most cases probably the best thing to do (this will put the LVM layer on top of the encryption layer). However, for a workstation and/or servers and other setups that might become complex over time, require just minimal or no downtime at all, require a certain amount of flexibility, etc. I strongly recommend to put the LVM layer below the encryption layer as shownhere in Example 2. Create PV(s) Next we are going to create some PVs from our afore created block devices (lines 13 to 15). 16 sub:/home/sa# pvscan -n
17 WARNING: only considering physical volumes in no volume group
18 No matching physical volumes found
19 sub:/home/sa# pvcreate --metadatacopies 2 /dev/sda1 /dev/sda2 /dev/sda3
20 Physical volume "/dev/sda1" successfully created
21 Physical volume "/dev/sda2" successfully created
22 Physical volume "/dev/sda3" successfully created
23 sub:/home/sa# pvscan -n
24 WARNING: only considering physical volumes in no volume group
25 PV /dev/sda1 lvm2 [55.88 GB]
26 PV /dev/sda2 lvm2 [11.18 GB]
27 PV /dev/sda3 lvm2 [166.70 GB]
28 Total: 3 [233.76 GB] / in use: 0 [0 ] / in no VG: 3 [233.76 GB]
There is not much to say about lines 16 to 18 — we are scanning for PVs not assigned to some VG yet. Since we have not created any PV yet we do not find any with pvscan -n. Line 19 is the important one — we are creating PVs from our afore created physical HDD partitions which can be seen in lines 13 to 15. As we remember, we used cfdisk to do so; line 3 and above images. --metadatacopies 2 is an additional switch I used in order to create 2 instead of just 1 (default) copy of VG metadata blocks on each of the PVs — one at the beginning and on at the end of any PV. I did so because, should it happen that the block device (physical HDD partition in our current case) gets damaged at the exact position where the VG metadata lives, chances are way better to survive this simply because there is a second metadata block around that can be used by LVM.
Line 23 is the same as line 16 except that now we find PVs not yet associated with some VG (line 24 the hint; lines 25 to 27 the PVs). The information provided in lines 25 to 28 is self-explaining.
29  sub:/home/sa# pvdisplay /dev/sda2
30    "/dev/sda2" is a new physical volume of "11.18 GB"
31    --- NEW Physical volume ---
32    PV Name               /dev/sda2
33    VG Name
34    PV Size               11.18 GB
35    Allocatable           NO
36    PE Size (KByte)       0
37    Total PE              0
38    Free PE               0
39    Allocated PE          0
40    PV UUID               nxjJoX-164q-KJMm-6LHE-qdru-8NYS-uJdqAO
41
42  sub:/home/sa# pvs /dev/sda*
43    Failed to read physical volume "/dev/sda"
44    PV         VG   Fmt  Attr PSize   PFree
45    /dev/sda1       lvm2 --    55.88G  55.88G
46    /dev/sda2       lvm2 --    11.18G  11.18G
47    /dev/sda3       lvm2 --   166.70G 166.70G
48  sub:/home/sa#
The commands used in line 29 and 42 are part of the LVM toolset in order to find out more about PVs. The first command for example can be used to take a closer look at one particular PV. The second one is more like the birds-eye view on all or a set (I used a particular path as argument i.e. /dev/sda) of PVs. All commands have manual files to read up on them e.g. man 8 pvs tells about pvs. Creating VG(s) Next, now that we have a bunch of PVs, we are going to assemble one or more PVs into one or more VGs. In particular, I am going to create 2 VGs out of 3 PVs. The first VG, (vg_mp3) is created in line 49. A second VG (vg_mail) is created in line 51. 49 sub:/home/sa# vgcreate --physicalextentsize 128M vg_mp3 /dev/sda1 /dev/sda3
50 Volume group "vg_mp3" successfully created
51 sub:/home/sa# vgcreate vg_mail /dev/sda2
52 Volume group "vg_mail" successfully created
53 sub:/home/sa# vgs -v | grep -v vg0
54 Finding all volume groups
55 Finding volume group "vg_mail"
56 Finding volume group "vg_mp3"
57 Finding volume group "vg0"
58 VG Attr Ext #PV #LV #SN VSize VFree VG UUID
59 vg_mail wz--n- 4.00M 1 0 0 11.18G 11.18G r7KqD4-jHVd-ZKdU-yYpB-Y8SX-Zy5T-l1fyoi
60 vg_mp3 wz--n- 128.00M 2 0 0 222.50G 222.50G u00E2W-KeR2-aSs9-5iA7-fLvM-uWA4-1Ykvk6
VG vg_mp3 is assembled of two PVs, /dev/sda1 and /dev/sda3 whereas vg_mail is created from PV /dev/sda2. Since we are talking LVM this setup can be changed in the future i.e. removing, adding PVs to VGs, changing some settings of VGs, etc. Another interesting thing can be seen in line 49, --physicalextentsize 128M (a power of two should be choosen) has been chosen over the default (4 MiB) in order to take into account that vg_mp3 will store only large chunks of data (mp3's, movies, etc.) instead of many tiny files like for example email — HDD seek time for example is better for this particular use case when we choose a big PE size; in case of SSDs (Solid State Drives) this would be superfluous simply because of the principle (random access) how SSDs work. Lines 53 to 60 simply show status information on our just created VGs. I have another VG (vg0) on my subnotebook which I exclude — it is of no importance. As can be seen, our VGs have different PE sizes — 4 respectively 128 MiB. More on what exactly each column determines can be found out by reading up on the manual page. wz--n- for example determines writable, resizable and normal.
61  sub:/home/sa# vgdisplay vg_mail vg_mp3 | grep 'PE Size'
62    PE Size               4.00 MB
63    PE Size               128.00 MB
64  sub:/home/sa# vgdisplay -v vg_mp3
65      Using volume group(s) on command line
66      Finding volume group "vg_mp3"
67    --- Volume group ---
68    VG Name               vg_mp3
69    System ID
70    Format                lvm2
71    Metadata Areas        4
72    Metadata Sequence No  1
73    VG Access             read/write
74    VG Status             resizable
75    MAX LV                0
76    Cur LV                0
77    Open LV               0
78    Max PV                0
79    Cur PV                2
80    Act PV                2
81    VG Size               222.50 GB
82    PE Size               128.00 MB
83    Total PE              1780
84    Alloc PE / Size       0 / 0
85    Free  PE / Size       1780 / 222.50 GB
86    VG UUID               u00E2W-KeR2-aSs9-5iA7-fLvM-uWA4-1Ykvk6
87
88    --- Physical volumes ---
89    PV Name               /dev/sda1
90    PV UUID               fq3cXc-9hpc-Subk-djOs-9R7l-UWTS-3I1DNq
91    PV Status             allocatable
92    Total PE / Free PE    447 / 447
93
94    PV Name               /dev/sda3
95    PV UUID               JqNlXK-MsD1-isLE-5xpb-wF5Z-Y6r7-9Xcl9k
96    PV Status             allocatable
97    Total PE / Free PE    1333 / 1333
98
99  sub:/home/sa# vgscan
100    Reading all physical volumes.  This may take a while...
101    Found volume group "vg_mail" using metadata type lvm2
102    Found volume group "vg_mp3" using metadata type lvm2
103    Found volume group "vg0" using metadata type lvm2
In line 61 we issue a command to see what we already know — lines 62 and 63 show the difference in PE size of vg_mail and vg_mp3 respectively. A detailed view on vg_mp3 can be seen from line 64 to line 98. I am not going into detail since the output is pretty much self-explaining plus man 8 vgdisplay can be used to get all the information needed to understand the output. The only thing I find worth mentioning explicitly is that -v not just provides us with the VG but also the PV(s) each VG is made of. Knowing about UUIDs (Universally Unique Identifiers) is important for all sorts of work with virtualized storage — I know that from experience already — it is important to know how to acquire UIDs through all the different layers — block device up to LVs, file systems even... Lines 99 to 103 show another quite interesting/important command — vgscan scans all disks for volume groups and rebuilds caches. Here is the rationale for line 99: I am using an external USB (Universal Serial Bus) HDD (Hard Disk Drive) for this article i.e. what can be seen in line 13 to 15 are physical partitions on this HDD. Since I turn this HDD off over night (I went to bed between lines 98 and 99 i.e. turned off the external HDD and subnotebook), I need to issue vgscan in order to rescan for VGs — otherwise only vg0 on my subnotebook would be known to the system. Creating LV(s) Now, the penultimate step before we are done setting up a virtualized storage environment. 104 sub:/home/sa# lvs vg_mail
105 sub:/home/sa# lvcreate -v -n mail_private -L 3G --addtag mail vg_mail
106 Setting logging type to disk
107 Finding volume group "vg_mail"
108 Archiving volume group "vg_mail" metadata (seqno 1).
109 Creating logical volume mail_private
110 Creating volume group backup "/etc/lvm/backup/vg_mail" (seqno 2).
111 Found volume group "vg_mail"
112 Creating vg_mail-mail_private
113 Loading vg_mail-mail_private table
114 Resuming vg_mail-mail_private (254:3)
115 Clearing start of logical volume "mail_private"
116 Creating volume group backup "/etc/lvm/backup/vg_mail" (seqno 2).
117 Logical volume "mail_private" created
118 sub:/home/sa# lvs vg_mail
119 LV VG Attr LSize Origin Snap% Move Log Copy% Convert
120 mail_private vg_mail -wi-a- 3.00G
121 sub:/home/sa# cd /etc/lvm/
In line 104 I am issuing a command on one of our VGs (vg_mail) in order to get information on all LVs within this particular VG. As can be seen, we are not getting any output. This makes sense. We have not created any LV yet. Creating a LV takes place in line 105. Even though it looks quite complicated at first glance it is quite simple actually: -v is for verbose output; the name of the LV we are creating is mail_private; we are making it 3 GiB in size (for now); the VG used is vg_mail i.e. vg_mail did not have any LV before — after line 117 there is one LV (mail_private) within the VG (vg_mail). During creating of our first LV (mail_private) we have also tagged it — more on that later... We have now successfully created our first LV! Line 118 shows us issuing the same command as we already did in line 104 except that now we get output for vg_mail and the LV(s) it contains (line line 119 and 120).
I mentioned tagging before. One argument provided in line 105 was --addtag mail i.e. we put a tag on LV mail_private. With LVM we can tag PVs, VGs and as we did, LVs. Why tagging makes sense and what it is in context with LVM can be found with man 8 lvm:
-
Add the tag tag to a PV, VG or LV. A tag is a word that can be used to group LVM2 objects of the same type together.
Tags can be given on the command line in place of PV, VG or LV arguments i.e. we can build logial sets across VG and all such fancy stuff!
-
Tags should be prefixed with
@ to avoid ambiguity. Each tag is expanded by replacing it with all objects possessing that tag which are of the type expected by its position on the command line. PVs can only possess tags while they are part of a Volume Group: PV tags are discarded if the PV is removed from the VG. As an example, you could tag some LVs as database and others as userdata and then activate the database ones with
lvchange -ay @database . Objects can possess multiple tags simultaneously. Only the new LVM2 metadata format supports tagging: objects using the LVM1 metadata format cannot be tagged because the on-disk format does not support it. Snapshots cannot be tagged. Characters allowed in tags are: A-Z a-z 0-9 _ + . -
Should we forget or be unable to provide a tag at LV creation time, adding it later is no problem lvchange --addtag mail /dev/vg_mail/mail_private for example would add the tag mail to our LV mail_private after it had been created already. Also, I find it important to know that one PV, VG or LV can have many tags at the same time. Deleting tags works as well... 122 sub:/etc/lvm# grep tags backup/vg_mail
123 tags = ["mail"]
124 sub:/etc/lvm# lvdisplay @mail | md5sum && lvdisplay /dev/vg_mail/mail_private | md5sum
125 eee3133f822c3db42bdb9e26c8bb3b9c -
126 eee3133f822c3db42bdb9e26c8bb3b9c -
127 sub:/etc/lvm# lvdisplay @mail
128 --- Logical volume ---
129 LV Name /dev/vg_mail/mail_private
130 VG Name vg_mail
131 LV UUID zfFP20-z3wq-iAaF-y3Uc-LeYJ-b80y-GUa7hG
132 LV Write Access read/write
133 LV Status available
134 # open 0
135 LV Size 3.00 GB
136 Current LE 768
137 Segments 1
138 Allocation inherit
139 Read ahead sectors auto
140 - currently set to 256
141 Block device 254:3
142
With line 122 we can verify that the afore added tag mail exists (line 123). Furthermore, with some tag added to LV mail_private specifying one particular LV either via tag, absolute path or relative path (just mail_private) is the same from a technical point of view. This can be seen in lines 124 to 126 (md5sums match). In line 127 we are again using the tag mail in order to specify all LVs tagged with mail — so far there is only one LV (mail_private) tagged with the tag mail.
Now we want to create a second LV within our VG vg_mail. In line 143 we are creating the LV mail_work, 5 GiB in size, also tagged with mail. 143 sub:/home/sa# lvcreate -v -n mail_work -L 5G --addtag mail vg_mail
144 Setting logging type to disk
145 Finding volume group "vg_mail"
146 Archiving volume group "vg_mail" metadata (seqno 12).
147 Creating logical volume mail_work
148 Creating volume group backup "/etc/lvm/backup/vg_mail" (seqno 13).
149 Found volume group "vg_mail"
150 Creating vg_mail-mail_work
151 Loading vg_mail-mail_work table
152 Resuming vg_mail-mail_work (254:4)
153 Clearing start of logical volume "mail_work"
154 Creating volume group backup "/etc/lvm/backup/vg_mail" (seqno 13).
155 Logical volume "mail_work" created
156 sub:/home/sa# lvdisplay @mail
157 --- Logical volume ---
158 LV Name /dev/vg_mail/mail_private
159 VG Name vg_mail
160 LV UUID zfFP20-z3wq-iAaF-y3Uc-LeYJ-b80y-GUa7hG
161 LV Write Access read/write
162 LV Status available
163 # open 0
164 LV Size 3.00 GB
165 Current LE 768
166 Segments 1
167 Allocation inherit
168 Read ahead sectors auto
169 - currently set to 256
170 Block device 254:3
171
172 --- Logical volume ---
173 LV Name /dev/vg_mail/mail_work
174 VG Name vg_mail
175 LV UUID ntU4C6-pfx7-tLz1-Ptxa-IywR-W4mp-eSDL3L
176 LV Write Access read/write
177 LV Status available
178 # open 0
179 LV Size 5.00 GB
180 Current LE 1280
181 Segments 1
182 Allocation inherit
183 Read ahead sectors auto
184 - currently set to 256
185 Block device 254:4
186
187 sub:/home/sa#
Line 156 is the exact same command as line 127 except now we already have to LVs (mail_private and mail_work) within our VG vg_mail. man 8 lvdisplay details the meaning of for example lines 173 to 185.
188  sub:/home/sa# vgdisplay -s vg_mail
189    "vg_mail" 11.18 GB  [8.00 GB   used / 3.18 GB free]
190  sub:/home/sa# vgdisplay -v vg_mail
191      Using volume group(s) on command line
192      Finding volume group "vg_mail"
193    --- Volume group ---
194    VG Name               vg_mail
195    System ID
196    Format                lvm2
197    Metadata Areas        2
198    Metadata Sequence No  13
199    VG Access             read/write
200    VG Status             resizable
201    MAX LV                0
202    Cur LV                2
203    Open LV               0
204    Max PV                0
205    Cur PV                1
206    Act PV                1
207    VG Size               11.18 GB
208    PE Size               4.00 MB
209    Total PE              2861
210    Alloc PE / Size       2048 / 8.00 GB
211    Free  PE / Size       813 / 3.18 GB
212    VG UUID               r7KqD4-jHVd-ZKdU-yYpB-Y8SX-Zy5T-l1fyoi
213
214    --- Logical volume ---
215    LV Name                /dev/vg_mail/mail_private
216    VG Name                vg_mail
217    LV UUID                zfFP20-z3wq-iAaF-y3Uc-LeYJ-b80y-GUa7hG
218    LV Write Access        read/write
219    LV Status              available
220    # open                 0
221    LV Size                3.00 GB
222    Current LE             768
223    Segments               1
224    Allocation             inherit
225    Read ahead sectors     auto
226    - currently set to     256
227    Block device           254:3
228
229    --- Logical volume ---
230    LV Name                /dev/vg_mail/mail_work
231    VG Name                vg_mail
232    LV UUID                ntU4C6-pfx7-tLz1-Ptxa-IywR-W4mp-eSDL3L
233    LV Write Access        read/write
234    LV Status              available
235    # open                 0
236    LV Size                5.00 GB
237    Current LE             1280
238    Segments               1
239    Allocation             inherit
240    Read ahead sectors     auto
241    - currently set to     256
242    Block device           254:4
243
244    --- Physical volumes ---
245    PV Name               /dev/sda2
246    PV UUID               nxjJoX-164q-KJMm-6LHE-qdru-8NYS-uJdqAO
247    PV Status             allocatable
248    Total PE / Free PE    2861 / 813
249
In line 189 we can see a short summary about VG vg_mail. If we are interested in detailed information across all LVM layers (PVs, VG and LVs) with regards to our VG vg_mail, line 190 is for us. The resulting output is pretty much self-explanatory so... Putting a File System on top of LV(s) Ultimately we can finish our LVM endeavor by putting a file system on top of our LVs mail_private and mail_work. 250 sub:/home/sa# vgchange -a y
251 2 logical volume(s) in volume group "vg_mail" now active
252 0 logical volume(s) in volume group "vg_mp3" now active
253 2 logical volume(s) in volume group "vg0" now active
Again, I went to bed after line 249 so line 250 is just to make the kernel recognize/set active all VGs again after I turned off/on my external HDD. Without vgchange -a y there would have been no device path to mail_work and mail_private i.e. no /dev/vg_mail/mail_private for example. However, this whole step is only necessary with my current setup for this article — should one not use an external HDD and/or not switch off this HDD, then there should probably be no need for vgchange -a y.
254  sub:/home/sa# mkfs.ext3 -v /dev/vg_mail/mail_private
255  mke2fs 1.41.0 (10-Jul-2008)
256  fs_types for mke2fs.conf resolution: 'ext3', 'default'
257  Filesystem label=
258  OS type: Linux
259  Block size=4096 (log=2)
260  Fragment size=4096 (log=2)
261  196608 inodes, 786432 blocks
262  39321 blocks (5.00%) reserved for the super user
263  First data block=0
264  Maximum filesystem blocks=805306368
265  24 block groups
266  32768 blocks per group, 32768 fragments per group
267  8192 inodes per group
268  Superblock backups stored on blocks:
269          32768, 98304, 163840, 229376, 294912
270
271  Writing inode tables: done
272  Creating journal (16384 blocks): done
273  Writing superblocks and filesystem accounting information: done
274
275  This filesystem will be automatically checked every 21 mounts or
276  180 days, whichever comes first.  Use tune2fs -c or -i to override.
277
With line 254 we are putting a file system atop of our LV mail_private. The -v switch is just there to get verbose output — usually I use the -q switch or none at all as can be seen in line 278.
278  sub:/home/sa# mkfs.xfs /dev/vg_mail/mail_work
279  meta-data=/dev/vg_mail/mail_work isize=256    agcount=4, agsize=327680 blks
280           =                       sectsz=512   attr=2
281  data     =                       bsize=4096   blocks=1310720, imaxpct=25
282           =                       sunit=0      swidth=0 blks
283  naming   =version 2              bsize=4096
284  log      =internal log           bsize=4096   blocks=2560, version=2
285           =                       sectsz=512   sunit=0 blks, lazy-count=0
286  realtime =none                   extsz=4096   blocks=0, rtextents=0
Line 278 is pretty much the same as 254 except we are using XFS instead of ext3. More on what implications our choice for a particular file system has will follow later.
287  sub:/home/sa# ls -la /dev/mapper/vg_mail-mail_private
288  brw-rw---- 1 root disk 254, 3 2008-08-12 07:29 /dev/mapper/vg_mail-mail_private
289  sub:/home/sa# mkdir /tmp/m{p,w}
290  sub:/home/sa# mount -t ext3 /dev/vg_mail/mail_private /tmp/mp
291  sub:/home/sa# mount -t xfs /dev/vg_mail/mail_work /tmp/mw
In line 289 we are creating some directories used to mount our LVs (lines 290 and 291). Line 292 shows how we used some di and egrep magic to get information about our new, read-to-use, storage capacity. What I find interesting here is how much storage is used from each file system per default — since XFS does dynamic inode allocation it needs way less storage than for example ext3 does. However, ext3 has advantages over XFS when it comes to resizing as we will see later. 292 sub:/home/sa# di -h | egrep ^Filesystem\|vg_mail
293 Filesystem Mount Size Used Avail %Used fs Type
294 /dev/mapper/vg_mail-mail_private /tmp/mp 3.0G 68.6M 2.7G 7% ext3
295 /dev/mapper/vg_mail-mail_work /tmp/mw 5.0G 4.2M 5.0G 0% xfs
296 sub:/home/sa#
Mounting LV(s) automatically at boot time We may also want to edit /etc/fstab to automatically mount a LV (e.g. mail_private) at boot time (one might choose a better mount point than /mnt/mp but then this is a show case thingy what we do right now): sa@sub:~$ grep -m1 -B2 mapper /etc/fstab | grep -v proc
# <file system> <mount point> <type> <options> <dump> <pass>
/dev/mapper/vg_mail-mail_private /mnt/mp ext3 errors=remount-ro 0 1
sa@sub:~$
/etc/fstab tells the computer where to mount different devices on the file system. The format is <file system> <mount point> <type of filesystem> <options> <mount options> <dump frequency> <fsck pass>. More information can be found by reading man 5 fstab.
Resizing Volumes
- If we know we have enough free space within the VG, we just have to use
lvextend in order to extend a LV. There is no need to unmount it! Afterwards, we also need to extend the file system inside the LV (they are two separate containers). Depending on the file system we are using, it also can be extended online (while mounted and applications and users are in use of the file system i.e. no costlydowntime for enterprise environments). - If we do not have enough space in our VG, we need to make more space — wow, how smart ;-] Adding new storage capacity to some VG can be done by adding more PVs or by resizing (increasing) PVs. In case we are adding PVs, using
vgextend can be used to add it to an existing VG. As we already know, PVs can be made out of block devices which in turn can be pretty much anything...
Resizing the File System When it comes to using LVM effectively it is worth considering the file system that we wish to use upon our LVs respectively encrypted containers (see here). If we choose a file system which does not support resizing then increasing the size of our LVs would be pointless. Here is a brief list of a few resizable file systems (some filesystems can be increased in size, but cannot be reduced):
| File system | increase while mounted | increase while unmounted | decrease |
|---|
| ext2fs | yes | yes | yes | | ext3fs | yes | yes | yes | | ReiserFS | yes | yes | yes | | JFS | no | no | no | | XFS | yes | no | no | | BTRFS | yes | yes | yes |
Shrinking Even though growing LVs seems to be by far the most needed option, shrinking LVs is sometimes needed as well. We can shrink LVs the same way we can extend one, using the lvreduce command. From the LVM point of view, this operation can always be done with the LV online. However, the majority of file systems does not support online file system shrinking. The above table does not cover shrinking. In order to shrink a LV with an ext3 file system on top we need to unmount it first (see man 8 resize2fs).
297  sub:/home/sa# lvdisplay /dev/vg_mail/mail_private | grep Size
298    LV Size                3.00 GB
299  sub:/home/sa# mount | grep vg_mail
300  /dev/mapper/vg_mail-mail_work on /tmp/mw type xfs (rw)
301  /dev/mapper/vg_mail-mail_private on /tmp/mp type ext3 (rw)
302  sub:/home/sa# df -h /tmp/mp
303  Filesystem                         Size   Used  Avail   Use%   Mounted on
304  /dev/mapper/vg_mail-mail_private   3.0G   69M   2.8G    3%     /tmp/mp
305  sub:/home/sa# umount /tmp/mp
306  sub:/home/sa# mount | grep vg_mail
307  /dev/mapper/vg_mail-mail_work on /tmp/mw type xfs (rw)
The LV mail_private is 3 GiB in size (line 298). We have two LVs mounted as can be seen in lines 300 and 301. The file system stretches the whole LV mail_private as can be seen in line 304. As said, we need to unmount the file system (line 305), run a file system check (lines 308 to 315) and finally shrink the file system to its new size of 1 GiB (line 316). 308 sub:/home/sa# e2fsck -f /dev/vg_mail/mail_private
309 e2fsck 1.41.0 (10-Jul-2008)
310 Pass 1: Checking inodes, blocks, and sizes
311 Pass 2: Checking directory structure
312 Pass 3: Checking directory connectivity
313 Pass 4: Checking reference counts
314 Pass 5: Checking group summary information
315 /dev/vg_mail/mail_private: 11/196608 files (9.1% non-contiguous), 29902/786432 blocks
316 sub:/home/sa# resize2fs /dev/vg_mail/mail_private 1G
317 resize2fs 1.41.0 (10-Jul-2008)
318 Resizing the filesystem on /dev/vg_mail/mail_private to 262144 (4k) blocks.
319 The filesystem on /dev/vg_mail/mail_private is now 262144 blocks long.
320
321 sub:/home/sa# mount -t ext3 /dev/vg_mail/mail_private /tmp/mp
322 sub:/home/sa# df -h /tmp/mp
323 Filesystem Size Used Avail Use% Mounted on
324 /dev/mapper/vg_mail-mail_private 1008M 68M 889M 8% /tmp/mp
325 sub:/home/sa# lvdisplay /dev/vg_mail/mail_private | grep Size
326 LV Size 3.00 GB
At this point (until line 332) the LV and its file system atop have different sizes — line 324 and 326 respectively.
327  sub:/home/sa# lvreduce -L 1G /dev/vg_mail/mail_private
328    WARNING: Reducing active and open logical volume to 1.00 GB
329    THIS MAY DESTROY YOUR DATA (filesystem etc.)
330  Do you really want to reduce mail_private? [y/n]: y
331    Reducing logical volume mail_private to 1.00 GB
332    Logical volume mail_private successfully resized
333  sub:/home/sa# lvdisplay /dev/vg_mail/mail_private | grep Size
334    LV Size                1.00 GB
335  sub:/home/sa# dd if=/dev/zero of=/tmp/mp/a_file_filled_with_zeros bs=1M count=200
336  200+0 records in
337  200+0 records out
338  209715200 bytes (210 MB) copied, 4.868 s, 43.1 MB/s
339  sub:/home/sa# df -h /tmp/mp
340  Filesystem                        Size   Used  Avail   Use%   Mounted on
341  /dev/mapper/vg_mail-mail_private  1008M  269M  689M    29%    /tmp/mp
In line 335 I am sort of testing the whole shebang after shrinking it by writing data to mail_private. Line 341 shows the result of line 335. We have shrunk the LV and its file system atop as can be seen from line 324 for example.
As LV mail_private was part of the VG vg_mail we have also changed the available space within vg_mail — comparing line 189 with 343 shows that we have whole lot more free space within vg_mail. 342 sub:/home/sa# vgdisplay -s vg_mail
343 "vg_mail" 11.18 GB [6.00 GB used / 5.18 GB free]
Growing Now that we have shrunk one LV within the VG vg_mail we are assuming, for some reason, we need to grow both LVs i.e. mail_private and mail_work. Growing an XFS respectively ext3 file system works online i.e. growing both LVs within VG vg_mail works transparent for users and all kinds of applications and daemons — no downtime or crazy-complex change management needed!
344  sub:/home/sa# mount | grep vg_mail
345  /dev/mapper/vg_mail-mail_work on /tmp/mw type xfs (rw)
346  /dev/mapper/vg_mail-mail_private on /tmp/mp type ext3 (rw)
347  sub:/home/sa# df -h /tmp/m{p,w}
348  Filesystem                        Size    Used   Avail  Use%  Mounted on
349  /dev/mapper/vg_mail-mail_private  1008M   269M   689M   29%   /tmp/mp
350  /dev/mapper/vg_mail-mail_work      5.0G   4.2M   5.0G    1%   /tmp/mw
351  sub:/home/sa# vgdisplay -s vg_mail
352    "vg_mail" 11.18 GB  [6.00 GB   used / 5.18 GB free]
353  sub:/home/sa# echo 'We are not unmounting LVs this time!'
354  We are not unmounting LVs this time!
As can be seen from lines 345 and 346, both LVs are currently mounted; and will be mounted throughout the whole procedure... Lines 347 to 352 are in place to show the current status of used/free storage capacity of our LVs respectively also file systems on top.
355  sub:/home/sa# lvextend -L 1.4G /dev/vg_mail/mail_private
356    Rounding up size to full physical extent 1.40 GB
357    Extending logical volume mail_private to 1.40 GB
358    Logical volume mail_private successfully resized
359  sub:/home/sa# lvdisplay /dev/vg_mail/mail_private | grep Size
360    LV Size                1.40 GB
361  sub:/home/sa# df -h /tmp/mp
362  Filesystem                         Size    Used   Avail   Use%   Mounted on
363  /dev/mapper/vg_mail-mail_private   1008M   269M    689M    29%   /tmp/mp
In line 355 we are growing the LV mail_private to 1.4 GiB as can be seen in line 360. When growing a LV we need to first grow the LV and afterwards we need to grow the file system on top of our LV — at line 363 we can see that the file system still is 1 GiB in size although the underlying LV has already been grown to 1.4 GiB.
364  sub:/home/sa# resize2fs /dev/vg_mail/mail_private
365  resize2fs 1.41.0 (10-Jul-2008)
366  Filesystem at /dev/vg_mail/mail_private is mounted on /tmp/mp; online resizing required
367  old desc_blocks = 1, new_desc_blocks = 1
368  Performing an online resize of /dev/vg_mail/mail_private to 367616 (4k) blocks.
369  The filesystem on /dev/vg_mail/mail_private is now 367616 blocks long.
370
371  sub:/home/sa# df -h /tmp/mp
372  Filesystem                          Size    Used   Avail  Use%   Mounted on
373  /dev/mapper/vg_mail-mail_private    1.4G    269M    1.1G   21%   /tmp/mp
374  sub:/home/sa# vgdisplay -s vg_mail
375    "vg_mail" 11.18 GB  [6.40 GB   used / 4.77 GB free]
Now we resize the file system on top of our LV mail_private (lines 364 to 370). It worked (online!) as can be seen in line 373. Comparing line 375 with line 352, we can see that the VG vg_mail has 400 MiB free space after growing LV mail_private and its file system.
376  sub:/home/sa# df -h /tmp/mw
377  Filesystem                        Size    Used   Avail   Use%   Mounted on
378  /dev/mapper/vg_mail-mail_work     5.0G    4.2M    5.0G     1%   /tmp/mw
379  sub:/home/sa# lvdisplay /dev/vg_mail/mail_work | grep Size
380    LV Size                5.00 GB
381  sub:/home/sa# lvextend -L +300M /dev/vg_mail/mail_work
382    Extending logical volume mail_work to 5.29 GB
383    Logical volume mail_work successfully resized
384  sub:/home/sa# lvdisplay /dev/vg_mail/mail_work | grep Size
385    LV Size                5.29 GB
Lines 376 to 404 are about growing a LV (mail_work) and its file system atop as well. The only difference now is that on top mail_work we have an XFS file system and not ext3 as with LV mail_private — therefore there is a difference with growing the file system (line 364 respectively 389). Also, line 381 demonstrates another way to specify the new LV size — absolute with line 355 and relative i.e. + with line 381.
386  sub:/home/sa# df -h /tmp/mw
387  Filesystem                        Size   Used   Avail   Use%   Mounted on
388  /dev/mapper/vg_mail-mail_work     5.0G   4.2M    5.0G     1%   /tmp/mw
389  sub:/home/sa# xfs_growfs /tmp/mw
390  meta-data=/dev/mapper/vg_mail-mail_work isize=256    agcount=4, agsize=327680 blks
391           =                       sectsz=512   attr=2
392  data     =                       bsize=4096   blocks=1310720, imaxpct=25
393           =                       sunit=0      swidth=0 blks
394  naming   =version 2              bsize=4096
395  log      =internal               bsize=4096   blocks=2560, version=2
396           =                       sectsz=512   sunit=0 blks, lazy-count=0
397  realtime =none                   extsz=4096   blocks=0, rtextents=0
398  data blocks changed from 1310720 to 1387520
399  sub:/home/sa# df -h /tmp/mw
400  Filesystem                       Size    Used   Avail   Use%   Mounted on
401  /dev/mapper/vg_mail-mail_work    5.3G    4.2M    5.3G     1%   /tmp/mw
402  sub:/home/sa# vgdisplay -s vg_mail
403    "vg_mail" 11.18 GB  [6.70 GB   used / 4.48 GB free]
Block-layer Encryption This section tells about adding another layer to the mix. Why encryption is a godsend and a necessity from my point of view can be found onto another page. This section will only focus on the practical aspect — no in depth theory — of how to set up block-layer encryption on top of some LV. Set up Block-layer encryption with LVM We already have a VG vg_mail containing two LVs, mail_private and mail_work respectively. For some reason, we require a third LV which need be fully encrypted. Therefore what we are going to do is to create a new LV (mail_encrypted) which can then be used to store our top secret email.
404  sub:/home/sa# lvscan
405    inactive          '/dev/vg_mail/mail_private' [1.40 GB] inherit
406    inactive          '/dev/vg_mail/mail_work' [5.29 GB] inherit
407    ACTIVE            '/dev/vg0/root' [143.28 GB] inherit
408    ACTIVE            '/dev/vg0/swap_1' [5.53 GB] inherit
409  sub:/home/sa# vgchange -a y
410    2 logical volume(s) in volume group "vg_mail" now active
411    0 logical volume(s) in volume group "vg_mp3" now active
412    2 logical volume(s) in volume group "vg0" now active
413  sub:/home/sa# lvscan
414    ACTIVE            '/dev/vg_mail/mail_private' [1.40 GB] inherit
415    ACTIVE            '/dev/vg_mail/mail_work' [5.29 GB] inherit
416    ACTIVE            '/dev/vg0/root' [143.28 GB] inherit
417    ACTIVE            '/dev/vg0/swap_1' [5.53 GB] inherit
And again, I went to bed between lines 403 and 404 i.e. switching off my external HDD requires me to issue line 409. See above.
418  sub:/home/sa# vgdisplay -s vg_mail
419    "vg_mail" 11.18 GB  [6.70 GB   used / 4.48 GB free]
420  sub:/home/sa# lvcreate -n mail_encrypted -L 200M --addtag mail vg_mail
421    Logical volume "mail_encrypted" created
422  sub:/home/sa# vgdisplay -s vg_mail
423    "vg_mail" 11.18 GB  [6.89 GB   used / 4.29 GB free]
424  sub:/home/sa# lvs vg_mail
425    LV             VG      Attr   LSize   Origin Snap%  Move Log Copy%  Convert
426    mail_encrypted vg_mail -wi-a- 200.00M
427    mail_private   vg_mail -wi-a-   1.40G
428    mail_work      vg_mail -wi-a-   5.29G
As can be seen in line 419, we have 4.48 GiB left within VG vg_mail. Line 420 shows how to create another LV, named mail_encrypted, 200 MiB in size and tagged with mail. It worked as can be seen in lines 423 and 426.
429  sub:/home/sa# time badblocks -c 10240 -s -w -t random -v /dev/vg_mail/mail_encrypted
430  Checking for bad blocks in read-write mode
431  From block 0 to 204799
432  Testing with random pattern: done
433  Reading and comparing: done
434  Pass completed, 0 bad blocks found.
435
436  real    0m20.668s
437  user    0m0.504s
438  sys     0m0.152s
The prerequisites for block-layer encryption are explained on my dm-crypt/LUKS page. Now that we have our LV (mail_encrypted), we can start setting up the intermediate layer between the LV and the file system i.e. we are setting up a virtual logical block device using dm-crypt and LUKS. First we need to check for errors and initialize the LV (line 429). This may take quite some time — I am quite paranoid so usually it takes hours if not days. With the current setup (only 200 MiB) and the non-paranoid way of writing random data it takes only ~20 seconds (line 436).
439  sub:/home/sa# cryptsetup --verbose -c aes-cbc-essiv:sha256 --verify-passphrase luksFormat /dev/vg_mail/mail_encrypted
440
441  WARNING!
442  ========
443  This will overwrite data on /dev/vg_mail/mail_encrypted irrevocably.
444
445  Are you sure? (Type uppercase yes): YES
446  Enter LUKS passphrase:
447  Verify passphrase:
448  Command successful.
449  sub:/home/sa# cryptsetup luksOpen /dev/vg_mail/mail_encrypted lv_encr
450  Enter LUKS passphrase:
451  key slot 0 unlocked.
452  Command successful.
453  sub:/home/sa# ls -l /dev/mapper/ | grep lv
454  brw-rw---- 1 root disk 254,  6 2008-08-15 00:12 lv_encr
Line 439 is where all the magic happens — i.e. putting the encryption layer into place. We decided to use a passphrase instead of a key-file for accessing our data. More on that can also be found on my dedicated encryption page. After issuing mkfs.xfs /dev/mapper/lv_encr we got a file system on top of our logical virtual block device which we have opened before (line 449). The whole shebang is now pretty much ready to put into use — only mounting (line 455) the LV with its encryption layer on top which furthermore carries the file system is left to do before we can start using this LV (mail_encrypted).
455  sub:/home/sa# mount -t xfs /dev/mapper/lv_encr /mnt
456  sub:/home/sa# df -h | egrep ^Filesy\|lv_
457  Filesystem            Size  Used Avail Use% Mounted on
458  /dev/mapper/lv_encr   195M  4.2M  191M   3% /mnt
459  sub:/home/sa# dd if=/dev/zero of=/mnt/my_file bs=1M count=100
460  100+0 records in
461  100+0 records out
462  104857600 bytes (105 MB) copied, 0.604 s, 174 MB/s
463  sub:/home/sa# df -h | egrep ^Filesy\|lv_
464  Filesystem            Size  Used Avail Use% Mounted on
465  /dev/mapper/lv_encr   195M  105M   91M  54% /mnt
466  sub:/home/sa# umount /mnt
467  sub:/home/sa# df -h | egrep ^Filesy\|lv_
468  Filesystem            Size  Used Avail Use% Mounted on
Lines 456 to 469 are just about the storage capacity with mail_encrypted, putting some data inside (line 459) and checking the result (lines 463 to 465. Finally we unmountmail_encrypted as can be seen from line 466. How to further umount/close the logical virtual block device can be read here. /etc/crypttab /etc/crypttab is a list of encrypted devices which are mapped during system boot. It contains descriptive information about encrypted file systems and is only read by programs, and not written to i.e. it is the duty of the system administrator to properly create and maintain this file.
Each file system is described on a separate line. Fields on each line are separated by tabs or spaces. The format is <map name> <path to device> <key file> <options>. Since we are using a passphrase, we do not have a key file so our entry might look like this 469 sub:/home/sa# cat /etc/crypttab | grep lv
470 lv_encr /dev/mapper/vg_mail-mail_encrypted none luks
471 sub:/home/sa# exit
472 exit
Creating a Mount Point Lines 473 to 489 are really just all about creating a decent mount point layout onto my subnotebook and workstation respectively. 473 sa@sub:~$ type ll
474 ll is aliased to `ls -lh'
475 sa@sub:~$ ll
476 total 32K
477 drwxr-xr-x 2 sa sa 4.0K 2008-07-11 19:18 Desktop
478 drwxr-xr-x 18 sa sa 4.0K 2008-06-02 10:44 em
479 drwxr-xr-x 3 sa sa 4.0K 2008-06-03 13:11 Mail
480 drwxr-xr-x 11 sa sa 4.0K 2008-07-19 09:05 misc
481 drwxr-xr-x 5 sa sa 4.0K 2008-07-19 20:16 mm
482 drwxr-xr-x 4 sa sa 4.0K 2008-06-03 13:11 News
483 drwxr-xr-x 6 sa sa 4.0K 2008-08-09 12:24 Podcasts
484 drwxr-xr-x 5 sa sa 4.0K 2008-02-28 10:08 work
485 sa@sub:~$ mkdir -p mail/{work,private,encrypted} && ls -l mail
486 total 12
487 drwxr-xr-x 2 sa sa 4096 2008-08-15 13:57 encrypted
488 drwxr-xr-x 2 sa sa 4096 2008-08-15 13:57 private
489 drwxr-xr-x 2 sa sa 4096 2008-08-15 13:57 work
/etc/fstab The reader might go here for background information. In particular, with our current encrypted LV with an XFS file system on top the fstab entry could look like this: 490 sa@sub:~$ cat /etc/fstab | grep encrypted
491 /dev/mapper/vg_mail-mail_encrypted /home/sa/mail/encrypted xfs defaults 0 2
Update the initial ramdisk The initial ramdisk is used to jumpstart the boot process and load modules for the Linux kernel that it cannot load itself (such as drivers for block devices that contain the modules it uses). The command update-initramfs -u -k all ensures that our initial ramdisk(s) is/are up to date. Resizing an encrypted File System on top of some LV Yes, possible! We can resize an encrypted LV (logical virtual block device actually) — same as we can resize a normal LV and its file system on top — as long as the size of the underlying LV grows first respectively the file system on top shrinks first. Below I will show how to grow the whole shebang i.e.
- grow the LV then
- grow the logical virtual block device i.e. the dm-crypt layer and finally
- grow the filesystem
When shrinking, the order is the opposite i.e.
- we need to shrink the file system then
- shrink the dm-crypt layer and finally
- we need to shrink the LV
492  sa@sub:~$ su
493  Password:
494  sub:/home/sa# ls -l /dev/mapper/ | grep encr
495  brw-rw---- 1 root disk 254,  5 2008-08-15 13:40 vg_mail-mail_encrypted
496  sub:/home/sa# cryptsetup luksOpen /dev/mapper/vg_mail-mail_encrypted lv_encr
497  Enter LUKS passphrase:
498  key slot 0 unlocked.
499  Command successful.
500  sub:/home/sa# ls -l /dev/mapper/ | grep encr
501  brw-rw---- 1 root disk 254,  6 2008-08-15 17:36 lv_encr
502  brw-rw---- 1 root disk 254,  5 2008-08-15 13:40 vg_mail-mail_encrypted
As can be seen, the encrypted container is not opened yet (line 495), only is the LV mail_encrypted visible to the kernel. Opening the container — including setting its name — is done in line 496. The passphrase set in lines 446 and 447 needs to be entered in line 497 which is what we did successfully and therefore the opened container shows up in line 501 — the command in line 500 is the same as with line 494.
503  sub:/home/sa# mount -t xfs /dev/mapper/lv_encr /home/sa/mail/encrypted
504  sub:/home/sa# df -h | egrep ^Filesy\|lv_
505  Filesystem            Size  Used Avail Use% Mounted on
506  /dev/mapper/lv_encr   195M  105M   91M  54% /home/sa/mail/encrypted
507  sub:/home/sa# vgdisplay -s vg_mail
508    "vg_mail" 11.18 GB  [6.89 GB   used / 4.29 GB free]
509  sub:/home/sa# lvs vg_mail
510    LV             VG      Attr   LSize   Origin Snap%  Move Log Copy%  Convert
511    mail_encrypted vg_mail -wi-ao 200.00M
512    mail_private   vg_mail -wi-a-   1.40G
513    mail_work      vg_mail -wi-a-   5.29G
Mounting the container also known as logical virtual block device takes place in line 503. As can be seen from line 506, 54% of the storage capacity is already used since we put data into the container (line 459). Also, the free storage capacity withing the VG is enough to grow the LV mail_encrypted, its container atop and finally the file system at the top of mail_encrypted. As we look at the LVs within our VG vg_mail, we can see from line 511 that mail_encrypted is currently 200 MiB in size — later, we will grow it to around372 MiB.
514  sub:/home/sa# ls -la /dev/mapper/vg_mail-mail_encrypted /dev/mapper/lv_encr
515  brw-rw---- 1 root disk 254, 6 2008-08-15 17:36 /dev/mapper/lv_encr
516  brw-rw---- 1 root disk 254, 5 2008-08-15 13:40 /dev/mapper/vg_mail-mail_encrypted
517  sub:/home/sa# grep '^\s*254\s*[5,6]' /proc/partitions
518   254     5     204800 dm-5
519   254     6     204284 dm-6
Lines 514 to 519 are pretty much only for reconnaissance — figuring a block devices major and minor number. The container can be seen in line 515 whereas its underlying LV (mail_encrypted) can be seen in line 516 — major numbers (254) are the same but minor numbers (6 respectively 5) are different. Lines 518 and 519 provides us with a look at the raw bock device and the storage capacity each layer takes up — of course, the LV is a bit bigger than its container on top. As can be see below, the metadata for the container is 516 kiB in size. sa@sub:~$ python
Python 2.5.2 (r252:60911, Aug 6 2008, 09:17:29)
[GCC 4.3.1] on linux2
Type "help", "copyright", "credits" or "license" for more information.
>>> 204800-204284
516
>>>
sa@sub:~$
520  sub:/home/sa# lvresize -L +171M vg_mail/mail_encrypted
521    Rounding up size to full physical extent 172.00 MB
522    Extending logical volume mail_encrypted to 372.00 MB
523    Logical volume mail_encrypted successfully resized
524  sub:/home/sa# grep '^\s*254\s*[5,6]' /proc/partitions
525   254     5     380928 dm-5
526   254     6     204284 dm-6
527  sub:/home/sa# lvs vg_mail
528    LV             VG      Attr   LSize   Origin Snap%  Move Log Copy%  Convert
529    mail_encrypted vg_mail -wi-ao 372.00M
530    mail_private   vg_mail -wi-a-   1.40G
531    mail_work      vg_mail -wi-a-   5.29G
532  sub:/home/sa# vgdisplay -s vg_mail
533    "vg_mail" 11.18 GB  [7.06 GB   used / 4.12 GB free]
Resizing is what we start in line 520, the LV at first since we are growing the stack instead of shrinking it. As can be seen, our wish for 171 MiB of additional storage is not meet. Instead LVM adds 172 MiB to mail_encrypted. This is because our PE/LE size is 4 MiB — 172 is a multiple of 4 but 171 is not. Line 49 and 61 to 63 shows a few more details about what we did initially. The interesting thing is with lines 525 and 526 — the LV mail_encrypted has already been grown but not the container. Also, line 533 shows that free storage capacity within our VG vg_mail has been reduced by the amount of storage the LV mail_encrypted has been grown.
534  sub:/home/sa# cryptsetup resize lv_encr
535  sub:/home/sa# grep '^\s*254\s*[5,6]' /proc/partitions
536   254     5     380928 dm-5
537   254     6     380412 dm-6
538  sub:/home/sa# df -h | egrep ^Filesy\|lv_
539  Filesystem            Size  Used Avail Use% Mounted on
540  /dev/mapper/lv_encr   195M  105M   91M  54% /home/sa/mail/encrypted
541  sub:/home/sa# xfs_growfs /home/sa/mail/encrypted/
542  meta-data=/dev/mapper/lv_encr    isize=256    agcount=4, agsize=12768 blks
543           =                       sectsz=512   attr=2
544  data     =                       bsize=4096   blocks=51071, imaxpct=25
545           =                       sunit=0      swidth=0 blks
546  naming   =version 2              bsize=4096
547  log      =internal               bsize=4096   blocks=1200, version=2
548           =                       sectsz=512   sunit=0 blks, lazy-count=0
549  realtime =none                   extsz=4096   blocks=0, rtextents=0
550  data blocks changed from 51071 to 95103
551  sub:/home/sa# df -h | egrep ^Filesy\|lv_
552  Filesystem            Size  Used Avail Use% Mounted on
553  /dev/mapper/lv_encr   367M  105M  263M  29% /home/sa/mail/encrypted
The next thing to do is to grow the dm-crypt/LUKS container as can be seen in line 534. Without specifying a --size parameter, the container is grown to its maximal possible size on top the LV respectively the block device (HDD, physical HDD partition, hard/software RAID, LUN, etc.) in case we were not using LVM as an intermediate layer. As can be seen from lines 536 to 537 now the LV and its container on top have the same size (except for the additional metadata needed by the container). The top layer (file system) is still to be grown as can be seen from line 540. Growing it is done in line 541 as we can see in line 553. Of course, the file system layer also needs to store its metadata and therefore container size and file system size cannot match exactly.
Excellent! We have just grown (online!) a stack of virtualized storage (LVM in our case), dm-crypt/LUKS container on top the storage layer and an XFS file system at the top of the whole stack. Would we have used another file system, the just carried out tasks would have worked too as long as the file system allows for online resizing (growing/shrinking). Cleanup And since no example is responsibly complete without the cleanup phase: 554 sub:/home/sa# mount | grep lv_encr
555 /dev/mapper/lv_encr on /home/sa/mail/encrypted type xfs (rw)
556 sub:/home/sa# umount mail/encrypted/
557 sub:/home/sa# mount | grep lv_encr
558 sub:/home/sa# ls -la /dev/mapper/vg_mail-mail_encrypted /dev/mapper/lv_encr
559 brw-rw---- 1 root disk 254, 6 2008-08-15 17:36 /dev/mapper/lv_encr
560 brw-rw---- 1 root disk 254, 5 2008-08-15 13:40 /dev/mapper/vg_mail-mail_encrypted
561 sub:/home/sa# cryptsetup luksClose lv_encr
562 sub:/home/sa# ls -la /dev/mapper | grep encr
563 brw-rw---- 1 root disk 254, 5 2008-08-15 13:40 vg_mail-mail_encrypted
564 sub:/home/sa# lvs vg_mail
565 LV VG Attr LSize Origin Snap% Move Log Copy% Convert
566 mail_encrypted vg_mail -wi-a- 372.00M
567 mail_private vg_mail -wi-a- 1.40G
568 mail_work vg_mail -wi-a- 5.29G
569 sub:/home/sa# vgdisplay -s vg_mail
570 "vg_mail" 11.18 GB [7.06 GB used / 4.12 GB free]
571 sub:/home/sa# lvremove /dev/vg_mail/mail_encrypted
572 Do you really want to remove active logical volume "mail_encrypted"? [y/n]: y
573 Logical volume "mail_encrypted" successfully removed
574 sub:/home/sa# lvs vg_mail
575 LV VG Attr LSize Origin Snap% Move Log Copy% Convert
576 mail_private vg_mail -wi-a- 1.40G
577 mail_work vg_mail -wi-a- 5.29G
578 sub:/home/sa# vgdisplay -s vg_mail
579 "vg_mail" 11.18 GB [6.70 GB used / 4.48 GB free]
580 sub:/home/sa#
At first, we unmount the file system (line 556), next we close the container (line 561) and finally we remove the LV (line 571). That the free storage capacity within our VGvg_mail grown for exact the same amount the LV mail_encrypted took up can be seen in line 570 and 579 respectively. Adding the Notion of Hardware RAID In case the lowest (closest to bare hardware) layer would be a hardware RAID (provided by the 31205 for example) we can easily proceed as we did above, making just a small detour to partition resizing. Snapshots What snapshots are can be read here and with man 8 lvcreate. This section is about why we need them and how they are made/used. Below follow two examples what might be a potential use case for LVM snapshots:
- A consistent backup is only achieved when the data to be backed up does NOT CHANGE during the whole backup process — something which is not the case for the most part. Taking a snapshot of the data to be backed up and then running the backup against this snapshot ensures that the data does not change while performing the backup i.e. we are ensuring data persistence and data integrity.
- Fallback. Anything is fine now with our data/system. Then something happens e.g.
aptitude full-upgrade. Afterwards.... peng. At this point we could switch back our whole system to the state before we issued aptitude full-upgrade simply by activating the snapshot which has been taken before issuing aptitude full-upgrade.
However, there are a lot more use cases out there. LVM snapshots can commonly be thought of as enabling time traveling with any computer system using LVM — for example, one LV (the snapshot) can be used for backup purposes while the other LV (the original) continues in operation. All this works online i.e. no downtime for the whole system. And again, LVs are the LVM equivalent of physical HDD partitions — for all practical purposes, they are physical HDD partitions. The LV is like a block device for all purposes, including but not limited to using it as a raw partition for databases. This is, in fact, a standard best practice if we want to perform consistent backups over a database using LVM snapshots.
UPDATE: Instead of using LVM's snapshot feature, I decided to use the one that is built-in with BTRFS. Therefore, I am not going to finish this section. If, however, one is interested in creating LVM snapshots, below is a script that shows how to do it. Creating the Snapshot LV See script below. Removing the Snapshot LV See script below. Automatized Backup using LVM Snapshots This is a script used to backup data. It includes the creation and removal of an LVM snapshot. To actually create the backup I would then recommend the use of rsync or better, Unison.
#!/bin/sh

# we need the dm-snapshot module
modprobe dm-snapshot
if [ -e /dev/vg_test/snap ]
then
  # remove left-overs, if any
  umount -f /mnt/home-snap && true
  lvremove -f /dev/vg_test/snap
fi

# create snapshot, 1GB CoW space
# that should be sufficient for accommodating changes during copy
lvcreate -vs -p r -n home-snap -L 1G /dev/vg_test/home
mkdir -p /mnt/home-snap
# mount recently-created snapshot as read-only
mount -o ro /dev/vg_test/snap /mnt/home-snap
# magical rsync command or even better, Unison
rsync -avhzPCi --delete -e "ssh -i /home/sa/.ssh/id_rsa" \
      --filter '- .Trash/' --filter '- *~' \
      --filter '- .local/share/Trash/' \
      --filter '- *.mp3' --filter '- *Cache*' --filter '- *cache*' \
      /mnt/home-snap/sa <backuphost.domain.net:backupdir>/

# unmount and scrap snapshot LV
umount /mnt/home-snap
lvremove -f /dev/vg_test/snap
Virtualization The idea was to use LVM to provide LV's to VEs (Virtual Environments), one LV per VE. This way we can achieve two (from my point of view) very important things
- the ability to contain whatever happens within a VE not just with the virtualization code itself but with yet another layer, LVM in this case
- the ability to do online snapshots on VEs with all its nice benefits like backups etc. (see above)
However, the same can now be accomplished with BTRFS but in even simpler fashion. Even better, BTRFS has the notion of built-in incremental backups. Fault Tolerance With LVM it is possible to provide for increased fault tolerance and increased I/O (Input/Output) as can be read below. More information can be found with man 8 lvcreate. RAID-like Feature with LVM Recent LVM developments allows for a LV to sport high-availability features by having two or more mirrors each which can be placed under different PVs. dmeventd can bring a PV offline without service prejudice when an I/O error is detected in the device. More information can be found at man 8 lvcreate, man 8 lvconvert and man 8 lvchange.dm_mirror need be compiled into the kernel or its kernel module loaded; one might check with lsmod Increased / Redundant I/O to some LV For hardware that supports it, it is possible to use a multipath feature with the device mapper for using different channels to access a LV, having a fail-over possibility in case a channel goes down. One might take a look at the dm_multipath and multipathd documentation for more details. dm_multipath need be compiled into the kernel or its kernel module loaded; one might check with lsmod Managing Volumes This section is intended to cover a few commands which we did not use/cover so far — most people or use cases respectively only require the minority of commands we used so far i.e. pvcreate, vgcreate, lvresize, etc. Stuff like for example pvmove is by far not used as frequently as is lvcreate or lvdisplay for example. Removing PVs Let us imagine the following situation: We have a VG with two 80 GiB HDDs, and we want to upgrade those to 160 GiB HDDs — replacing two 80 GiB HDDs with two 160 GiB HDDs that is. Marginal Note for those in Possession of high-end Hardware With some hot-plugging environment, we can even swap all HDDs with no downtime at all! Generally, depending on the hardware used, this may not be the best option available (doing it within the LVM layer that is). If possible we should use the underlying layer (the one below the LVM layer) which is also part of the wholevirtualized storage shebang (not just the LVM layer). So, what am I talking about?! Enterprise hardware like for example
usually provides us with hot-plugging and means for storage capacity expansion within the storage layer (the one below the LVM layer) already. What I usually do when working with hardware as mentioned above is
Storage Layer
- Within the storage layer I ensure that adding/replacing storage media (HDDs, SSDs (Solid State Drives), tapes, etc.) happens without big effort
- Best practice here is to keep hot-spare drives around so we can log in remotely (e.g. via SSH (Secure Shell) or out-of-band even) and grow the storage respectively replace damaged HDDs/SSDs online (no downtime!) and without the need to actually visit the datacenter to often.
- Also, within this layer, I ensure for data reliability and high data I/O (Input/Output) into/from the storage — both done with RAID 6 and hot-spare HDDs/SSDs for example. Then I create VGs on top of this block device (which we already know can pretty much be any type of storage media) and this is where the
LVM Layer
No high-end Hardware available In this case there is no storage layer. Only some block device e.g. software RAID or simply one or more HDDs/SSDs and the LVM layer on top. With LVM, we can remove a PV from a VG in the same way they are added i.e. online. Since we cannot remove PVs that are being used in an LV we need to use a particular LVM2 tool called pvmove. It can free PVs online so we can replace them easily. pvmove 's only requirement is a contiguous number of free LEs in the VG equivalent to the number of PEs to be moved out of a PV. There is no easy way to directly determine the largest free set of contiguous PEs within a VG, but we can use pvdisplay -m to display the PV allocation map:
sub:/home/sa# pvdisplay -m
  --- Physical volume ---
  PV Name               /dev/sdc1
  VG Name               vg_data
  PV Size               4.91 GB / not usable 1.34 MB
  Allocatable           yes (but full)
  PE Size (KByte)       4096
  Total PE              1200
  Free PE               0
  Allocated PE          1200
  PV UUID               BA99ay-tOcn-Atmd-LTCZ-2KQr-b4Z0-CJ0FjO

  --- Physical Segments ---
  Physical extent 0 to 2367:
    Logical volume      /dev/vg_data/lv_linux
    Logical extents     5692 to 8059
  Physical extent 2368 to 2499:
    Logical volume      /dev/vg_data/lv_linux
    Logical extents     5560 to 5691

  --- Physical volume ---
  PV Name               /dev/sdb1
  VG Name               vg_data
  PV Size               9.77 GB / not usable 1.37 MB
  Allocatable           yes
  PE Size (KByte)       4096
  Total PE              2500
  Free PE               1220
  Allocated PE          1280
  PV UUID               Es9jwb-IjiL-jtd5-TgBx-XSxK-Xshj-Wxnjni

  --- Physical Segments ---
  Physical extent 0 to 1279:
    Logical volume      /dev/vg_data/lv_debian
    Logical extents     0 to 1279
  Physical extent 1280 to 2499:
    FREE

sub:/home/sa#
As can be seen, there are 2499 - 1279 = 1220 free contiguous LEs available within the VG vg_data , meaning we can move up to 1220 PEs from another PV to /dev/sdb1 i.e. withinvg_data.
If we want to free a PV for replacement purposes, it is a good idea to disable its allocation so that we can be sure it remains free until we remove it from the VG. The onliner below disables the allocation of physical extents on this PV. sub:/home/sa# pvchange -xn /dev/sdc1
Once we disabled the allocation for /dev/sdc1 we can move its 1200 PE away from the PV into the VG vg_data since the amount of PEs on /dev/sdc1 (1200) is less than the amount of free LEs (1220) within vg_data. The following line actually does the trick. sub:/home/sa# pvmove -i 10 /dev/sdc1
The -i 10 parameter tells pvmove to report back status once every 10 seconds. Depending on how large the data to be moved is, this operation can take very long. The whole operation can also run in background when adding -b parameter to the line above. In this case, status would be reported to the syslogd.
In case we just do not have enough free contiguous LEs within a VG, we can always add one or more block devices to a VG, thus adding enough contiguous LEs for pvmove to use. Other useful LVM operations One might consult the man pages for more details on these other useful LVM operations — below is just a subset of all commands that ship with LVM anyway:
pvresize extends PVs if the underlying partition has also been extended; it shrinks PVs if the allocation map permits it. For those who wonder about the difference between lvresize and lvextend / lvreduce please go here.vgreduce removes unallocated PVs from a VG, reducing the VG.pvremove destroys PVs (wipes its metadata clean). Use only after the PV had been removed from a VG with vgreduce.vgmerge merges two different VGs into one. The target VG can be online.vgsplit splits a VG.vgchange changes attributes and permissions of a VG.lvchange changes attributes and permissions of a LV.lvconvert converts between a linear volume and a mirror or snapshot and vice versa.
Miscellaneous This section is used to cover miscellaneous issues with regards to LVM. Difference between lvresize and lvextend / lvreduce? So what is the difference really? For example lvresize as well as lvreduce can be used to shrink a LV. Same for growing a LV — lvresize or lvextend can be used. There must be a reason respectively difference?
Well, there is none from what I can tell sub:~# ls -al /sbin/lv{extend,resize}
lrwxrwxrwx 1 root root 3 2008-07-19 07:55 /sbin/lvextend -> lvm
lrwxrwxrwx 1 root root 3 2008-07-19 07:55 /sbin/lvresize -> lvm
sub:~# ls -al /sbin/lv{reduce,resize}
lrwxrwxrwx 1 root root 3 2008-07-19 07:55 /sbin/lvreduce -> lvm
lrwxrwxrwx 1 root root 3 2008-07-19 07:55 /sbin/lvresize -> lvm
sub:~# lsb_release -ric
Distributor ID: Debian
Release: unstable
Codename: sid
sub:~# uname -r
2.6.26-1-openvz-amd64
sub:~#
Therefore it does not make a difference if we would use e.g. lvextend -L 1.4G /dev/vg_mail/mail_private
or lvresize -L 1.4G /dev/vg_mail/mail_private
| 


 1053
1053

 被折叠的 条评论
为什么被折叠?
被折叠的 条评论
为什么被折叠?
 到【灌水乐园】发言


