


ActiveMQ实现Master-Slave的方式有几种,一种是使用Jdbc Peristent的方式,未被Consumer读取的消息和死消息写在数据库的ActiveMQ_MSGS表中,还有一种是使用LevelDB文件,这些消息将被存储在Level DB的.log文件中。
现在我们项目有一个需求是将原先使用Jdbc Persistent的ActiveMQ转换为使用Zk + Replicated Level DB的ActiveMQ,这就产生了一个问题:如何将原先保存在ActiveMQ_MSGS表的消息导入到新ActiveMQ服务器的LevelDB数据文件中?
我们查看了使用jdbc peristent的ACTIVEMQ_MSGS表数据(以MySQL数据库为例)

可以看出存储在数据库里的消息是以Blob形式保存的。
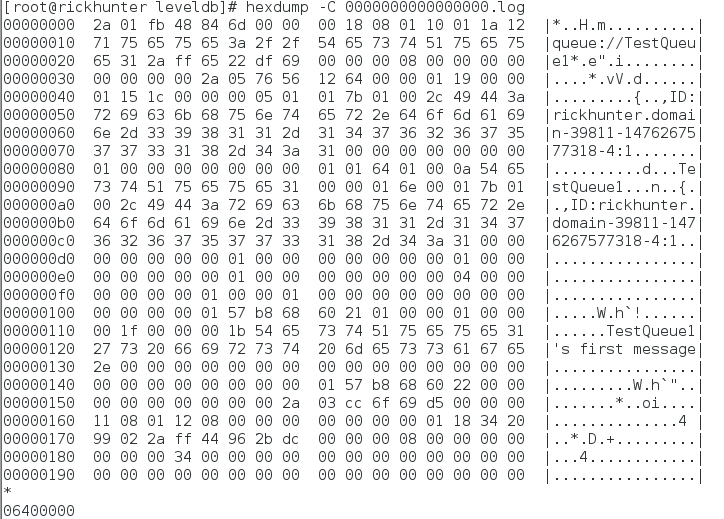
使用leveldb形式保存的消息数据的形式是二进制形式的
我们可以看出两者的数据存储格式完全不一样,因此不可能像jdbc peristent迁移那样,将activemq_msgs表数据从一个数据库迁移到另一个数据库那样简单。只能采用从源ActiveMQ服务器读取队列消息,再将队列消息发送到目标ActiveMQ的方式。
我们搭建了两个CentOS虚拟机,虚拟机A上是源ActiveMQ,使用jdbc persistent(MySQL),有三个Queue:TestQueue1,TestQueue2,TestQueue3.
虚拟机B使用LevelDB做数据持久化。
1.单ActiveMQ,单队列消息迁移
TestQueue1有三条持久化消息

消息的内容我们可以使用activemq-admin.bat查看(这个只在windows环境下可用),这个命令支持获取远程ActiveMQ信息。
activemq-admin.bat browse --amqurl tcp://xxx.xxx.xxx.xxx:61616 TestQueue1获得的TestQueue1队列信息如下所示
JMS_HEADER_FIELD:JMSDestination = TestQueue1
JMS_BODY_FIELD:JMSText = Test Queue1's first message.
JMS_HEADER_FIELD:JMSType =
JMS_HEADER_FIELD:JMSCorrelationID =
JMS_HEADER_FIELD:JMSDeliveryMode = persistent
JMS_HEADER_FIELD:JMSMessageID = ID:rickhunter.domain-46264-1476266938779-4:1:1:1:1
JMS_HEADER_FIELD:JMSExpiration = 0
JMS_HEADER_FIELD:JMSPriority = 0
JMS_HEADER_FIELD:JMSRedelivered = false
JMS_HEADER_FIELD:JMSTimestamp = 1476267006371

JMS_HEADER_FIELD:JMSDestination = TestQueue1
JMS_BODY_FIELD:JMSText = TestQueue's second message
JMS_HEADER_FIELD:JMSType =
JMS_HEADER_FIELD:JMSCorrelationID =
JMS_HEADER_FIELD:JMSDeliveryMode = persistent
JMS_HEADER_FIELD:JMSMessageID = ID:rickhunter.domain-44431-1476325780609-4:1:1:1:1
JMS_HEADER_FIELD:JMSExpiration = 0
JMS_HEADER_FIELD:JMSPriority = 0
JMS_HEADER_FIELD:JMSRedelivered = false
JMS_HEADER_FIELD:JMSTimestamp = 1476326826475

JMS_HEADER_FIELD:JMSDestination = TestQueue1
JMS_BODY_FIELD:JMSText = TestQueue1's third message.
JMS_HEADER_FIELD:JMSType =
JMS_HEADER_FIELD:JMSCorrelationID =
JMS_HEADER_FIELD:JMSDeliveryMode = persistent
JMS_HEADER_FIELD:JMSMessageID = ID:rickhunter.domain-44431-1476325780609-4:1:1:1:2
JMS_HEADER_FIELD:JMSExpiration = 0
JMS_HEADER_FIELD:JMSPriority = 0
JMS_HEADER_FIELD:JMSRedelivered = false
JMS_HEADER_FIELD:JMSTimestamp = 1476326873071
我们数据迁移的基本思路,是从虚拟机A的ActiveMQ上读取TestQueue1的持久化消息,发送给虚拟机B的ActiveMQ的TestQueue1.
读取TestQueue1队列消息的代码片段如下(这段代码参考了王新春的代码, 根据实际做了一点修改,特此感谢。http://wangxinchun.iteye.com/blog/2146120?utm_source=tuicool&utm_medium=referral)
String url = "tcp://xxx.xxx.xxx.xxx:61616";
        ActiveMQConnectionFactory connectionFactory =
                new ActiveMQConnectionFactory("admin", "admin", url);

        ActiveMQConnection connection = null;
        try {
            connection = (ActiveMQConnection)connectionFactory.createConnection();
            connection.start();
            Session session = connection.createSession(false, Session.AUTO_ACKNOWLEDGE);
            Queue destination = session.createQueue("TestQueue1");
            QueueBrowser browser = session.createBrowser(destination);
            Enumeration<?> enumeration = browser.getEnumeration();
            while (enumeration.hasMoreElements()) {
                TextMessage message = (TextMessage) enumeration.nextElement();
                System.out.println("Browsing: " + message.getText());
            }
            session.close();
        } catch (Exception e) {
            e.printStackTrace();
        }
        finally {
            if (connection != null) {
                try {
                    connection.close();
                } catch (JMSException e) {
                    e.printStackTrace();
                }
            }
        }
上述代码只是从源ActiveMQ的TestQueue1读取所有持久化消息并将每条消息正文输出到控制台,接下来我们对这段代码进行改造,将获取的消息发送到目标ActiveMQ的TestQueue1。
我们将每一条消息放到一个消息List中。然后连接目标ActiveMQ,将消息List中的每一条消息发送到TestQueue1。代码片段如下:
List<TextMessage> messageList = new ArrayList<TextMessage>();

..........
Enumeration<?> enumeration = browser.getEnumeration();
while (enumeration.hasMoreElements())
{
	TextMessage message = (TextMessage) enumeration.nextElement();
	messageList.add(message);
}
..........

sendMessages(messageList);
..........


 private static void sendMessages(List<TextMessage> messageList)
    {
        try
        {
            String sendActiveMQUrl = "tcp://xxx.xxx.xxx.xxx:61616";
            ActiveMQConnectionFactory connectionFactory =
                    new ActiveMQConnectionFactory(sendActiveMQUrl);
            connectionFactory.setUserName("admin");
            connectionFactory.setPassword("admin");
            ActiveMQConnection connection = (ActiveMQConnection)connectionFactory.createConnection();

            connection.setDisableTimeStampsByDefault(true);
            connection.start();
            Session session = connection.createSession(false, Session.AUTO_ACKNOWLEDGE);

            //创建目标,就创建主题也可以创建队列
            Destination destination = session.createQueue("TestQueue1");
            //创建消息生产者
            MessageProducer producer = session.createProducer(destination);
            //设置持久化,DeliveryMode.PERSISTENT和DeliveryMode.NON_PERSISTENT
            producer.setDeliveryMode(DeliveryMode.PERSISTENT);

            for(TextMessage message:messageList)
            {
                // 发送消息到ActiveMQ
                producer.send(message);
                TimeUnit.MILLISECONDS.sleep(10);
            }

            // 关闭资源
            session.close();
            connection.close();
            System.out.println("The messages import is completed.");
        }
        catch(Exception ex)
        {
            ex.printStackTrace();
        }
    }
上述代码中有一句代码请特别注意
connection.setDisableTimeStampsByDefault(true);这句代码是控制是否使用JmsMessage本身自带的TimeStamp属性。ActiveMQConnection类的disableTimeStampsByDefault属性的API描述是这样的(基于ActiveMQ 5.14.0的代码)
 /**
     * Sets whether or not timestamps on messages should be disabled or not. If
     * you disable them it adds a small performance boost.
     */
    public void setDisableTimeStampsByDefault(boolean timeStampsDisableByDefault) {
        this.disableTimeStampsByDefault = timeStampsDisableByDefault;
    }
从API描述看出来,它是设置JMS Message自身所带的timestamp是否被禁用。具体使用这个属性的代码是在ActiveMQConnection的send方法
 void send(ActiveMQDestination destination, ActiveMQMessage msg, MessageId messageId, int deliveryMode,
int priority, long timeToLive, boolean async) throws JMSException
{
  ...............
   if (!isDisableTimeStampsByDefault()) {
            long timeStamp = System.currentTimeMillis();
            msg.setJMSTimestamp(timeStamp);
            if (timeToLive > 0) {
                expiration = timeToLive + timeStamp;
            }
        }
  ...............
}
从上述代码可以看出,如果disableTimeStampsByDefault属性是false,ActiveMQ在发送Jms Message对象时,将无视消息对象自带的timestamp,使用JmsMessage发送时的时间。这样对于Jms Message对象timestamp属性敏感的应用就会出现问题,而设置这个属性为true,将保留Jms Message对象原先的timestamp信息。
补充一点,如果不设置ActiveMQConnection的disableTimeStampsByDefault属性,设置MessageProducer的disableMessageTimestamp属性可以起到相同的效果。MessageProducer的disableMessageTimestamp属性的API描述是
public abstract class ActiveMQMessageProducerSupport implements MessageProducer, Closeable {
...............
 /**
     * Sets whether message timestamps are disabled.
     * <P>
     * Since timestamps take some effort to create and increase a message's
     * size, some JMS providers may be able to optimize message overhead if
     * they are given a hint that the timestamp is not used by an application.
     * By calling the <CODE>setDisableMessageTimestamp</CODE> method on this
     * message producer, a JMS client enables this potential optimization for
     * all messages sent by this message producer. If the JMS provider accepts
     * this hint, these messages must have the timestamp set to zero; if the
     * provider ignores the hint, the timestamp must be set to its normal
     * value.
     * <P>
     * Message timestamps are enabled by default.
     *
     * @param value indicates if message timestamps are disabled
     * @throws javax.jms.JMSException if the JMS provider fails to close the producer due to
     *                      some internal error.
     */
    public void setDisableMessageTimestamp(boolean value) throws JMSException
    {
      ............
    }
当MessageProducer在发送消息时使用到了这个属性
public class ActiveMQSession implements Session, QueueSession,
   TopicSession, StatsCapable, ActiveMQDispatcher
{
  ..............
 protected void send(ActiveMQMessageProducer producer, ActiveMQDestination destination,
                     Message message,int deliveryMode, int priority, long timeToLive,
                     MemoryUsage producerWindow, int sendTimeout, AsyncCallback onComplete)
                     throws JMSException
 {
  ..............
   synchronized (sendMutex) {
   ..............
   if (!producer.getDisableMessageTimestamp())
   {
	    long timeStamp = System.currentTimeMillis();
	    message.setJMSTimestamp(timeStamp);
	    if (timeToLive > 0)
        {
	       expiration = timeToLive + timeStamp;
	    }
   }
   .......
 }
对照ActiveMQConnection的send方法,可以看出两段代码的作用完全一样,因此我们可以设置MessageProducer的disableMessageTimestamp属性达到相同效果,具体修改代码如下:
ActiveMQMessageProducer producer = (ActiveMQMessageProducer)session.createProducer(destination);
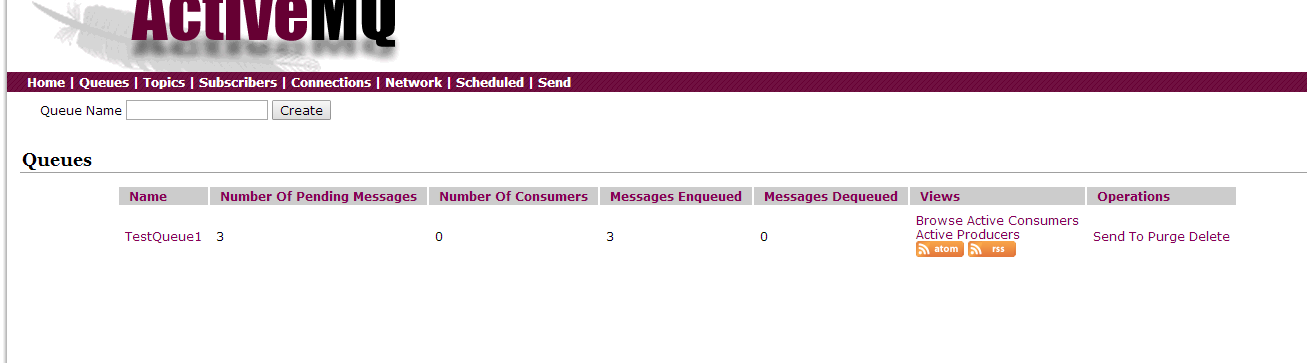
producer.setDisableMessageTimestamp(true);代码修改完成后运行,我们可以看到目标ActiveMQ的TestQueue1中已经有迁移的三条消息。
JMS_HEADER_FIELD:JMSDestination = TestQueue1
JMS_BODY_FIELD:JMSText = Test Queue1's first message.
JMS_HEADER_FIELD:JMSType =
JMS_HEADER_FIELD:JMSCorrelationID =
JMS_HEADER_FIELD:JMSDeliveryMode = persistent
JMS_HEADER_FIELD:JMSMessageID = ID:rick.domain-4065-1476339886463-3:1:1:1:1
JMS_HEADER_FIELD:JMSExpiration = 0
JMS_HEADER_FIELD:JMSPriority = 4
JMS_HEADER_FIELD:JMSRedelivered = false
JMS_HEADER_FIELD:JMSTimestamp = 1476267006371

JMS_HEADER_FIELD:JMSDestination = TestQueue1
JMS_BODY_FIELD:JMSText = TestQueue's second message
JMS_HEADER_FIELD:JMSType =
JMS_HEADER_FIELD:JMSCorrelationID =
JMS_HEADER_FIELD:JMSDeliveryMode = persistent
JMS_HEADER_FIELD:JMSMessageID = ID:rick.domain-4065-1476339886463-3:1:1:1:2
JMS_HEADER_FIELD:JMSExpiration = 0
JMS_HEADER_FIELD:JMSPriority = 4
JMS_HEADER_FIELD:JMSRedelivered = false
JMS_HEADER_FIELD:JMSTimestamp = 1476326826475

JMS_HEADER_FIELD:JMSDestination = TestQueue1
JMS_BODY_FIELD:JMSText = TestQueue1's third message.
JMS_HEADER_FIELD:JMSType =
JMS_HEADER_FIELD:JMSCorrelationID =
JMS_HEADER_FIELD:JMSDeliveryMode = persistent
JMS_HEADER_FIELD:JMSMessageID = ID:rick.domain-4065-1476339886463-3:1:1:1:3
JMS_HEADER_FIELD:JMSExpiration = 0
JMS_HEADER_FIELD:JMSPriority = 4
JMS_HEADER_FIELD:JMSRedelivered = false
JMS_HEADER_FIELD:JMSTimestamp = 1476326873071
与源ActiveMQ的三条消息比较,除了JMSMessageID属性不一样以外(MessageId是由发送Message的Client机器ID和随机数生成的,不可能保证和原消息完全一致),其他属性完全一致。如果要保留源消息的MessageId信息,可以将其设置到JMSCorrelationID属性。
2.单ActiveMQ,多队列消息迁移
在1中我们实现单队列消息的迁移。但如果源ActiveMQ有多个队列,每个队列都有持久化消息,如何实现这些队列消息的迁移?
我们最初的思路是将所有包含持久化消息的队列名称写入一个配置文件里,在迁移的时候读取这些队列名称。但是这样做的问题就是不灵活,有可能在迁移时一些原先没有持久化消息的队列包含了消息,一些原先有持久化消息的队列的消息被消费掉了,使得不是所有队列的消息都能被迁移。
通过查看ActiveMQ的API文档,我们决定使用ActiveMQConnection类的destinationSource属性,这个属性的API描述是
 /**
     * Returns the {@link DestinationSource} object which can be used to listen to destinations
     * being created or destroyed or to enquire about the current destinations available on the broker
     *
     * @return a lazily created destination source
     * @throws JMSException
     */
   @Override
    public DestinationSource getDestinationSource() throws JMSException {
    .......
   }
从API描述上可以看出这个属性是一个源对象,是对当前ActiveMQ连接上的所有Destination(包括Queue和Topic)的一个侦听对象。从DestinationSource对象,我们可以获取源ActiveMQ的所有Queue(也可以获得所有Topic,这里不再赘述).
public class DestinationSource implements MessageListener {

  ..............
/**
     * Returns the current queues available on the broker
     */
    public Set<ActiveMQQueue> getQueues() {
        return queues;
    }
  ..............
}
获得了源ActiveMQ的Queue集合,接下来的操作就和1一样了,只是过滤掉那些不不包含持久化消息的Queue。实现代码的片段如下:
HashMap<String, List<TextMessage>> queueMessageMap =
new HashMap<String, List<TextMessage>>();
.................
Set<ActiveMQQueue> activeMQQueues =
connection.getDestinationSource().getQueues();
for(ActiveMQQueue destination: activeMQQueues)
{
QueueBrowser browser = session.createBrowser(destination);
Enumeration<?> enumeration = browser.getEnumeration();
List<TextMessage> messageList = new ArrayList<TextMessage>();
while (enumeration.hasMoreElements()) {
TextMessage message = (TextMessage) enumeration.nextElement();
messageList.add(message);
}
if (messageList.size() > 0)
{
queueMessageMap.put(destination.getQueueName(), messageList);
}
.................
if(queueMessageMap.size() > 0)
{
sendMessages(queueMessageMap);
}
.................
private static void sendMessages(HashMap<String, List<TextMessage>> queueMessageMap)
{
.................
for(String queueName:queueMessageMap.keySet())
{
// 创建目标,就创建主题也可以创建队列
Destination destination = session.createQueue(queueName);
// 创建消息生产者
MessageProducer producer = session.createProducer(destination);
// 设置持久化,DeliveryMode.PERSISTENT和DeliveryMode.NON_PERSISTENT
producer.setDeliveryMode(DeliveryMode.PERSISTENT);
List<TextMessage> messageList = queueMessageMap.get(queueName);
for(TextMessage message:messageList)
{
// 发送消息到ActiveMQ
producer.send(message);
TimeUnit.MILLISECONDS.sleep(10);
}
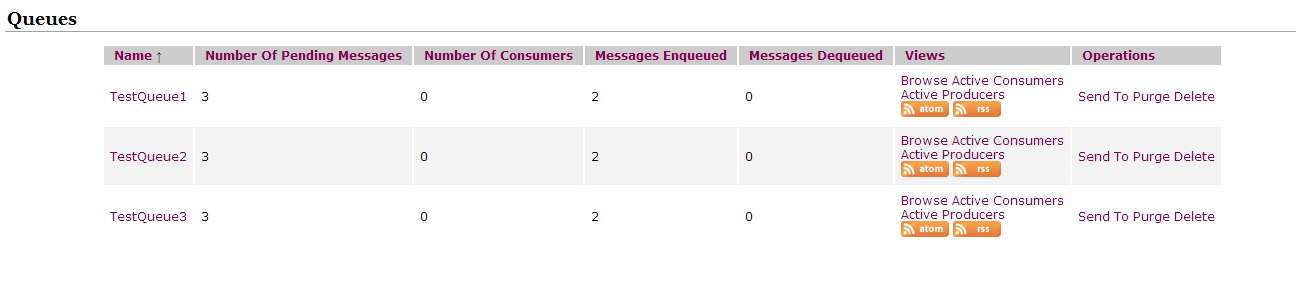
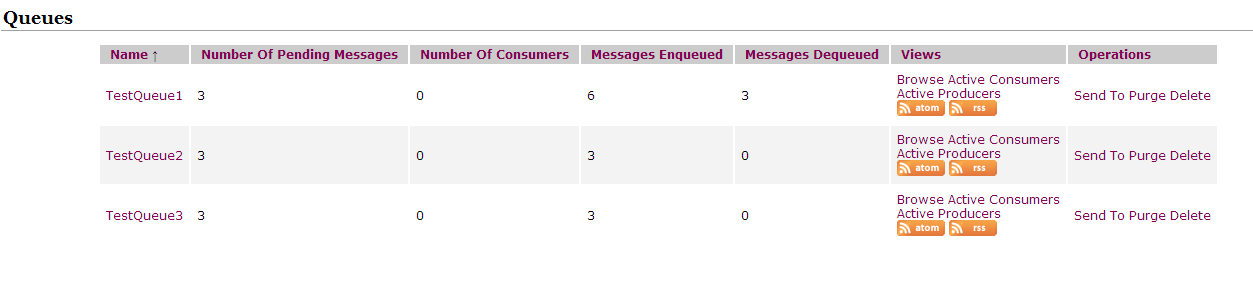
}我们在源ActiveMQ的TestQueue1,TestQueue2,TestQueue3队列里分别创建三条持久化消息(如下图所示)
删除目标ActiveMQ TestQueue1队列里1中迁移的三条消息

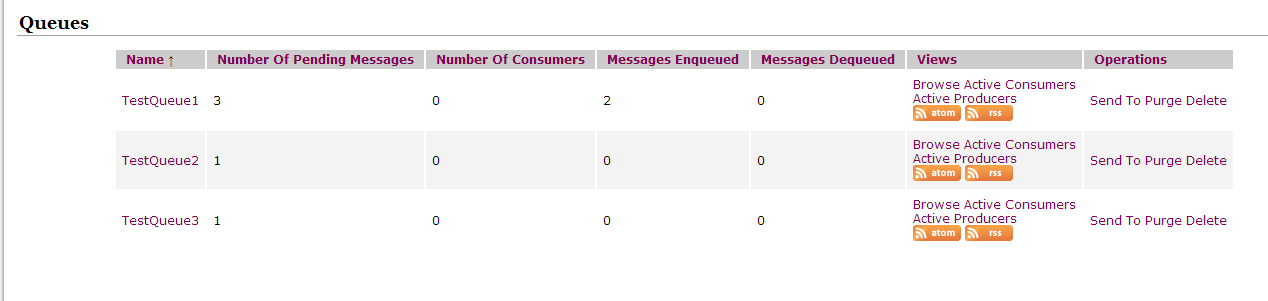
运行代码,我们可以看到源ActiveMQ中的三个队列里的九条消息被迁移到了目标ActiveMQ
3.多ActiveMQ,多队列消息迁移
在这个场景中目标ActiveMQ是使用zk + Replicated LevelDB结构的三台ActiveMQ。代码仍然使用和2相同的代码,只是连接目标ActiveMQ的brokerUrl形式改为failover:(tcp://xxx.xxx.xxx, tcp://xxx.xxx.xxx, tcp://xxx.xxx.xxx)
我们使用的三台ActiveMQ的清单如下:
| ActiveMQ服务器号 | tcp端口号 | zk端口号 | 管理界面端口号 |
| ActiveMQ-1 | 61616 | 2181 | 8161 |
| ActiveMQ-2 | 62616 | 2181 | 8261 |
| ActiveMQ-3 | 63616 | 2181 | 8361 |
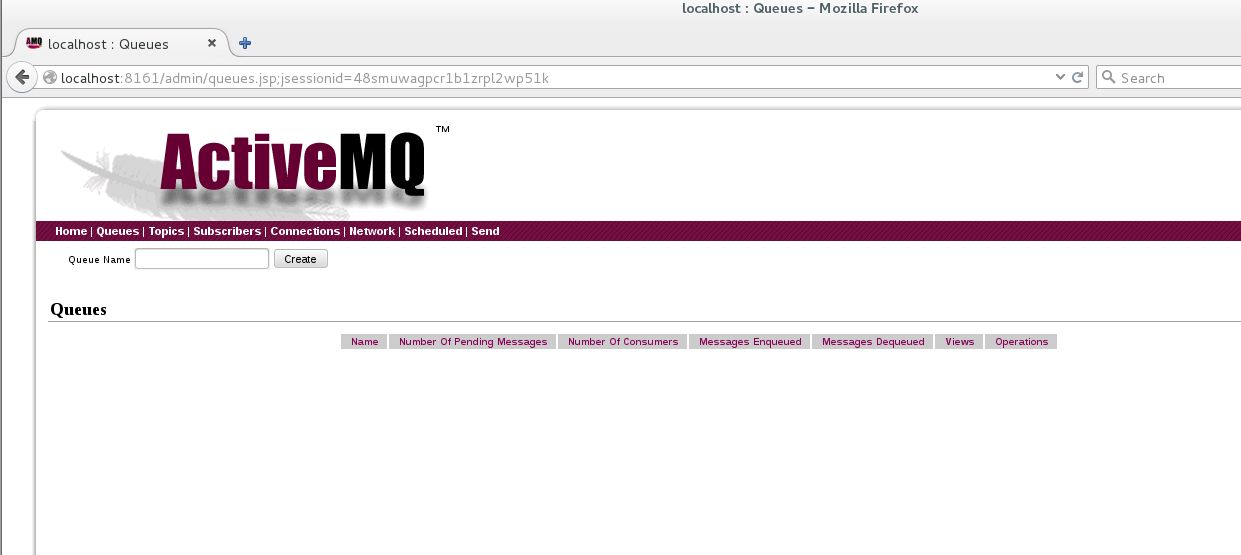
最初三台ActiveMQ中没有队列,也没有消息(此时ActiveMQ-1为Master,ActiveMQ-2,ActiveMQ-3为Slave)
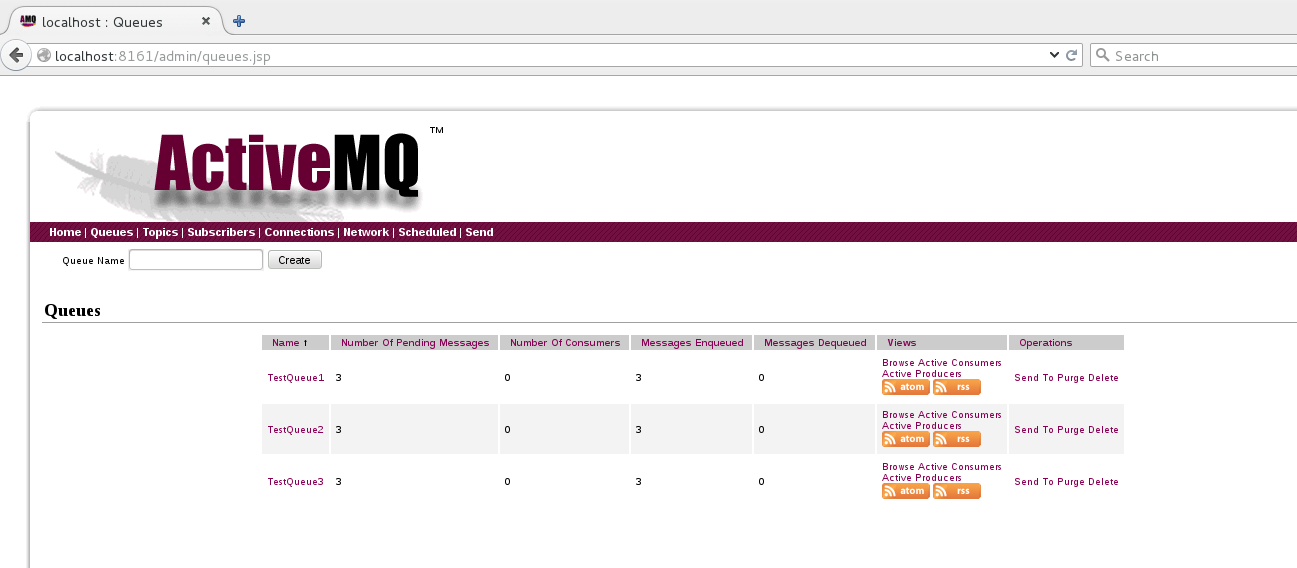
运行2的程序后,我们可以看到ActiveMQ-1中有了TestQueue1,TestQueue2,TestQueue3三个队列,并且有了9条消息。
当我们停掉ActiveMQ-1后,ActiveMQ-2成为Master,我们可以从它的管理界面看到ActiveMQ-2也有三个队列,9条消息。
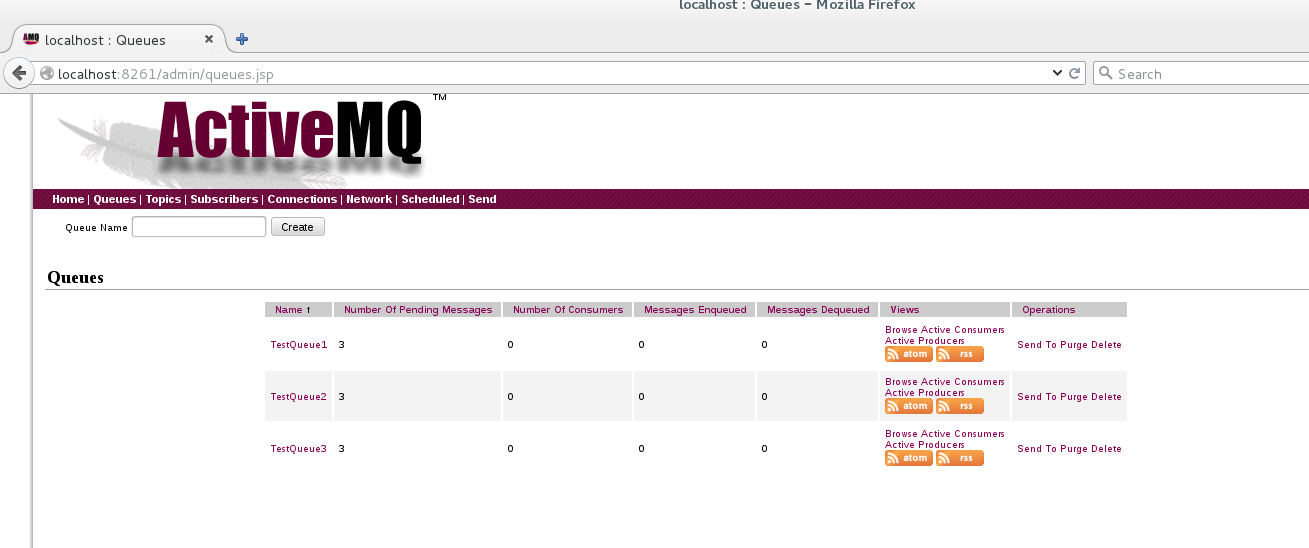
这说明2的程序对于Zookeeper + Replicated LevelDB架构的多ActiveMQ 数据迁移仍然有效。
4.结语
本文实现了从数据库介质的ActiveMQ到使用Replicated LevelDB文件介质的ActiveMQ的消息迁移,但并不仅限于此种场景,任何两个ActiveMQ之间都可以实现类似的消息迁移。在实际运行中,还可以使用这样的程序实现不同ActiveMQ之间的数据同步,以及在一个ActiveMQ内,消息在不同队列间的迁移。这需要开发者根据实际需要进行修改和调整。


 1275
1275

 被折叠的 条评论
为什么被折叠?
被折叠的 条评论
为什么被折叠?
 到【灌水乐园】发言


