


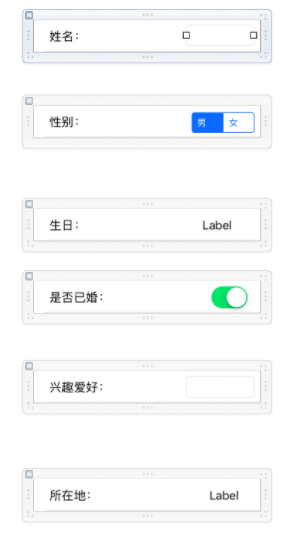
在我们复用cell时,如果每个cell的布局不同,如实现以下的布局:

我们接下来用Xib文件来进行实现
1.创建TableViewCell文件,在Xib文件中生成6个Cell,并设置每个Cell的identifier,为了方便起见,我这里将其设置为数字0~5

2.在ViewController.m中创建Cell
TableViewCell*cell=[tableView dequeueReusableCellWithIdentifier:(nonnull NSString *)];
if (cell==nil) {
 cell=[[[NSBundle mainBundle]loadNibNamed:@"TableViewCell" owner:nil options:nil]
objectAtIndex:(NSUInteger)];
}
        return cell;
这几行代码是正常复用cell的流程,可以看到,identifier后面接当前Cell的识别码,index后面要加当前Cell所在位置。
例如:第一个Cell就是
TableViewCell*cell=[tableView dequeueReusableCellWithIdentifier:@"0"];
        if (cell==nil) {
            cell=[[[NSBundle mainBundle]loadNibNamed:@"TableViewCell" owner:nil options:nil]
firstObject];
        }
第二个Cell是
 TableViewCell*cell=[tableView dequeueReusableCellWithIdentifier:@"1"];
        if (cell==nil) {
            cell=[[[NSBundle mainBundle]loadNibNamed:@"TableViewCell" owner:nil options:nil]
objectAtIndex:1];
        }
所以在上面加一个判断语句,确定当前Cell的信息
-(UITableViewCell *)tableView:(UITableView *)tableView cellForRowAtIndexPath:(NSIndexPath *)
indexPath{
    NSString*identifier=0;
    NSInteger index=0;
//判断在第几组
    if (indexPath.section==0) {
        switch (indexPath.row) {
            case 0:
                identifier=@"0";
                index=0;
                break;
            case 1:
                identifier=@"1";
                index=1;
                break;
            case 2:
                identifier=@"2";
                index=2;
               break;

            default:
                break;
    }
    }else{
        switch (indexPath.row) {
            case 0:
                identifier=@"3";
                index=3;
                break;
            case 1:
                identifier=@"4";
                 index=4;
                break;
            case 2:
                identifier=@"5";
                 index=5;
                break;

            default:
                break;
        }
    }

        TableViewCell*cell=[tableView dequeueReusableCellWithIdentifier:identifier];
        if (cell==nil) {
            cell=[[[NSBundle mainBundle]loadNibNamed:@"TableViewCell" owner:nil options:nil]
objectAtIndex:index];
        }
        return cell;
}
3.可以把创建Cell的过程,在Cell.m文件中进行,以免ViewController中代码过多
TableViewCell.h
+(instancetype)setupCellWith:(UITableView*)tableView AtIndexPath:(NSIndexPath *)indexPath;TableViewCell.m
+(instancetype)setupCellWith:(UITableView*)tableView AtIndexPath:(NSIndexPath *)indexPath{
    NSString*identifier=0;
    NSInteger index=0;
    if (indexPath.section==0) {
        switch (indexPath.row) {
            case 0:
                identifier=@"0";
                index=0;
                break;
            case 1:
                identifier=@"1";
                index=1;
                break;
            case 2:
                identifier=@"2";
                index=2;
                break;

            default:
                break;

        }
    }else{
        switch (indexPath.row) {
            case 0:
                identifier=@"3";
                index=3;
                break;
            case 1:
                identifier=@"4";
                index=4;
                break;
            case 2:
                identifier=@"5";
                index=5;
                break;

            default:
                break;

        }
    }

    TableViewCell*cell=[tableView dequeueReusableCellWithIdentifier:identifier];
    if (cell==nil) {
        cell=[[[NSBundle mainBundle]loadNibNamed:@"TableViewCell" owner:nil options:nil]
objectAtIndex:index];
    }
    return cell;
}
ViewController.m文件中
-(UITableViewCell *)tableView:(UITableView *)tableView cellForRowAtIndexPath:(NSIndexPath *)
indexPath{
    TableViewCell*cell=[TableViewCell setupCellWith:tableView AtIndexPath:indexPath];
    return cell;
   }
4.把控件拖到Cell中
这样我们的布局就完成了ಠ౪ಠ


 6366
6366

 被折叠的 条评论
为什么被折叠?
被折叠的 条评论
为什么被折叠?
 到【灌水乐园】发言


