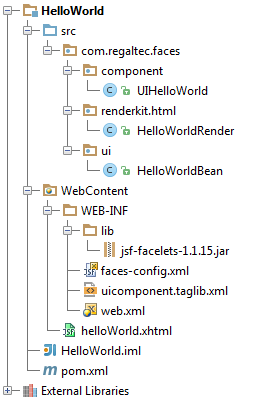
完整的教材:
前面2篇教材已实现了一个简单的JSF组件了,接下来这篇将重构JSF组件使用EL表达式。

开发环境:
- Windows 7
- IntelliJ IDEA 12.1.2
- jboss-6.1.0.Final
- JSF 1.2
1、这一次先修改helloWorld.xhtml,网页需要a4j的支持,事先需要引入。
<!DOCTYPE html PUBLIC "-//W3C//DTD XHTML 1.0 Transitional//EN" "http://www.w3.org/TR/xhtml1/DTD/xhtml1-transitional.dtd">
<html xmlns="http://www.w3.org/1999/xhtml" xmlns:f="http://java.sun.com/jsf/core" xmlns:ida="http://www.regaltec.com/ida40" xmlns:h="http://java.sun.com/jsf/html" xmlns:a4j="http://richfaces.org/a4j">
<f:view>
    <head>
        <title>Hello World</title>
    </head>
    <body>
        <a4j:form>
            <h:panelGrid columns="3">
                <h:outputText value="姓名:" />
                <h:inputText value="#{helloWorldBean.name}" />
                <a4j:commandButton value="确定" reRender="out" />
            </h:panelGrid>
        </a4j:form>
        <h:panelGroup id="out">
            <ida:helloWorld name="#{helloWorldBean.name}" />
        </h:panelGroup>
    </body>
</f:view>
</html>
2、helloWorld.xhtml使用了#{hellWorldBean.name}表达式,需要新建HelloWorldBean类。
public class HelloWorldBean {
    private String name;
    public String getName() {
        return name;
    }
    public void setName(String name) {
        this.name = name;
    }
}
3、HelloWorldBean是Managed Bean,需要在faces-config.xml声明。
<?xml version='1.0' encoding='UTF-8'?>
<faces-config xmlns="http://java.sun.com/xml/ns/javaee" xmlns:xsi="http://www.w3.org/2001/XMLSchema-instance" xsi:schemaLocation="http://java.sun.com/xml/ns/javaee http://java.sun.com/xml/ns/javaee/web-facesconfig_1_2.xsd" version="1.2">
    <component>
        <component-type>com.regaltec.faces.HelloWorld</component-type>
        <component-class>com.regaltec.faces.component.UIHelloWorld</component-class>
    </component>
    <managed-bean>
        <managed-bean-name>helloWorldBean</managed-bean-name>
        <managed-bean-class>com.regaltec.faces.ui.HelloWorldBean</managed-bean-class>
        <managed-bean-scope>request</managed-bean-scope>
    </managed-bean>
    <render-kit>
        <renderer>
            <component-family>com.regaltec.faces.HelloWorld</component-family>
            <renderer-type>com.regaltec.faces.render.HelloWorld</renderer-type>
            <renderer-class>com.regaltec.faces.renderkit.html.HelloWorldRender</renderer-class>
        </renderer>
    </render-kit>
    <application>
        <locale-config>
            <default-locale>zh_CN</default-locale>
            <supported-locale>en_US</supported-locale>
        </locale-config>
        <view-handler>com.sun.facelets.FaceletViewHandler</view-handler>
    </application>
</faces-config>
这个时候如果启动jboss,会发现示例无法按预期的工作。这是因为name属性使用了表达式,UIHelloWorld组件不能简单的使用getter了,继续重构吧。
4、UIHelloWorld组件在使用表达式时,不是直接赋值到属性,原因是java类型不一样,UIHelloWorld的name属性是String,而表达式对应的类型是ValueExpression,JSF组件可以getValueExpression取出这个ValueExpression。
public class UIHelloWorld extends UIOutput {
    private String name;

    public String getName() {
        if (StringUtils.isNotBlank(this.name)) { //这里是为了支持非表达式
            return name;
        }
        ValueExpression _ve = getValueExpression("name");
        if (_ve != null) {
            return (String)_ve.getValue(getFacesContext().getELContext());
        } else {
            return null;
        }
    }

    public void setName(String name) {
        this.name = name;
    }

    @Override
    public String getFamily() {
        return "com.regaltec.faces.HelloWorld";
    }
}
当调getter的时候,同时探测name属性与ValueExpression就行了。
5、Render类保持不变。
public class HelloWorldRender extends Renderer {
    @Override
    public void encodeBegin(FacesContext context, UIComponent component) throws IOException {
        UIHelloWorld helloWorld = (UIHelloWorld) component;
        if (StringUtils.isNotBlank(helloWorld.getName())) {
            ResponseWriter writer = context.getResponseWriter();
            writer.write("<div>");
            writer.write(String.format("你好,%s! ", helloWorld.getName()));
            writer.write("</div>");
        }
    }
}相比上一节教材,只是多了一个HelloWorldBean类,现在启动jboss就能正常工作了。效果如下图,在文本框输入世界并点击按钮后,文本框下方显示你好,世界!。

下一节中,我们将重构组件,让组件同时支持jsp和facelets。
以上代码在jboss-6.1.0.Final调试通过,感谢百度云网盘提供源码下载。


 本文详细介绍了如何在JSF环境中开发自定义组件,包括使用EL表达式来实现动态属性绑定,通过引入a4j支持,新建HelloWorldBean类,并在faces-config.xml中声明该ManagedBean,实现组件与页面之间的交互。文章最后展示了启动jboss后的正确工作流程和预期效果。


 195
195

 被折叠的 条评论
为什么被折叠?


