


0、演示在此:http://runjs.cn/detail/y8w993if
1、框架搭建
为了方便演示,我搭建了一个简单的游戏“框架”,框架包含描述游戏状态的部分及逻辑部分。
一个弹幕游戏至少应当包含“自机”及“弹幕”。首先,游戏页面中应当包含一个用于绘制实际图形的canvas、一个用于演示的描述自机及弹幕形状的canvas。此外,为了便于更换图形,我还创建了两个canvas用于绘制自机和子弹。
不包含JS代码时,页面如下:
<!doctype html>
<html>
<head>
    <meta charset="UTF-8">
    <title>.</title>
</head>
<style type="text/css">
    #stage{
        display:block;
        float:left;
        width:400px;
        height:300px;
        box-shadow:
            -2px -2px 4px rgba(0, 0, 0, 0.3),
            2px 2px 4px rgba(0, 0, 0, 0.6);
    }
    #hitck{
        display:block;
        float:left;
        width:400px;
        height:300px;
        box-shadow:
            -2px -2px 4px rgba(0, 0, 0, 0.3),
            2px 2px 4px rgba(0, 0, 0, 0.6);
    }
    #plane{
        display:block;
        float:left;
        width:48px;
        height:48px;
        box-shadow:
            -2px -2px 4px rgba(0, 0, 0, 0.3),
            2px 2px 4px rgba(0, 0, 0, 0.6);
    }
    #ammo{
        display:block;
        float:left;
        width:12px;
        height:12px;
        box-shadow:
            -2px -2px 4px rgba(0, 0, 0, 0.3),
            2px 2px 4px rgba(0, 0, 0, 0.6);
    }
</style>
<body>
    <canvas id="stage"></canvas>
    <canvas id="hitck"></canvas>
    <canvas id="plane"></canvas>
    <canvas id="ammo"></canvas>
</body>
</html>
正如前文所说的,整个页面就只有四个canvas,从方便的角度出发,我们把舞台的大小写死为800*600。
2、一个子弹
在开始探究碰撞检测前,我们需要编写弹幕生成的代码,因为没有实际的弹幕就无法理解碰撞。
子弹理所当然是一个物体,在此,我们假设每个子弹都是一个对象(注意,这么做的性价比很低),一个基本的子弹定义如下:
DirectAmmo = function(x, y, vx, vy, ax, ay){
    this.x   = x  || 400; // 横坐标
    this.y   = y  || 300; // 纵坐标
    this.vx  = vx || 2;   // 横向速度
    this.vy  = vy || 2;   // 纵向速度
    this.ax  = ax || 0;   // 横向加速度
    this.ay  = ay || 0;   // 纵向加速度
    this.die = false;     // 子弹是否已消亡
}
假设每个子弹的运动都是独立的,那么可以写一个函数来描述每一个时间片中子弹的移动:
DirectAmmo.prototype.move = function(){
    this.vx += this.ax;
    this.vy += this.ay;
    this.x  += this.vx;
    this.y  += this.vy;

    if(this.x < 0){
        this.die = true;
    }
    if(this.y < 0){
        this.die = true;
    }
    if(this.x > 800){
        this.die = true;
    }
    if(this.y > 600){
        this.die = true;
    }
    if(this.vx == 0 && this.vy == 0 && this.ax == 0 && this.ay == 0){
        this.die = true;
    }
    return this;
}
当子弹超出屏幕范围之后,子弹便会消亡,将其die属性置为true。
一个游戏不可能只有一颗子弹,同一个屏幕上可能同时出现很多的子弹,这些子弹按照各自的轨迹独立运动,这构成了弹幕游戏华丽的基础,因此,我们需要一个弹幕队列来管理这些子弹。
var Queue = {
    ammo : [],
    initAmmo : function(maxAmmoCount){
        maxAmmoCount = maxAmmoCount || 512;
        for(var i = 0; i < maxAmmoCount; i ++){
            Queue.ammo[i] = null;
        }
    },
    init : function(){
        Queue.initAmmo();
    }
}在initAmmo方法中,定义了一个maxAmmoCount变量,弹幕队列中之多只能包含maxAmmoCount个子弹对象实例。早期的弹幕游戏通常用此方法控制性能。
然后,我们需要为子弹添加一个方法,用于将子弹自身加入到弹幕队列中:从头开始扫描队列,当找到空位时把自己装进去空位置中。空位的定义是null或者是指向已死亡的子弹的位置:
DirectAmmo.prototype.queue = function(){
    var i = 0;
    while(i < Queue.ammo.length){
        if(Queue.ammo[i] == null || Queue.ammo[i].die){
            Queue.ammo[i] = this;
            return true;
        }
        i ++;
    }
    return false;
}
至此,子弹本身就实现了。
3、一组子弹
弹幕游戏中,敌机通常都是一次性倾泻出一堆子弹——一堆有规律的子弹,譬如如下图的从圆心开始往外扩散的子弹:

自然不可能逐个子弹去生成、去描述,我们需要定义一个方法来生成这样的一组子弹,这样的一个整体比起单个子弹来多了两个属性:数量、速度。
RoundDirectAmmo = function(x, y, count, speed, ax, ay){
    x          = x || 400;
    y          = y || 300;
    count      = count || 32;
    speed      = speed || 2;
    ax         = ax || 0;
    ay         = ay || 0;
    var offset = 0.00001;
    var step   = Math.PI * 2 / count;
    var ammos  = [];
    var i, vx, vy, da;
    for(i = 0; i < count; i++){
        vx = speed * Math.cos(offset);
        vy = speed * Math.sin(offset);
        da = new DirectAmmo(x, y, vx, vy, ax, ay);
        offset += step;

        ammos[ammos.length] = da;
    }
    this.ammos = ammos;
}
RoundDirectAmmo这个对象实际上包含了一组子弹,在生成这组子弹时按照每一个子弹的扩散方向赋予不同的初速度,环状弹幕就这样实现了。
然后给RoundDirectAmmo写一个将子弹加入到队列的函数:
RoundDirectAmmo.prototype.queue = function(){
    var i = 0,
        j = 0;
    while(i < Queue.ammo.length && j < this.ammos.length){
        if(Queue.ammo[i] == null || Queue.ammo[i].die){
            Queue.ammo[i] = this.ammos[j];
            j ++;
        }
        i ++;
    }
    return this;
}
这里相当于对每个子弹直接调用DirectAmmo的queue方法,至于为什么没直接调用queue,我也忘记当时写这段代码时的目的了。
环状弹幕的“散开”,除了上述这种同步散开外,还有螺旋状散开的例子:
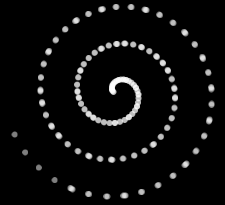
要实现这种弹幕,只需要对RoundDirectAmmo的加入队列的方式进行一些修改,来添加一个queue_delay方法:
RoundCircleAmmo.prototype.queue_delay = function(n, i){
    n = n || 10;
    i = i || 0;
    if(this.ammos[i]){
        this.ammos[i].queue();
        var qr = this;
        setTimeout(function(){qr.queue_delay(n, i + 1)}, n);
    }
    return this;
}
如上,只要添加每个子弹加入到队列的时间间隔,就可以实现螺旋散开的弹幕。
4、绘制对象
对子弹的讲解到此为止,接下来是实际的绘制过程。
在上面我们创建了四个canvas,这里我们创建几个变量用来指向这几个canvas:
var cvs_plane,  // 自机
    ctx_plane,

    cvs_ammo,   // 子弹
    ctx_ammo,

    cvs,        // 舞台
    ctx,

    cvs_ck,     // 碰撞演示
    ctx_ck;
为了偷懒,灰机和子弹都画一个圆来表示,实际上程序写完之后只要替换一下这个绘制过程,无论什么形状的自机和子弹都没问题:
cvs_plane = document.getElementById('plane');
cvs_plane.height = 48;
cvs_plane.width  = 48;
ctx_plane = cvs_plane.getContext('2d');
ctx_plane.fillStyle = 'rgba(0, 192, 248, 1)';
ctx_plane.beginPath();
ctx_plane.arc(24,24,24,0,Math.PI*2,true);
ctx_plane.closePath();
ctx_plane.fill();
var plane_data = ctx_plane.getImageData(0, 0, 48, 48).data;
for(var i = 0; i < 48 * 48; i ++){
    var dot = i * 4;
    if(plane_data[dot] > 0 || plane_data[dot + 1] > 0 || plane_data[dot + 2] > 0){
        Matrix.plane[i] = 1;
    }else{
        Matrix.plane[i] = 0;
    }
}

cvs_ammo = document.getElementById('ammo');
cvs_ammo.height = 12;
cvs_ammo.width  = 12;
ctx_ammo = cvs_ammo.getContext('2d');
ctx_ammo.fillStyle = 'rgba(255, 255, 255, 0.5)';
ctx_ammo.beginPath();
ctx_ammo.arc(6,6,6,0,Math.PI*2,true);
ctx_ammo.closePath();
ctx_ammo.fill();
var ammo_data = ctx_ammo.getImageData(0, 0, 12, 12).data;
for(var i = 0; i < 12 * 12; i ++){
    var dot = i * 4;
    if(ammo_data[dot] > 0 || ammo_data[dot + 1] > 0 || ammo_data[dot + 2] > 0){
        Matrix.ammo[i] = 1;
    }else{
        Matrix.ammo[i] = 0;
    }
}

cvs = document.getElementById('stage');
cvs.height = 600;
cvs.width  = 800;
ctx = cvs.getContext('2d');
ctx.fillStyle = '#000000';
ctx.fillRect(0, 0, 800, 600);

cvs_ck = document.getElementById('hitck');
cvs_ck.height = 600;
cvs_ck.width  = 800;
ctx_ck = cvs_ck.getContext('2d');
ctx_ck.fillStyle = '#000000';
ctx_ck.fillRect(0, 0, 800, 600);
上面这段代码中牵扯到了一个Matrix对象,这个对象,我们姑且称之为“碰撞检测矩阵”。
5、碰撞检测
碰撞检测的方法很多,最容易实现的是基于颜色。
就如同我们肉眼看到子弹撞上飞机一样,只要设想,在飞机所处的位置上出现了子弹,就认为两者发生了碰撞。
弹幕游戏都有着“擦弹”的设定。面对形状多变的子弹和飞机,我们不能简单的对子弹的坐标宽高与飞机的坐标宽高进行比对来断定是否发生了碰撞。譬如上面绘制的圆形子弹,其画板面积是一个矩形,但实际能参与到碰撞的只有包含图形的一个圆形部分,自机同理。
如是,很容易得出一个理论:只有自机、子弹画板中不透明的部分发生了重叠,才是真碰撞。
屏幕上的图形有很多的颜色,而在检测碰撞时我们只需要两种颜色:透明、不透明。
因此,我们来定义几个大小等于画板宽度乘以画板高度的数组,用来单纯地绘制形状,此外,我们再定义几个方法,组成Matrix对象:
var Matrix = {
    /**
     * 自机形状
     * @type {Array}
     */
    plane : [],
    /**
     * 子弹形状
     * @type {Array}
     */
    ammo  : [],
    /**
     * 舞台MAP
     * @type {Array}
     */
    stage : [],
    /**
     * 碰撞位置
     * @type {Array}
     */
    hited : [],
    /**
     * 重置舞台
     */
    init : function(){
        var i,
            n = 800 * 600;
        for(i = 0; i < n; i ++){
            Matrix.stage[i] = 0;
        }
    },

    drawAmmo : function(x, y, w, h){

    },

    drawPlane : function(x, y, w, h){

    }
} 在绘制对象这一步中,我们已经把子弹形状跟飞机形状绘制到了Matrix.ammo和Matrix.plane数组中。当然对于后期扩展来说,我们也可以不断修改这两个数组,但在本次演示中,两者的形状已经固定了。
Matrix.drawAmmo的任务是把弹幕队列中的所有子弹绘制到Matrix.stage中:
drawAmmo : function(x, y, w, h){
    w = w || 12;
    h = h || 12;
    x = parseInt(x);
    y = parseInt(y);
    var i = 0,
        j = 0,
        k = 0,
        l = 0,
        m = 0,
        n = 0;
    for(i = 0; i < w; i ++){
        for(j = 0; j < h; j ++){
            m = parseInt(j * w + i);
            if(Matrix.ammo[m] > 0){
                n = parseInt((j + y) * 800 + (i + x));
                Matrix.stage[n] = 1;
            }
        }
    }
}
Matrix.stage中,每一项表示一个像素点。设值为0时,这个像素点中没有内容,是虚空;值为1时,这个像素点中有子弹;值为2时,这个像素点中有子弹且有飞机;值为3时,这个像素点中有飞机。
在每一个时间片中,我们先调用Matrix.drawAmmo绘制所有的子弹,然后调用Matrix.drawPlane绘制自机。
那么,Matrix.drawPlane方法实际上包含了碰撞检测的流程:
drawPlane : function(x, y, w, h){
    w = w || 48;
    h = h || 48;
    x = parseInt(x);
    y = parseInt(y);
    var i = 0,
        j = 0,
        k = 0,
        l = 0,
        m = 0,
        n = 0,
        hit = false;
    Matrix.hited.length = 0;
    for(i = 0; i < w; i ++){
        for(j = 0; j < h; j ++){
            m = parseInt(j * w + i);
            if(Matrix.plane[m] > 0){
                n = parseInt((j + y) * 800 + (i + x));
                if(Matrix.stage[n] == 1){
                    Matrix.stage[n] = 2;
                    hit = true;
                    Matrix.hited.push(n);
                }else{
                    Matrix.stage[n] = 3;
                }
            }
        }
    }
    return hit;
}
当有碰撞发生时,Matrix.drawPlane返回true。
接下来,定义一个plane对象来保存飞机的位置速度信息:
var plane = {
    x : 0,
    y : 0,

    speed : 2
}
至此,我们已经可以着手写游戏的主线程了。
在主线程中,我们在stage画板中绘制实际的游戏舞台,包括实际的子弹和飞机;此外,我们还在hitck画板中绘制子弹、飞机的形状及碰撞状态,不妨用高对比的颜色来分别标示这些像素,譬如用红色、绿色、蓝色分别代表子弹、飞机、碰撞。
那么,基本的主线程如下:
function run(){

    Matrix.init();

    ctx.fillStyle = '#000000';
    ctx.fillRect(0, 0, 800, 600);
    ctx.fillStyle = '#00ff00';
    ctx.drawImage(cvs_plane, plane.x, plane.y);
    var i, j;
    for(i = 0; i < Queue.ammo.length; i ++){
        if(Queue.ammo[i] != null && !Queue.ammo[i].die){
            Queue.ammo[i].move();
            ctx.drawImage(cvs_ammo, Queue.ammo[i].x, Queue.ammo[i].y);
            Matrix.drawAmmo(Queue.ammo[i].x, Queue.ammo[i].y);
        }
    }

    if(Matrix.drawPlane(plane.x, plane.y)){
        //碰撞发生时执行
    }

    // 绘制碰撞演示内容
    var ck_data = ctx_ck.createImageData(800, 600);
    for(i = 0, j = 0; i < 480000; i++, j += 4){
        switch(Matrix.stage[i]){
            case 1:
                ck_data.data[j] = 255;
                ck_data.data[j + 1] = 0;
                ck_data.data[j + 2] = 0;
                ck_data.data[j + 3] = 255;
                break;
            case 2:
                ck_data.data[j] = 0;
                ck_data.data[j + 1] = 0;
                ck_data.data[j + 2] = 255;
                ck_data.data[j + 3] = 255;
                break;
            case 3:
                ck_data.data[j] = 0;
                ck_data.data[j + 1] = 255;
                ck_data.data[j + 2] = 0;
                ck_data.data[j + 3] = 255;
                break;
            default:
                ck_data.data[j] = 0;
                ck_data.data[j + 1] = 0;
                ck_data.data[j + 2] = 0;
                ck_data.data[j + 3] = 255;
                break;
        }
    }
    ctx_ck.putImageData(ck_data, 0, 0);

    setTimeout(function(){run()}, 20);
}
作为一个游戏,我们还需要记录游戏状态,譬如是否暂停,来引入一个对象:
var Game = {
    playing : true
}
再次,我们需要一个对象来记录键盘状态,以便让玩家操作飞机移动,在此我们定义移动的方向键为WASD:
var Keyboard = {
    // 上下左右的键盘码
    UP    : 87,
    DOWN  : 83,
    LEFT  : 65,
    RIGHT : 68,

    // 上下左右四个键是否被按下
    up    : false,
    down  : false,
    left  : false,
    right : false
}
然后,在主线程run函数中加入如下语句对游戏状态及键盘进行响应:
if(!Game.playing){
    setTimeout(function(){run()}, 20);
    return;
}

if(Keyboard.up    && plane.y > 0){
    plane.y -= plane.speed;
}
if(Keyboard.down  && plane.y < 600){
    plane.y += plane.speed;
}
if(Keyboard.left  && plane.x > 0){
    plane.x -= plane.speed;
}
if(Keyboard.right && plane.x < 800){
    plane.x += plane.speed;
}
要让游戏在飞机与子弹发生碰撞时暂停,在run对Matrix.drawPlane的调用中作修改:
if(Matrix.drawPlane(plane.x, plane.y)){
    //碰撞发生时执行
    Game.playing = false;
}
然后我们需要产生子弹——定义两种子弹产生的流程:一是定时生成螺旋散开的弹幕,二是鼠标点击画面后在点击处生成均匀散开的弹幕。
function test_ammo(){
    var rca = new RoundCircleAmmo(Math.random() * 400 + 100, Math.random() * 300 + 100, 512);
    rca.queue_delay(10);
    setTimeout(function(){test_ammo()}, 8000);
}
test_ammo();
这里会每八秒钟生成一个随机位置出现、包含512颗子弹的螺旋弹幕。
要让鼠标点击生成弹幕,先来引入一个Mouse对象来记录鼠标状态:
var Mouse = {
    downX : 0,
    downY : 0
}
然后引入两个方法用于判断鼠标点击位置是否在画板范围内以及相对画板的偏移:
/**
 * 工具库
 * @type {Object}
 */
var Util = {
    /**
     * 是否在画板范围内
     * @param  {canvas}   canvas
     * @param  {float}    x
     * @param  {float}    y
     * @return {bool}
     */
    canvasInScope : function(canvas, x, y){
        x = x || Mouse.downX;
        y = y || Mouse.downY;
        return (
            x > canvas.offsetLeft &&
            x < canvas.offsetLeft + canvas.clientWidth &&
            y > canvas.offsetTop &&
            y < canvas.offsetTop + canvas.clientHeight
        );
    },
    /**
     * 位置在画板上的坐标偏移
     * @param  {canvas} canvas
     * @param  {float}  x
     * @param  {float}  y
     * @return {Vect}
     */
    offsetOnCanvas : function(canvas, x, y){
        x = x || Mouse.downX;
        y = y || Mouse.downY;
        var ratioX = canvas.width  / canvas.clientWidth;
        var ratioY = canvas.height / canvas.clientHeight;
        var offsetX = (x - canvas.offsetLeft) * ratioX;
        var offsetY = (y - canvas.offsetTop)  * ratioY;
        return new Vect(offsetX, offsetY);
    }
}

Vect = function(x, y){
    this.x = x || 0;
    this.y = y || 0;
}
然后可以给window添加事件了:
window.onkeydown = function(e){
    switch(e.keyCode){
        case Keyboard.UP:
            Keyboard.up    = true;
            break;
        case Keyboard.DOWN:
            Keyboard.down  = true;
            break;
        case Keyboard.LEFT:
            Keyboard.left  = true
            break;
        case Keyboard.RIGHT:
            Keyboard.right = true;
            break;
        default:
            break;
    }
}

window.onkeyup = function(e){
    switch(e.keyCode){
        case Keyboard.UP:
            Keyboard.up    = false;
            break;
        case Keyboard.DOWN:
            Keyboard.down  = false;
            break;
        case Keyboard.LEFT:
            Keyboard.left  = false;
            break;
        case Keyboard.RIGHT:
            Keyboard.right = false;
            break;
        default:
            break;
    }
}

window.onclick = function(e){
    Game.playing = true;

    Mouse.downX = e.x || e.clientX;
    Mouse.downY = e.y || e.clientY;

    if(Util.canvasInScope(cvs)){
        var ammo2v = Util.offsetOnCanvas(cvs);
        new RoundDirectAmmo(ammo2v.x, ammo2v.y).queue();
    }

    if(Util.canvasInScope(cvs_ck)){
        var ammo2v = Util.offsetOnCanvas(cvs_ck);
        new RoundDirectAmmo(ammo2v.x, ammo2v.y).queue();
    }
}
至此,程序算是完成了。

从左到右依次为:stage、hitck、plane、ammo
*、运行演示:http://runjs.cn/detail/y8w993if
*、完整代码:http://runjs.cn/code/y8w993if


 205
205


 被折叠的 条评论
为什么被折叠?
被折叠的 条评论
为什么被折叠?
 到【灌水乐园】发言


