


Windows Phone 自带的Button样式很优雅很大气,而且和整体的风格也很一致。但是,个性化定制的界面有时候需要其他的“特殊”要求。比如图片按钮,由于个性化程度较高,直接套用现在的Button的样式的话会导致UI风格不统一,但是我们又不想用其他比如“Image”来代替现在的Button。那么,我们可以自己去自定义Button,重写它!
先来看,素材图片吧。
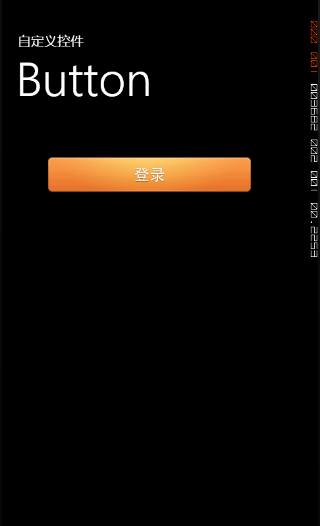
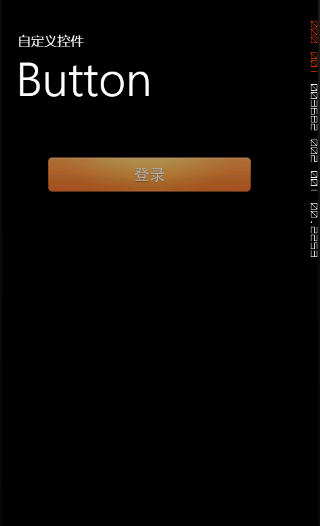
第一张是普通情况下的Button显示效果 第二张是Button按下的时候的显示效果


所以我只能用两张图来重写这个按钮了。
先来看效果图吧
废话不多说,直接上代码
<phone:PhoneApplicationPage
	xmlns="http://schemas.microsoft.com/winfx/2006/xaml/presentation"
	xmlns:x="http://schemas.microsoft.com/winfx/2006/xaml"
	xmlns:phone="clr-namespace:Microsoft.Phone.Controls;assembly=Microsoft.Phone"
	xmlns:shell="clr-namespace:Microsoft.Phone.Shell;assembly=Microsoft.Phone"
	xmlns:d="http://schemas.microsoft.com/expression/blend/2008"
	xmlns:mc="http://schemas.openxmlformats.org/markup-compatibility/2006"
	mc:Ignorable="d" d:DesignWidth="480" d:DesignHeight="768"
	x:Class="WindowsPhoneApplication3.MainPage"
	FontFamily="{StaticResource PhoneFontFamilyNormal}"
	FontSize="{StaticResource PhoneFontSizeNormal}"
	Foreground="{StaticResource PhoneForegroundBrush}"
	SupportedOrientations="Portrait" Orientation="Portrait"
	shell:SystemTray.IsVisible="True">
	<phone:PhoneApplicationPage.Resources>
		<Style x:Key="ButtonStyle1" TargetType="Button">
			<Setter Property="Background" Value="Transparent"/>
			<Setter Property="BorderBrush" Value="{StaticResource PhoneForegroundBrush}"/>
			<Setter Property="Foreground" Value="{StaticResource PhoneForegroundBrush}"/>
			<Setter Property="BorderThickness" Value="{StaticResource PhoneBorderThickness}"/>
			<Setter Property="FontFamily" Value="{StaticResource PhoneFontFamilySemiBold}"/>
			<Setter Property="FontSize" Value="{StaticResource PhoneFontSizeMediumLarge}"/>
			<Setter Property="Padding" Value="10,3,10,5"/>
			<Setter Property="Template">
				<Setter.Value>
					<ControlTemplate TargetType="Button">
						<Grid Background="Transparent">
							<VisualStateManager.VisualStateGroups>
								<VisualStateGroup x:Name="CommonStates">
									<VisualState x:Name="Normal"/>
									<VisualState x:Name="MouseOver"/>
									<VisualState x:Name="Pressed">
										<Storyboard>
                                            <ObjectAnimationUsingKeyFrames Storyboard.TargetProperty="ImageSource" Storyboard.TargetName="SeanBackground">
                                                <DiscreteObjectKeyFrame KeyTime="0" Value="Images/login_click.png"/>
                                            </ObjectAnimationUsingKeyFrames>
										</Storyboard>
									</VisualState>
								</VisualStateGroup>
							</VisualStateManager.VisualStateGroups>
							 <StackPanel Margin="0,0,0,0">
                                <StackPanel.Background>
                                    <ImageBrush x:Name="SeanBackground" ImageSource="Images/login.png" />
                                </StackPanel.Background>
								<ContentControl x:Name="ContentContainer" ContentTemplate="{TemplateBinding ContentTemplate}" Content="{TemplateBinding Content}" Foreground="{TemplateBinding Foreground}" HorizontalContentAlignment="{TemplateBinding HorizontalContentAlignment}" Padding="{TemplateBinding Padding}" VerticalContentAlignment="{TemplateBinding VerticalContentAlignment}"/>
							</StackPanel>
						</Grid>
					</ControlTemplate>
				</Setter.Value>
			</Setter>
		</Style>
	</phone:PhoneApplicationPage.Resources>

	<!--LayoutRoot 是放置所有页面内容的根网格-->
	<Grid x:Name="LayoutRoot" Background="Transparent">
		<Grid.RowDefinitions>
			<RowDefinition Height="Auto"/>
			<RowDefinition Height="*"/>
		</Grid.RowDefinitions>

		<!--TitlePanel 包含应用程序名称和页面标题-->
		<StackPanel x:Name="TitlePanel" Grid.Row="0" Margin="12,17,0,28">
			<TextBlock x:Name="ApplicationTitle" Text="自定义控件" Style="{StaticResource PhoneTextNormalStyle}"/>
			<TextBlock x:Name="PageTitle" Text="Button" Margin="9,-7,0,0" Style="{StaticResource PhoneTextTitle1Style}"/>
		</StackPanel>

		<!--ContentPanel - 在此放置附加内容-->
		<Grid x:Name="ContentPanel" Grid.Row="1" Margin="12,0,12,0">
			<Button Width="320" Height="55" HorizontalAlignment="Left" Margin="52,47,0,0" VerticalAlignment="Top" Style="{StaticResource ButtonStyle1}" Click="Button_Click"/>
		</Grid>
	</Grid>
</phone:PhoneApplicationPage>这篇是我,关于控件重写的最后一篇博文。之所以说是最后一篇,是因为这三篇博文已经全部涵盖了我手头的一个WP项目全部关于控件重写的部分内容。
最后,顺便庆祝一下,我的WP项目顺利完成。


 70
70

 被折叠的 条评论
为什么被折叠?
被折叠的 条评论
为什么被折叠?
 到【灌水乐园】发言


