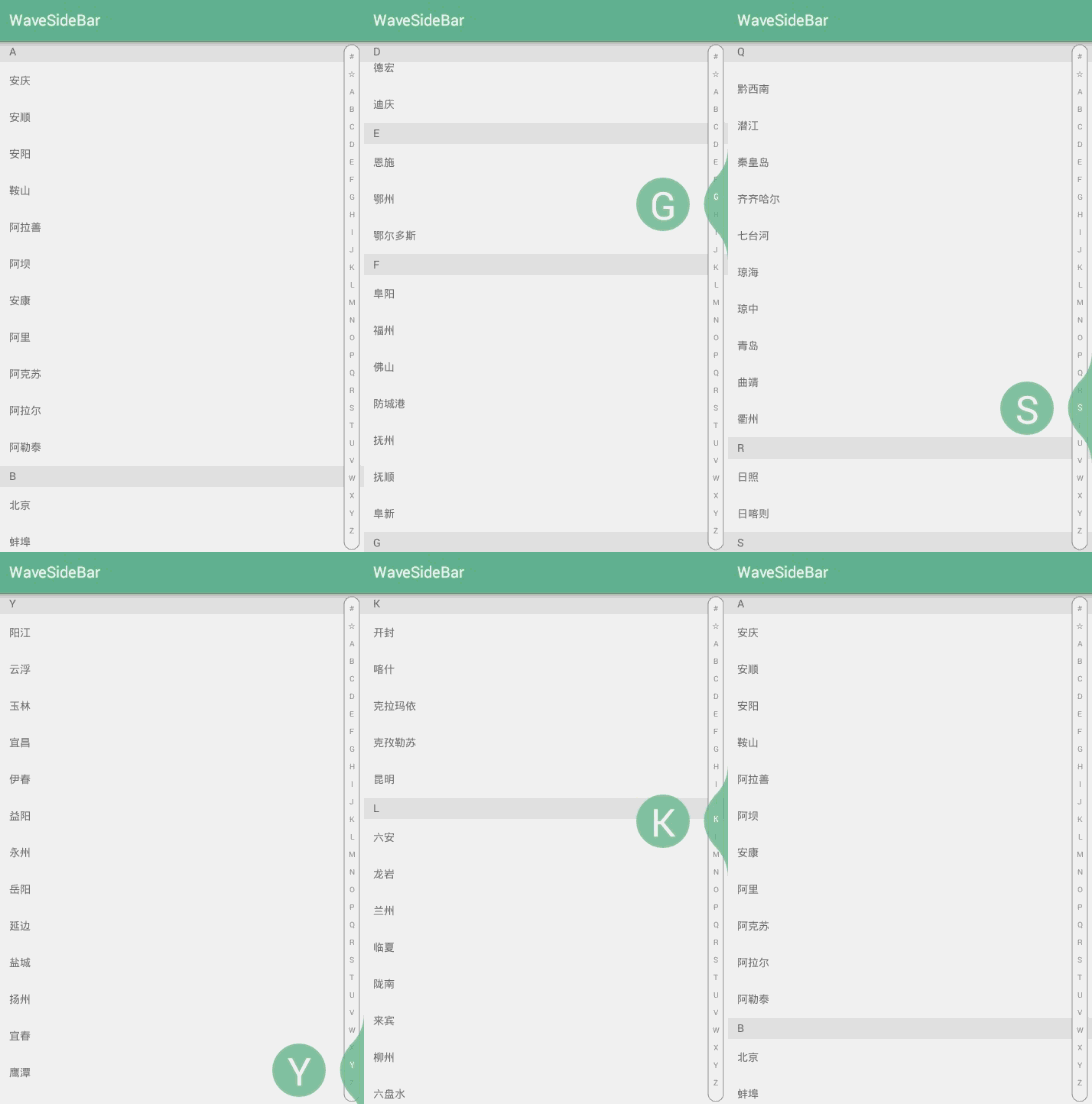
相信大家在许多App中都见到过带字母索引的界面,比如我最近看到的这个开源控件:
很酷是不是?!!!如果加在例如联系人列表界面上,大大提升了用户体验。
那么这个索引控件要怎么做呢,说到底就是自定义一个view,因为自身能力原因我并不能做出这样的效果,当然各位大神们可以自行去研究这类开源索引控件的源码。
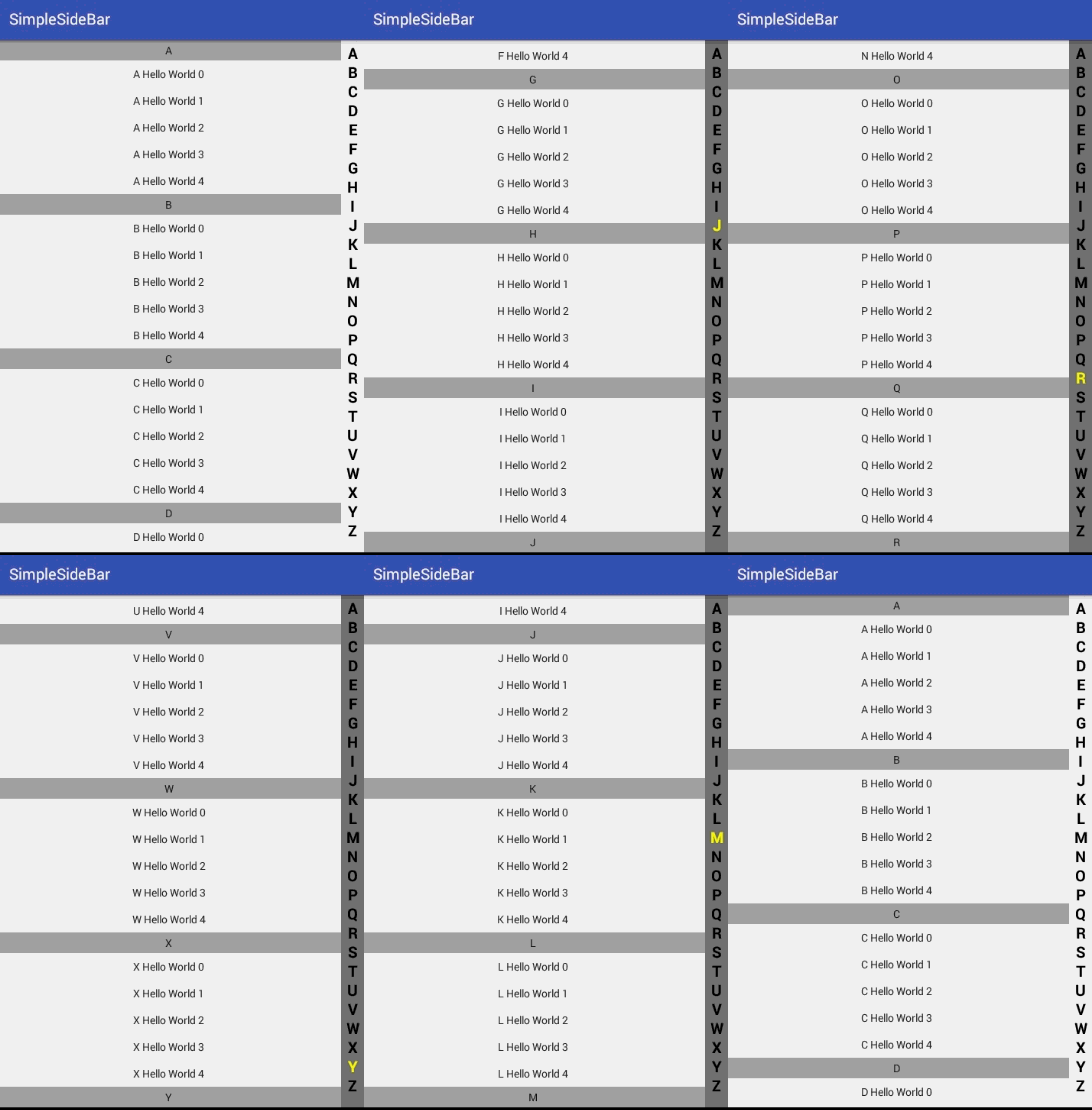
以我的能力,现在只能做这样的:
虽然简单,但是对于新手来说学习一番还是不错的。
下面我们开始一步步写一个字母索引控件 SimpleSideBar
准备一些知识
这里推荐博主guolin的一系列文章
http://blog.csdn.net/guolin_blog/article/details/12921889
http://blog.csdn.net/guolin_blog/article/details/16330267
http://blog.csdn.net/jdsjlzx/article/details/41113969
第一步,创建类SimpleSideBar继承View
public class SimpleSideBar extends View {

    public SimpleSideBar(Context context) {
        super(context);
    }

    public SimpleSideBar(Context context, AttributeSet attrs) {
        super(context, attrs);
    }

    public SimpleSideBar(Context context, AttributeSet attrs, int defStyleAttr) {
        super(context, attrs, defStyleAttr);
    }

}
第二步,声明所需要的变量
    // 索引字母数组
    private String[] alphabet = {
            "A", "B", "C", "D", "E", "F",
            "G", "H", "I", "J", "K", "L",
            "M", "N", "O", "P", "Q", "R",
            "S", "T", "U", "V", "W", "X",
            "Y", "Z"
    };

    // 当前选择的索引字母的下标
    private int currentChoosenAlphabetIndex=-1;

    // 画笔
    private Paint mPaint=new Paint();

    // 索引字母绘制大小
    private int alphabetTextSize=20;
第三步,重写onDraw函数
该函数是绘制函数,通过它将控件内容显现出来
    @Override
    protected void onDraw(Canvas canvas) {
        super.onDraw(canvas);

        // 获得控件高度
        int viewHeight=getHeight();
        // 获得控件宽度
        int viewWidth=getWidth();
        // 控件高度除以索引字母个数得到每个索引字母的高度
        int heightPerAlphabet=viewHeight/alphabet.length;

        //通过循环每个索引字母,并绘制出来
        for (int i=0;i<alphabet.length;i++){

            // 设置画笔颜色、画笔绘制文字粗细和大小,设置抗锯齿
            mPaint.setColor(Color.BLACK);
            mPaint.setTypeface(Typeface.DEFAULT_BOLD);
            mPaint.setTextSize(alphabetTextSize);
            mPaint.setAntiAlias(true);

            // 如果当前选择的索引字母下标和循环到的索引字母下标相同
            if(currentChoosenAlphabetIndex==i){

                // 设置画笔颜色,绘制文字大小和加粗
                mPaint.setColor(Color.YELLOW);
                mPaint.setTextSize(alphabetTextSize);
                mPaint.setFakeBoldText(true);

            }

            // 索引字母的相对于控件的x坐标,此处算法结果为居中
            float xPos=viewWidth/2-mPaint.measureText(alphabet[i])/2;
            // 索引字母的相对于控件的y坐标,索引字母的高度乘以索引字母下标+1即为y坐标
            float yPos=heightPerAlphabet*i+heightPerAlphabet;
            // 绘制索引字母
            canvas.drawText(alphabet[i],xPos,yPos,mPaint);
            // 重置画笔,为绘制下一个索引字母做准备
            mPaint.reset();

        }
    }
到这里,我们直接把该控件加入layout中已经可以显示出来,只是没有触摸到索引字母使ListView/RecyclerView滚动到相应位置的功能。
如果要实现这个功能,我们需要重写dispatchTouchEvent函数来处理控件触摸事件,并且要对外提供一个接口来实现列表滚动到相应位置。
下面我们继续实现它。
第四步,提供一个接口
首先定义一个接口
    public interface OnLetterTouchedChangeListener{

        void onTouchedLetterChange(String letterTouched);

    }
接着声明一个接口变量,提供set方法
    OnLetterTouchedChangeListener onLetterTouchedChangeListener;

    public void setOnLetterTouchedChangeListener(OnLetterTouchedChangeListener onLetterTouchedChangeListener) {
        this.onLetterTouchedChangeListener = onLetterTouchedChangeListener;
    }
第五步,重写dispatchTouchEvent函数
该函数是控件触摸事件分发函数,当返回值为true时表示处理完毕不分发到下一级处理。
@Override
public boolean dispatchTouchEvent(MotionEvent event) {
// 获得触摸后的动作
int action = event.getAction();
// 获得触摸点的Y轴坐标
float touchYPos=event.getY();
// 控件高度除以索引字母的个数得到每个索引字母的高度(这里进行int强转),触摸点的Y轴坐标除以每个索引字母的高度就得到触摸到的索引字母的下标
int currentTouchIndex= (int) (touchYPos/getHeight()*alphabet.length);
switch (action){
// 当触摸的动作为按下或者按下移动时
case MotionEvent.ACTION_DOWN:
case MotionEvent.ACTION_MOVE:
// 设置背景颜色
setBackgroundResource(R.color.grey_600);
// 设置当前选的索引字母的下标值为当前选择的值
currentChoosenAlphabetIndex=currentTouchIndex;
// 如果接口存在和索引下标值合法,执行接口方法,传入当前触摸的索引字母,供外部调用接收
if(onLetterTouchedChangeListener!=null&¤tTouchIndex<alphabet.length&¤tTouchIndex>-1){
onLetterTouchedChangeListener.onTouchedLetterChange(alphabet[currentTouchIndex]);
}
// 重新绘制控件,即重新执行onDraw函数
invalidate();
break;
case MotionEvent.ACTION_UP:
setBackgroundResource(R.color.grey_50);
// 当停止触摸控件的时候,将当前选择的索引字母下标值设为-1
currentChoosenAlphabetIndex=-1;
invalidate();
break;
default:break;
}
// 返回true表明该触摸事件处理完毕不分发出去
return true;
}第六步,使用自定义的SimpleSideBar控件
activity_main.xml
<?xml version="1.0" encoding="utf-8"?>
<LinearLayout xmlns:android="http://schemas.android.com/apk/res/android"
    android:id="@+id/root"
    android:orientation="horizontal" android:layout_width="match_parent"
    android:layout_height="match_parent">


    <LinearLayout
        android:layout_weight="1"
        android:layout_width="0dp"
        android:layout_height="match_parent">

        <android.support.v7.widget.RecyclerView
            android:id="@+id/recycler_view"
            android:layout_width="match_parent"
            android:layout_height="match_parent"/>


    </LinearLayout>

    <me.pwcong.simplesidebar.view.SimpleSideBar
        android:id="@+id/sideBar"
        android:layout_width="30dp"
        android:layout_height="wrap_content" />


</LinearLayout>
MainActivity.java
        ...

        sideBar= (SimpleSideBar) findViewById(R.id.sideBar);

        // 这里使用前面定义的接口
        sideBar.setOnLetterTouchedChangeListener(new SimpleSideBar.OnLetterTouchedChangeListener() {
            @Override
            public void onTouchedLetterChange(String letterTouched) {

                // 获得触摸到的索引字母,再通过索引字母获取相应item的下标,执行列表滚动方法
                int pos=simpleAdapter.getLetterPosition(letterTouched);
                if(pos!=-1){
                    recyclerView.scrollToPosition(pos);
                }
            }
        });
到这里我们的简单索引字母控件完成了,SimpleSideBar 的 Demo 可以在这里下载


 404
404

 被折叠的 条评论
为什么被折叠?


