


说明:本文主要讲述使用Redis作为缓存加快页面访问速度。同时,会将开发过程中的一些截图和代码黏上去,提高阅读效率。
备注:最近在学习github上别人的源码时,发现好多在计算一篇博客页面访问量view_count时都是这么做的:利用Laravel的事件监听器监听IP访问该post,然后页面每访问一次,都刷新一次MySQL(假设MySQL)中post表的view_count字段,如果短时间内大量的IP来访问,那效率就不是很高了。何不用Redis来做缓存,等到该post达到一定浏览页面后再刷新下MySQL,效率也很高。
开发环境:Laravel5.1+MAMP+PHP7+MySQL5.5
Redis依赖包安装与配置
Redis就和MySQL一样,都是数据库,只不过MySQL是磁盘数据库,数据存储在磁盘里,而Redis是内存数据库,数据存储在内存里,不持久化的话服务器断电数据就被抹掉了。Redis数据存储类型比较多,包括:字符串类型、哈希类型、列表类型、集合类型和有序集合类型,而不像MySQL主要只有三类:字符串类型、数字类型和日期类型。Redis可作缓存系统、队列系统。
Redis服务端安装
首先得在主机上装下Redis服务端,以MAC为例,Windows/Linux安装也很多教程:
brew install redis
//设置电脑启动时也启动redis-server
ln -sfv /usr/local/opt/redis/*.plist ~/Library/LaunchAgents
//通过launchctl启动redis-server
launchctl load ~/Library/LaunchAgents/homebrew.mxcl.redis.plist
//或者通过配置文件启动
redis-server /usr/local/etc/redis.conf
//停止redis-server
launchctl unload ~/Library/LaunchAgents/homebrew.mxcl.redis.plist
//卸载redis-server
$ brew uninstall redis
$ rm ~/Library/LaunchAgents/homebrew.mxcl.redis.plist
//测试是否安装成功,出现pong,输入redis-cli进入redis自带的终端客户端
redis-cli ping
主机安装完,就可以在Laravel环境安装下PHP的Redis客户端依赖包:
composer require predis/predispredis是用PHP语言写的一个redis客户端包,Laravel的Redis模块依赖于这个包。phpredis是C语言写的一个PHP扩展,和predis功能差不多,只不过作为扩展效率高些,phpredis可以作为扩展装进PHP语言中,不过这里没用到,就不装了。
推荐Laravel开发插件三件套,提高开发效率,可以参考之前写的Laravel5.2之Seeder填充数据小技巧:
composer require barryvdh/laravel-debugbar --dev
composer require barryvdh/laravel-ide-helper --dev
composer require mpociot/laravel-test-factory-helper --dev

//config/app.php
        /**
         *Develop Plugin
        */
        Barryvdh\Debugbar\ServiceProvider::class,
        Mpociot\LaravelTestFactoryHelper\TestFactoryHelperServiceProvider::class,
        Barryvdh\LaravelIdeHelper\IdeHelperServiceProvider::class,
配置下config/cache.php文件把缓存驱动设为redis,还有redis自身配置在config/database.php文件中:
//config/cache.php
//'default' => 'redis',
'default' => env('CACHE_DRIVER', 'file'),//或者改下.env文件
'redis' => [
            'driver'     => 'redis',
            'connection' => 'default',//改为连接的实例,就默认连接'default'实例
        ],

//config/database.php
'redis' => [

        'cluster' => false,

        //就做一个实例,名为'default'实例
        'default' => [
            'host'     => env('REDIS_HOST', 'localhost'),
            'password' => env('REDIS_PASSWORD', null),
            'port'     => env('REDIS_PORT', 6379),
            'database' => 0,
        ],

    ],
Redis存储浏览量字段
先做个post表,建个post迁移文件再设计表字段值,包括seeder填充假数据,可以参考下这篇文章Laravel学5.2之Seeder填充数据小技巧,总之表字段如下:
class CreatePostsTable extends Migration
{
    /**
     * Run the migrations.
     *
     * @return void
     */
    public function up()
    {
        Schema::create('posts', function (Blueprint $table) {
            $table->increments('id');
            $table->integer('category_id')->unsigned()->comment('外键');
            $table->string('title')->comment('标题');
            $table->string('slug')->unique()->index()->comment('锚点');
            $table->string('summary')->comment('概要');
            $table->text('content')->comment('内容');
            $table->text('origin')->comment('文章来源');
            $table->integer('comment_count')->unsigned()->comment('评论次数');
            $table->integer('view_count')->unsigned()->comment('浏览次数');
            $table->integer('favorite_count')->unsigned()->comment('点赞次数');
            $table->boolean('published')->comment('文章是否发布');
            $table->timestamps();
            $table->foreign('category_id')
                  ->references('id')
                  ->on('categories')
                  ->onUpdate('cascade')
                  ->onDelete('cascade');
        });
    }

    /**
     * Reverse the migrations.
     *
     * @return void
     */
    public function down()
    {
        Schema::table('posts', function(Blueprint $tabel){
            $tabel->dropForeign('posts_category_id_foreign');
        });
        Schema::drop('posts');
    }
}
做一个控制器和一个路由:
php artisan make:controller PostControllerRoute::get('post/{id}', 'PostController@showPostCache');
利用Laravel的事件模块,来定义一个IP访问事件类,然后在事件监听器类里做一些逻辑处理如把访问量存储在Redis里。Laravel的事件监听这么做:在EventServiceProvider里定义事件和对应的监听器,然后输入指令:
//app/Providers/EventServiceProvider.php
protected $listen = [
        'App\Events\PostViewCount' => [
            'App\Listeners\PostEventListener',
        ],
       ]

//指令
php artisan event:generate
在app/Event和app/Listeners会生成事件类和监听器类。
在PostController写上showPostCache方法:
const modelCacheExpires = 10;

public function showPostCache(Request $request, $id)
    {
        //Redis缓存中没有该post,则从数据库中取值,并存入Redis中,该键值key='post:cache'.$id生命时间10分钟
        $post = Cache::remember('post:cache:'.$id, self::modelCacheExpires, function () use ($id) {
            return Post::whereId($id)->first();
        });

        //获取客户端IP
        $ip = $request->ip();
        //触发浏览量计数器事件
        event(new PostViewCount($post, $ip));

        return view('browse.post', compact('post'));
    }
这里Cache上文已经配置了以redis作为驱动,这里取IP,这样防止同一IP短时间内刷新页面增加浏览量,event()或Event::fire()触发事件,把$post和$ip作为参数传入,然后再定义事件类:
//app/Events/PostViewCount.php
/**
     * @var Post
     */
    public $post;

    /**
     * @var string
     */
    public $ip;

    /**
     * Create a new event instance.
     *
     * @param Post $post
     * @param string $ip
     */
    public function __construct(Post $post, $ip)
    {
        $this->post = $post;
        $this->ip   = $ip;
    }
顺便也把视图简单写下吧:
<html lang="en">
<head>
<meta charset="utf-8">
<meta http-equiv="X-UA-Compatible" content="IE=edge">
<meta name="viewport" content="width=device-width, initial-scale=1">
<!-- 上述3个meta标签*必须*放在最前面,任何其他内容都*必须*跟随其后! -->
<title>Bootstrap Template</title>
<!-- 新 Bootstrap 核心 CSS 文件 -->
<link rel="stylesheet" href="//cdn.bootcss.com/bootstrap/3.3.5/css/bootstrap.min.css">
<style>
html,body{
width: 100%;
height: 100%;
}
*{
margin: 0;
border: 0;
}
.jumbotron{
margin-top: 10%;
}
</style>
</head>
<body>
<div class="container">
<div class="row">
<div class="col-xs-12 col-md-12">
<div class="jumbotron">
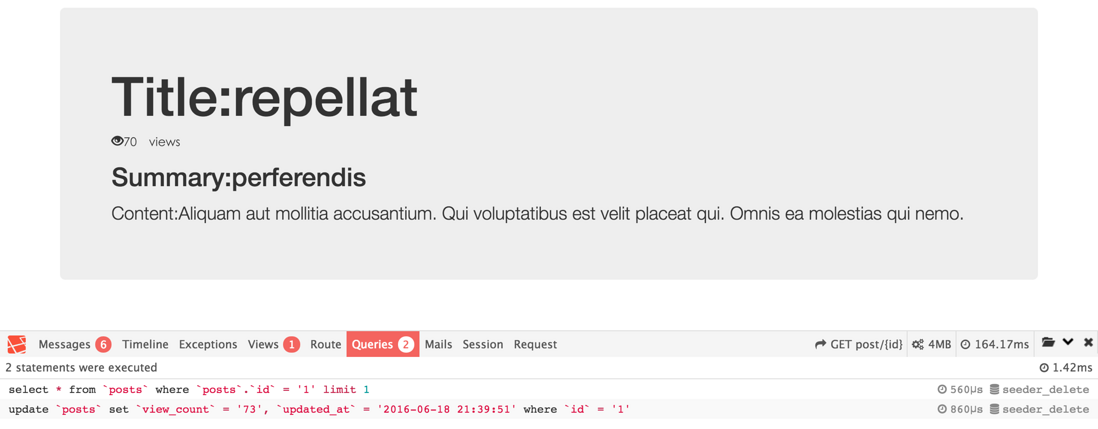
<h1>Title:{{$post->title}}</h1>
<span class="glyphicon glyphicon-eye-open" aria-hidden="true">{{$post->view_count}} views</span>
<h2>Summary:{{$post->summary}}</h2>
<p>Content:{{$post->content}}</p>
</div>
</div>
</div>
</div>
<!-- jQuery文件。务必在bootstrap.min.js 之前引入 -->
<script src="//cdn.bootcss.com/jquery/1.11.3/jquery.min.js"></script>
<!-- 最新的 Bootstrap 核心 JavaScript 文件 -->
<script src="//cdn.bootcss.com/bootstrap/3.3.5/js/bootstrap.min.js"></script>
<script>
</script>
</body>
</html>然后重点写下事件监听器逻辑:
class PostEventListener
{
/**
* 同一post最大访问次数,再刷新数据库
*/
const postViewLimit = 30;
/**
* 同一用户浏览同一post过期时间
*/
const ipExpireSec = 300;
/**
* Create the event listener.
*
*/
public function __construct()
{
}
/**
* Handle the event.
* 监听用户浏览事件
* @param PostViewCount $event
* @return void
*/
public function handle(PostViewCount $event)
{
$post = $event->post;
$ip = $event->ip;
$id = $post->id;
//首先判断下ipExpireSec = 300秒时间内,同一IP访问多次,仅仅作为1次访问量
if($this->ipViewLimit($id, $ip)){
//一个IP在300秒时间内访问第一次时,刷新下该篇post的浏览量
$this->updateCacheViewCount($id, $ip);
}
}
/**
* 一段时间内,限制同一IP访问,防止增加无效浏览次数
* @param $id
* @param $ip
* @return bool
*/
public function ipViewLimit($id, $ip)
{
// $ip = '1.1.1.6';
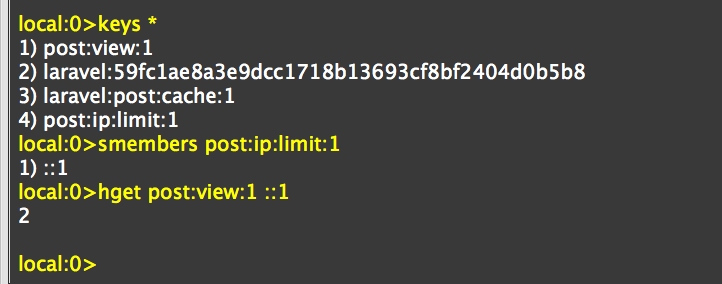
//redis中键值分割都以:来做,可以理解为PHP的命名空间namespace一样
$ipPostViewKey = 'post:ip:limit:'.$id;
//Redis命令SISMEMBER检查集合类型Set中有没有该键,该指令时间复杂度O(1),Set集合类型中值都是唯一
$existsInRedisSet = Redis::command('SISMEMBER', [$ipPostViewKey, $ip]);
if(!$existsInRedisSet){
//SADD,集合类型指令,向ipPostViewKey键中加一个值ip
Redis::command('SADD', [$ipPostViewKey, $ip]);
//并给该键设置生命时间,这里设置300秒,300秒后同一IP访问就当做是新的浏览量了
Redis::command('EXPIRE', [$ipPostViewKey, self::ipExpireSec]);
return true;
}
return false;
}
/**
* 更新DB中post浏览次数
* @param $id
* @param $count
*/
public function updateModelViewCount($id, $count)
{
//访问量达到300,再进行一次SQL更新
$postModel = Post::find($id);
$postModel->view_count += $count;
$postModel->save();
}
/**
* 不同用户访问,更新缓存中浏览次数
* @param $id
* @param $ip
*/
public function updateCacheViewCount($id, $ip)
{
$cacheKey = 'post:view:'.$id;
//这里以Redis哈希类型存储键,就和数组类似,$cacheKey就类似数组名,$ip为$key.HEXISTS指令判断$key是否存在$cacheKey中
if(Redis::command('HEXISTS', [$cacheKey, $ip])){
//哈希类型指令HINCRBY,就是给$cacheKey[$ip]加上一个值,这里一次访问就是1
$incre_count = Redis::command('HINCRBY', [$cacheKey, $ip, 1]);
//redis中这个存储浏览量的值达到30后,就往MySQL里刷下,这样就不需要每一次浏览,来一次query,效率不高
if($incre_count == self::postViewLimit){
$this->updateModelViewCount($id, $incre_count);
//本篇post,redis中浏览量刷进MySQL后,把该篇post的浏览量键抹掉,等着下一次请求重新开始计数
Redis::command('HDEL', [$cacheKey, $ip]);
//同时,抹掉post内容的缓存键,这样就不用等10分钟后再更新view_count了,
//如该篇post在100秒内就达到了30访问量,就在3分钟时更新下MySQL,并把缓存抹掉,下一次请求就从MySQL中请求到最新的view_count,
//当然,100秒内view_count还是缓存的旧数据,极端情况300秒内都是旧数据,而缓存里已经有了29个新增访问量
//实际上也可以这样做:在缓存post的时候,可以把view_count单独拿出来存入键值里如single_view_count,每一次都是给这个值加1,然后把这个值传入视图里
//或者平衡设置下postViewLimit和ipExpireSec这两个参数,对于view_count这种实时性要求不高的可以这样做来着
//加上laravel前缀,因为Cache::remember会自动在每一个key前加上laravel前缀,可以看cache.php中这个字段:'prefix' => 'laravel'
Redis::command('DEL', ['laravel:post:cache:'.$id]);
}
}else{
//哈希类型指令HSET,和数组类似,就像$cacheKey[$ip] = 1;
Redis::command('HSET', [$cacheKey, $ip, '1']);
}
}
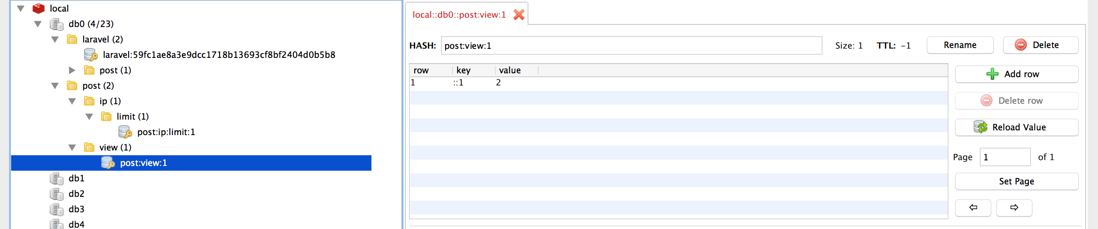
}这里推荐下一本Redis入门书《Redis入门指南》(作者也是北航的,软件学院的),快的话看个一两天就能看完,也就基本入门了。还推荐一个Redis客户端:Redis Desktop Manager,可以在客户端里看下各个键值:
It is working!!!
不知道有没有说清楚,有疑问或者指正的地方请留言交流吧。
总结:研究Redis和Cache模块的时候,还看到可以利用Model Observer模型观察器来监听事件自动刷新缓存,晚上在研究下吧,这两天也顺便把Redis数据存储类型总结下,到时见。


 363
363


 被折叠的 条评论
为什么被折叠?
被折叠的 条评论
为什么被折叠?
 到【灌水乐园】发言


