


《j2ee 简单网站搭建:(一) windows 操作系统下使用 eclipse 建立 maven web 项目》
《j2ee 简单网站搭建:(二)添加和配置 spring + spring-mvc 的 mvc 开发环境》
《j2ee 简单网站搭建:(三)在搭建好的 spring maven web 项目中加入 mybatis 访问数据库》
《j2ee 简单网站搭建:(四)将 freemaker 模板引擎作为 spring-mvc 展现层》
《j2ee 简单网站搭建:(五)使用 jcaptcha 生成验证码图片》
《j2ee 简单网站搭建:(六)使用 hibernate validation 实现 domain 层实体类验证》
《j2ee 简单网站搭建:(七)使用 shiro 结合 jcaptcha 实现用户验证登录》
《j2ee 简单网站搭建:(八)使用 jquery-validate 实现页面验证入门》
《j2ee 简单网站搭建:(九)jquery datatables + jquery ui dialog 插件使用入门》
《j2ee 简单网站搭建:(十)jquery ztree 插件使用入门》
《j2ee 简单网站搭建:(十一)ckeditor 控件使用入门》
shiro 要比 Spring Security 轻量简单。shiro 对于用户登录 session 默认会使用 ehcache 缓存,因此在加载 jar 包时也需要将 ehcache 引入。此外 shiro 默认使用正常的 request 提交方法完成验证请求,如果采用 ajax 方式登录,需要相对复杂的接口实现,在本文最后会简要介绍。使用 shiro 主要就是对需要用户自己实现的 AuthorizingRealm 和 FormAuthenticationFilter 两个类中相关方法进行重载,其次就是完成 shiro 配置文件的各个环节修改。jcaptcha 配置不在本文中说明,请参考本系列第五篇。
shiro 版本 1.4.0-RC2
ehcache 版本 3.3.1
一 在 pom.xml 中添加 shiro 需要的库
 <properties>

    <shiro.version>1.4.0-RC2</shiro.version>
    <ehcache.version>3.3.1</ehcache.version>

  </properties>
  <dependencies>

    <!-- Apache 安全验证框架 shiro start -->
    <dependency>
      <groupId>org.apache.shiro</groupId>
      <artifactId>shiro-core</artifactId>
      <version>${shiro.version}</version>
    </dependency>
    <dependency>
      <groupId>org.apache.shiro</groupId>
      <artifactId>shiro-spring</artifactId>
      <version>${shiro.version}</version>
    </dependency>
    <dependency>
      <groupId>org.apache.shiro</groupId>
      <artifactId>shiro-web</artifactId>
      <version>${shiro.version}</version>
    </dependency>
    <dependency>
      <groupId>org.apache.shiro</groupId>
      <artifactId>shiro-ehcache</artifactId>
      <version>${shiro.version}</version>
    </dependency>
    <dependency>
      <groupId>org.apache.shiro</groupId>
      <artifactId>shiro-quartz</artifactId>
      <version>${shiro.version}</version>
    </dependency>
    <!-- ehcache 缓存包 -->
    <dependency>
      <groupId>org.ehcache</groupId>
      <artifactId>ehcache</artifactId>
      <version>${ehcache.version}</version>
    </dependency>
    <!-- Apache 安全验证框架 shiro end -->

  </dependencies>
二 添加 ehcache 缓存配置文件 ehcache.xml
<?xml version="1.0" encoding="UTF-8"?>
<ehcache updateCheck="false" name="defaultCache">
    <diskStore path="java.io.tmpdir"/>
    <defaultCache
            maxElementsInMemory="10000"
            maxElementsOnDisk="0"
            eternal="true"
            overflowToDisk="true"
            diskPersistent="false"
            timeToIdleSeconds="0"
            timeToLiveSeconds="0"
            diskSpoolBufferSizeMB="50"
            diskExpiryThreadIntervalSeconds="120"
            memoryStoreEvictionPolicy="LFU"/>
    <cache name="categorytree"
           maxElementsInMemory="1000"
           maxElementsOnDisk="0"
           eternal="false"
           overflowToDisk="false"
           diskPersistent="false"
           timeToIdleSeconds="120"
           timeToLiveSeconds="300"
           diskSpoolBufferSizeMB="50"
           diskExpiryThreadIntervalSeconds="120"
           memoryStoreEvictionPolicy="LFU"/>

    <cache name="normalcategorytree"
           maxElementsInMemory="1000"
           maxElementsOnDisk="0"
           eternal="false"
           overflowToDisk="false"
           diskPersistent="false"
           timeToIdleSeconds="120"
           timeToLiveSeconds="300"
           diskSpoolBufferSizeMB="50"
           diskExpiryThreadIntervalSeconds="120"
           memoryStoreEvictionPolicy="LFU"/>
</ehcache>
<!-- EHCache 参数含义
    name:cache标识
    maxElementsInMemory:设置基于内存的缓存可存放对象的最大数目
    maxElementOnDisk:设置基于硬盘的缓存可存放对象的最大数目(现在不设置,基于硬盘IO也会比较耗费时间)
    eternal:如果为true,表示对象永远不会过期,此时会忽略tiemToldleSeconds和timeToLiveSeconds属性,默认为false。
    timeToldleSeconds:设置允许对象处于空间状态的最长时间。当对象自动最近一次被访问后,如果处于空闲状态的时间超过了
        timeToldleSeconds属性值,这个对象就会过期。当对象过期,只有当eternal属性为false,该属性才有
        效。如果该属性的值为0,那么就表示该对象可以无限期地存于缓存中。
    timeToLiveSeconds必须大于timeToldleSeconds属性,才有意义。不需要配置此项。
    overflowToDisk:如果为true,表示当基于内存的缓存中的对象数目达到了maxElementsInMemory界限后,会把溢出的对象写到基于硬盘的缓存中。
    注意,如果缓存的对象要写入到硬盘中的话,则该对象必须时间了Serializable接口才行;
    memoryStoreEvictionPolicy:缓存清除策略:FIFO,LFU,LRU
-->
三 添加 spring-ehcache.xml 配置文件,连接 spring 和 ehcache ,该文件新建后需要在 web.xml 文件 <context-param> 节点的 <param-value> 参数节点中添加一行 spring-ehcache.xml 的配置信息,格式为 classpath*:spring-ehcache.xml
<?xml version="1.0" encoding="UTF-8"?>
<beans xmlns="http://www.springframework.org/schema/beans"
       xmlns:cache="http://www.springframework.org/schema/cache"
       xmlns:xsi="http://www.w3.org/2001/XMLSchema-instance"
       xsi:schemaLocation="
          http://www.springframework.org/schema/beans
          http://www.springframework.org/schema/beans/spring-beans.xsd
          http://www.springframework.org/schema/cache
          http://www.springframework.org/schema/cache/spring-cache.xsd">
    <description>ehcache configuration</description>
    <cache:annotation-driven cache-manager="cacheManager"/>

    <bean id="ehcacheManager" class="org.springframework.cache.ehcache.EhCacheManagerFactoryBean">
        <property name="configLocation" value="classpath:ehcache.xml"/>
    </bean>

    <bean id="cacheManager" class="org.springframework.cache.ehcache.EhCacheCacheManager">
        <property name="cacheManager" ref="ehcacheManager"/>
        <property name="transactionAware" value="true" />
    </bean>
</beans>
四 添加 spring-shiro-config.xml 配置文件,连接 spring 和 shiro ,该配置文件非常重要,具体节点含义请参照以下节点的注释。
需要提前说明的是 securityManager 节点中的 com.binux.webdemo.shiro.DBRealm 定义了用户如何进行认证。
节点 jCaptchaFormAuthenticationFilter 中的 com.binux.webdemo.shiro.JCaptchaFormAuthenticationFilter 定义了用户登录页面提交的和用户名、密码、验证码相关的控件名称和验证逻辑。
节点 shiroFilter 中的 <property name="loginUrl" value="/login"/> 定义了如果用户未认证会转向哪个待认证路径,也就是登录界面的请求路径,本例中为 /login ,该路径需要在 controller 包中有对应的类和方法处理该路径指向网站根目录下的 login.jsp 页面,本例中在 TestController.java 类的 login 方法中实现转向。
节点 shiroFIlter 中的 <property name="successUrl" value="/index"/> 定义了如果用户认证成功后会请求哪个路径, 本例为 /index,该路径需要在 controller 包中有对应的类和方法处理该路径指向网站根目录下的 index.jsp 页面,本例中在 TestController.java 类的 loginin 方法中实现转向。
节点 shiroFIlter 中的 <property name="filterChainDefinitions"> 定义了哪些路径需要验证,哪些可以排除,本例中除验证码图片的生成路径外其它所有路径都需要验证,所以配置为 /captcha/** = anon 和 /** = authc
<?xml version="1.0" encoding="UTF-8"?>
<beans xmlns="http://www.springframework.org/schema/beans"
       xmlns:xsi="http://www.w3.org/2001/XMLSchema-instance"
       xsi:schemaLocation="
          http://www.springframework.org/schema/beans
          http://www.springframework.org/schema/beans/spring-beans.xsd">

    <!-- Shiro配置开始 -->
    <bean id="securityManager" class="org.apache.shiro.web.mgt.DefaultWebSecurityManager">
        <!-- 指定Shiro验证用户登录的类为自定义的Realm(若有多个Realm,可使用[realms]属性代替) -->
        <property name="realm">
            <bean class="com.binux.webdemo.shiro.DBRealm"/>
        </property>
        <!--
        Shiro默认会使用Servlet容器的Session,此时修改超时时间的话,可以修改web.xml或者这里自定义的MyRealm
        而若想使用Shiro原生Session则可以设置sessionMode属性为native,此时修改超时时间则只能修改MyRealm
        -->
        <!-- <property name="sessionMode" value="native"/> -->
    </bean>

    <!-- 自定义form认证过虑器 -->
    <!-- 基于Form表单的身份验证过滤器,不配置将也会注册此过虑器,表单中的用户账号、密码及loginurl将采用默认值,建议配置 -->
    <bean id="jCaptchaFormAuthenticationFilter" class="com.binux.webdemo.shiro.JCaptchaFormAuthenticationFilter">
        <!-- 表单中账号的input名称 -->
        <property name="usernameParam" value="username" />
        <!-- 表单中密码的input名称 -->
        <property name="passwordParam" value="password" />
    </bean>

    <!-- Shiro主过滤器本身功能十分强大,其强大之处就在于它支持任何基于URL路径表达式的、自定义的过滤器的执行 -->
    <!-- Web应用中,Shiro可控制的Web请求必须经过Shiro主过滤器的拦截,并且Shiro对基于Spring的Web应用提供了完美的支持 -->
    <bean id="shiroFilter" class="org.apache.shiro.spring.web.ShiroFilterFactoryBean">
        <!-- Shiro的核心安全接口,这个属性是必须的 -->
        <property name="securityManager" ref="securityManager"/>
        <!-- 要求登录时的链接(可根据项目的URL进行替换),非必须的属性,默认会找Web工程根目录下的[/login.jsp] -->
        <property name="loginUrl" value="/login"/>
        <!-- 登录成功后要跳转的连接(本例中此属性用不到,因为登录成功后的处理逻辑已在LoginController中硬编码为main.jsp) -->
         <property name="successUrl" value="/index"/>
        <!--
        用户访问未授权的资源时,所显示的连接
        若想更明显的测试此属性可以修改它的值,比如unauthor.jsp
        然后用[xuanyu]登录后访问/admin/list.jsp就看见浏览器会显示unauthor.jsp
        -->
        <property name="unauthorizedUrl" value="/login"/>

        <!-- 自定义filter配置 -->
        <property name="filters">
            <map>
                <!-- 将自定义 的FormAuthenticationFilter注入shiroFilter中 -->
                <entry key="authc" value-ref="jCaptchaFormAuthenticationFilter" />
            </map>
        </property>

        <!--
        Shiro连接约束配置,即过滤链的定义
        更详细介绍,见本文最下方提供的Shiro-1.2.2内置的FilterChain说明
        下面value值的第一个'/'代表的路径是相对于HttpServletRequest.getContextPath()的值来的
        anon:它对应的过滤器里面是空的,什么都没做,另外.do和.jsp后面的*表示参数,比方说[login.jsp?main]这种
        authc:该过滤器下的页面必须验证后才能访问,它是Shiro内置的org.apache.shiro.web.filter.authc.FormAuthenticationFilter
        注意:对于类似资源,既有authc验证,也有anon允许匿名访问的情况下,需要将anon设置放在authc前面,才会生效
        -->
        <property name="filterChainDefinitions">
            <value>
                /captcha/** = anon
                /** = authc
            </value>
        </property>
    </bean>

    <!-- 保证实现了Shiro内部lifecycle函数的bean执行 -->
    <bean id="lifecycleBeanPostProcessor" class="org.apache.shiro.spring.LifecycleBeanPostProcessor"/>
     <!-- Shiro配置结束 -->

</beans>
五 新建 shiro 用户处理代码,其中包括组装验证信息的 DBRealm.java 类、执行验证的 JCaptchaFormAuthenticationFilter.java 类
1 编写验证信息组装类 DBRealm.java ,实现 shiro 的 AuthorizingRealm 类,其中 doGetAuthenticationInfo 方法是由开发人员自己编写可被 shiro 使用的认证信息,包括用户名、密码、加密盐,此外向开发人员公开了 initCredentialsMatcher 方法,开发人员可以提供自己对密码的加密算法让 shiro 使用,shiro 使用开发人员提供的服务端保存的真实用户信息和客户端浏览器提交的信息使用开发人员的加密算法加密后进行对比,一致则认证成功。
package com.binux.webdemo.shiro;

import org.apache.shiro.authc.AuthenticationException;
import org.apache.shiro.authc.AuthenticationInfo;
import org.apache.shiro.authc.AuthenticationToken;
import org.apache.shiro.authc.SimpleAuthenticationInfo;
import org.apache.shiro.authc.UnknownAccountException;
import org.apache.shiro.authc.credential.HashedCredentialsMatcher;
import org.apache.shiro.authz.AuthorizationInfo;
import org.apache.shiro.authz.SimpleAuthorizationInfo;
import org.apache.shiro.realm.AuthorizingRealm;
import org.apache.shiro.subject.PrincipalCollection;
import org.apache.shiro.util.ByteSource;

import javax.annotation.PostConstruct;

public class DBRealm extends AuthorizingRealm {

    @Override
    protected AuthorizationInfo doGetAuthorizationInfo(PrincipalCollection principals) {
        return new SimpleAuthorizationInfo();
    }

    @Override
    protected AuthenticationInfo doGetAuthenticationInfo(AuthenticationToken token) throws AuthenticationException {
        // 交给AuthenticatdingRealm使用CredentialsMatcher进行密码匹配
        SimpleAuthenticationInfo info = new SimpleAuthenticationInfo(
                "admin", // 用户名
                "7a8e3d4fdcf6e812aad08d23d2c6edbb", // 密文密码 这里明文是 admin
                ByteSource.Util.bytes("442132dd5cfd9f1fd5464e8d527b80f7"), // 序列化后的盐
                getName()); // realm name
        return info;
    }

    @Override
    public void clearCachedAuthorizationInfo(PrincipalCollection principals) {
        super.clearCachedAuthorizationInfo(principals);
    }

    @Override
    public void clearCachedAuthenticationInfo(PrincipalCollection principals) {
        super.clearCachedAuthenticationInfo(principals);
    }

    @Override
    public void clearCache(PrincipalCollection principals) {
        super.clearCache(principals);
    }

    @PostConstruct
    public void initCredentialsMatcher() { //
        //该句作用是重写shiro的密码验证,让shiro用我自己的验证,这里用shiro标准MD5算法设置一些参数
        HashedCredentialsMatcher matcher = new HashedCredentialsMatcher();
        matcher.setHashAlgorithmName("md5");
        matcher.setHashIterations(2);
        matcher.setStoredCredentialsHexEncoded(true);
        setCredentialsMatcher(matcher);

    }
}
2 编写执行验证的 JCaptchaFormAuthenticationFilter.java 类
package com.binux.webdemo.shiro;
import com.octo.captcha.service.image.ImageCaptchaService;
import org.apache.shiro.authc.AuthenticationException;
import org.apache.shiro.authc.AuthenticationToken;
import org.apache.shiro.subject.Subject;
import org.apache.shiro.web.filter.authc.FormAuthenticationFilter;
import org.apache.shiro.web.util.WebUtils;
import org.springframework.beans.factory.annotation.Autowired;
import javax.servlet.ServletRequest;
import javax.servlet.ServletResponse;
import javax.servlet.http.HttpServletRequest;
public class JCaptchaFormAuthenticationFilter extends FormAuthenticationFilter {
@Autowired
private ImageCaptchaService imageCaptchaService;
/**
* 尚未通过 shiro 验证时执行该方法,如果有特殊的验证逻辑都可以在该方法中加入
* @param request
* @param response
* @return
* @throws Exception
*/
@Override
protected boolean onAccessDenied(ServletRequest request, ServletResponse response) throws Exception {
if(this.isLoginRequest(request, response)) // 是否请求登录页面,也可能只是加载页面,不是提交登录
if(this.isLoginSubmission(request, response)) // 是否是提交登录认证
return this.executeLogin(request, response); // 进行认证
else
return true; // 否则返回未登录状态,页面转向需要登录认证的登录页面
else { // 认证成功转向登录成功页面
this.saveRequestAndRedirectToLogin(request, response);
return false;
}
}
@Override
protected boolean executeLogin(ServletRequest request, ServletResponse response) throws Exception {
AuthenticationToken token = createToken(request, response); //根据用户提交的登录 request 请求创建用户名、密码、验证码的登录 token
if (token == null) // 如果传入的验证信息失效
throw new IllegalStateException(FormatMessage.Admin_Login_TokenMissing);
try {
// 判断验证码是否输入正确
if (!imageCaptchaService.validateResponseForID(
((HttpServletRequest) request).getSession().getId(), // 获得验证码的输入值
WebUtils.getCleanParam(request, FormatMessage.Form_Login_Captcha))) // 获得当前用户的sessionid
throw new AuthenticationException(FormatMessage.Admin_Login_CaptchaError);
Subject subject = getSubject(request, response);
// 登录认证[这里才是真正进行用户验证比对的核心方法]
subject.login(token);
return onLoginSuccess(token, subject, request, response);
} catch (AuthenticationException e) {
if (FormatMessage.Admin_Login_CaptchaError.equals(e.getMessage()))
AuthenResult.getInst().setAuthenErrorMessage(FormatMessage.Admin_Login_CaptchaError);
else
AuthenResult.getInst().setAuthenErrorMessage(FormatMessage.Admin_Login_Error);
return onLoginFailure(token, e, request, response);
}
}
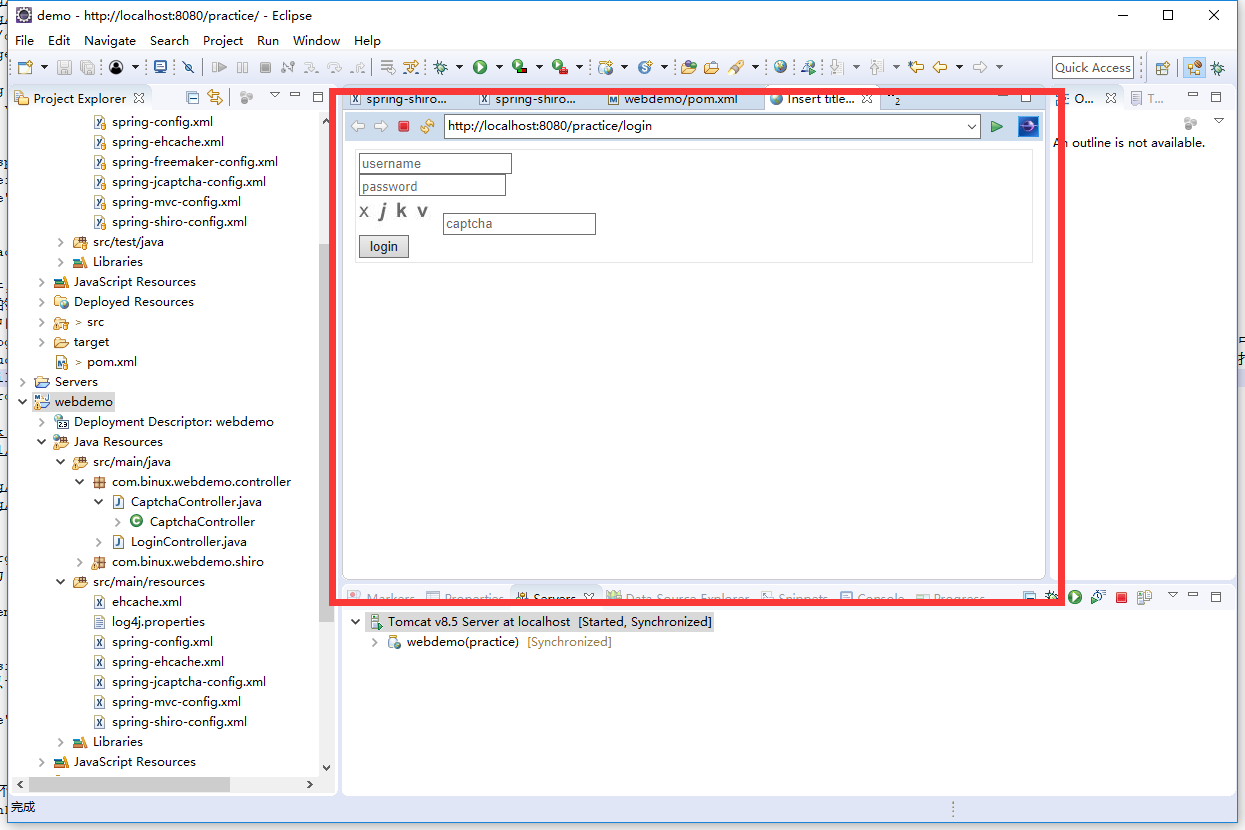
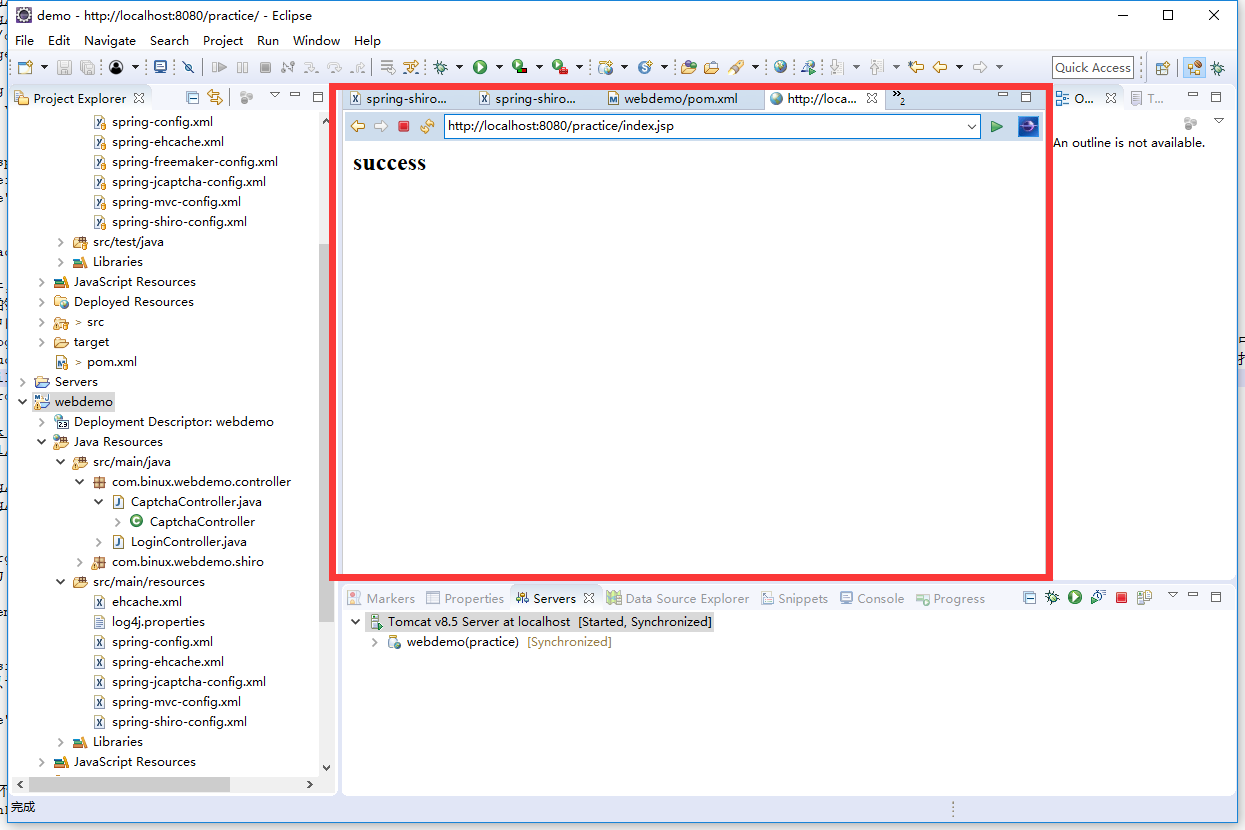
}六 在网站根目录下新建 login.jsp 和 index.jsp 页面,未登录和登录不成功 转向 login.jsp 页面,登录成功后转向index.jsp 页面,login.jsp 页面中包含账号、密码和验证码的
<html>
<body>
    <form id="loginform" name="loginform" role="form" action="login"
        method="post">
        <fieldset>
            <div>
                <input placeholder="username" id="username" name="username"
                    type="text" autofocus>
            </div>
            <div>
                <input placeholder="password" id="password" name="password"
                    type="password">
            </div>
            <div>
                <img id="captchaimg" name="captchaimg" src="captcha/get"
                    onclick="this.src='captcha/get?d=' + new Date().getTime()" /> <input
                    placeholder="captcha" id="captcha" name="captcha" type="text"
                    maxlength="4">
            </div>
            <input type="submit" id="loginbutton" name="loginbutton"
                value="login" />
        </fieldset>
    </form>
</body>
</html>
<html>
<body>
success
</body>
</html>七 在 controller 层定义处理登录页面和登录成功页面的转向方法,因为其它认证逻辑都由 shiro 执行了,所以只需要在转向方法中实现转向页面即可,本例中添加 LoginController.java 类文件处理 http://localhost:8080/webdemo/login 请求。
package com.binux.webdemo.controller;

import org.springframework.stereotype.Controller;
import org.springframework.web.bind.annotation.RequestMapping;
import org.springframework.web.servlet.ModelAndView;

@Controller
public class LoginController {

    @RequestMapping(value="/login")
    public ModelAndView  login() {
        ModelAndView mv = new ModelAndView();
            mv.setViewName("login.jsp");
        return mv;

    }
}
八 shiro 认证只是基本功能之一,另一个主要功能是为类、方法、页面提供角色权限的管理,有兴趣可以自行研究。


 209
209

 被折叠的 条评论
为什么被折叠?
被折叠的 条评论
为什么被折叠?
 到【灌水乐园】发言


