


上篇《AngularJS入门心得3——HTML的左右手指令》初步介绍了指令的概念和作用。已经和指令打过一个照面,就不会那么陌生了,今天主要介绍的是一个困扰了我很久终于想通的问题,这个问题与scope有关,可以看做是《AngularJS入门心得1——directive和controller如何通信》在scope上的补充和延伸。
小时候,老师就教会了我们盲人摸象这个成语,教导我们认识事物不能片面,缺少对于一个事物全局的认知。所以,说到指令,它的一个完整结构如下:
angular.module('myApp', [])
.directive('myDirective', function() {
    return {
        restrict: String,
        priority: Number,
        terminal: Boolean,
        template: String or Template Function:
    function(tElement, tAttrs) {...},
    templateUrl: String,
    replace: Boolean or String,
    scope: Boolean or Object,
    transclude: Boolean,
    controller: String or
    function(scope, element, attrs, transclude, otherInjectables) { ... },
    controllerAs: String,
    require: String,
    link: function(scope, iElement, iAttrs) { ... },
    compile: // 返回一个对象或连接函数,如下所示:
    function(tElement, tAttrs, transclude) {
        return {
            pre: function(scope, iElement, iAttrs, controller) { ... },
            post: function(scope, iElement, iAttrs, controller) { ... }
           }
        return function postLink(...) { ... }
        }
    };
 });
我们一眼就看到上篇有介绍的参数restrict,其包括元素、属性、注释和类名四种形式。再往后看,就有点蒙了,很多没见过。没关系,我们不care,不是所有的参数我们都要掌握,更不是所有的参数我们都会在平常的编程开发中用到。但是为了更方便的讲解今天的主题,需要先了解一下几个参数:
(1)templateUrl
该参数是一个可选参数,可以是:
一个代表外部HTML文件路径的字符串,如templateUrl: 'my-dialog.html';
一个可以接受两个参数的函数,参数为tElement和tAttrs并返回一个外部HTML文件路径的字符串,如templateUrl: function (elem, attr) { return attr.value + ".html"
(2)transclude
该参数是一个可选的参数。默认值是false。指令的内部可以访问外部指令的作用域,并且模板也可以访问外部的作用域对象。为了将作用域传递进去,scope参数的值必须通过{}或true设置成隔离作用域。如果没有设置scope参数,那么指令内部的作用域将被设置为传入模板的作用域。
举例:
index.html:
<html lang="en">
<head>
  <meta charset="UTF-8">
  <title>Example - example-example19-production</title>

  <script src="//ajax.googleapis.com/ajax/libs/angularjs/1.4.1/angular.min.js"></script>
  <script src="script.js"></script>

</head>
<body ng-app="docsTransclusionDirective">
  <div ng-controller="Controller">
  <my-dialog>Check out the contents, {{name}}!</my-dialog>
</div>
</body>
</html>
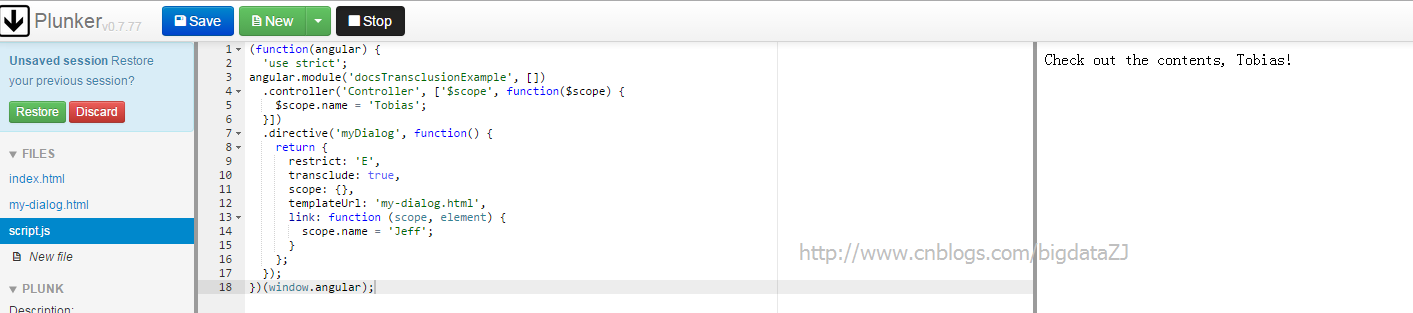
script.js:
(function(angular) {
  'use strict';
angular.module('docsTransclusionDirective', [])
  .controller('Controller', ['$scope', function($scope) {
    $scope.name = 'Tobias';
  }])
  .directive('myDialog', function() {
    return {
      restrict: 'E',
      transclude: true,
      templateUrl: 'my-dialog.html'
    };
  });
})(window.angular);
my-dialog.html:
<div class="alert" ng-transclude></div>
页面显示:

从index.html我们看出定义了一个自定义标签,这里可以称为指令<my-dialog></my-dialog>。从script.js中我们可以看出,加入了参数transclude和templateUrl,这两个是配合使用的。主要实现的功能就是将DOM中获取的内容放到它发现ng-transclude指令的地方显示。
整个例子的工作流程如下图所示:
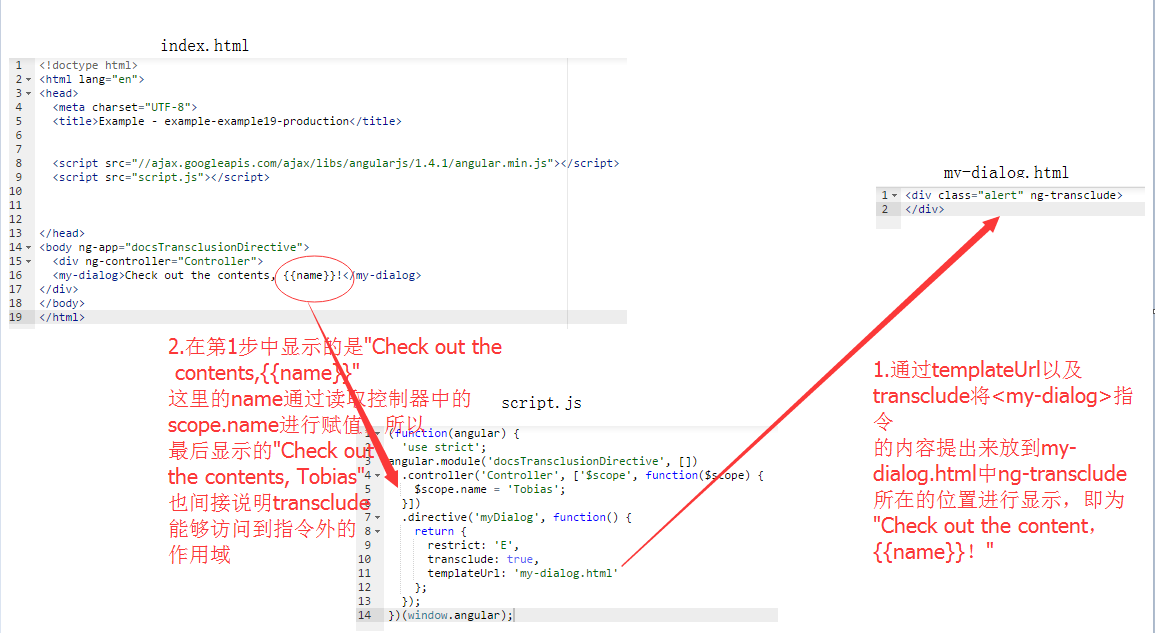
在本例结合上图,即为将“Check out the contents, {{name}}!”显示到my-dialog.html中的div标签中。同时,{{name}}能够读取到指令外的作用域,即控制器中scope.name的值。
有了上面的铺垫,我们就可以来介绍今天的主题了,先上菜
index.html:
<!doctype html>
<html lang="en">
<head>
  <meta charset="UTF-8">
  <title>Example - example-example20-production</title>

  <script src="//ajax.googleapis.com/ajax/libs/angularjs/1.4.1/angular.min.js"></script>
  <script src="script.js"></script>

</head>
<body ng-app="docsTransclusionExample">
  <div ng-controller="Controller">
  <my-dialog>Check out the contents, {{name}}!</my-dialog>
</div>
</body>
</html>
script.js:
(function(angular) {
  'use strict';
angular.module('docsTransclusionExample', [])
  .controller('Controller', ['$scope', function($scope) {
    $scope.name = 'Tobias';
  }])
  .directive('myDialog', function() {
    return {
      restrict: 'E',
      transclude: true,
      scope: {},
      templateUrl: 'my-dialog.html',
      link: function (scope, element) {
        scope.name = 'Jeff';
      }
    };
  });
})(window.angular);
my-dialog.html:
<div class="alert" ng-transclude></div>
主要分为以下几种情况:
1. script.js中没有transclude、scope、templateUrl、link参数
(function(angular) {
  'use strict';
angular.module('docsTransclusionExample', [])
  .controller('Controller', ['$scope', function($scope) {
    $scope.name = 'Tobias';
  }])
  .directive('myDialog', function() {
    return {
      restrict: 'E',
    };
  });
})(window.angular);
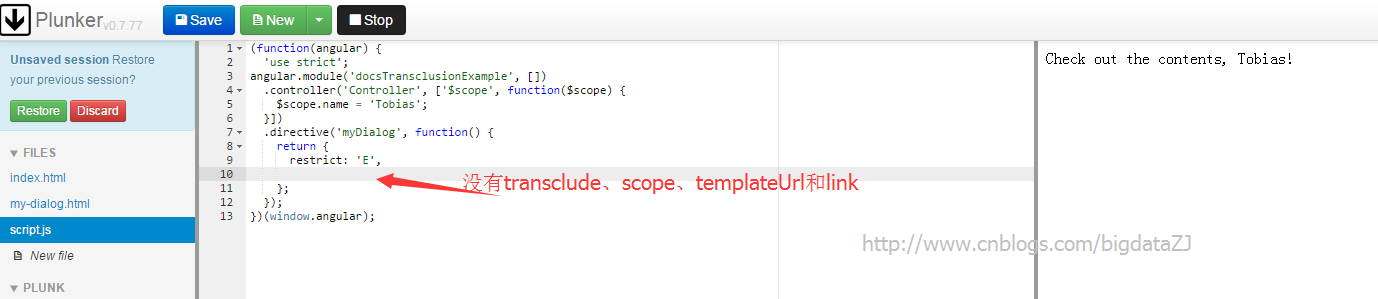
这是一个最干净的情况,index.html中的{{name}}的值到控制器Controller中读取为“Tobias”。
2. script.js中没有transclude、scope、templateUrl参数
(function(angular) {
  'use strict';
angular.module('docsTransclusionExample', [])
  .controller('Controller', ['$scope', function($scope) {
    $scope.name = 'Tobias';
  }])
  .directive('myDialog', function() {
    return {
      restrict: 'E',
      link: function (scope, element) {
        scope.name = 'Jeff';
      }
    };
  });
})(window.angular);
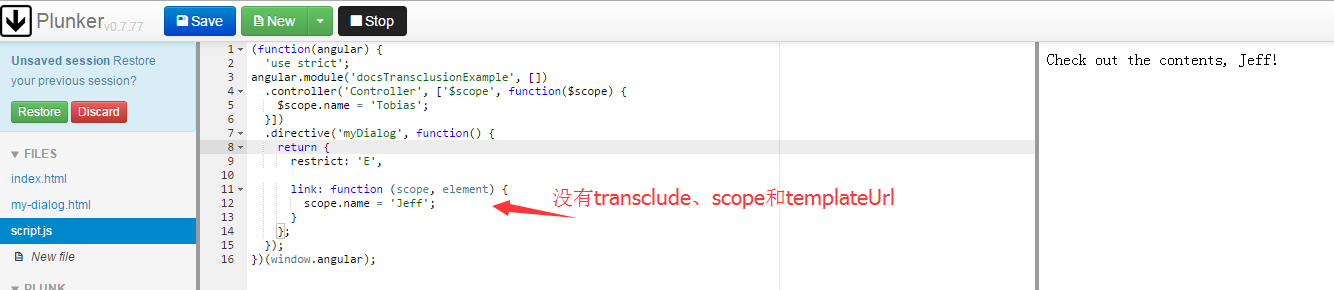
这里添加了link参数,最终的显示结果是“Check out the contents, Jeff”,这是因为Angular编译器complie后返回的一个链接函数,可以看出是执行在Controller控制器后的,所以最终Tobias被Jeff覆盖了。
3. script.js没有scope
(function(angular) {
  'use strict';
angular.module('docsTransclusionExample', [])
  .controller('Controller', ['$scope', function($scope) {
    $scope.name = 'Tobias';
  }])
  .directive('myDialog', function() {
    return {
      restrict: 'E',
      transclude: true,

      templateUrl: 'my-dialog.html',
      link: function (scope, element) {
        scope.name = 'Jeff';
      }
    };
  });
})(window.angular);
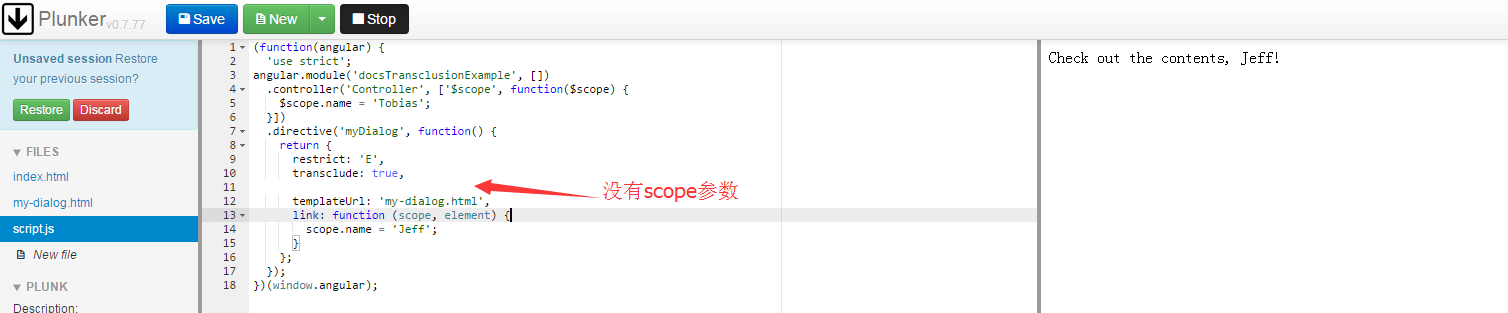
这时,没有scope作用域,表示是共享作用域。即指令直接共享外部控制器的scope,此时directive中的scope就和控制器紧密相关,所以此时,scope.name在指令的link中被重新赋值,这时候控制器和指令中的name都被更新为Jeff。
4. script.js包含transclude、scope、templateUrl和link
(function(angular) {
  'use strict';
angular.module('docsTransclusionExample', [])
  .controller('Controller', ['$scope', function($scope) {
    $scope.name = 'Tobias';
  }])
  .directive('myDialog', function() {
    return {
      restrict: 'E',
      transclude: true,
      scope: {},
      templateUrl: 'my-dialog.html',
      link: function (scope, element) {
        scope.name = 'Jeff';
      }
    };
  });
})(window.angular);
这里添加了scope:{},其实也可以写成scope:true。通过这种声明,表明directive有了自己的独立的scope,但是这种scope会在directive实例化的时候将外部控制器中的变量全部复制到自己的scope作用域中。这就造成最后输出的结果还是Tobias,而不是Jeff。
5. 隔离scope
具体细节已经在《AngularJS入门心得1——directive和controller如何通信》介绍,这里不再赘述。
这里主要介绍了指令中的一些参数以及着重介绍了对于scope的个人理解,如有不足之处,还请不吝指教^_^。
本文链接:《AngularJS入门心得4——死磕指令scope》
如果您觉得阅读本文对您有帮助,请点一下“推荐”按钮,您的“推荐”将是我最大的写作动力!如果您想持续关注我的文章,请扫描二维码,关注JackieZheng的微信公众号,我会将我的文章推送给您,并和您一起分享我日常阅读过的优质文章。
友情赞助
如果你觉得博主的文章对你那么一点小帮助,恰巧你又有想打赏博主的小冲动,那么事不宜迟,赶紧扫一扫,小额地赞助下,攒个奶粉钱,也是让博主有动力继续努力,写出更好的文章^^。
1. 支付宝 2. 微信


 1013
1013


 被折叠的 条评论
为什么被折叠?
被折叠的 条评论
为什么被折叠?
 到【灌水乐园】发言


