使用的是IDEA 2016.2 社区免费版。已经内置了maven。也可以自定义为个人安装的maven。
创建一个maven项目
File -> New -> Project,选择maven项目。然后next,填个内容: 
下一步:

完成。
编写pom.xml和代码
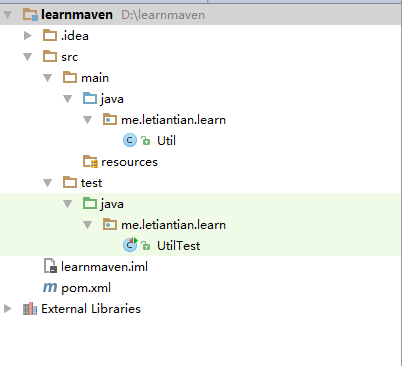
项目结构最终如下:

在pom.xml中加入如下内容:
    <dependencies>
        <dependency>
            <groupId>com.github.kevinsawicki</groupId>
            <artifactId>http-request</artifactId>
            <version>6.0</version>
        </dependency>

        <dependency>
            <groupId>junit</groupId>
            <artifactId>junit</artifactId>
            <version>4.11</version>
            <scope>test</scope>
        </dependency>
    </dependencies>
最终内容如下:
<?xml version="1.0" encoding="UTF-8"?>
<project xmlns="http://maven.apache.org/POM/4.0.0"
         xmlns:xsi="http://www.w3.org/2001/XMLSchema-instance"
         xsi:schemaLocation="http://maven.apache.org/POM/4.0.0 http://maven.apache.org/xsd/maven-4.0.0.xsd">
    <modelVersion>4.0.0</modelVersion>

    <groupId>me.letiantian.learn</groupId>
    <artifactId>learn</artifactId>
    <version>1.0-SNAPSHOT</version>

    <dependencies>
        <dependency>
            <groupId>com.github.kevinsawicki</groupId>
            <artifactId>http-request</artifactId>
            <version>6.0</version>
        </dependency>

        <dependency>
            <groupId>junit</groupId>
            <artifactId>junit</artifactId>
            <version>4.11</version>
            <scope>test</scope>
        </dependency>
    </dependencies>


</project>
IDEA会自动使用maven(或者会有提示)下载依赖。我们可以直接在自己的代码里使用这些依赖的库了。
Util.java类的内容如下:
package me.letiantian.learn;

import com.github.kevinsawicki.http.HttpRequest;

public class Util {

    public static int getRespCode(String url) {
        String ua = "Mozilla/5.0 (Windows NT 6.1; WOW64) AppleWebKit/537.36 (KHTML, like Gecko) Chrome/52.0.2743.82 Safari/537.36 OPR/39.0.2256.48";
        HttpRequest request = HttpRequest.get(url).header("User-Agent", ua);
        return request.code();
    }

    public static int add(int x, int y) {
        return x+y;
    }

    // 在main函数里测试一下
    // 当然,最好是在UtilTest类中写测试代码
    public static void main(String[] args) {
        System.out.println(add(2,3));
    }
}
UtilTest内容如下:
package me.letiantian.learn;

import org.junit.After;
import org.junit.Before;
import org.junit.Test;

import static org.junit.Assert.assertEquals;

public class UtilTest {

    @Before
    public void before() throws Exception {
    }

    @After
    public void after() throws Exception {
    }

    @Test
    public void testAdd() throws Exception {
        assertEquals(3, Util.add(1,2));
    }

    @Test
    public void testGetRespCode() throws Exception {
        assertEquals(200, Util.getRespCode("http://www.oschina.net"));
    }
}
运行和测试
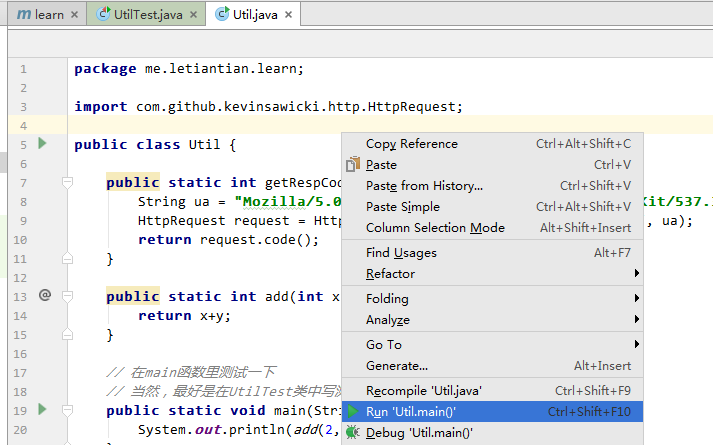
在Util.java的编辑界面中右击鼠标,选择“Run Util.main()”:

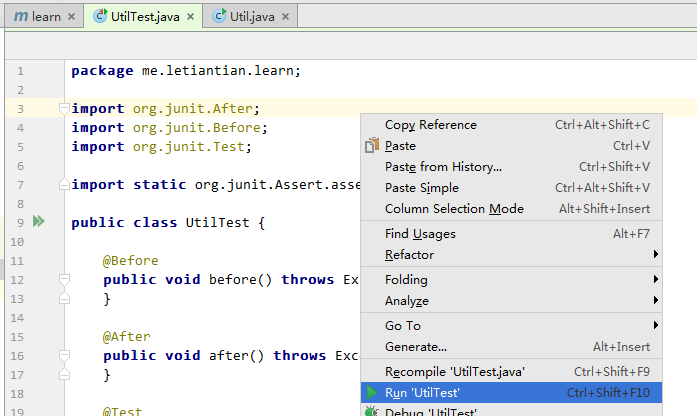
在UtilTest.java的编辑界面中右击鼠标,选择“Run UtilTest”

使用maven
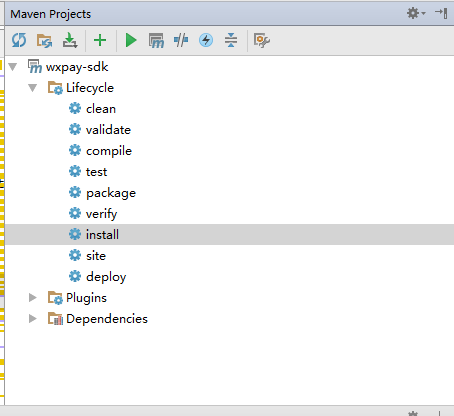
菜单中依次点击“View” ->“Tool Windows” -> “Maven projects”,会出现:

如果要在本机的其他项目中使用该项目,依次运行clean和install,maven会将生成的jar文件打包到本机的maven库中。在其他项目的pom.xml中加入以下内容即可:
<dependency>
    <groupId>com.qq.weixin.pay</groupId>
    <artifactId>wxpay-sdk</artifactId>
    <version>1.0-SNAPSHOT</version>
</dependency>


 74
74

 被折叠的 条评论
为什么被折叠?


