


7
、初始化 extman 软件
7.1
、 数据库脚本
重启mysql
[root@mail webmail]# service mysqld restart
[root@mail ~]# tar -zxvf extman-0.2.5.tar.gz -C /usr/src/
[root@mail ~]# cd /usr/src/extman-0.2.5/docs/
[root@mail docs]# mysql -u root -p < extmail.sql
[root@mail docs]# mysql -u root -p <init.sql
脚本导入数据库的时候会询问密码,默认情况下root用户密码为空
8
、配置 Postfix
8.1
、 修改配置文件
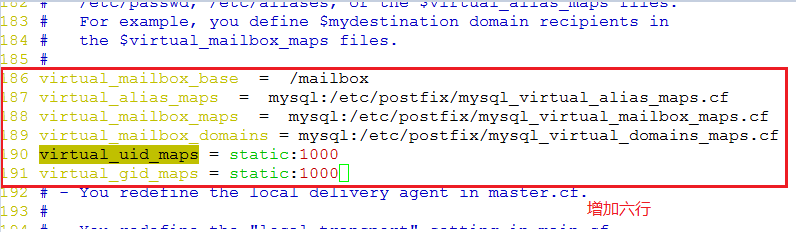
[root@mail ~]# vim /etc/postfix/main.cf
# mydestination = $myhostname, localhost.$mydomain, localhost, $mydomain,
# mail.$mydomain, www.$mydomain, ftp.$mydomain
该行需要注释掉
virtual_mailbox_base = /mailbox
指定虚拟邮箱存储目录的路径起点
virtual_alias_maps = mysql:/etc/postfix/mysql_virtual_alias_maps.cf
指定虚拟邮件用户对应的别名文件位置
virtual_mailbox_maps = mysql:/etc/postfix/mysql_virtual_mailbox_maps.cf
指定记录虚拟邮箱地址与存储位置对应关系的映射文件位置
virtual_mailbox_domains = mysql:/etc/postfix/mysql_virtual_domains_maps.cf
设置postfix服务器可以接收的虚拟邮件域的域名
virtual_uid_maps = static:1000
设置所有虚拟邮件用户映射的本地用户的UID号
virtual_gid_maps = static:1000
设置所有虚拟邮件用户映射的本地组的GID 号
如图:
[root@mail extman-0.2.5]# cd /usr/src/extman-0.2.5/docs/
[root@mail docs]# cp mysql_virtual_* /etc/postfix/ #
在上面的三行配置中指定了这三个文件
9
、虚拟用户设置SMTP发信认证
9.1
、 软件安装
注意:确认系统中的rpm格式的mysql 软件被卸载
[root@mail ~]# tar -jxvf courier-authlib-0.62.4.tar.bz2 -C /usr/src/
[root@mail ~]# cd /usr/src/courier-authlib-0.62.4/
[root@mail courier-authlib-0.62.4]# ./configure --prefix=/usr/local/courier-authlib --without-stdheaderdir --with-authmysql --with-redhat --with-mysql-libs=/usr/local/mysql/lib/mysql --with-mysql-includes=/usr/local/mysql/include/mysql
[root@mail courier-authlib-0.62.4]# make && make install
[root@mail courier-authlib-0.62.4]# make install-configure #
生成默认配置文件authmysqlrc 和 authdaemonrc
9.2
、 添加courier-authlib的库文件路径
[root@mail ~]# vim /etc/ld.so.conf.d/courier-authlib.conf
/usr/local/courier-authlib/lib/courier-authlib
[root@mail ~]# ldconfig
9.3
、 修改authdaemonrc主配置文件
[root@mail ~]# cd /usr/local/courier-authlib/etc/authlib/
[root@mail authlib]# cp authdaemonrc authdaemonrc.bak
[root@mail authlib]# vim authdaemonrc
修改的内容为:
authmodulelist=”authmysql”
authmodulelistorig=”authmysql”
[root@mail authlib]# chmod -R 755 /usr/local/courier-authlib/var/spool/authdaemon
9.4
、 修改authmysqlrc 文件
[root@mail authlib]# cd /usr/local/courier-authlib/etc/authlib/
[root@mail authlib]# cp authmysqlrc authmysqlrc.bak
[root@mail authlib]# vim authmysqlrc
修改内容如下:
MYSQL_SERVER localhost #
数据库服务器位置
MYSQL_USERNAME extmail #
数据库管理员账户
MYSQL_PASSWORD extmail #
数据库管理员账户密码
MYSQL_SOCKET /tmp/mysql.sock #
文件位置
MYSQL_PORT 3306 #mysql
端口
MYSQL_DATABASE extmail #
虚拟用户数据库
MYSQL_USER_TABLE mailbox #
从mailbox表获得邮件账户信息
MYSQL_CRYPT_PWFIELD password #
从password字段获得账户密码
MYSQL_UID_FIELD uidnumber #
从uidnumber字段获得映射的本地用户UID
MYSQL_GID_FIELD gidnumber #
从gidnumber字段获得映射的本地组GID
MYSQL_LOGIN_FIELD username #
从username字段获得账户名称,带@后缀
MYSQL_HOME_FIELD concat('/mailbox/',homedir) #
合并出用户的宿主目录路径
MYSQL_NAME_FIELD name #
从name 字段获得账户名称,不带@后缀
MYSQL_MAILDIR_FIELD concat ('/mailbox/',maild
ir) #
合并出用户的邮件存储路径
9.5
、 复制脚本,启动服务
[root@mail authlib]# cd /usr/src/courier-authlib-0.62.4/
[root@mail courier-authlib-0.62.4]# cp courier-authlib.sysvinit /etc/init.d/courier-authlib
[root@mail courier-authlib-0.62.4]# chmod 755 /etc/rc.d/init.d/courier-authlib
[root@mail courier-authlib-0.62.4]# chkconfig --level 35 courier-authlib on
[root@mail courier-authlib-0.62.4]# service courier-authlib start
10
、修改Cyrus sasl 设置
10.1
、在/usr/lib/sasl2/目录下新建文件smtpd.conf 并编辑
[root@mail ~]# vim /usr/lib/sasl2/smtpd.conf
写入下面三行:
pwcheck_method:authdaemond
mech_list:PLAIN LOGIN
authdaemond_path:/usr/local/courier-authlib/var/spool/authdaemon/socket
11
、修改Dovecot配置
11.1
、修改Dovecot
[root@mail ~]# vim /etc/dovecot.conf
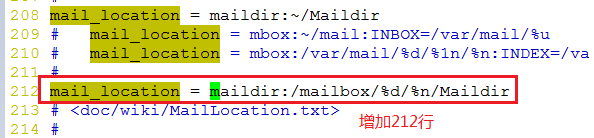
打开900、902、903行,并修改902行:

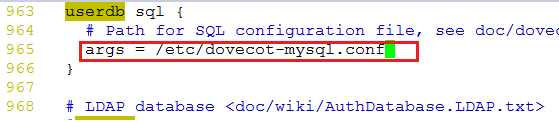
打开963、965、966行,并修改965行:
[root@mail courier-authlib-0.62.4]# vim /etc/postfix/main.cf
打开下面一行
home_mailbox = Maildir/
11.2
、 建立数据查询配置文件
[root@mail ~]# vim /etc/dovecot-mysql.conf
(此文件为新文件)
添加的内容:
driver = mysql
connect = host=localhost dbname=extmail user=extmail password=extmail
default_pass_scheme = CRYPT
password_query = SELECT username AS user,password AS password FROM mailbox WHERE username = '%u'
user_query = SELECT maildir, uidnumber AS uid, gidnumber AS gid FROM mailbox WHERE username = '%u'
12
、建立虚拟用户
12.1
、 建立邮箱目录并调整权限
[root@mail ~]# mkdir -pv /mailbox/extmail.org/postmaster/Maildir
[root@mail ~]# cd /mailbox/extmail.org/postmaster/Maildir
[root@mail Maildir]# chown -R postfix:postfix /mailbox
启动dovecot
[root@mail Maildir]# dovecot
12.2
、 虚拟用户测试
确认authlib服务
13
、ExtMail平台
基于Perl 语言开发的中文Webmail管理平台
套件:ExtMail --Web 界面的邮件操作
Extman
–Web 界面的邮件系统管理
13.1
、平台安装
3
个依赖包
[root@mail ~]# tar -zxvf Unix-Syslog-1.1.tar.gz -C /usr/src/
[root@mail ~]# cd /usr/src/Unix-Syslog-1.1/
[root@mail Unix-Syslog-1.1]# perl Makefile.PL
[root@mail Unix-Syslog-1.1]# make && make install
[root@mail ~]# tar -zxvf DBI-1.616.tar.gz -C /usr/src/
[root@mail ~]# cd /usr/src/DBI-1.616/
[root@mail DBI-1.616]# perl Makefile.PL
[root@mail DBI-1.616]# make && make install
[root@mail ~]# tar -zxvf DBD-mysql-4.020.tar.gz -C /usr/src/
[root@mail ~]# cd /usr/src/DBD-mysql-4.020/
[root@mail DBD-mysql-4.020]# perl Makefile.PL
[root@mail DBD-mysql-4.020]# make && make install
注意以上三个包在编译安装过程可能会提示 警告信息 隐式函数 计算出的变量值未被使用等,只要没有error信息就一切ok
安装ExtMail
[root@mail ~]# tar -zxvf extmail-1.2.tar.gz –C /usr/local/apache2/htdocs/
[root@mail ~]# cd /usr/local/apache2/htdocs/
[root@mail htdocs]# mv extmail-1.2 extmail
[root@mail htdocs]# cd extmail/
[root@mail extmail]# chown -R postfix:postfix cgi
[root@mail extmail]# cp webmail.cf.default webmail.cf
13.2
、 修改配置文件
[root@mail extmail]# cd /usr/local/apache2/htdocs/extmail/
[root@mail extmail]# vim webmail.cf
修改内容:
SYS_CONFIG = /usr/local/apache2/htdocs/extmail/
程序根目录
SYS_LANGDIR = /usr/local/apache2/htdocs/extmail/lang
语言包文件目录
SYS_TEMPLDIR = /usr/local/apache2/htdocs/extmail/html
系统模版目录
SYS_MAILDIR_BASE = /mailbox
邮件存储目录
SYS_MYSQL_USER = extmail
访问mysql数据库的用户
SYS_MYSQL_PASS = extmail
访问mysql数据库的用户的密码
SYS_MYSQL_DB = extmail
使用数据库的名称
SYS_MYSQL_HOST = localhost
数据库服务器地址
SYS_MYSQL_SOCKET = /tmp/mysql.sock
数据库套接文件位置
13.3
、 修改apache服务,添加虚拟主机
[root@mail ~]# vim /usr/local/apache2/conf/httpd.conf
修改如下内容:
User postfix
找到 User 该用户为postfix
Group postfix
找到 Group 该组为postfix
NameVirtualHost 192.168.101.222:80
<VirtualHost 192.168.101.222:80>
414 ServerName mail.abc.com
415 DocumentRoot /usr/local/apache2/htdocs/extmail/html/
416 ScriptAlias /extmail/cgi/ "/usr/local/apache2/htdocs/extmail/cgi/"
417 Alias /extmail "/usr/local/apache2/htdocs/extmail/html/"
418 </VirtualHost>
13.4
、重启apache
[root@mail ~]# /usr/local/apache2/bin/apachectl restart
14
、Extman平台
14.1
、 安装包
4
个依赖包
[root@mail ~]# tar -zxvf GD-2.46.tar.gz -C /usr/src/
[root@mail ~]# cd /usr/src/GD-2.46/
[root@mail GD-2.46]# perl Makefile.PL
[root@mail GD-2.46]# make && make install
[root@mail GD-2.46]#cd
[root@mail ~]# tar -zxvf File-Tail-0.99.3.tar.gz -C /usr/src/
[root@mail ~]# cd /usr/src/File-Tail-0.99.3/
[root@mail File-Tail-0.99.3]# perl Makefile.PL
[root@mail File-Tail-0.99.3]# make && make install
[root@mail File-Tail-0.99.3]#cd
[root@mail ~]# rpm -ivh rrdtool-1.2.23-3.el5.i386.rpm
[root@mail ~]# rpm -ivh rrdtool-perl-1.2.23-3.el5.i386.rpm
Extman
套件
[root@mail ~]# tar -zxvf extman-1.1.tar.gz -C /usr/local/apache2/htdocs/
[root@mail ~]# cd /usr/local/apache2/htdocs/
[root@mail htdocs]# mv extman-1.1 extman
[root@mail htdocs]# cd extman/
[root@mail extman]# chown -R postfix:postfix cgi
[root@mail extman]# mkdir -p /tmp/extman
[root@mail extman]# chown -R postfix:postfix /tmp/extman
14.2
、 修改配置文件
[root@mail extman]# cp webman.cf.default webman.cf
[root@mail extman]# vim /usr/local/apache2/htdocs/extman/webman.cf
修改如下内容:
SYS_CONFIG = /usr/local/apache2/htdocs/extman/
程序根目录
SYS_LANGDIR = /usr/local/apache2/htdocs/extman/lang
语言包文件目录
SYS_TEMPLDIR = /usr/local/apache2/htdocs/extman/html
系统模版目录
SYS_MAILDIR_BASE = /mailbox
邮件数据存放路径
SYS_MYSQL_USER = webman
访问mysql数据库的用户
SYS_MYSQL_PASS = webman
访问mysql数据库的用户的密码
SYS_MYSQL_DB = extmail
使用的数据库名称
SYS_MYSQL_HOST = localhost
数据库服务器地址
SYS_MYSQL_SOCKET = /tmp/mysql.sock
数据库套接文件位置
14.3
、 调整apache主配文件。添加extman相关目录别名
[root@mail extman]# vim /usr/local/apache2/conf/httpd.conf
<VirtualHost 192.168.101.222:80>
ServerName mail.abc.com
DocumentRoot /usr/local/apache2/htdocs/extmail/html/
ScriptAlias /extmail/cgi/ "/usr/local/apache2/htdocs/extmail/cgi/"
Alias /extmail "/usr/local/apache2/htdocs/extmail/html/"
ScriptAlias /extman/cgi "/usr/local/apache2/htdocs/extman/cgi/"
Alias /extman "/usr/local/apache2/htdocs/extman/html/"
</VirtualHost>
14.4
、重启apache
[root@mail extman]# /usr/local/apache2/bin/apachectl restart
14.5
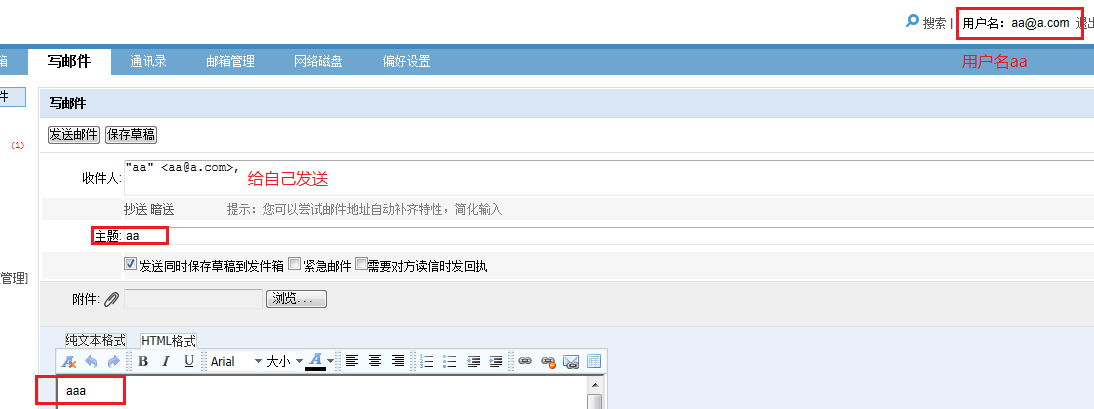
、 现在在客户端访问
在浏览器中输入http://mail.abc.com

就可以看见Extman后台管理登录界面了
默认管理员账户:root@extmail.org
默认密码:extmail*123*
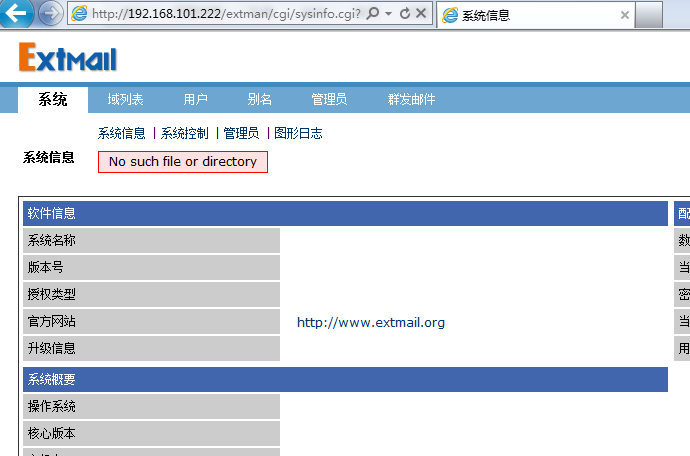
注意:在用管理员登陆地时候,如果一直提示“校验码不正确,请重新输入”
如图:
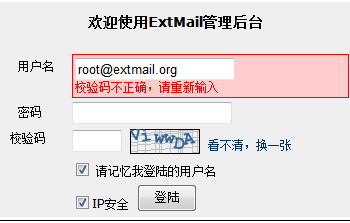
则要编辑webman.cf
[root@mail ~]# vim /usr/local/apache2/htdocs/extman/webman.cf

重启apache
[root@mail extman]# /usr/local/apache2/bin/apachectl restart
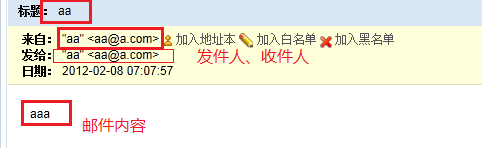
再次登录:
此时你可以在此添加新域,创建新用户,正常接收和发送电子邮件了。
15
、设置邮件系统的图形化日志信息
[root@mail ~]# ln -sf /usr/local/apache2/htdocs/extman/addon/mailgraph_ext/mailgraph-init /usr/sbin/
[root@mail ~]# ln -sf /usr/local/apache2/htdocs/extman/addon/mailgraph_ext/qmonitor.pl /usr/sbin/
[root@mail ~]# cp -a /usr/local/apache2/htdocs/extman/addon/mailgraph_ext /usr/local/
[root@mail ~]# mailgraph-init start
[root@mail ~]# qmonitor.pl start
[root@mail ~]# echo "/usr/sbin/mailgraph-init start" >> /etc/rc.d/rc.local
[root@mail ~]# echo "/usr/sbin/qmonitor.pl start" >> /etc/rc.d/rc.local
测试:
登录管理界面,在“系统”下面找到“图形日志” 打开:
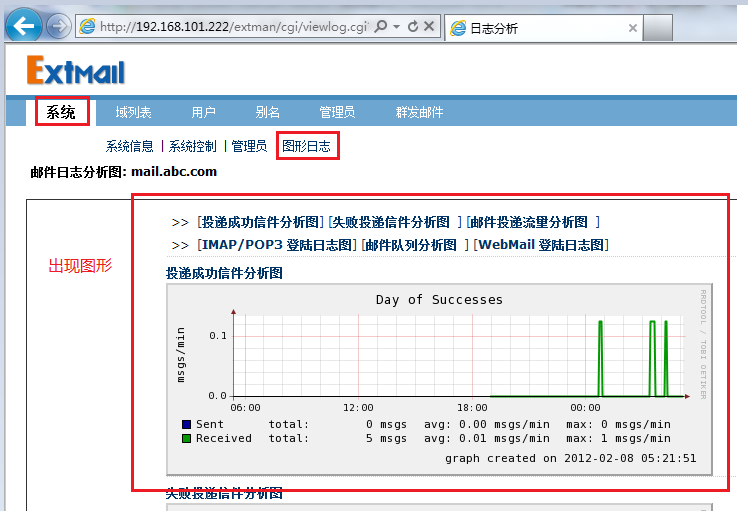
16
、垃圾邮件过滤
16.1
、 根据客户端的主机名/地址过滤邮件
[root@mail ~]# vim /etc/postfix/main.cf
添加一行:
smtpd_client_restrictions = check_client_access hash:/etc/postfix/access
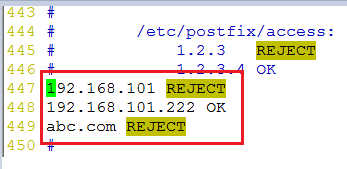
编辑文件access:
[root@mail ~]# vim /etc/postfix/access
增加的内容为:
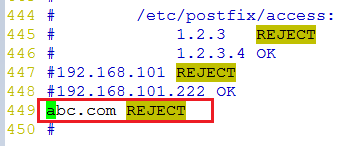
禁止abc.com域下发送邮件,
(注意:前面不能留空格)
[root@mail ~]# postmap /etc/postfix/access
测试:
用user1@abc.com
来发送邮件:
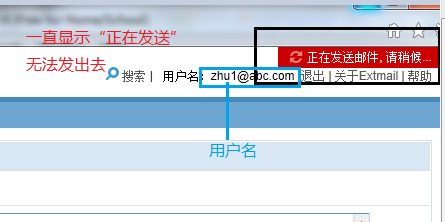
换个域名a.com:可以看到能正常接发邮件。
下面是限制192.168.101网段的地址和abc.com域下的用户不可接发邮件,但允许192.168.101.222地址上的用户
16.2
、 根据客户机HELO 信息中的主机名地址过滤邮件
[root@mail ~]# vim /etc/postfix/main.cf
添加内容:
smtpd_helo_required = yes
smtpd_helo_restrictions = reject_invalid_hostname
[root@mail ~]# postfix reload
16.3
、 根据发件人的地址过滤邮件
[root@mail ~]# vim /etc/postfix/main.cf
添加的内容:
smtpd_sender_login_maps = mysql:/etc/postfix/mysql_virtual_sender_maps.cf,mysql:/etc/postfix/mysql_virtual_alias_maps.cf
smtpd_sender_restrictions = permit_mynetworks,reject_sender_login-mismatch,reject_non_fqdn_sender,reject_unknown_sender_domain,check_sender_access hash:/etc/postfix/sender_access
[root@mail ~]# vim /etc/postfix/sender_access
添加内容:
abc@sina.com REJECT
marketing@ REJECT
fake.aptech.com REJECT
[root@mail ~]# postmap /etc/postfix/sender_access
16.4
、 根据收件人的地址过滤邮件
[root@mail ~]# vim /etc/postfix/main.cf
添加的内容:
smtpd_recipient_restrictions = permit_mynetworks,permit_sasl_authenticated,reject_unauth_destination,reject_non_fqdn_ recipient,reject_unknown_recipient_domain
[root@mail ~]# postfix reload
17
、基于邮件内容的过滤
17.1
、安装并配置MailScanner 扫描调度工具
1)
安装MailScanner 扫描调度工具
[root@mail ~]# tar -zxvf MailScanner-4.84.3-1.rpm.tar.gz -C /usr/src/
[root@mail ~]# cd /usr/src/MailScanner-4.84.3-1/
[root@mail MailScanner-4.84.3-1]# ./install.sh
17.2
、 修改配置文件MailScanner
[root@mail ~]# vim /etc/MailScanner/MailScanner.conf
131
行 Run As User = postfix
136
行
Run As Group = postfix
165
行
Incoming Queue Dir = /var/spool/postfix/hold
169
行
Outgoing Queue Dir = /var/spool/postfix/incoming
196
行
MTA = postfix
2231
行
Required SpamAssassin Score = 7
2237
行
High SpamAssassin Score = 10
2437
行
Spam Actions = deliver header "X-Spam-Status: Yes"
2499
行
High Scoring Spam Actions = delete forward spam@extmail.org
17.3
、 配置Postfix 支持调用MailScanner
[root@mail ~]# vim /etc/postfix/main.cf
520
行
header_checks = regexp:/etc/postfix/header_checks
[root@mail ~]# vim /etc/postfix/header_checks
497
行添加
/^Received:/HOLD
17.4
、 调整邮件过滤队列的目录属主、属组,并启动MailScanner 服务程序
[root@mail ~]# chown -R postfix.postfix /var/spool/MailScanner/incoming/
[root@mail ~]# chown -R postfix.postfix /var/spool/MailScanner/quarantine/
[root@mail ~]# service MailScanner start
Starting MailScanner daemons:
incoming postfix: [ OK ]
outgoing postfix: [ OK ]
MailScanner: [ OK ]
[root@mail ~]# chkconfig --level 35 MailScanner on
18
、 安装并配置SpamAssassin 垃圾邮件过滤器
18.1
、 安装并配置SpamAssassin 垃圾邮件过滤器
[root@mail ~]# mount /dev/cdrom /mnt/cdrom/
[root@mail ~]# yum install spamassassin -y
18.2
、 修改配置文件local.cf
(位于“/etc/mail/spamassassin/local.cf”,一般不需要进行任何修改,保
持默认设置即可)
18.3
、 启动SpamAssassin 服务
[root@mail ~]# service spamassassin start
[root@mail ~]# chkconfig --level 35 spamassassin on
18.4
、 安装并配置F-Port 病毒查杀软件
1)
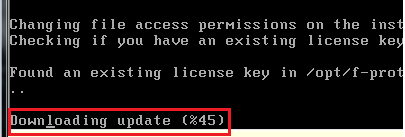
安装F-Port 软件包安装过程中出现提示是按回车键接受默认设置
[root@mail ~]# tar -zxvf fp-Linux-i686-ws.tar.gz -C /opt/
[root@mail ~]# cd /opt/f-prot/
[root@mail f-prot]# ./install-f-prot.pl
显示更新进度
18.5
、 升级F-Port 病毒库(服务器要能够访问Internet 互联网)
[root@mail f-prot]# /opt/f-prot/fpupdate
[root@mail f-prot]#crontab –e
[root@mail f-prot]#
service crond start
[root@mail f-prot]#
chkconfig --level 35 crond on
[root@mail f-prot]# service crond restart
Stopping crond: [ OK ]
Starting crond: [ OK ]
18.6
、测试反病毒能力
病毒测试数据:
X5O!P%@AP[4\PZX54(P^)7CC)7}$EICAR-STANDARD-ANTIVIRUS-TEST-FILE!$H+H*
18.7
、测试反垃圾能力
垃圾邮件测试数据:
XJS*C4JDBQADN1.NSBN3*2IDNEN*GTUBE-STANDARD-ANTI-UBE-TEST-EMAIL*C.34X
历时两天的时间终于做到了最后一步,但因为试验环境的限制,防病毒与反垃圾实验测试不能完成,这里只给出了相关的数据;请高手指点;
转载于:https://blog.51cto.com/zhuchaobo/917802


 225
225


 被折叠的 条评论
为什么被折叠?
被折叠的 条评论
为什么被折叠?
 到【灌水乐园】发言


