


在这里,我们首先写一个用于登陆的login.jsp,相信很多刚开始进行jsp开发的人,都会很快遇到这个问题。
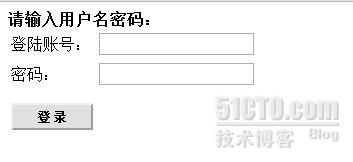
这是一个很常见的界面。具体代码如下
- <%@page contentType="text/html;charset=gbk" %>
- <%@page language="java" import="java.util.*"%>
- <%@page language="java" import="gfs04.*"%>
- <%
- String sID = (String)session.getAttribute("ID");
- if ( sID == null )
- {
- sID = "";
- }
- String stype = (String)session.getAttribute("type");
- if ( stype == null )
- {
- stype = "0";
- }
- String sname = (String)session.getAttribute("name");
- if ( sname == null )
- {
- sname = "0";
- }
- %>
- <script language="JavaScript" type="text/JavaScript">
- //表单reset的时候。需要做的特需处理
- function resetForm(){
- form_login.ID.focus();
- form_login.password.focus();
- }
- //登录前的检查
- function checkInput(){
- //check the ID
- if(form_login.ID.value.length<1){
- form_login.ID.foucs();
- form_login.ID.select();
- alert("登陆账号不能为空!");
- return false;
- }
- if(getLength(form_login.sID.value)>12){
- form_login.ID.focus();
- form_login.ID.select();
- alert("账号最大不能超过12位数字!");
- return false;
- }
- //检查密码
- if(form_login.password.value.length<1){
- form_login.password.focus();
- form_login.password.select();
- alert("请输入密码!!");
- return false;
- }
- return true;
- }
- </script>
- <html>
- <head>
- <title>国防生信息管理系统</title></head>
- <body>
- <b>请输入用户名密码:</b>
- <form action="gfs04/Login" method="post" name="form_login">
- <table>
- <tr>
- <td> 登陆账号:</td><td><input type="text" name="ID"></input></td>
- </tr>
- <tr>
- <td>密码:</td><td><input type="password" name="password"></input></td>
- </tr>
- <tr>
- <td height=10></td>
- </tr>
- <tr>
- <td><input type="submit" value="登 录" style="FONT-WEIGHT: bold;
- FONT-SIZE: 12px; WIDTH: 82px; COLOR: #000000;
- HEIGHT: 27px; BACKGROUND-COLOR: #E0E0DE"></td>
- </tr>
- </table>
- </form>
- </body>
- </html>
- package gfs04;
- import java.io.*;
- import java.sql.*;
- import javax.servlet.ServletException;
- import javax.servlet.http.*;
- public class Login extends Common {
- /**
- *
- */
- private static final long serialVersionUID = 1L;
- public String check(String ID , String password , String type){
- Connection conn = this.getDBConnection();
- if(conn==null){
- return null;
- }
- Statement stmt=null;
- ResultSet rs=null;
- try{
- stmt =conn.createStatement();
- //execute the sql query
- String sQuery = "select * from user where ID= '"
- +ID+"' and password='"+password+
- "' and type='"+type+"' ";
- rs = stmt.executeQuery(sQuery);
- String sname=null;
- if(rs.next()){
- sname = rs.getString("name");
- }
- return sname;
- }catch (Exception e){
- e.printStackTrace();
- return null;
- }
- finally{
- try{
- rs.close();
- stmt.close();
- conn.close();
- }catch (Exception ex){
- ex.printStackTrace();
- return null;
- }
- }
- }
- public void doGet(HttpServletRequest request,
- HttpServletResponse response)
- throws ServletException , IOException{
- //set the code of the form
- request.setCharacterEncoding("GBK");
- HttpSession mySession = request.getSession(true);
- //clear the error message
- mySession.setAttribute("errMsg", "");
- //get user info
- String sID = request.getParameter("sID");
- String spassword = request.getParameter("spassword");
- String stype = request.getParameter("stype");
- //deal with the get
- if(sID!=null&&sID.length()>0){
- //check user info
- String sname=check(sID , spassword , stype);
- if(sname==null){
- //login failed
- mySession.setAttribute("errMsg", "登录失败,请重新登陆!");
- mySession.setAttribute("ID",sID );
- mySession.setAttribute("type", stype);
- response.sendRedirect("../login.jsp");
- }
- else {
- mySession.setAttribute("name", sname);
- mySession.setAttribute("ID",sID );
- mySession.setAttribute("type", stype);
- response.sendRedirect("../index.jsp");
- return ;
- }
- }
- else {
- response.sendRedirect("../login.jsp");
- return ;
- }
- }
- //deal with post method
- public void doPost(HttpServletRequest request ,
- HttpServletResponse response)
- throws ServletException , IOException{
- doGet(request , response);
- }
- }
这样,用户在login.jsp输入账号密码进行登录,Login.java将传来的参数查询数据库,若匹配,则跳转到首页index.jsp;否则,留在登陆页。可是,当我在部署这个应用时,却发现了很多问题。
主要有如下:java并没有自动生成class文件,没有在web.xml文件里自动生成servlet配置。解决问题留在下一篇文章那。
转载于:https://blog.51cto.com/1754771/789078


 2189
2189


 被折叠的 条评论
为什么被折叠?
被折叠的 条评论
为什么被折叠?
 到【灌水乐园】发言


