


一、vue-cli使用教程
   npm install -g vue-cli  #全局安装vue-cli
   vue init webpack my-project    #创建一个vue-cli项目
   cd my-project
   npm install
   npm run dev
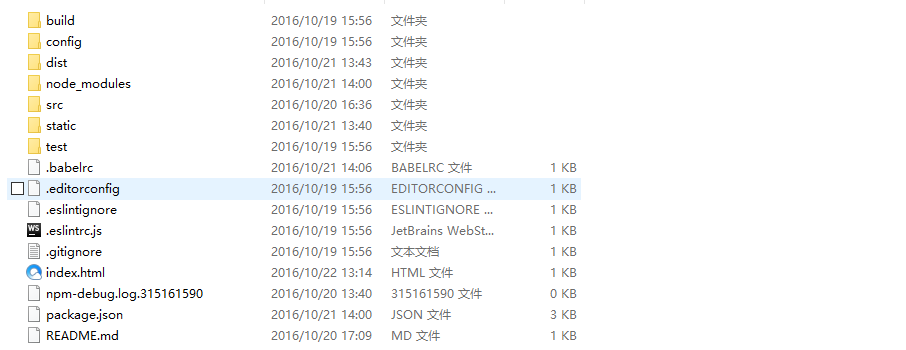
成功后会出现如下图文件:
二、使用vue-cli开发SPA应用---路由配置
使用vue2.0的路由进行配置
新建route-config.js文件
用来进行路由的管理,内容如下
import index from './components/Index'
import login from './components/Login'
// 2. 定义路由
// 每个路由应该映射一个组件。 其中"component" 可以是
// 通过 Vue.extend() 创建的组件构造器,
// 或者,只是一个组件配置对象。
// 我们晚点在讨论嵌套路由。
const routes = [
{ path: '/', component: index },
{ path: '/index', component: index },
{ path: '/login', component: login }
]
export default { routes }
上面定义了两个.vue文件Index.vue和Login.vue文件,代码如下:
Index.vue:
<template>
<mt-header title="日志分享">
<router-link class="head-a" to="/login" slot="right">
<mt-button>登录</mt-button>
</router-link>
</mt-header>
</template>
<script>
export default {
name: 'index'
}
</script>
<style>
.head-a{
color: #fff;
}
</style>
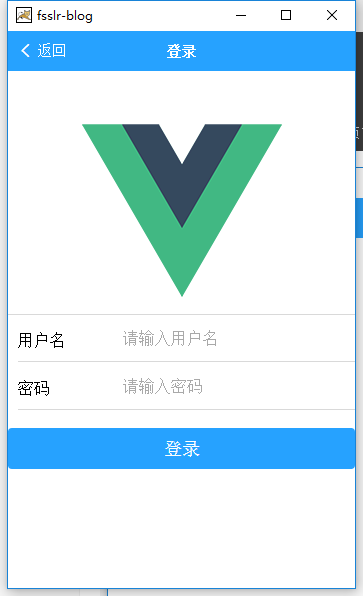
Login.vue:
<template>
<div id="login">
<mt-header title="登录">
<router-link class="head-a" to="/" slot="left">
<mt-button icon="back">返回</mt-button>
</router-link>
</mt-header>
<div class="login-logo">
<img src="../assets/logo.png">
</div>
<div class="login-form">
<mt-field label="用户名" placeholder="请输入用户名"></mt-field>
<mt-field label="密码" placeholder="请输入密码" type="password"></mt-field>
<br>
<mt-button type="primary" size="large">登录</mt-button>
</div>
</div>
</template>
<script>
export default {
name: 'login'
}
</script>
<style scoped>
.head-a{
color: #fff;
}
.login-logo {
margin: auto;
text-align: center;
padding-top: 40px;
}
.login-logo img {
margin: auto;
}
.form-line{
font-size: 20px;
padding: 5px 10px;
}
.form-input-label{
}
</style>
#在main.js中引入route-config.js文件进行配置路由后续操作
import Vue from 'vue'
import App from './App'
import VueRouter from 'vue-router'
import configRouter from './route-config'
import MintUI from 'mint-ui'
import 'mint-ui/lib/style.css'
Vue.use(MintUI)
Vue.use(VueRouter)
// 3. 创建 router 实例,然后传 `routes` 配置
// 你还可以传别的配置参数, 不过先这么简单着吧。
const router = new VueRouter({
mode: 'history',
routes: configRouter.routes
})
// 4. 创建和挂载根实例。
// 记得要通过 router 配置参数注入路由,
// 从而让整个应用都有路由功能
new Vue({
el: '#app',
router: router,
template: '<App/>',
components: {
App
}
}).$mount('#app')
然后我们就可以看见效果,主页和登录页面进行切换,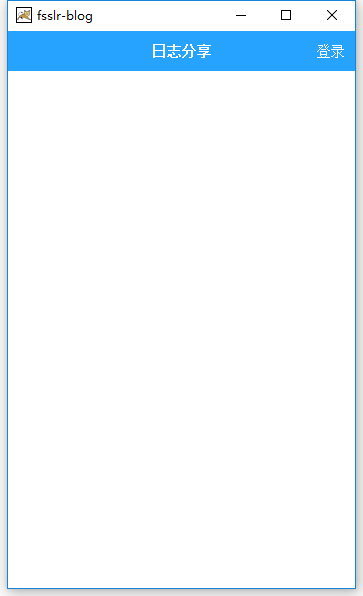
实现如上的功能,


 172
172

 被折叠的 条评论
为什么被折叠?
被折叠的 条评论
为什么被折叠?
 到【灌水乐园】发言


