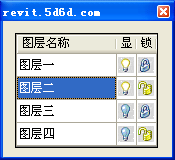
实现类似AutoCAD或者PhotoShop中图层的效果。
层名称,层状态,锁定,显示。如图:


总结一下DataGridView的小技巧:
1.代码添加列,次序是由右至左,即越先添加的列,越靠右。
2.代码添加行,先添加行数,再往行里加数据。
dataGridView1.Rows.Add(3);
dataGridView1.Rows[0].Cells[0].Value = "图层一";
3.图片列的使用DataGridViewImageColumn
4.去掉行标题
dataGridView1.RowHeadersVisible = false;
5.ListView也可以实现同样的效果,但是界面很不好控制。
ListBox可以编辑但是无法添加图像列。
C# WinForm控件ListBox点选可编辑(附源码)
代码:
代码:
using
System;
using System.Collections.Generic;
using System.ComponentModel;
using System.Data;
using System.Drawing;
using System.Linq;
using System.Text;
using System.Windows.Forms;
namespace WinDataGridView
{
public partial class Form1 : Form
{
public Form1()
{
InitializeComponent();
}
private void BindData()
{
// 去掉行标题
dataGridView1.RowHeadersVisible = false ;
// 图片列,列的添加是由右至左
// 是否锁定
DataGridViewImageColumn colLock = new DataGridViewImageColumn();
colLock.Name = " layerLock " ;
colLock.HeaderText = " 锁 " ;
colLock.Width = 20 ;
dataGridView1.Columns.Insert( 0 , colLock);
// 是否显示
DataGridViewImageColumn colShow = new DataGridViewImageColumn();
colShow.Name = " layerShow " ;
colShow.HeaderText = " 显 " ;
colShow.Width = 20 ;
dataGridView1.Columns.Insert( 0 , colShow);
// 编辑框列
DataGridViewTextBoxColumn colTxt = new DataGridViewTextBoxColumn();
colTxt.Name = " layerName " ;
colTxt.HeaderText = " 图层名称 " ;
dataGridView1.Columns.Insert( 0 , colTxt);
// 添加行数据
dataGridView1.Rows.Add( 3 );
this .dataGridView1.Rows[ 0 ].Cells[ 0 ].Value = " 图层一 " ;
this .dataGridView1.Rows[ 0 ].Cells[ 1 ].Value = imageList1.Images[ 0 ];
this .dataGridView1.Rows[ 0 ].Cells[ 2 ].Value = imageList1.Images[ 2 ];
this .dataGridView1.Rows[ 1 ].Cells[ 0 ].Value = " 图层二 " ;
this .dataGridView1.Rows[ 1 ].Cells[ 1 ].Value = imageList1.Images[ 0 ];
this .dataGridView1.Rows[ 1 ].Cells[ 2 ].Value = imageList1.Images[ 3 ];
this .dataGridView1.Rows[ 2 ].Cells[ 0 ].Value = " 图层三 " ;
this .dataGridView1.Rows[ 2 ].Cells[ 1 ].Value = imageList1.Images[ 1 ];
this .dataGridView1.Rows[ 2 ].Cells[ 2 ].Value = imageList1.Images[ 2 ];
this .dataGridView1.Rows[ 3 ].Cells[ 0 ].Value = " 图层四 " ;
this .dataGridView1.Rows[ 3 ].Cells[ 1 ].Value = imageList1.Images[ 1 ];
this .dataGridView1.Rows[ 3 ].Cells[ 2 ].Value = imageList1.Images[ 3 ];
}
private void Form1_Load( object sender, EventArgs e)
{
BindData();
}
}
}


 4301
4301

 被折叠的 条评论
为什么被折叠?


