


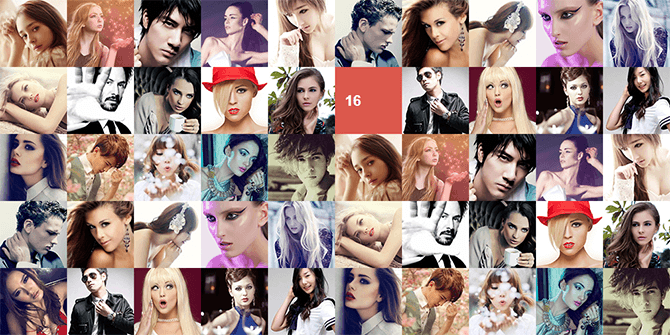
今天就为大家分享一个非常有创意的CSS3头像展示效果,交互性强,是一个基于css3和js来实现的,代码量不多,但是最终的效果却很让人赞叹,所以特别推荐给大家。其中关于本示例的一些css样式呈现,个人认为还有很大的发挥空间,例如鼠标经过的时候而不是切换成一个背景色和文字,而是替换成其他的相关图片(例如改为人物的其他表情),这将会是非常的有意思的。
好了,接下来我们一起看看其效果的制作方法。
HTML代码结构

看了上面代码是极其简单的,就一个列表元素,你需要放多少张图片就写多少
。里面的结构如上。CSS样式表
接下来就是我们的css样式表了,在这里只是一个示例,大家在这部分可以自由发挥,定义出你们的个性来。
body {
font-family: Helvetica, Arial, sans-serif;
font-size: 16px;
-webkit-font-smoothing: antialiased;
-moz-font-smoothing: antialiased;
font-smoothing: antialiased;
margin:0;
padding:0;
background-color: #E6E6E6;
}
.grid {
margin: 100px auto 80px auto;
padding: 0px;
width: 100%;
height: auto;
overflow: hidden;
max-width: 1000px;
-webkit-box-shadow:0px 40px 50px rgba(0, 0, 0, 0.3);
-moz-box-shadow:0px 40px 50px rgba(0, 0, 0, 0.3);
box-shadow:0px 40px 50px rgba(0, 0, 0, 0.3);
}
.grid li {
width: 10%;
background: #000000;
float: left;
position: relative;
overflow: hidden;
}
.grid img {
float: left;
width: 100%;
height: auto;
position: relative;
-webkit-transform-style: preserve-3d;
-webkit-backface-visibility: hidden;
-webkit-transform: translate3d(0, 0, 0);
-moz-transform-style: preserve-3d;
-moz-backface-visibility: hidden;
-moz-transform: translate3d(0, 0, 0);
transform-style: preserve-3d;
backface-visibility: hidden;
transform: translate3d(0, 0, 0);
}
.grid .info {
position: absolute;
width: 100%;
height: 100%;
padding: 15px;
background: #DC584C;
display: none;
z-index: 2;
-webkit-transform-style: preserve-3d;
-webkit-backface-visibility: hidden;
-webkit-transform: translate3d(0, 0, 0);
-moz-transform-style: preserve-3d;
-moz-backface-visibility: hidden;
-moz-transform: translate3d(0, 0, 0);
transform-style: preserve-3d;
backface-visibility: hidden;
transform: translate3d(0, 0, 0);
}
.grid p {
font-size: 22px;
font-weight: bolder;
color: #FFF;
}
JavaScript代码
最后,我们需要借助JavaScript来完成一些特殊的互动(动画效果)。
(function() {
$(function() {
var columns, current, easing, grid, hideItem, showItem, time,
_this = this;
grid = $(".grid");
current = {
index: -1,
column: 0,
line: 0
};
columns = 10;
easing = "cubic-bezier(0.165, 0.840, 0.440, 1.000)";
time = 400;
grid.on("mouseenter", "a", function(e) {
var column, el, image, index, info, item, line;
el = $(e.currentTarget);
info = el.find(".info");
image = el.find("img");
index = el.parent().index();
column = index % columns;
line = Math.floor(index / columns);
console.log(index, column, line);
item = {
el: el,
index: index,
column: column,
line: line,
info: info,
image: image
};
if (current.el && current.index === index) return;
if (line === current.line && column > current.column) {
showItem(item, "-100%", 0, "25%", 0);
hideItem(current, "100%", 0, "-25%", 0);
} else if (line === current.line && column < current.column) { showItem(item, "100%", 0, "-25%", 0); hideItem(current, "-100%", 0, "25%", 0); } else if (line > current.line && column === current.column) {
showItem(item, 0, "-100%", 0, "25%");
hideItem(current, 0, "100%", 0, "-25%");
} else {
showItem(item, 0, "100%", 0, "-25%");
hideItem(current, 0, "-100%", 0, "25%");
}
return current = item;
});
showItem = function(item, infoX, infoY, imageX, imageY) {
item.info.stop().css({
x: infoX,
y: infoY,
display: "block"
}).transition({
x: 0,
y: 0,
duration: time,
easing: easing
});
return item.image.stop().transition({
x: imageX,
y: imageY,
opacity: .5,
duration: time,
easing: easing
});
};
return hideItem = function(item, infoX, infoY, imageX, imageY) {
if (!item.el) return;
item.info.stop().transition({
x: infoX,
y: infoY,
duration: time,
easing: easing
});
return item.image.stop().css({
x: imageX,
y: imageY,
opacity: .5
}).transition({
x: 0,
y: 0,
opacity: 1,
duration: time,
easing: easing
});
};
});
}).call(this);
到这里,我们的示例基本上就完成了,但是按照上面几步来,最终是没效果的,那是因为我们还没引入jQuery库和一个jQuery插件(jQuery Transit)。
jQuery Transit是一个利用了CSS3的过渡和转换特性来实现动画特效的 jQuery插件,与jQuery的animate方法有着同样的语法。此插件支持这个特性所提供的大部分方法,同时增加了 jQuery 独有的技术:回调(callbacks)、自动增加浏览器CSS前缀、链盒(chaining)等。由于此插件使用了真正的CSS3规则,所以它不能兼容旧版本的浏览器。
今天的示例就到这里了,希望大家喜欢,如果有问题可以在下方留言,一起探讨研究。


 510
510


 被折叠的 条评论
为什么被折叠?
被折叠的 条评论
为什么被折叠?
 到【灌水乐园】发言


