


今天我们来一步步手动构建一个小于10M的类嵌入式Linux系统,所谓"工欲善其事,必先利其器",所以我们得先准备一下工具才能完成Mini Linux的构建。
环境准备
1、宿主机系统:CentOS5.8 x86_64
2、硬盘:
①/dev/hda1(50M) ext3 boot分区
②/dev/hda2(512M) ext3 /分区
3、Kernel:linux-2.6.39.tar.xz[root@soysauce tmp]# wget https://www.kernel.org/pub/linux/kernel/v2.6/linux-2.6.39.tar.xz
4、busybox:busybox-1.23.2.tar.bz2
[root@soysauce tmp]# wget http://www.busybox.net/downloads/busybox-1.23.2.tar.bz2
5、开发库安装
[root@soysauce tmp]# yum groupinstall -y "Development Tools" "Development Libraries"
一、完成boot(50M)分区和/(512M)分区的创建、格式化及挂载[root@CentOS5 test]# fdisk -l # 查看所有磁盘及分区
Disk /dev/hda: 21.4 GB, 21474836480 bytes
15 heads, 63 sectors/track, 44384 cylinders
Units = cylinders of 945 * 512 = 483840 bytes
Disk /dev/hda doesn't contain a valid partition table
Disk /dev/sda: 21.4 GB, 21474836480 bytes
255 heads, 63 sectors/track, 2610 cylinders
Units = cylinders of 16065 * 512 = 8225280 bytes
Device Boot Start End Blocks Id System
/dev/sda1 * 1 13 104391 83 Linux
/dev/sda2 14 2610 20860402+ 8e Linux LVM
[root@CentOS5 test]# fdisk /dev/hda # 对/dev/hda进行分区操作
The number of cylinders for this disk is set to 44384.
There is nothing wrong with that, but this is larger than 1024,
and could in certain setups cause problems with:
1) software that runs at boot time (e.g., old versions of LILO)
2) booting and partitioning software from other OSs
(e.g., DOS FDISK, OS/2 FDISK)
Command (m for help): n
Command action
e extended
p primary partition (1-4)
p
Partition number (1-4): 1
First cylinder (1-44384, default 1):
Using default value 1
Last cylinder or +size or +sizeM or +sizeK (1-44384, default 44384): +50M
Command (m for help): n
Command action
e extended
p primary partition (1-4)
p
Partition number (1-4): 2
First cylinder (105-44384, default 105):
Using default value 105
Last cylinder or +size or +sizeM or +sizeK (105-44384, default 44384): +512M
Command (m for help): p
Disk /dev/hda: 21.4 GB, 21474836480 bytes
15 heads, 63 sectors/track, 44384 cylinders
Units = cylinders of 945 * 512 = 483840 bytes
Device Boot Start End Blocks Id System
/dev/hda1 1 104 49108+ 83 Linux
/dev/hda2 105 1163 500377+ 83 Linux
Command (m for help): w
The partition table has been altered!
Calling ioctl() to re-read partition table.
Syncing disks.
[root@CentOS5 test]# partprobe /dev/hda # 通知内核重读分区信息
[root@CentOS5 test]# cat /proc/partitions # 查看内核当前已识别的分区信息
major minor #blocks name
3 0 20971520 hda
3 1 49108 hda1
3 2 500377 hda2
8 0 20971520 sda
8 1 104391 sda1
8 2 20860402 sda2
253 0 18776064 dm-0
253 1 2064384 dm-1
[root@CentOS5 test]# mke2fs -j /dev/hda1 # 格式化/dev/hda1为ext3文件系统
mke2fs 1.39 (29-May-2006)
Filesystem label=
OS type: Linux
Block size=1024 (log=0)
Fragment size=1024 (log=0)
12288 inodes, 49108 blocks
2455 blocks (5.00%) reserved for the super user
First data block=1
Maximum filesystem blocks=50331648
6 block groups
8192 blocks per group, 8192 fragments per group
2048 inodes per group
Superblock backups stored on blocks:
8193, 24577, 40961
Writing inode tables: done
Creating journal (4096 blocks): done
Writing superblocks and filesystem accounting information: done
This filesystem will be automatically checked every 28 mounts or
180 days, whichever comes first. Use tune2fs -c or -i to override.
[root@CentOS5 test]# mke2fs -j /dev/hda2 # 格式化/dev/hda2为ext3文件系统
mke2fs 1.39 (29-May-2006)
Filesystem label=
OS type: Linux
Block size=1024 (log=0)
Fragment size=1024 (log=0)
125488 inodes, 500376 blocks
25018 blocks (5.00%) reserved for the super user
First data block=1
Maximum filesystem blocks=67633152
62 block groups
8192 blocks per group, 8192 fragments per group
2024 inodes per group
Superblock backups stored on blocks:
8193, 24577, 40961, 57345, 73729, 204801, 221185, 401409
Writing inode tables: done
Creating journal (8192 blocks): done
Writing superblocks and filesystem accounting information: done
This filesystem will be automatically checked every 29 mounts or
180 days, whichever comes first. Use tune2fs -c or -i to override.
[root@CentOS5 test]# mount /dev/hda1 /mnt/boot/ # 挂载/dev/hda1至/mnt/boot
[root@CentOS5 test]# mount /dev/hda2 /mnt/sysroot/ # 挂载/dev/hda2至/mnt/sysroot
[root@CentOS5 test]# tree /mnt/ # 可以看到此时已成功挂载
/mnt/
|-- boot
| `-- lost+found
`-- sysroot
`-- lost+found
4 directories, 0 files
二、提供内核
1、完全编译[root@soysauce tmp]# ls
busybox-1.23.2 busybox-1.23.2.tar.bz2 linux-2.6.39 linux-2.6.39.tar
[root@soysauce tmp]# mv linux-2.6.39 /usr/src/
[root@soysauce tmp]# cd /usr/src/
[root@soysauce src]# ln -sv linux-
linux-2.6.39/ linux-4.2.6/
[root@soysauce src]# ln -sv linux-2.6.39/ linux
create symbolic link `linux/linux-2.6.39' to `linux-2.6.39/'
[root@soysauce linux]# make
[root@soysauce linux]# make modules_install
[root@soysauce linux]# make install
[root@soysauce linux]# cp arch/x86/boot/bzImage /mnt/boot/vmlinuz
2、部分编译
(1)、只编译某子目录下的相关代码make dir/
make arch/
make drivers/net/
(2)、只编译部分模块make M=drivers/net/
(3)、只编译某一模块
make drivers/net/pcnet32.ko
(4)、将编译完成的结果放置于别的目录中
make O=/tmp/kernel
(5)、交叉编译make ARCH=
3、二次编译时清理,清理前,如果有需要,请备份配置文件.config
make clean
make mrproper
三、编译安装busybox
1、解压源码包并执行make menuconfig[root@soysauce tmp]# ls
busybox-1.23.2.tar.bz2 linux-2.6.39 linux-2.6.39.tar.xz
[root@soysauce tmp]# tar xf busybox-1.23.2.tar.bz2 # 解压busybox源码包
[root@soysauce tmp]# cd busybox-1.23.2 # 进入busybox源码目录
[root@soysauce busybox-1.23.2]# make menuconfig # 定义编译特性,打开图形化窗口
HOSTCC scripts/basic/fixdep
HOSTCC scripts/basic/split-include
HOSTCC scripts/basic/docproc
GEN include/applets.h
GEN include/usage.h
GEN networking/Kbuild
GEN networking/Config.in
GEN networking/libiproute/Kbuild
GEN networking/udhcp/Kbuild
GEN networking/udhcp/Config.in
GEN applets/Kbuild
GEN shell/Kbuild
GEN shell/Config.in
GEN archival/Kbuild
GEN archival/Config.in
GEN archival/libarchive/Kbuild
GEN runit/Kbuild
GEN runit/Config.in
GEN console-tools/Kbuild
GEN console-tools/Config.in
GEN selinux/Kbuild
GEN selinux/Config.in
GEN editors/Kbuild
GEN editors/Config.in
GEN coreutils/Kbuild
GEN coreutils/Config.in
GEN coreutils/libcoreutils/Kbuild
GEN e2fsprogs/Kbuild
GEN e2fsprogs/Config.in
GEN e2fsprogs/old_e2fsprogs/Kbuild
GEN e2fsprogs/old_e2fsprogs/Config.in
GEN e2fsprogs/old_e2fsprogs/e2p/Kbuild
GEN e2fsprogs/old_e2fsprogs/ext2fs/Kbuild
GEN e2fsprogs/old_e2fsprogs/blkid/Kbuild
GEN e2fsprogs/old_e2fsprogs/uuid/Kbuild
GEN findutils/Kbuild
GEN findutils/Config.in
GEN util-linux/Kbuild
GEN util-linux/Config.in
GEN util-linux/volume_id/Kbuild
GEN util-linux/volume_id/Config.in
GEN procps/Kbuild
GEN procps/Config.in
GEN modutils/Kbuild
GEN modutils/Config.in
GEN sysklogd/Kbuild
GEN sysklogd/Config.in
GEN loginutils/Kbuild
GEN loginutils/Config.in
GEN debianutils/Kbuild
GEN debianutils/Config.in
GEN libbb/Kbuild
GEN libbb/Config.in
GEN scripts/Kbuild
GEN miscutils/Kbuild
GEN miscutils/Config.in
GEN mailutils/Kbuild
GEN mailutils/Config.in
GEN printutils/Kbuild
GEN printutils/Config.in
GEN libpwdgrp/Kbuild
GEN init/Kbuild
GEN init/Config.in
HOSTCC scripts/kconfig/conf.o
HOSTCC scripts/kconfig/kxgettext.o
HOSTCC scripts/kconfig/mconf.o
SHIPPED scripts/kconfig/zconf.tab.c
SHIPPED scripts/kconfig/lex.zconf.c
SHIPPED scripts/kconfig/zconf.hash.c
HOSTCC scripts/kconfig/zconf.tab.o
HOSTLD scripts/kconfig/mconf
HOSTCC scripts/kconfig/lxdialog/checklist.o
HOSTCC scripts/kconfig/lxdialog/inputbox.o
HOSTCC scripts/kconfig/lxdialog/lxdialog.o
HOSTCC scripts/kconfig/lxdialog/menubox.o
HOSTCC scripts/kconfig/lxdialog/msgbox.o
HOSTCC scripts/kconfig/lxdialog/textbox.o
HOSTCC scripts/kconfig/lxdialog/util.o
HOSTCC scripts/kconfig/lxdialog/yesno.o
HOSTLD scripts/kconfig/lxdialog/lxdialog
scripts/kconfig/mconf Config.in
#
# using defaults found in /dev/null
#
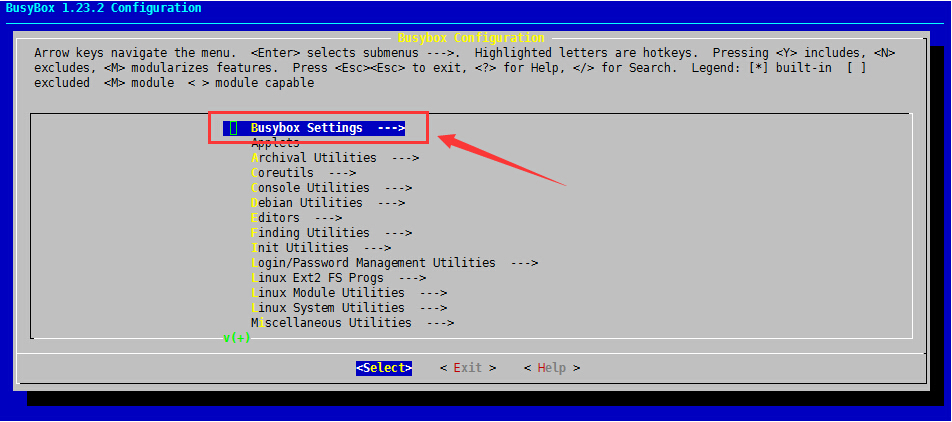
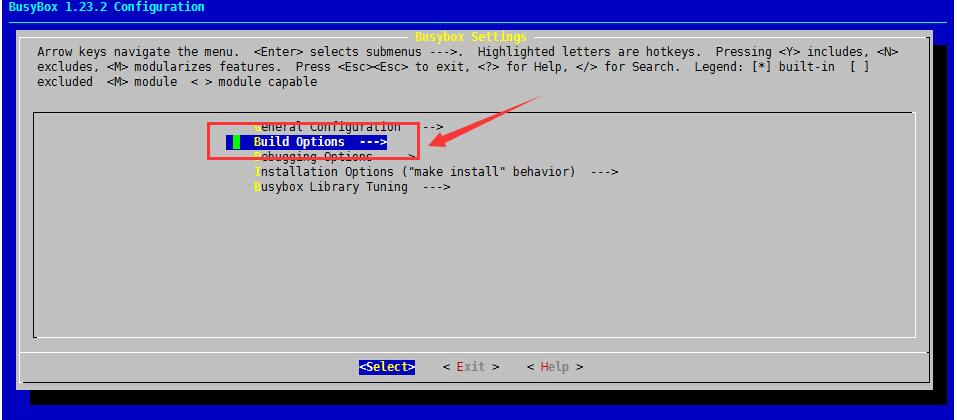
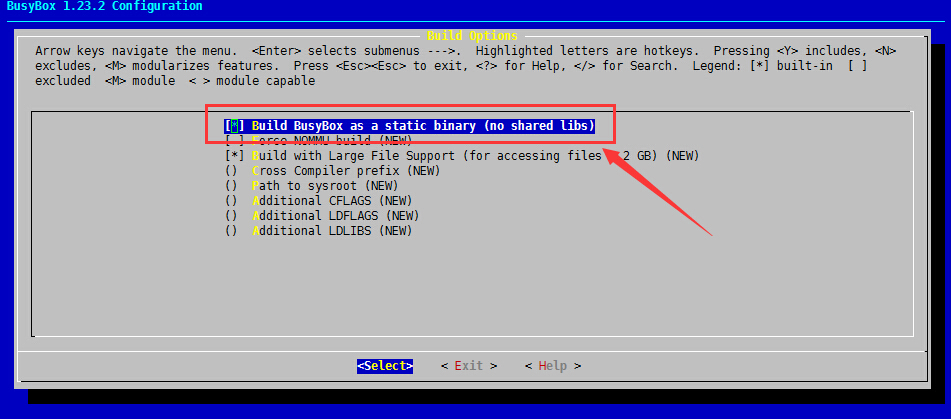
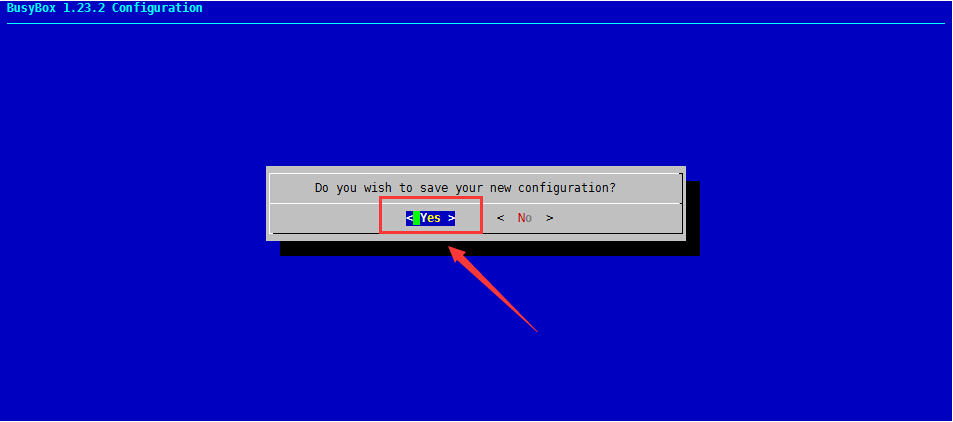
2、busybox编译方式修改
(1)、先选择Busybox Settings,回车即可
(2)、选择Build Options,回车即可
(3)、选择以静态库方式编译,敲一下空格让前面中括号里面为*即可
(4)、一直按ESC键即可退出,然后保存设置,其他选项修改可自定义
3、安装busybox[root@soysauce busybox-1.23.2]# make install # 篇幅原因,故只取报错部分,因为依赖新内核的头文件
CC miscutils/ubi_tools.o
miscutils/ubi_tools.c:67:26: error: mtd/ubi-user.h: No such file or directory
miscutils/ubi_tools.c: In function ‘ubi_tools_main’:
miscutils/ubi_tools.c:106: error: ‘UBI_DEV_NUM_AUTO’ undeclared (first use in this function)
miscutils/ubi_tools.c:106: error: (Each undeclared identifier is reported only once
miscutils/ubi_tools.c:106: error: for each function it appears in.)
miscutils/ubi_tools.c:107: error: ‘UBI_VOL_NUM_AUTO’ undeclared (first use in this function)
miscutils/ubi_tools.c:114: error: field ‘attach_req’ has incomplete type
miscutils/ubi_tools.c:115: error: field ‘mkvol_req’ has incomplete type
miscutils/ubi_tools.c:116: error: field ‘rsvol_req’ has incomplete type
miscutils/ubi_tools.c:177: error: ‘UBI_IOCATT’ undeclared (first use in this function)
miscutils/ubi_tools.c:190: error: ‘UBI_IOCDET’ undeclared (first use in this function)
miscutils/ubi_tools.c:233: error: ‘UBI_DYNAMIC_VOLUME’ undeclared (first use in this function)
miscutils/ubi_tools.c:235: error: ‘UBI_STATIC_VOLUME’ undeclared (first use in this function)
miscutils/ubi_tools.c:238: error: ‘UBI_MAX_VOLUME_NAME’ undeclared (first use in this function)
miscutils/ubi_tools.c:243: error: ‘UBI_IOCMKVOL’ undeclared (first use in this function)
miscutils/ubi_tools.c:256: error: ‘UBI_IOCRMVOL’ undeclared (first use in this function)
miscutils/ubi_tools.c:274: error: ‘UBI_IOCRSVOL’ undeclared (first use in this function)
miscutils/ubi_tools.c:290: error: ‘UBI_IOCVOLUP’ undeclared (first use in this function)
make[1]: *** [miscutils/ubi_tools.o] Error 1
make: *** [miscutils] Error 2
[root@soysauce busybox-1.23.2]# mkdir include/mtd # 拷贝新内核版本的一个头文件至此目录即可
[root@soysauce busybox-1.23.2]# cp ../linux-2.6.39/include/mtd/ubi-user.h include/mtd/
[root@soysauce busybox-1.23.2]# make install # 篇幅原因,故只取后面安装过程
./_install//usr/sbin/ubirsvol -> ../../bin/busybox
./_install//usr/sbin/ubiupdatevol -> ../../bin/busybox
./_install//usr/sbin/udhcpd -> ../../bin/busybox
--------------------------------------------------
You will probably need to make your busybox binary
setuid root to ensure all configured applets will
work properly.
--------------------------------------------------
四、制作initrd
1、拷贝busybox安装之后生成的_install目录至/tmp/test[root@soysauce busybox-1.23.2]# mkdir /tmp/busyinit # 创建此目录用于创建initrd
[root@soysauce busybox-1.23.2]# cp -a _install/ /tmp/busyinit # 保留所有
[root@soysauce busybox-1.23.2]# cd /tmp/busyinit
[root@soysauce busyinit]# ls
bin linuxrc sbin usr
[root@soysauce busyinit]# rm -f linuxrc # 没有的链接可以删除
2、建立rootfs[root@soysauce busyinit]# mkdir -pv proc sys dev etc/rc.d/init.d tmp lib mnt/sysroot
mkdir: created directory `proc'
mkdir: created directory `sys'
mkdir: created directory `dev'
mkdir: created directory `etc'
mkdir: created directory `etc/rc.d'
mkdir: created directory `etc/rc.d/init.d'
mkdir: created directory `tmp'
mkdir: created directory `lib'
mkdir: created directory `mnt'
mkdir: created directory `mnt/sysroot'
[root@soysauce busyinit]# ls
bin dev etc lib mnt proc sbin sys tmp usr
3、创建两个必要的设备文件[root@soysauce busyinit]# pwd
[root@soysauce busyinit]# mknod dev/console c 5 1
[root@soysauce busyinit]# mknod dev/null c 1 3
[root@soysauce busyinit]# tree dev/
dev/
|-- console
`-- null
0 directories, 2 files
4、为initrd制作init程序,此程序的主要任务是实现rootfs的切换,脚本实现[root@soysauce busyinit]# vim init # 创建init文件并添加如下内容
[root@soysauce busyinit]# cat init
#!/bin/sh
#
echo "Mounting proc and sys..."
mount -t proc proc /proc
mount -t sysfs sysfs /sys
echo "Loading jbd,ko and ext3.ko..."
insmod /lib/modules/jbd.ko
insmod /lib/modules/ext3.ko
echo "Scaning the hardware information..."
mdev -s
echo "Mounting the real rootfs..."
mount -t ext3 /dev/hda2 /mnt/sysroot
exec switch_root /mnt/sysroot /sbin/init
[root@soysauce busyinit]# chmod +x init # 给脚本添加可执行权限
5、拷贝jbd模块和ext3模块(如果ext3模块已经编译进内核,则此步可省)[root@soysauce busyinit]# mkdir lib/modules/
[root@soysauce busyinit]# modinfo jbd # 查看jdb模块的相关信息
filename: /lib/modules/2.6.18-308.el5/kernel/fs/jbd/jbd.ko
license: GPL
srcversion: 11842879E04FE2392B988CC
depends:
vermagic: 2.6.18-308.el5 SMP mod_unload gcc-4.1
module_sig:883f3504f44471a48d0a1fbae482c4c11291709e30dee9dc797f252349a5d6942c86133b252488f09d1f81bede58e78df45a8fcb29bac6f42c84f6d0
[root@soysauce busyinit]# modinfo ext3 # 查看ext3模块的相关信息
filename: /lib/modules/2.6.18-308.el5/kernel/fs/ext3/ext3.ko
license: GPL
description: Second Extended Filesystem with journaling extensions
author: Remy Card, Stephen Tweedie, Andrew Morton, Andreas Dilger, Theodore Ts'o and others
srcversion: 26DC008FC415305C5F65313
depends: jbd
vermagic: 2.6.18-308.el5 SMP mod_unload gcc-4.1
module_sig:883f3504f44471a48d0a1fbae482c4c112ea5b09f41851dad45dd445dcfb23e95fff97f19ab59e5909cd6e1f686761927393b8c58fec7726e7fc21a3
[root@soysauce busyinit]# pwd
/tmp/busyinit
[root@soysauce busyinit]# cp /lib/modules/2.6.18-308.el5/kernel/fs/jbd/jbd.ko lib/modules
[root@soysauce busyinit]# cp /lib/modules/2.6.18-308.el5/kernel/fs/ext3/ext3.ko lib/modules
6、制作initrd[root@soysauce busyinit]# find . | cpio -H newc --quiet -o | gzip -9 > /mnt/boot/initrd.gz # cpio打包
五、建立真正的根文件系统
1、拷贝busybox安装之后生成的_install目录至/mnt/sysroot[root@soysauce busyinit]# cd /mnt/sysroot/
[root@soysauce sysroot]# ls
lost+found
[root@soysauce sysroot]# cp -a /tmp/busybox-1.23.2/_install/* ./
[root@soysauce sysroot]# rm -f linuxrc # 没有的链接可以删除
[root@soysauce sysroot]# ls
bin lost+found sbin usr
2、建立rootfs[root@soysauce sysroot]# mkdir -pv dev sys proc etc/rc.d/init.d root boot var/{log,lock,run} tmp mnt/sysroot media home lib
mkdir: created directory `dev'
mkdir: created directory `sys'
mkdir: created directory `proc'
mkdir: created directory `etc'
mkdir: created directory `etc/rc.d'
mkdir: created directory `etc/rc.d/init.d'
mkdir: created directory `root'
mkdir: created directory `boot'
mkdir: created directory `var'
mkdir: created directory `var/log'
mkdir: created directory `var/lock'
mkdir: created directory `var/run'
mkdir: created directory `tmp'
mkdir: created directory `mnt'
mkdir: created directory `mnt/sysroot'
mkdir: created directory `media'
mkdir: created directory `home'
mkdir: created directory `lib'
[root@soysauce sysroot]# ls
bin boot dev etc home lib lost+found media mnt proc root sbin sys tmp usr var
3、创建两个必要的设备文件[root@soysauce sysroot]# mknod dev/console c 5 1
[root@soysauce sysroot]# mknod dev/null c 1 3 # 与前面制作initrd时指定的主次设备号要一致
[root@soysauce sysroot]# tree dev/
dev/
|-- console
`-- null
0 directories, 2 files
4、配置init及其所需要inittab文件[root@soysauce sysroot]# vim etc/inittab
[root@soysauce sysroot]# cat etc/inittab
::sysinit:/etc/rc.d/rc.sysinit
::respawn:/sbin/getty 9600 tty1
::respawn:/sbin/getty 9600 tty2
::ctrlaltdel:/sbin/reboot
::shutdown:/bin/umount -a -r
5、建立系统初始化脚本文件/etc/rc.d/rc.sysinit[root@soysauce sysroot]# vim etc/rc.d/init.d/rc.sysinit
[root@soysauce sysroot]# cat etc/rc.d/init.d/rc.sysinit
#!/bin/sh
#
echo -e "\tWelcome to \033[31mMy Little\033[0m Linux"
echo -e "Remounting the root filesystem ..."
mount -t proc proc /proc
mount -t sysfs sysfs /sys
mount -o remount,rw /
echo -e "Creating the files of device ..."
mdev -s
echo -e "Mounting the filesystem ..."
mount -a
[root@soysauce sysroot]# chmod +x etc/rc.d/init.d/rc.sysinit # 添加可执行权限
6、为系统准备一个“文件系统表”配置文件/etc/fstab[root@soysauce sysroot]# vim etc/fstab
[root@soysauce sysroot]# cat etc/fstab
/dev/hda1 /boot ext3 defaults 0 0
/dev/hda2 / ext3 defaults 0 0
sysfs /sys sysfs defaults 0 0
proc /proc proc defaults 0 0
六、安装Grub
1、安装grub引导程序[root@soysauce sysroot]# grub-install --root-directory=/mnt/ /dev/hda # 指定的目录为boot的父目录
Installation finished. No error reported.
This is the contents of the device map /mnt//boot/grub/device.map.
Check if this is correct or not. If any of the lines is incorrect,
fix it and re-run the script `grub-install'.
(fd0)/dev/fd0
(hd0)/dev/hda
(hd1)/dev/sda
2、添加grub.conf配置文件
[root@soysauce sysroot]# cd /mnt/boot/
[root@soysauce boot]# ls
grub initrd.gz lost+found vmlinuz
[root@soysauce boot]# cd grub/ # 进入grub目录
[root@soysauce grub]# pwd
/mnt/boot/grub
[root@soysauce grub]# vim grub.conf
[root@soysauce grub]# cat grub.conf
default=0
timeout=2
title My Test Linux
root (hd0,0)
kernel /vmlinuz
initrd /initrd.gz
[root@soysauce grub]# sync # 同步一下,然后将/dev/hda这块磁盘装到另一个主机上即可启动
七、添加用户登录功能和日志功能[root@soysauce ~]# cd /mnt/sysroot/etc/
[root@soysauce etc]# grep "^root" /etc/passwd > ./passwd # 为用户认证提供配置文件
[root@soysauce etc]# grep "^root" /etc/shadow > ./shadow
[root@soysauce etc]# grep "^root" /etc/group > ./group
[root@soysauce sysroot]# pwd
/mnt/sysroot
[root@soysauce sysroot]# vim etc/syslog.conf # 为syslog服务提供配置文件
[root@soysauce sysroot]# cat etc/syslog.conf
*.info;auth.none /var/log/messages
auth.* /var/log/secure
[root@soysauce sysroot]# touch var/log/secure
[root@soysauce sysroot]# chmod 600 var/log/secure
[root@soysauce sysroot]# ll var/log/secure
-rw------- 1 root root 0 Dec 6 23:40 var/log/secure
[root@soysauce sysroot]# vim etc/rc.d/rc.sysinit
[root@soysauce sysroot]# cat etc/rc.d/rc.sysinit
#!/bin/sh
#
echo -e "\tWelcome to \033[31mMy Little\033[0m Linux"
echo -e "Remounting the root filesystem ..."
mount -t proc proc /proc
mount -t sysfs sysfs /sys
mount -o remount,rw /
echo -e "Creating the files of device ..."
mdev -s
echo -e "Mounting the filesystem ..."
mount -a
syslogd # 启动syslogd和klogd服务来记录日志
klogd
echo "Set the hostname for the system..."
[ -f /etc/hostname ] && . /etc/hostname
[ -z $HOSTNAME -o $HOSTNAME == '(none)' ] && HOSTNAME=soysauce
hostname $HOSTNAME
八、添加banner信息和主机名[root@soysauce sysroot]# pwd
/mnt/sysroot
[root@soysauce sysroot]# ls
bin boot dev etc home lib lib64 lost+found media mnt proc root sbin sys tmp usr var
[root@soysauce sysroot]# cp /etc/issue etc/
[root@soysauce sysroot]# vim etc/issue
[root@soysauce sysroot]# cat etc/issue # 提供banner信息
My Little Linux
Kernel \r on an \m
[root@soysauce sysroot]# sync
[root@soysauce sysroot]# pwd
/mnt/sysroot
[root@soysauce sysroot]# ls
bin boot dev etc home lib lib64 lost+found media mnt proc root sbin sys tmp usr var
[root@soysauce sysroot]# vim etc/hostname
[root@soysauce sysroot]# cat etc/hostname # 提供主机名
HOSTNAME=soysauce
[root@soysauce sysroot]# vim etc/rc.d/rc.sysinit
[root@soysauce sysroot]# tail -4 etc/rc.d/rc.sysinit
echo "Set the hostname for the system..."
[ -f /etc/hostname ] && . /etc/hostname
[ -z $HOSTNAME -o $HOSTNAME == '(none)' ] && HOSTNAME=soysauce
hostname $HOSTNAME
[root@soysauce sysroot]# sync
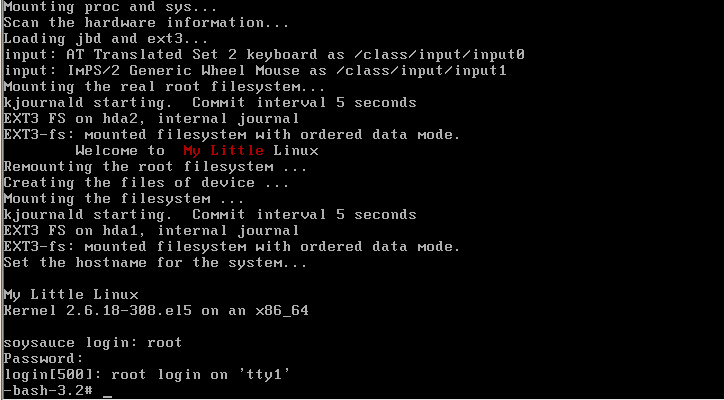
至此,一个不到10M的Mini Linux便出来了。启动成功之后如下
注:我是移植了bash替换了busybox自身提供的sh,所以如果你也是习惯bash,那么可以使用我下面那个复制命令及依赖库的脚本进行移植即可
补充相关命令
1、lddldd - print shared library dependencies # 显示共享库依赖关系
SYNOPSIS
ldd [OPTION]... FILE...
[root@soysauce scripts]# ldd /sbin/init # 显示/sbin/init所依赖的库文件路径
linux-vdso.so.1 => (0x00007fff6f1ea000)
libsepol.so.1 => /lib64/libsepol.so.1 (0x0000003484e00000)
libselinux.so.1 => /lib64/libselinux.so.1 (0x0000003482800000)
libc.so.6 => /lib64/libc.so.6 (0x000000347e800000)
libdl.so.2 => /lib64/libdl.so.2 (0x000000347ec00000)
/lib64/ld-linux-x86-64.so.2 (0x000000347e400000)
[root@soysauce scripts]# ldd /bin/bash # 显示/bin/bash所依赖的库文件路径
linux-vdso.so.1 => (0x00007fff24695000)
libtermcap.so.2 => /lib64/libtermcap.so.2 (0x000000347f000000)
libdl.so.2 => /lib64/libdl.so.2 (0x000000347ec00000)
libc.so.6 => /lib64/libc.so.6 (0x000000347e800000)
/lib64/ld-linux-x86-64.so.2 (0x000000347e400000)
2、mktempmktemp - make temporary filename (unique) # 生成唯一的临时文件或目录
SYNOPSIS
mktemp [-V] | [-dqtu] [-p directory] [template]
-d:生成临时目录
[root@soysauce testbin]# ls
[root@soysauce testbin]# mktemp ./file.XX # 后缀为2位随机数的文件,注意X必须为大写
./file.00
[root@soysauce testbin]# mktemp ./file.XXXXX # 后缀为5位随机数的文件
./file.s9601
[root@soysauce testbin]# mktemp ./file.XXXXXXXXXX # 后缀为10位随机数的文件
./file.bJfocr9602
[root@soysauce testbin]# mktemp ./file.XXXXXXXXXXXXXX # 后缀为14位随机数的文件
./file.HqGoTLDPpL9603
[root@soysauce testbin]# mktemp -d ./file.XXXXXXXXXXXXXX # 后缀为14位随机数的目录
./file.MbAeMTEbMG9607
[root@soysauce testbin]# ll
total 24
-rw------- 1 root root 0 Dec 6 11:02 file.00
-rw------- 1 root root 0 Dec 6 11:02 file.bJfocr9602
-rw------- 1 root root 0 Dec 6 11:02 file.HqGoTLDPpL9603
drwx------ 2 root root 4096 Dec 6 11:03 file.MbAeMTEbMG9607
-rw------- 1 root root 0 Dec 6 11:02 file.s9601
3、mknodmknod - make block or character special files # 创建字符设备或是块设备
SYNOPSIS
mknod [OPTION]... NAME TYPE [MAJOR MINOR]
[root@CentOS5 ~]# mknod /dev/console c 5 1 # 主设备号为5,次设备号为1
[root@CentOS5 ~]# mknod /dev/null c 1 3 # 主设备号为1,次设备号为3
4、unameuname - print system information # 显示系统信息
SYNOPSIS
uname [OPTION]...
[root@soysauce testbin]# uname -a
Linux soysauce 2.6.18-308.el5 #1 SMP Tue Feb 21 20:06:06 EST 2012 x86_64 x86_64 x86_64 GNU/Linux
[root@soysauce testbin]# uname # 同uanme -s,显示内核名称
Linux
[root@soysauce testbin]# uname -n # 显示主机名
soysauce
[root@soysauce testbin]# uname -r # 显示内核release
2.6.18-308.el5
[root@soysauce testbin]# uname -v # 显示内核版本
#1 SMP Tue Feb 21 20:06:06 EST 2012
[root@soysauce testbin]# uname -m # 显示机器硬件架构
x86_64
[root@soysauce testbin]# uname -o # 显示操作系统类型
GNU/Linux
5、mkinitrdmkinitrd - creates initial ramdisk p_w_picpaths for preloading modules # 创建ramdisk磁盘映像文件
SYNOPSIS
mkinitrd [--version] [-v] [-f]
[--preload=module] [--omit-scsi-modules]
[--omit-raid-modules] [--omit-lvm-modules]
[--with=module] [--p_w_picpath-version]
[--fstab=fstab] [--nocompress]
[--builtin=module] [--nopivot]
[--with-fips]
p_w_picpath kernel-version
mkinitrd /boot/initrd-`uname -r`.img `uname -r`
[root@soysauce testbin]# mkinitrd ./initrd-`uname -r`.img `uname -r`
[root@soysauce testbin]# ls
initrd-2.6.18-308.el5.img
6、复制二进制文件及其依赖库文件的脚本[root@soysauce ~]# cat bincp.sh
#!/bin/bash
# Date:2015-12-3 21:37:15
# Author: soysauce
# Description: copy the libraries needed by binary file
# Version: 1.0
VirRoot=/mnt/sysroot
function bincp {
ComPath=`which $COM | grep -v "^alias" | awk -F' ' '{print $1}'`
[ -e $VirRoot${ComPath%/*} ] || mkdir -p $VirRoot${ComPath%/*}
if [ ! -e $VirRoot$ComPath ]; then
cp $ComPath $VirRoot$ComPath
fi
}
function libcp {
LibPath=`ldd $ComPath | egrep -o "/.*lib(64){0,1}/[^[:space:]]+"`
for Lib in $LibPath; do
[ -e $VirRoot${Lib%/*} ] || mkdir -p $VirRoot${Lib%/*}
if [ ! -e $VirRoot$Lib ]; then
cp $Lib $VirRoot$Lib
fi
done
}
echo -en "\e[31mPlease input the command:\e[0m "
read COM
until [[ $COM == 'quit' ]]; do
if which $COM &> /dev/null; then
bincp && [ $? -eq 0 ] && echo "Copy $ComPath finished." || echo "$ComPath exists."
libcp && [ $? -eq 0 ] && echo "Copy The Lib of $ComPath finished." || echo "The Lib of $ComPath exists."
else
echo "No Such Command."
fi
echo -en "\e[31mPlease input the command again:\e[0m "
read COM
done
[root@soysauce ~]# ./bincp.sh
Please input the command: ls
Copy /bin/ls finished.
Copy The Lib of /bin/ls finished.
Please input the command again: man
Copy /usr/bin/man finished.
Copy The Lib of /usr/bin/man finished.
Please input the command again:
No Such Command.
Please input the command again: which
Copy /usr/bin/which finished.
Copy The Lib of /usr/bin/which finished.
Please input the command again: grep
Copy /bin/grep finished.
Copy The Lib of /bin/grep finished.
Please input the command again: sssfda
No Such Command.
Please input the command again: quit
总结:要拼凑一个Linux,至少要提供以下四个
①提供grub
②提供内核
③提供initrd
④提供根文件系统


 1万+
1万+


 被折叠的 条评论
为什么被折叠?
被折叠的 条评论
为什么被折叠?
 到【灌水乐园】发言


