


本文实例为大家分享了Android实现仪表盘效果的具体代码,供大家参考,具体内容如下
仪表盘效果,圆弧可变色,效果图如下:
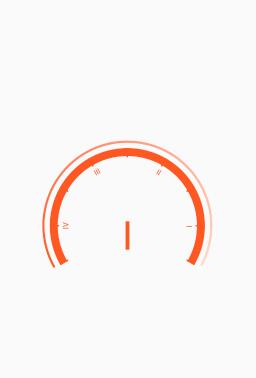
通过自定义view实现,代码如下:
public class DashboardView extends View {
private int mRadius; // 画布边缘半径(去除padding后的半径)
private int mStartAngle = 150; // 起始角度
private int mSweepAngle = 240; // 绘制角度
private int mMin = 1; // 最小值
private int mMax = 8; // 最大值
private int mSection = 8; // 值域(mMax-mMin)等分份数
private int mPortion = 3; // 一个mSection等分份数
private String mHeaderText = ""; // 表头
private int mCreditValue = (int) 8.12; // 信用分
private int mSolidCreditValue = mCreditValue; // 信用分(设定后不变)
private int mSparkleWidth; // 亮点宽度
private int mProgressWidth; // 进度圆弧宽度
private float mLength1; // 刻度顶部相对边缘的长度
private int mCalibrationWidth; // 刻度圆弧宽度
private float mLength2; // 刻度读数顶部相对边缘的长度
private int mPadding;
private float mCenterX, mCenterY; // 圆心坐标
private Paint mPaint;
private RectF mRectFProgressArc;
private RectF mRectFCalibrationFArc;
private RectF mRectFTextArc;
private Path mPath;
private Rect mRectText;
private String[] mTexts;
private int mBackgroundColor;
private int[] mBgColors;
private boolean isAnimFinish = true;
private float mAngleWhenAnim;
public DashboardView(Context context) {
this(context, null);
}
public DashboardView(Context context, AttributeSet attrs) {
this(context, attrs, 0);
}
public DashboardView(Context context, AttributeSet attrs, int defStyleAttr) {
super(context, attrs, defStyleAttr);
init();
}
private void init() {
mSparkleWidth = dp2px(10);
mProgressWidth = dp2px(3);
mCalibrationWidth = dp2px(10);
mPaint = new Paint();
mPaint.setAntiAlias(true);
mPaint.setStrokeCap(Paint.Cap.ROUND);
mRectFProgressArc = new RectF();
mRectFCalibrationFArc = new RectF();
mRectFTextArc = new RectF();
mPath = new Path();
mRectText = new Rect();
mTexts = new String[]{"", "Ⅳ", "", "Ⅲ", "", "Ⅱ", "", "Ⅰ", ""};
mBgColors = new int[]{ContextCompat.getColor(getContext(), R.color.color_red),
ContextCompat.getColor(getContext(), R.color.color_orange),
ContextCompat.getColor(getContext(), R.color.color_yellow),
ContextCompat.getColor(getContext(), R.color.color_green),
ContextCompat.getColor(getContext(), R.color.color_blue)};
mBackgroundColor = mBgColors[0];
}
@Override
protected void onMeasure(int widthMeasureSpec, int heightMeasureSpec) {
super.onMeasure(widthMeasureSpec, heightMeasureSpec);
mPadding = Math.max(
Math.max(getPaddingLeft(), getPaddingTop()),
Math.max(getPaddingRight(), getPaddingBottom())
);
setPadding(mPadding, mPadding, mPadding, mPadding);
mLength1 = mPadding + mSparkleWidth / 2f + dp2px(8);
mLength2 = mLength1 + mCalibrationWidth + dp2px(1) + dp2px(5);
int width = resolveSize(dp2px(220), widthMeasureSpec);
mRadius = (width - mPadding * 2) / 2;
setMeasuredDimension(width, width - dp2px(30));
mCenterX = mCenterY = getMeasuredWidth() / 2f;
mRectFProgressArc.set(
mPadding + mSparkleWidth / 2f,
mPadding + mSparkleWidth / 2f,
getMeasuredWidth() - mPadding - mSparkleWidth / 2f,
 最低0.47元/天 解锁文章


 1451
1451


 被折叠的 条评论
为什么被折叠?
被折叠的 条评论
为什么被折叠?
 到【灌水乐园】发言


