


简介:
Google在android 4.3(API Level 18)的android版本中引入了低功耗蓝牙BLE核心API。低功耗蓝牙BLE也就是我们经常说的蓝牙4.0。
BLE区别于经典蓝牙,有搜索、连接的速度更快、低能耗的优点;缺点是传输的速度慢,传输的数据量也很小,每次只有20个字节。
1.协议
BLE遵循GATT协议,经典蓝牙遵循GAP协议。
GATT协议:
GATT(Generic Attribute Profile):全称叫做通用属性配置文件,是基于ATT做进一步的逻辑封装,定义数据的交互方式和含义,APP的开发其实就已经接触到这一层了。
BLE协议栈的结构,如下:

转载地址: Android-BLE蓝牙原理
我们需要主要关注的是GATT的结构, 下文中会详细叙述。
GAP协议:
GAP(Generic Access Profile):通用访问控制配置文件。
标准蓝牙连接里有两个角色一个是客户端一个是服务器,当客户端搜索到蓝牙服务器后并与之配对后,才能通过UUID(这个是唯一的,服务器端必须与客户端一致)建立socket,然后使用流像文件读写和网络通信那样传输数据就行了。
2.双模设备
BLE设备分单模和双模两种。
双模简称BR,商标为Bluetooth Smart Ready,单模简称BLE或者LE,商标为Bluetooth Smart。Android是在4.3后才支持BLE,这可以解释不是所有蓝牙手机都支持BLE,而且支持BLE的蓝牙手机一般是双模的。
3.实现原理
4.应用场景
智能手环、手表、android ios互通。
开发:
1.添加manifest权限
正常需要如下4个权限:
<!--声明蓝牙权限-->
    <uses-permission android:name="android.permission.BLUETOOTH" />
    <uses-permission android:name="android.permission.BLUETOOTH_ADMIN" />
    <uses-permission android:name="android.permission.ACCESS_COARSE_LOCATION" />
    <uses-permission android:name="android.permission.ACCESS_FINE_LOCATION" />
还有一个额外的权限,作用是“允许应用程序在没有用户交互的情况下配对蓝牙设备,并允许或禁止电话簿访问或消息访问”
应该只有系统才能获得这个权限。
<uses-permission android:name="android.permission.BLUETOOTH_PRIVILEGED" />
蓝牙的权限是Normal级,位置权限是Dangerous级权限。
6.0以上的手机系统,需要申请位置权限。
2.动态申请权限
ACCESS_COARSE_LOCATION:允许一个程序访问CellID或WiFi热点来获取粗略的位置
ACCESS_FINE_LOCATION:允许一个程序访问精良位置(如GPS)
    String[] mapPermission = {
            Manifest.permission.ACCESS_COARSE_LOCATION,
            Manifest.permission.ACCESS_FINE_LOCATION,
    };

        new RxPermissions(activity).request(Constant.mapPermission).subscribe(new Consumer<Boolean>() {
            @Override
            public void accept(Boolean aBoolean) throws Exception {
                if (aBoolean) {

                } else {

                }
            }
        });
注意:若无授权,移动端不能使用完整的功能,尽管不影响打开蓝牙功能,但蓝牙的设备搜索功能是没有办法使用的。
3.开启蓝牙
开启蓝牙前需要先判断:1.设备是否支持蓝牙功能;2.蓝牙功能是否开启;3.没有开启蓝牙功能,在开启蓝牙或者跳转到蓝牙。
蓝牙地址格式:AA:AA:AA:AA:AA:AA
一共17位
1.设备是否支持蓝牙功能
FEATURE_BLUETOOTH 是基础蓝牙
FEATURE_BLUETOOTH_LE 是BLE蓝牙
	if(context.getPackageManager().hasSystemFeature(PackageManager.FEATURE_BLUETOOTH_LE)){
		//包含BLE蓝牙
	}
2.判断蓝牙功能是否开启
    BluetoothManager bluetoothManager= (BluetoothManager) getSystemService(Context.BLUETOOTH_SERVICE);
    BluetoothAdapter mBluetoothAdapter = bluetoothManager.getAdapter();
    if (mBluetoothAdapter != null && !mBluetoothAdapter.isEnabled()) {
		//蓝牙没有开启
    }
3.开启蓝牙功能
低版本android会静默打开蓝牙:
    BluetoothManager bluetoothManager= (BluetoothManager) getSystemService(Context.BLUETOOTH_SERVICE);
    BluetoothAdapter mBluetoothAdapter = bluetoothManager.getAdapter();
    if (mBluetoothAdapter != null){
      mBluetoothAdapter.enable();
    }
高版本android会请求打开蓝牙,跳转到系统界面,由用户进行打开蓝牙的操作:
    BluetoothManager bluetoothManager= (BluetoothManager) getSystemService(Context.BLUETOOTH_SERVICE);
    BluetoothAdapter mBluetoothAdapter = bluetoothManager.getAdapter();
    if (mBluetoothAdapter != null && !mBluetoothAdapter.isEnabled()) {
      Intent enableBtIntent = new Intent(BluetoothAdapter.ACTION_REQUEST_ENABLE);
      enableBtIntent.addFlags(Intent.FLAG_ACTIVITY_NEW_TASK);
      startActivityForResult(enableBtIntent, REQUEST_ENABLE_BT);
    }
4.扫描目标设备
关于扫描,官方提供两种方式。直观的反应在回调接口上:LeScanCallback和ScanCallback。
LeScanCallback:推荐用于4.3和4.4及以前的版本;
ScanCallback:推荐5.0以后的版本(android.os.Build.VERSION.SDK_INT >= 21)。
两种扫描方法如下:
先初始化:
	BluetoothManager bluetoothManager = (BluetoothManager) context.getSystemService(Context.BLUETOOTH_SERVICE);
    BluetoothAdapter mBluetoothAdapter = bluetoothManager.getAdapter();
4.1. 版本5.0之前的扫描
        BluetoothAdapter.LeScanCallback mLeScanCallback = new BluetoothAdapter.LeScanCallback() {
            @Override
            public void onLeScan(BluetoothDevice device, int rssi, byte[] scanRecord) {
                		//参数:
						//device : 识别的远程设备
						//rssi : RSSI的值作为对远程蓝牙设备的报告; 0代表没有蓝牙设备;
						//scanRecode: 远程设备提供的配对号(公告)
            }
        };

		//开始扫描
		mBluetoothAdapter.startLeScan(mLeScanCallback);
		//停止扫描
		mBluetoothAdapter.stopLeScan(mLeScanCallback);
4.2. 版本5.0以后的扫描
1.扫描方法
        ScanCallback scanCallback = new ScanCallback() {

			//当一个蓝牙ble广播被发现时回调
            @Override
            public void onScanResult(int callbackType, ScanResult result) {
                super.onScanResult(callbackType, result);
                //result是返回信息,可以通过返回信息找到我们需要的设备
            }

   			//批量返回扫描结果
            @Override
            public void onBatchScanResults(List<ScanResult> results) {
                super.onBatchScanResults(results);
                //results 以前扫描到的扫描结果列表。
            }

			//当扫描不能开启时回调
            @Override
            public void onScanFailed(int errorCode) {
                super.onScanFailed(errorCode);
                //扫描太频繁会返回ScanCallback.SCAN_FAILED_APPLICATION_REGISTRATION_FAILED,
                //表示app无法注册,无法开始扫描。
            }
        };

		mBluetoothAdapter.getBluetoothLeScanner().startScan(scanCallback);
		mBluetoothAdapter.getBluetoothLeScanner().stopScan(scanCallback);
以上就是扫描的方法。
2.构造方法扩展
扫描的构造方法有多种,如下是上面使用的默认构造:
    @RequiresPermission(Manifest.permission.BLUETOOTH_ADMIN)
    public void startScan(final ScanCallback callback) {
        startScan(null, new ScanSettings.Builder().build(), callback);
    }
除此之外还有两种种构造方法:
    @RequiresPermission(Manifest.permission.BLUETOOTH_ADMIN)
    public void startScan(List<ScanFilter> filters, ScanSettings settings,final ScanCallback callback) {
        startScan(filters, settings, null, callback, /*callbackIntent=*/ null, null);
    }
    public int startScan(@Nullable List<ScanFilter> filters, @Nullable ScanSettings settings,
    					@NonNull PendingIntent callbackIntent) {
        return startScan(filters,
                settings != null ? settings : new ScanSettings.Builder().build(),
                null, null, callbackIntent, null);
    }
三种构造中有统一的参数类型:List filters 和 ScanSettings settings。
2.1 ScanFilter:
如下是ScanFilter中的注释:
/**
 * Criteria for filtering result from Bluetooth LE scans. A {@link ScanFilter} allows clients to
 * restrict scan results to only those that are of interest to them.
 * <p>
 * Current filtering on the following fields are supported:
 * <li>Service UUIDs which identify the bluetooth gatt services running on the device.
 * <li>Name of remote Bluetooth LE device.
 * <li>Mac address of the remote device.
 * <li>Service data which is the data associated with a service.
 * <li>Manufacturer specific data which is the data associated with a particular manufacturer.
 *
 * @see ScanResult
 * @see BluetoothLeScanner
 */
百度翻译:
/
*蓝牙LE扫描结果的筛选条件。{@link ScanFilter}允许客户端将扫描结果限制为只对其感兴趣的结果。
*<p>
*支持对以下字段进行当前筛选:
*<li>服务uuid,用于标识设备上运行的蓝牙gatt服务。
*<li>远程蓝牙设备的名称。
*<li>远程设备的Mac地址。
*<li>服务数据,是与服务相关联的数据。
*<li>制造商特定数据,是与特定制造商相关联的数据。
*
*@查看ScanResult
*@查看BluetoothLeScanner
*/
可以理解为主要作用就是筛选,而内部数据用于筛选条件;
对象是通过 ScanFilter.Builder() 构建。
2.2 ScanSettings :
/**
 * Bluetooth LE scan settings are passed to {@link BluetoothLeScanner#startScan} to define the
 * parameters for the scan.
 */
译为:
蓝牙LE扫描设置传递给{@link BluetoothLeScanner#startScan}以定义扫描参数。
ScanSettings 是通过ScanSettings.Builder()构建对象。因此可以通过Builder查看具体的扫描参数。
		private int mScanMode = SCAN_MODE_LOW_POWER;//扫描模式

		private int mCallbackType = CALLBACK_TYPE_ALL_MATCHES;//回调类型

		private int mScanResultType = SCAN_RESULT_TYPE_FULL;//设置蓝牙LE扫描的扫描结果类型,TODO 不知其作用

		private long mReportDelayMillis = 0;//当设备蓝牙芯片支持批处理扫描时,用来设置蓝牙LE扫描的报告延迟的时间(毫秒单位)

		private int mMatchMode = MATCH_MODE_AGGRESSIVE;//蓝牙LE扫描滤波器硬件匹配的匹配模式

		//设置Bluetooth LE scan filters硬件匹配的匹配数,TODO 不知其作用
		private int mNumOfMatchesPerFilter = MATCH_NUM_MAX_ADVERTISEMENT;

        /**
         * Set whether only legacy advertisments should be returned in scan results.
         * Legacy advertisements include advertisements as specified by the
         * Bluetooth core specification 4.2 and below. This is true by default
         * for compatibility with older apps.
         *
         * @param legacy true if only legacy advertisements will be returned
         */
		private boolean mLegacy = true;

        /**
         * Set the Physical Layer to use during this scan.
         * This is used only if {@link ScanSettings.Builder#setLegacy}
         * is set to false.
         * {@link android.bluetooth.BluetoothAdapter#isLeCodedPhySupported}
         * may be used to check whether LE Coded phy is supported by calling
         * {@link android.bluetooth.BluetoothAdapter#isLeCodedPhySupported}.
         * Selecting an unsupported phy will result in failure to start scan.
         *
         * @param phy Can be one of {@link BluetoothDevice#PHY_LE_1M}, {@link
         * BluetoothDevice#PHY_LE_CODED} or {@link ScanSettings#PHY_LE_ALL_SUPPORTED}
         */
		private int mPhy = PHY_LE_ALL_SUPPORTED;
- setScanMode() 设置扫描模式,可选择模式主要三种:
     ScanSettings.SCAN_MODE_LOW_POWER 低功耗模式
     ScanSettings.SCAN_MODE_BALANCED 平衡模式
     ScanSettings.SCAN_MODE_LOW_LATENCY 高功耗模式

    从上到下,会越来越耗电,但扫描间隔越来越短,即扫描速度会越来越快。
- setCallbackType() 设置回调类型,可选择模式主要三种:
    ScanSettings.CALLBACK_TYPE_ALL_MATCHES  寻找符合过滤条件的蓝牙广播,如果没有设置过滤条件,则返回全部广播包(默认)
    ScanSettings.CALLBACK_TYPE_FIRST_MATCH  仅针对与筛选条件匹配的第一个广播包触发结果回调。
    ScanSettings.CALLBACK_TYPE_MATCH_LOST
- setMatchMode() 设置蓝牙LE扫描滤波器硬件匹配的匹配模式
一般设置ScanSettings.MATCH_MODE_STICKY
-
Bluetoothadapter.isOffloadedScanBatchingSupported()
判断当前手机蓝牙芯片是否支持批处理扫描。如果支持扫描则使用批处理扫描,可通过ScanSettings.Builder对象调用setReportDelay(Long)方法来设置蓝牙LE扫描的报告延迟的时间(以毫秒为单位)来启动批处理扫描模式。 -
ScanSettings.Builder.setReportDelay(Long);
当设备蓝牙芯片支持批处理扫描时,用来设置蓝牙LE扫描的报告延迟的时间(以毫秒为单位)。
该参数默认为 0,如果不修改它的值,则默认只会在onScanResult(int,ScanResult)中返回扫描到的蓝牙设备,不会触发不会触发onBatchScanResults(List)方法。
设置为0以立即通知结果,不开启批处理扫描模式。即ScanCallback蓝牙回调中,不会触发onBatchScanResults(List)方法,但会触发onScanResult(int,ScanResult)方法,返回扫描到的蓝牙设备。
当设置的时间大于0L时,则会开启批处理扫描模式。即触发onBatchScanResults(List)方法,返回扫描到的蓝牙设备列表。但不会触发onScanResult(int,ScanResult)方法。
4.3. 建议
多次扫描,多次停止扫描。这样可以排除一些异常情况,比如蓝牙长时间开启搜索不到设备的情况;手动开启蓝牙后,系统蓝牙进行扫描,导致我们扫描不到设备的问题。
目前,通过以上方法都可以扫描到设备,没有试过10.0系统,时间 2020.3.10
5.连接设备
5.1.获取BluetoothDeivce
通过扫描设备可以获取到目标设备的mac地址,用于创建BluetoothDevice,用于连接;创建好的BluetoothDevice可以进行缓存,以便于下次使用。
BluetoothManager bluetoothmanager = (BluetoothManager)context.getSystemService(Context.BLUETOOTH_SERVICE);
Bluetoothadapter mBluetoothAdapter = bluetoothmanager.getAdapter();
BluetoothDevice mBluetoothDevice = mBluetoothAdapter.getRemoteDevice(macAddressStr)
5.2.回调
以下是 BluetoothGattCallback 接口的所有回调方法。
//定义蓝牙Gatt回调类
public class BleGattCallback extends BluetoothGattCallback {

    @Override
    public void onPhyUpdate(BluetoothGatt gatt, int txPhy, int rxPhy, int status) {
        super.onPhyUpdate(gatt, txPhy, rxPhy, status);
        LogUtils.i(TAG,"回调触发的结果 setPreferredPhy(int, int, int),或者由于远程设备改变了体育。");
    }

    @Override
    public void onPhyRead(BluetoothGatt gatt, int txPhy, int rxPhy, int status) {
        super.onPhyRead(gatt, txPhy, rxPhy, status);
        LogUtils.i(TAG,"回调触发的结果 readPhy()");
    }

    @Override
    public void onConnectionStateChange(BluetoothGatt gatt, int status, int newState) {
        super.onConnectionStateChange(gatt, status, newState);
        LogUtils.i(TAG,"连接状态回调");
    }

    @Override
    public void onServicesDiscovered(BluetoothGatt gatt, int status) {
        super.onServicesDiscovered(gatt, status);
        LogUtils.i(TAG,"服务发现回调");
    }

    @Override
    public void onCharacteristicRead(BluetoothGatt gatt, BluetoothGattCharacteristic characteristic, int status) {
        super.onCharacteristicRead(gatt, characteristic, status);
        LogUtils.i(TAG,"当成功读取特征值时触发");
    }

    @Override
    public void onCharacteristicWrite(BluetoothGatt gatt, BluetoothGattCharacteristic characteristic, int status) {
        super.onCharacteristicWrite(gatt, characteristic, status);
        LogUtils.i(TAG,"当成功写入特征值到外设时触发");
    }

    @Override
    public void onCharacteristicChanged(BluetoothGatt gatt, BluetoothGattCharacteristic characteristic) {
        super.onCharacteristicChanged(gatt, characteristic);
        LogUtils.i(TAG,"回调通知由于远程触发特征");
    }

    @Override
    public void onDescriptorRead(BluetoothGatt gatt, BluetoothGattDescriptor descriptor, int status) {
        super.onDescriptorRead(gatt, descriptor, status);
        LogUtils.i(TAG,"回调报告描述符读操作的结果");
    }

    @Override
    public void onDescriptorWrite(BluetoothGatt gatt, BluetoothGattDescriptor descriptor, int status) {
        super.onDescriptorWrite(gatt, descriptor, status);
        LogUtils.i(TAG,"回调描述符写操作的结果");
    }

    @Override
    public void onReliableWriteCompleted(BluetoothGatt gatt, int status) {
        super.onReliableWriteCompleted(gatt, status);
        LogUtils.i(TAG,"回调时调用一个可靠写事务已经完成");
    }

    @Override
    public void onReadRemoteRssi(BluetoothGatt gatt, int rssi, int status) {
        super.onReadRemoteRssi(gatt, rssi, status);
        LogUtils.i(TAG,"回调报告的RSSI远程设备连接。");
    }

	//Mtu大小改变
    @Override
    public void onMtuChanged(BluetoothGatt gatt, int mtu, int status) {
        super.onMtuChanged(gatt, mtu, status);
        LogUtils.i(TAG,"回调表明MTU对于一个给定的设备连接已经改变了");
    }

}
5.3.连接蓝牙
mBluetoothDevice.connectGatt(context, true, bleGattCallback);
注意:传输层模式有三种TRANSPORT_AUTO 、TRANSPORT_BREDR 和TRANSPORT_LE。如果不传默认TRANSPORT_AUTO,6.0系统及以上需要使用TRANSPORT_LE这种传输模式
故,最终的写法是:
        if (Build.VERSION.SDK_INT >= Build.VERSION_CODES.M) {
            mBluetoothGatt = bluetoothDevice.connectGatt(context,true, gattCallback, TRANSPORT_LE);
        } else {
            mBluetoothGatt = bluetoothDevice.connectGatt(context,true, gattCallback);
        }
解析参数:
参数一 Context 上下文对象,;
参数二 boolean autoConnect 是否自动连接扫描到的蓝牙设备,;
参数三 BluetoothGattCallback 接口实现类。
错误码:
133 :连接超时或未找到设备;(可以调用mBluetoothGatt.close()尝试解决)
8 : 设备超出范围;
22 :表示本地设备终止了连接。
注意:蓝牙连接失败是常有的事,一般多次连接就可以连接成功。多次尝试连接。
6.GATT数据交互
6.1. GATT结构及原理:
以下内容部分转载自 :Android蓝牙BLE开发(一)-基本原理
BLE技术是基于GATT进行通信的,GATT(Generic Attribute Profile)是一种属性传输协议,简单的讲可以认为是一种属性传输的应用层协议。它的结构非常简单:
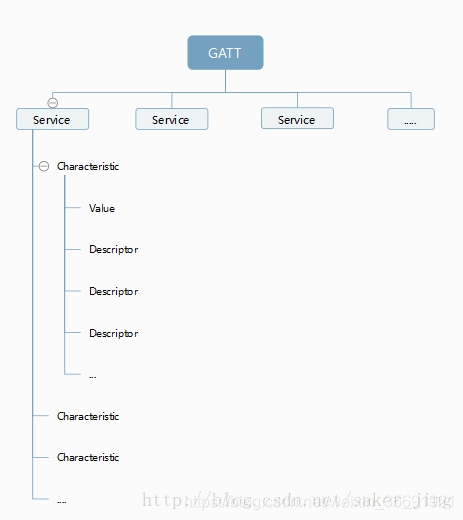
我们刚才提到的service和characteristic,都需要一个唯一的uuid来标识,如图:
[图片上传失败…(image-89e748-1514968778904)]
Android 应用连接到了 设备中的 GATT 服务, 并且发现了 各种服务 (特征集合), 可以读写其中的属性,遍历服务 (特征集合) 和 特征, 将其展示在 UI 界面中.
组织结构:
- 每个BLE设备由多个Profile(GATT)组成。(是不是多个Profile不太清楚,但是至少包含我们需要的Profile,他才是我们需要的BLE设备, Profile理解成是一个蓝牙模块);
- 每个Profile由多个的Service服务组成,如电量信息服务、系统信息服务等;
- 每个Service由多个Characteristic特征组成;
- 每个Characteristic特征里面包括属性(properties)和值(value)和若干个descriptor(描述符)。
用途:
- Profile,实际上是一组服务的集合,这些服务被人组合起来就形成了一个特定的使用场景
- Service,用于数据的分类
- Characteristic,用于存放属性。实际上Characteristic具有读、写、通知等权限,我们在对一个BLE设备发起连接成功以后,对他进行读写,其实就是对Characteristic的读写或者订阅通知。BLE数据传输实际上就是监听某一个Service下的Characteristic!
- Value是Characteristic的属性值。而Descriptor则是对Value不同角度的描述和说明,所以有多个Descriptor
基础知识:
-
GATT通信的双方是C/S关系。外设作为 GATT 服务端(Server),它维持了 ATT 的查找表以及 service 和 characteristic 的定义。中心设备是 GATT 客户端(Client),它向 Server 发起请求。需要注意的是,所有的通信事件,都是由客户端(也叫主设备,Master)发起,并且接收服务端(也叫从设备,Slave)的响应。
-
GATT连接是独占的。也就是一个BLE外设同时只能被一个中心设备连接。一旦外设被连接,它就会马上停止广播,这样它就对其他设备不可见了。当设备断开,它又开始广播。
-
Service、Characteristic和Descriptor均有一个唯一的UUID标识,UUID既有16位的也有128位的。16位的UUID是经过蓝牙组织认证的,是需要购买的,而128位的UUID则可以自定义,当然也有许多通用的UUID。
6.2. 进行数据传输:
通过以上的内容,可以知道,我们想要传输数据,需要找到我们需要的 Characteristic。再对他进行读写或者订阅通知即可。
继续蓝牙连接的代码:在我们最终连接成功后,获得了mBluetoothGatt 。
除此之外,我们还拥有一个回调接口BluetoothGattCallback。
通过这两项即可实现数据传输。
6.2.1 调用发现服务,mBluetoothGatt.discoverServices()
    //连接状态回调
    @Override
    public void onConnectionStateChange(BluetoothGatt gatt, int status, int newState) {
        super.onConnectionStateChange(gatt, status, newState);
        // status 用于返回操作是否成功,会返回异常码。
        //newState 用于连接成功与否,返回连接码

        if (status == BluetoothGatt.GATT_SUCCESS){ //操作成功的情况下
                if (newState == BluetoothProfile.STATE_CONNECTED) {//连接成功

                    mBluetoothGatt.discoverServices();//发现服务(可延迟发现服务,也可不延迟)
                    );
                }else if(newState == BluetoothProfile.STATE_DISCONNECTED){
                    //判断是否断开连接码

                }
        }
    }
调用上述方法后,如果成功发现服务,就可以在回调方法中取出我们需要的服务:
目标ServiceUUID:
	//定义需要进行通信的ServiceUUID
	private UUID mServiceUUID = UUID.fromString("0000xxxx-0000-1000-8000-00805f9b34fb");
服务发现回调 onServicesDiscovered 中:
    //服务发现回调
    @Override
    public void onServicesDiscovered(BluetoothGatt gatt, int status) {
        super.onServicesDiscovered(gatt, status);
        if (status == BluetoothGatt.GATT_SUCCESS) {
            mHandler.post(() ->

                BluetoothGattService gattService = mBluetoothGatt.getService(mServiceUUID);//获取指定uuid的service

                if(gattService != null){//获取到特定的服务不为空

                }else{//获取特定服务失败


                }
            );
        }
    }
如果发现没有找到对应 mServiceUUID 的服务:
发现服务时,会存在发现不了特定服务的情况。或者说,整个BluetoothGatt对象中的服务列表为空。
BluetoothGatt类中存在一个隐藏的方法refresh(),用于刷新Gatt的服务列表。当发现不了服务时,可以通过反射去调用该方法。
6.2.2 获取Characteristic(特征值),读写
我们知道:每个Service由多个Characteristic特征组成。所以,我们就可以获取到Service后,获取到我们需要的Characteristic。
目标ServiceUUID和目标mCharacteristicUUID :
//定义需要进行通信的ServiceUUID
private UUID mServiceUUID = UUID.fromString("0000xxxx-0000-1000-8000-00805f9b34fb");
//定义需要进行通信的CharacteristicUUID
private UUID mCharacteristicUUID = UUID.fromString("0000yyyy-0000-1000-8000-00805f9b34fb");
服务发现回调 onServicesDiscovered 中:
    //服务发现回调
    @Override
    public void onServicesDiscovered(BluetoothGatt gatt, int status) {
        super.onServicesDiscovered(gatt, status);
        if (status == BluetoothGatt.GATT_SUCCESS) {
            mHandler.post(() ->

                BluetoothGattService gattService = mBluetoothGatt.getService(mServiceUUID);//获取指定uuid的service

                if(gattService != null){//获取到特定的服务不为空

                    BluetoothGattCharacteristic gattCharacteristic =
                    	gattService.getCharacteristic(mCharacteristicUUID);//获取指定uuid的Characteristic


                    if(gattCharacteristic != null){//获取特定特征成功

                        gattCharacteristic.setValue(bytes);//写入你需要传递给外设的特征值(即传递给外设的信息)
                        mBluetoothGatt.writeCharacteristic(gattCharacteristic);//通过GATt实体类将,特征值写入到外设中。

                        //如果只是需要读取外设的特征值:
                        //通过Gatt对象读取特定特征(Characteristic)的特征值
                        String readValue = mBluetoothGatt.readCharacteristic(gattCharacteristic);
                    }
                }else{
                    //获取特定服务失败

                }
            );
        }
    }
上述 gattCharacteristic 既是读特征值,也是写特征值。
1.写特征值
当App传数据给外设的时候,即是写特征值,调用方法如下:
gattCharacteristic.setValue(bytes);//写入你需要传递给外设的特征值(即传递给外设的信息)
mBluetoothGatt.writeCharacteristic(gattCharacteristic);//通过GATt实体类将,特征值写入到外设中。
当成功读取特征值时,会触发BluetoothGattCallback#onCharacteristicRead()回调
@Override
public void onCharacteristicRead(BluetoothGatt gatt, BluetoothGattCharacteristic characteristic, int status) {
    super.onCharacteristicRead(gatt, characteristic, status);
    if (status == BluetoothGatt.GATT_SUCCESS) {
        //获取读取到的特征值
        characteristic.getValue()
    }
}
2.读特征值
当App从外设接数据的时候,即是读特征值,调用方法如下:
//如果只是需要读取外设的特征值:
//通过Gatt对象读取特定特征(Characteristic)的特征值
String readValue = mBluetoothGatt.readCharacteristic(gattCharacteristic);
当成功写入特征值到外设时,会触发BluetoothGattCallback#onCharacteristicWrite()回调
@Override
public void onCharacteristicWrite(BluetoothGatt gatt, BluetoothGattCharacteristic characteristic, int status) {
    super.onCharacteristicWrite(gatt, characteristic, status);
    if (status == BluetoothGatt.GATT_SUCCESS) {
        //获取写入到外设的特征值
        characteristic.getValue()
    }
}
6.2.3 监听读特征值,双向通信 BluetoothGattCallback#onCharacteristicChanged()
正常来讲,如果需要进行交互,读特征值和写特征值最好区别开来。因为这样写特征值就是完全是我们传给外设的数据,读特征值就是外设传给我们的数据。
我们听过监听读特征值,然后通过得到的数据操作写特征值,就可以实现数据的交互了。
监听 BluetoothGattCallback#onCharacteristicChanged()方法,进行双向通信。
监听 BluetoothGattCallback#onCharacteristicChanged()方法,需要订阅:
//定义读特征值的CharacteristicUUID
private UUID mReadCharacteristicUUID = UUID.fromString("0000yyyy-0000-1000-8000-00805f9b1234");
    //服务发现回调
    @Override
    public void onServicesDiscovered(BluetoothGatt gatt, int status) {
        super.onServicesDiscovered(gatt, status);
        if (status == BluetoothGatt.GATT_SUCCESS) {
            mHandler.post(() ->

                BluetoothGattService gattService = mBluetoothGatt.getService(mServiceUUID);//获取指定uuid的service

                if(gattService != null){//获取到特定的服务不为空

                    BluetoothGattCharacteristic readGattCharacteristic =
                    	gattService.getCharacteristic(mReadCharacteristicUUID);//获取读特征值的CharacteristicUUID

                    if(readGattCharacteristic != null){//获取读特征值成功

                        //订阅
                        boolean isEnableNotification =
                        	mBluetoothGatt.setCharacteristicNotification(readCharacteristic, true);
						//下面代码是为了确保onCharacteristicChanged可以正常回调
						if (isEnableNotification){
						List<BluetoothGattDescriptor> descriptors = characteristic.getDescriptors();
                        for (BluetoothGattDescriptor descriptor : descriptors) {
                            boolean b1 = descriptor.setValue(BluetoothGattDescriptor.ENABLE_NOTIFICATION_VALUE);
                            if (b1) {
                                boolean result = mBluetoothGatt.writeDescriptor(descriptor);
                                Log.d(TAG, "描述 UUID :" + descriptor.getUuid().toString() + "  result ==" + result );
                            }
                        }
                      }
                    }
                }else{
                    //获取特定服务失败

                }`在这里插入代码片`
            );
        }
    }
这样就可以确保 订阅成功,可以收到回调,回调接口如下:
需要注意的是调用上述代码的时候,并不会走onCharacteristicChanged()回调。
    @Override
    public void onCharacteristicChanged(BluetoothGatt bluetoothGatt, BluetoothGattCharacteristic characteristic) {
        super.onCharacteristicChanged(bluetoothGatt, characteristic);
        if (UUID.fromString(mReadCharacteristicUUID ).equals(characteristic.getUuid())) {
			byte[] data = characteristic.getValue();//获取外设修改的特征值

			//对特征值进行解析...

        }
    }
6.2.4 修改特征值传输类型,不同设备或许不同
我们通过 BluetoothGattCharacteristic 下属 BluetoothGattDescriptor 来修改特征值传输的方式
特征值的传输方法有两种:
其一:支持指示,对应 BluetoothGattDescriptor.ENABLE_INDICATION_VALUE
这种方式类似网络的tcp(丢过去就会有回应ACK)
其二:支持通知,对应 BluetoothGattDescriptor.ENABLE_NOTIFICATION_VALUE
这种方式类似网络中udp,丢过去就好了,不管成功与否
    /**
     * Value used to enable notification for a client configuration descriptor
     */
    public static final byte[] ENABLE_NOTIFICATION_VALUE = {0x01, 0x00};

    /**
     * Value used to enable indication for a client configuration descriptor
     */
    public static final byte[] ENABLE_INDICATION_VALUE = {0x02, 0x00};
两者是通过设置读特征值的CCCD客户端配置实现,底层都是广播的socket没有实际区别,只是系统蓝牙在上面做了一下所谓的ack的区别
调用如下方法,适配不同设备:
//根据特征属性设置
    if((characteristic.getProperties()&BluetoothGattCharacteristic.PROPERTY_NOTIFY)==0) {
        //支持指示
        descriptor.setValue(BluetoothGattDescriptor.ENABLE_INDICATION_VALUE);
    }else{
        //支持通知
        descriptor.setValue(BluetoothGattDescriptor.ENABLE_NOTIFICATION_VALUE);
    }
    mBluetoothGatt.writeDescriptor(descriptor);
上述:
bluetoothGattCharacteristic.getProperties()
是判断是支持通知(ENABLE_NOTIFICATION_VALUE)还是支持指示(ENABLE_INDICATION_VALUE)来设置描述符。
6.3. 数据包分析
6.3.1 蓝牙4.0,以下内容转载 :
BLE包的结构是:
preamble(1 Byte)+ AccessAddress(4 Bytes)+ PDU + CRC(3 Bytes)
PDU是:Header(2 Bytes)+ Payload (27 Bytes max)+MIC(4bytes),所以传输一个包的 最大长度是1+4+33+3=41字节,有效数据最大是27字节。
从GATT到底层需要封装7个字节的额外协议数据,因此GATT层最大是20字节。
其实,按照蓝牙BLE的协议,L2CAP协议层自动对数据包进行拆包和封装,理论上是支持ATT/GATT层更大的数据包的。但一般SDK默认ATT_MTU=23,这样L2CAP的工作会变得很简单,事实上,BLE的应用场景也不需要定义太长的数据包,20个字节足够了。
在Android上(API 21),改变ATT MTU的接口为 requestMtu (int mtu)
6.3.2 蓝牙4.2
蓝牙4.2版本改善了数据传输速度和隐私保护程度,可直接通过IPv6和6LoWPAN接入互联网。在新的标准下蓝牙信号想要连接或者追踪用户设备必须经过用户许可,否则蓝牙信号将无法连接和追踪用户设备。速度方面变得更加快速,两部蓝牙设备之间的数据传输速度提高了2.5倍,因为蓝牙智能(Bluetooth Smart)数据包的容量提高,其可容纳的数据量相当于此前的10倍左右。
6.3.3 蓝牙5.0
- 传输速率提高2倍
- 传输距离提高了4倍
- 广播模式信息容量提高了8倍。
- 功耗更低,且兼容老的蓝牙版本
6.3.4 GATT传输数据的结构
GATT的数据结构会具体到某一个Characteristic。每一个Characteristic可能都会有自己的传输设计。
例:我的Characteristic可能传输的数据结构是

包括BLE和GATT数据结构的延伸:深入浅出低功耗蓝牙(BLE)协议栈
7.断开蓝牙连接
断开蓝牙有两个操作:
disconnect
调用disconnect()后,会触发手机会触发BluetoothGattCallback#onConnectionStateChange()的回调,回调断开连接信息,newState = BluetoothProfile.STATE_DISCONNECTED;
该方式只是断开连接,并没有真正释放资源, 如果调用了该方法之后可以调用connect()方法进行重连,这样还可以继续进行断开前的操作.
close
一但调用了该方法, 如果你想再次连接,必须调用BluetoothDevice的connectGatt()方法. 因为close()方法将释放BluetootheGatt的所有资源.
调用:
在需要断开蓝牙的位置先调用mBluetoothGatt.disconnect(),然后如下:
    @Override
    public void onConnectionStateChange(BluetoothGatt bluetoothGatt, int status, int newState) {
        onConnectionStateChange(status, newState);
        if (newState == BluetoothGatt.STATE_CONNECTED) {

        } else if (newState == BluetoothProfile.STATE_DISCONNECTED) {

            bluetoothGatt.close();

        }
    }
扩展:
- 当手机断开连接 mBluetoothGatt.disconnect(); 甚至是mBluetoothGatt.close()。 app蓝牙只是给蓝牙服务发送了一个断开连接,蓝牙服务是以队列的形式去处理它. 要彻底断开该连接,可以通过让对方设备(从设备)也主动断开。我尝试过这种方式,确实解决了我当前的问题。(来自)
参考和转载地址
参考地址:android蓝牙BLE(一) —— 扫描
转载地址:android蓝牙BLE(二) —— 通信
参考地址:蓝牙BLE(BlueTooth BLE)入门及爬坑指南
参考地址:Android BLE 连接及数据传输详解
转载地址:Android蓝牙BLE开发(一)-基本原理
参考地址:蓝牙开发遇到几个问题
参考地址:android Ble开发的那些事(一)
参考地址: Android-BLE蓝牙原理
转载地址:Android蓝牙BLE开发(一)-基本原理
参考地址:如何提高蓝牙BLE的传输速率和稳定性


 609
609


 被折叠的 条评论
为什么被折叠?
被折叠的 条评论
为什么被折叠?
 到【灌水乐园】发言


