


This post is for you - if you are new to Liferay Portal, but you already have enough experience with Java development using Eclipse.If you are new to
Stop Liferay Portal- Go to bin folder in tomcat (e.g. liferay-portal-6.2.0-CE-GA1\tomcat-7.0.42\bin)
- Run "shutdown.bat". In 2-3 minutes, it would stop server and close the command prompt. That's it. [***NOTE-
Stop server without fail, as in next step we'll integrate it in Eclipse IDE to start/stop using Eclipse during development.]
Step 4-Install Liferay Plugins in your Eclipse
IDE (3.7 or greater) in same way you install other Eclipse plugins
The Liferay Eclipse plugins would allow you to integrate Liferay portal server and Liferay plugins SDK with Eclipse IDE. So you can control Liferay plugins projects development and deployment using Eclipse IDE.
Go to Help - Install New Software… - Enter the update site URL -%20IDE/2.0.1%20GA2/updatesite/
On successful Liferay plugins installation, you would see those in Eclipse IDE as per below screen. Now you can switch to Liferay perspective using Windows -> Open Perspective -> Other -> Select Liferay.

IMPORTANT NOTE:Firstly I tried "IDE 2.0.0.GA1" in Eclipse Kepler and could
install it without any error, butIDE 2.0.0.GA1 was causing
problems to open default page of liferay in browser even if liferay server started successfully. Finally "IDE 2.0.1.GA2" installation worked perfectly in Eclipse Kepler. However you can always refer to Liferay IDE page for latest updates -.
Step 5-Setup
Eclipse IDE for Liferay Development Environment
Configure new Liferay Server=
Windows -> Preferences -> Liferay -> Create new Liferay Server -> Select Liferay v6.2 CE Server (Tomcat7) and click Next -> Select Liferay Tomcat directory and click Next -> Select Liferay Javadoc and source code -> click Finish.

Configure new Liferay Plugin SDK= Windows -> Preferences -> Liferay -> Installed Plugin SDK -> Add (configure unzipped Liferay plugin SDK folder o n your machine as per below screen) -> OK.

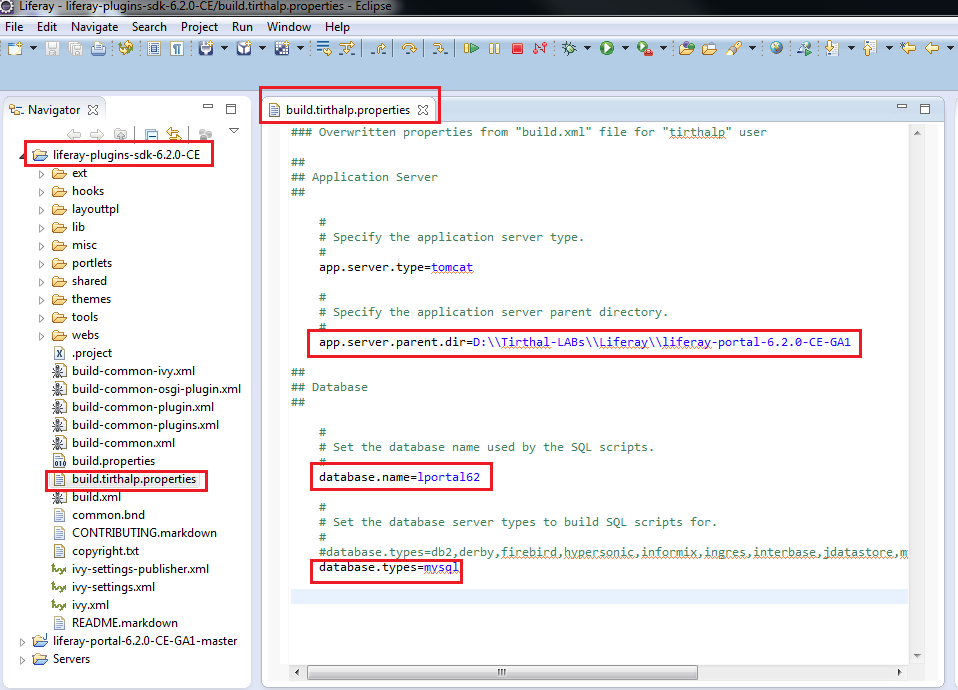
Now create a new "build..properties" (where must match with OS username, for example in Windows OS you can get it by executing "echo %username%" on command
prompt) file in your Liferay plugins SDK folder. For example, I created "build.tirthalp.properties" file. Then you can open default "build.xml" file and put required properties to overwrite in "build..properties" file. For example, I overwritten
"app.server.parent.dir=xxxxxxxxxxx", "database.name=lportal62" and "database.types=mysql" to match values with my development setup.
-
Liferay plugins SDK would facilitate you to create different types of Liferay plugins and deploy it directly in Liferay server using Eclipse IDE, hence ensure doing correct configuration of "build..properties" file. But at this stage, don't worry
about all details of liferay plugins sdk!
Start the Liferay serverin same way you start any integrated server in Eclipse & wait for 2-5 minutes. On successful server startup, you would see "server startup in x ms" message in Console. [***NOTE:
This step would create "portal-ide.properties" file automatically in root folder of Liferay portal server. E.g. D:\Tirthal-LABs\Liferay\liferay-portal-6.2.0-CE-GA1\portal-ide.properties).

Now open ":8080/"
url in browser and in less than 1-2 minutes you should see default liferay page. Then you can sign-in using default credentials - test@liferay.com / test (email/password).
Excellent... You completed one time setup steps for Liferay development environment and ready to develop
projects for customization/extension of default features of Liferay portal. Now next step would allow you quickly achieve "Hello World" application in Liferay. Then you can referLiferay
6.2 Developer's Guideto understand different Liferay plug-ins (such as portlets, themes, layouts, hooks and ext) development methodology.
Step 6-Hello World portlet application - Create,
deploy and test in Liferay server


 1655
1655


 被折叠的 条评论
为什么被折叠?
被折叠的 条评论
为什么被折叠?
 到【灌水乐园】发言


