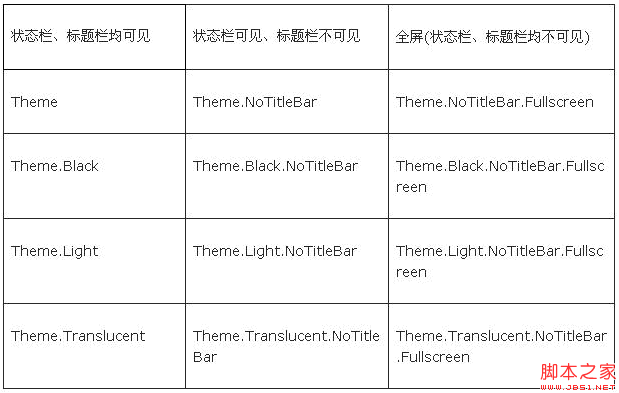
主题Theme就是用来设置界面UI风格,可以设置整个应用或者某个活动Activity的界面风格。在Android SDK中内置了下面的Theme,可以按标题栏Title Bar和状态栏Status Bar是否可见来分类:

android:theme="@android:style/Theme.Dialog" 将一个Activity显示为能话框模式
android:theme="@android:style/Theme.NoTitleBar" 不显示应用程序标题栏
android:theme="@android:style/Theme.NoTitleBar.Fullscreen" 不显示应用程序标题栏,并全屏
android:theme="Theme.Light" 背景为白色
android:theme="Theme.Light.NoTitleBar" 白色背景并无标题栏
android:theme="Theme.Light.NoTitleBar.Fullscreen" 白色背景,无标题栏,全屏
android:theme="Theme.Black" 背景黑色
android:theme="Theme.Black.NoTitleBar" 黑色背景并无标题栏
android:theme="Theme.Black.NoTitleBar.Fullscreen" 黑色背景,无标题栏,全屏
android:theme="Theme.Wallpaper" 用系统桌面为应用程序背景
android:theme="Theme.Wallpaper.NoTitleBar" 用系统桌面为应用程序背景,且无标题栏
android:theme="Theme.Wallpaper.NoTitleBar.Fullscreen" 用系统桌面为应用程序背景,无标题栏,全屏
android:theme="Translucent" 半透明
android:theme="Theme.Translucent.NoTitleBar" 半透明、无标题栏
android:theme="Theme.Translucent.NoTitleBar.Fullscreen" 半透明、无标题栏、全屏
android:theme="Theme.Panel"
android:theme="Theme.Light.Panel"
这些主题可以应用到整个应用Application范围或者某个活动Activity范围中。
应用Application范围
在AndroidManifest.xml中的application节点中设置theme属性,主题theme应用到整个应用程序中。
Android:icon=”@drawable/icon”
Android:icon=”@string/app_name”
Android:icon=”@android:style/ Theme.Black.NoTitleBar”>
活动Activity范围
使用java代码或者在AndroidManifest.xml中对活动Activity的主题进行设置,主题仅应用到当前活动中。
在AndroidMainifest.xml设置方法:
android:name=“.About”
android:label=“@string/app_name”
android:theme=“@android:style/ Theme.Black.NoTitleBar” >
使用java代码进行设置,在当前活动Activity的onCreate中进行设置:
@Override
public void onCreate(Bundle savedInstanceState){
super.onCreate(savedInstanceState);
setTheme(android.R.style.Theme_Translucent_NoTitleBar);
setContentView(R.layout.main);
}
-------------跳转---------------------
public void Start() {
new Thread() {
public void run() {
try {
Thread.sleep(3000);
} catch (InterruptedException e) {
e.printStackTrace();
}
Intent intent = new Intent();
intent.setClass(WelComeActivity.this, MainActivity.class);
startActivity(intent);
finish();
}
}.start();
}
---------为按钮添按下效果-----------
imageButton1 = (ImageButton) findViewById(R.id.imageButton3);
imageButton1.setOnTouchListener(new OnTouchListener() {
public boolean onTouch(View v, MotionEvent event) {
if (event.getAction() == MotionEvent.ACTION_DOWN) {
// 更改为按下时的背景图片
v.setBackgroundResource(R.drawable.menu_btn_f);
} else if (event.getAction() == MotionEvent.ACTION_UP) {
// 改为抬起时的图片
v.setBackgroundResource(R.drawable.menu_btn);
}
return false;
}
});


 531
531


 被折叠的 条评论
为什么被折叠?


