


顶部距离顶部的距离。
Step3 添加圆角边框
我们还可以为div添加边框,将main.css中input_f的选择器改为:
`#input_f {
text-align: center;
height: 40vh;
margin: 0 auto;
margin-top: 25vh;
width: 30vw;
border: 2px solid darkslategray;
border-radius: 30px;
}`
* 1
* 2
* 3
* 4
* 5
* 6
* 7
* 8
* 9
其中,border为边框设置,请参考点我跳转。
Step4 添加标题
在index.html中id为um的input元素的上面添加:
`
Login`
* 1
其中,font-size是设置文字大小。
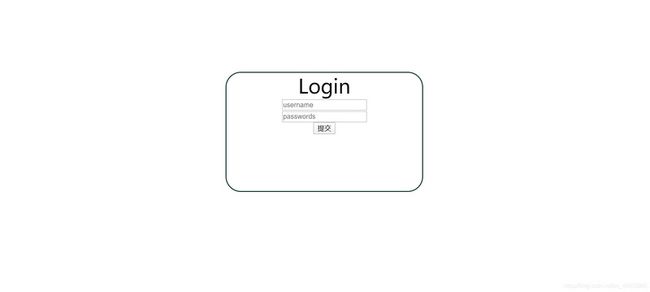
至此,我们可以拥有一个和图片一样的登录页面:
2.3.4 美化组件
BUTTON
默认的button按钮样式很不美观,笔者在此,引用mcya的博客的css样式,在main.css中添加:
`#bu {
margin-top: 5px;
width: 15vw;
}
/*以下来自https://blog.csdn.net/genius_yym/article/details/79670326 的博客,如有侵权,请联系删除*/
button {
display: inline-block;
outline: none;
cursor: pointer;
text-align: center;
text-decoration: none;
font: 14px/100% Arial, Helvetica, sans-serif;
padding: 5px 2px 4px;
text-shadow: 0 1px 1px rgba(0, 0, 0, .3);
-webkit-border-radius: 5px;
-moz-border-radius: 5px;
border-radius: 5px;
-webkit-box-shadow: 0 1px 2px rgba(0, 0, 0, .2);
-moz-box-shadow: 0 1px 2px rgba(0, 0, 0, .2);
box-shadow: 0 1px 2px rgba(0, 0, 0, .2);
color: #d9eef7;
border: solid 1px #0076a3;
background: #0095cd;
background: -webkit-gradient(linear, left top, left bottom, from(#0095cc), to(#00678e));
background: -moz-linear-gradient(top, #00adee, #00678e);
filter: progid:DXImageTransform.Microsoft.gradient(startColorstr='#00adee', endColorstr='#00678e');
}
button:hover {
background: #007ead;
background: -webkit-gradient(linear, left top, left bottom, from(#00678e), to(#0095cc));
background: -moz-linear-gradient(top, #00678e, #0095cc);
filter: progid:DXImageTransform.Microsoft.gradient(startColorstr='#00678e', endColorstr='#0095cc');
}
/*结束*/`
* 1
* 2
* 3
* 4
* 5
* 6
* 7
* 8
* 9
* 10
* 11
* 12
* 13
* 14
* 15
* 16
* 17
* 18
* 19
* 20
* 21
* 22
* 23
* 24
* 25
* 26
* 27
* 28
* 29
* 30
* 31
* 32
* 33
* 34
* 35
其中,如有属性名不熟悉,可参考点我跳转菜鸟教程,button:hover为鼠标悬浮在button的元素上时,button元素的样式,xxx{}为元素选择器,选择全部button元素。
INPUT
把main.css中除了button(刚刚上面给的代码)都替换成:
`#input_f {
text-align: center;
height: 40vh;
margin: 0 auto;
margin-top: 25vh;
width: 30vw;
border: 2px solid darkslategray;
border-radius: 30px;
background-color: rgb(170, 169, 169);
}
input {
outline-style: none;
border: 1px solid #ccc;
border-radius: 3px;
border: 0px;
width: 20vw;
height: 3vw;
margin-top: 5px;
}
#um {
margin-top: 10px;
}
input:focus {/*发光*/
border-color: #66afe9;
outline: 0;
-webkit-box-shadow: inset 0 1px 1px rgba(0, 0, 0, .075), 0 0 8px rgba(102, 175, 233, .6);
box-shadow: inset 0 1px 1px rgba(0, 0, 0, .075), 0 0 8px rgba(102, 175, 233, .6)
}`
* 1
* 2
* 3
* 4
* 5
* 6
* 7
* 8
* 9
* 10
* 11
* 12
* 13
* 14
* 15
* 16
* 17
* 18
* 19
* 20
* 21
* 22
* 23
* 24
* 25
* 26
* 27
* 28
* 29
* 30
* 31
2.4回顾
至此,我们页面的渲染部分结束,我们使用了html+css的方式渲染页面,我们可以获得和下图一样的效果:

2.5 JavaScript部分
2.5.1 创建主js文件
在/www/js文件夹下创建main.js
然后在index.html中里面添加:
``
* 1
2.5.2 提交表单(通过POST方法)
给在index.html的button添加onclick属性,绑定点击函数:
`提交`
* 1
有关POST问题看这里。
2.5.2.1 纯js方式
此处部分代码引用于另外一个博客
`/*此处代码为引用https://blog.csdn.net/Lianxingjie_1024/article/details/80238139的博客*/
function post(URL, PARAMS)
{
var temp = document.createElement("form");
temp.action = URL;
temp.method = "post";
temp.style.display = "none";
for (var x in PARAMS)
{
var opt = document.createElement("textarea");
opt.name = x;
opt.value = PARAMS[x];
// alert(opt.name)
temp.appendChild(opt);
}
document.body.appendChild(temp);
temp.submit();
return temp;
}
//代码引用结束
function submit(){
var um=document.getElementById("um").value;//根据 Id获得对象中的值
var pd=document.getElementById("pd").value;//根据 Id获得对象中的值
var rt=post('接收文件', {password:pd,username:um});
alert("提交成功,"+rt);
}`
* 1
* 2
* 3
* 4
* 5
* 6
* 7
* 8
* 9
* 10
* 11
* 12
* 13
* 14
* 15
* 16
* 17
* 18
* 19
* 20
* 21
* 22
* 23
* 24
* 25
* 26
其中,有关post问题参考原博客,有关取值问题参考这里
2.5.2.2 JQ方法
先于index.html中的里面添加:
``
* 1
* 2
* 3
* 4
来引入jq,然后在main.js中添加
`function submit(){
var um=document.getElementById("um").value;
var pd=document.getElementById("pd").value;
$.post("接收文件",{
username:um,
password:pd
},
function(data,status){
alert("数据: n" + data + "n状态: " + status);
});
}`
* 1
* 2
* 3
* 4
* 5
* 6
* 7
* 8
* 9
* 10
* 11
* 12
* 13
* 14
* 15
有关ajax post参考这里,其中,本次教程暂无接收php(教程已补点我跳转)
2.5.2.3 表单
或者,我们可以把整个作为一个表单提交,在index.html中修改input_f:
`
提交`
* 1
* 2
* 3
* 4
* 5
* 6
* 7
这样也可以达到一样的效果。


 被折叠的 条评论
为什么被折叠?
被折叠的 条评论
为什么被折叠?
 到【灌水乐园】发言


