


CentOS7最小化安装(配置生产环境内核参数及日常关闭的功能)
一、设置安装系统内存及CPU大小
1、设置内存、CPU和硬盘大小
1、设置内存及CPU大小,创建新的虚拟机,设置一个100G硬盘,够用即可。
2、开始安装,安装过程将网卡名称改为eth0
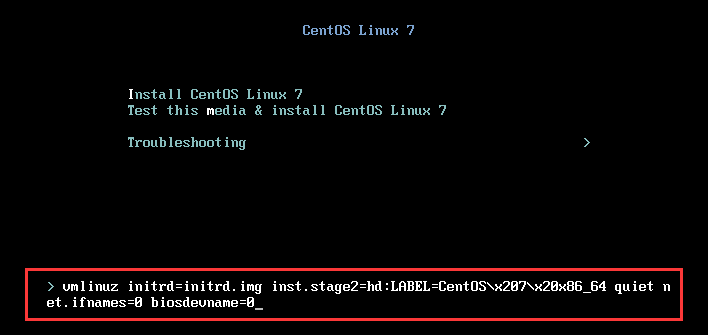
1、传递内核参数 net.ifnames=0 biosdevname=0 以 更改 网卡名称为 eth0 ethX;
出现安装界面时使用键盘上下键 移动 到第一行即 Install Centos Linux 7 然后按 tab 键,即
可出现 传递 参数界面。
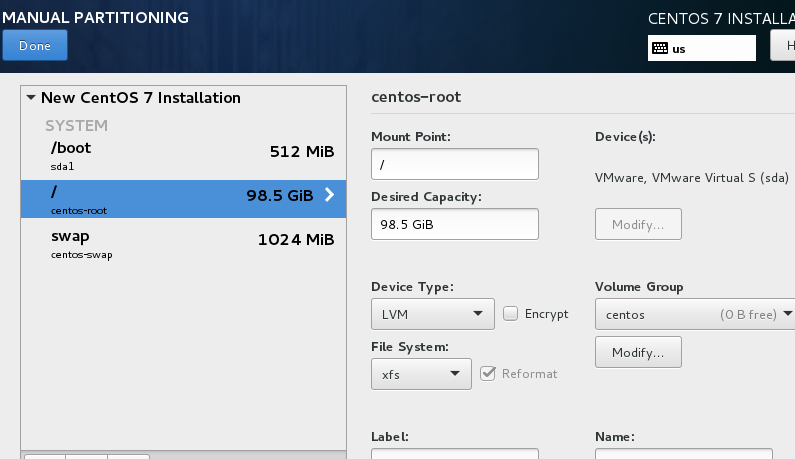
2、选择语言时,选择中文简体和英文,避免在英文界面上存在一些中文字体的出现乱码,并创建分区。
3、选择最小化安装

等待安装完成!!!
二、配置centos7的日常默认选项
1、开始配置centos7日常默认选项
1、安装最小化的命令
yum install  vim iotop bc gcc gcc-c++ glibc glibc-devel pcre pcre-devel openssl \
openssl-devel zip unzip zlib-devel  net-tools lrzsz tree ntpdate telnet lsof tcpdump \
wget libevent libevent-devel bc  systemd-devel bash-completion traceroute  bridge-utils  -y
2、关闭防火墙,并设置为开机不启动
[root@openstack network-scripts]# systemctl stop firewalld
[root@openstack network-scripts]# systemctl disable  firewalld
3、关闭NetworkManager网络,避免影响网络不通,或者网卡启动不成功等问题
[root@openstack network-scripts]# systemctl stop NetworkManager
[root@openstack network-scripts]# systemctl disable  NetworkManager
4、关闭selinux配置文件
[root@openstack network-scripts]# cat /etc/sysconfig/selinux

# This file controls the state of SELinux on the system.
# SELINUX= can take one of these three values:
#     enforcing - SELinux security policy is enforced.
#     permissive - SELinux prints warnings instead of enforcing.
#     disabled - No SELinux policy is loaded.
SELINUX=disabled
# SELINUXTYPE= can take one of three values:
#     targeted - Targeted processes are protected,
#     minimum - Modification of targeted policy. Only selected processes are protected.
#     mls - Multi Level Security protection.
SELINUXTYPE=targeted
5、配置内核参数优化
[root@openstack network-scripts]# cat /etc/sysctl.conf
# Controls source route verification
net.ipv4.conf.default.rp_filter = 1
net.ipv4.ip_nonlocal_bind = 1
net.ipv4.ip_forward = 1

# Do not accept source routing
net.ipv4.conf.default.accept_source_route = 0

# Controls the System Request debugging functionality of the kernel
kernel.sysrq = 0

# Controls whether core dumps will append the PID to the core filename.
# Useful for debugging multi-threaded applications.
kernel.core_uses_pid = 1

# Controls the use of TCP syncookies
net.ipv4.tcp_syncookies = 1

# Disable netfilter on bridges.
net.bridge.bridge-nf-call-ip6tables = 0
net.bridge.bridge-nf-call-iptables = 0
net.bridge.bridge-nf-call-arptables = 0

# Controls the default maxmimum size of a mesage queue
kernel.msgmnb = 65536

# # Controls the maximum size of a message, in bytes
kernel.msgmax = 65536

# Controls the maximum shared segment size, in bytes
kernel.shmmax = 68719476736

# # Controls the maximum number of shared memory segments, in pages
kernel.shmall = 4294967296


# TCP kernel paramater
net.ipv4.tcp_mem = 786432 1048576 1572864
net.ipv4.tcp_rmem = 4096        87380   4194304
net.ipv4.tcp_wmem = 4096        16384   4194304
net.ipv4.tcp_window_scaling = 1
net.ipv4.tcp_sack = 1

# socket buffer
net.core.wmem_default = 8388608
net.core.rmem_default = 8388608
net.core.rmem_max = 16777216
net.core.wmem_max = 16777216
net.core.netdev_max_backlog = 262144
net.core.somaxconn = 20480
net.core.optmem_max = 81920


# TCP conn
net.ipv4.tcp_max_syn_backlog = 262144
net.ipv4.tcp_syn_retries = 3
net.ipv4.tcp_retries1 = 3
net.ipv4.tcp_retries2 = 15

# tcp conn reuse
net.ipv4.tcp_tw_reuse = 1
net.ipv4.tcp_tw_recycle = 1
net.ipv4.tcp_fin_timeout = 1


net.ipv4.tcp_max_tw_buckets = 20000
net.ipv4.tcp_max_orphans = 3276800
net.ipv4.tcp_timestamps = 1 #?
net.ipv4.tcp_synack_retries = 1
net.ipv4.tcp_syncookies = 1

# keepalive conn
net.ipv4.tcp_keepalive_time = 300
net.ipv4.tcp_keepalive_intvl = 30
net.ipv4.tcp_keepalive_probes = 3
net.ipv4.ip_local_port_range = 10001    65000

# swap
vm.overcommit_memory = 0
vm.swappiness = 10

#net.ipv4.conf.eth1.rp_filter = 0
#net.ipv4.conf.lo.arp_ignore = 1
#net.ipv4.conf.lo.arp_announce = 2
#net.ipv4.conf.all.arp_ignore = 1
#net.ipv4.conf.all.arp_announce = 2
6、配置文件大小限制
[root@openstack network-scripts]# cat /etc/security/limits.conf
#上面省略,以下是重要部分
*                soft    core          unlimited
*                hard    core          unlimited
*                soft    nproc         1000000
*                hard    nproc         1000000
*                soft    nofile        1000000
*                hard    nofile        1000000
*                soft    memlock       32000
*                hard    memlock       32000
*                soft    msgqueue      8192000
*                hard    msgqueue      8192000
7、poweroff关机,保存快照,系统安装完成,设置也完成,此时centos7整个基本配置完成,就可以放到生产中使用了。


 3447
3447


 被折叠的 条评论
为什么被折叠?
被折叠的 条评论
为什么被折叠?
 到【灌水乐园】发言


