


首先,不得不感慨spring框架的强大,学习了很久还是发现很多东西都只是理解了皮毛,但是往往你所能想到的功能,都可以用编码来实现,只不过效率高低取决于采取什么方法。
今天在完善我的《教务信息管理系统》项目时,构想如下:
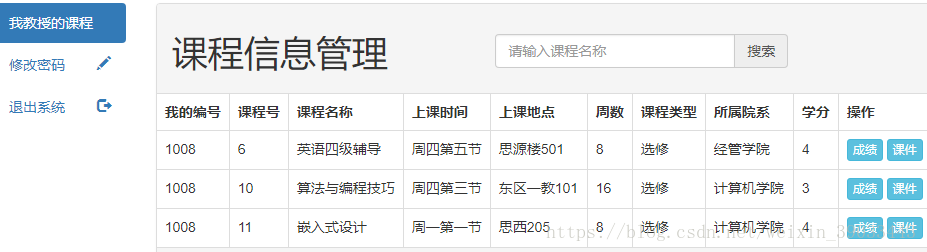
教师登录自己的教师系统,可以查看到自己所教授的课程,同时可以进行给学生打分、上传课件等操作;
学生登录自己的学生系统,在已选课程列表可以查看某课程的具体信息,并且下载某课程对应的课件。
为了实现这个功能,我开始上网找资料,了解到可以用SpringMVC来解决。
项目基于ssm+shiro,具体配置建上一篇介绍。实现步骤如下:
1、pom.xml配置commons-io和commons-fileload,maven会根据对应版本去下载依赖:
<!-- 文件上传 -->
    <dependency>
      <groupId>commons-io</groupId>
      <artifactId>commons-io</artifactId>
      <version>2.4</version>
    </dependency>

    <dependency>
      <groupId>commons-fileupload</groupId>
      <artifactId>commons-fileupload</artifactId>
      <version>1.3.1</version>
      <exclusions>
        <exclusion>
          <groupId>commons-io</groupId>
          <artifactId>commons-io</artifactId>
        </exclusion>
      </exclusions>
    </dependency>
2、配置springmvc.xml文件:定义文件上传解析器:
文件不可能无限大的上传,所以一定要设置文件大小的限制。
  <!-- 定义文件上传解析器 -->
    <bean id="multipartResolver" class="org.springframework.web.multipart.commons.CommonsMultipartResolver">
        <!-- 设定默认编码 -->
        <property name="defaultEncoding" value="UTF-8" />
        <!-- 设定文件上传的最大值5MB,5*1024*1024 -->
        <property name="maxUploadSize" value="5242880" />
        <property name="maxInMemorySize" value="4096" />
    </bean>
3、接下来是实现文件上传、文件下载及上传文件显示的后端代码:
controller层:
(1)文件上传:
 /*
    * 上传课件
    */
    //文件上传:表单:POST请求,file类型,enctype="multipart/form-data"
    @RequestMapping(value = "fileUpload", method = RequestMethod.POST)
    public String testUpload(HttpServletRequest request, @RequestParam(value = "desc", required = false) String desc,
                             @RequestParam("photo") CommonsMultipartFile fileList[]) throws Exception {
        ServletContext servletContext = request.getServletContext();
        //获取服务器下的upload目录
        String realPath = servletContext.getRealPath("/newuploads");
        File filePath = new File(realPath);
        //如果目录不存在,则创建该目录
        if (!filePath.exists()) {
            filePath.mkdir();
        }
        OutputStream out;
        InputStream in;
        for (CommonsMultipartFile file : fileList) {
            if (file.getSize() == 0) {
                    continue;
            }
            // 防止重命名uuid_name.jpg
            String prefix = UUID.randomUUID().toString();
            prefix = prefix.replace("-", "");
            String fileName = prefix + "_" + file.getOriginalFilename();
            out = new FileOutputStream(new File(realPath + "\\" + fileName));
            in = file.getInputStream();
            byte[] b = new byte[1024];
            int c = 0;
            while ((c = in.read(b)) != -1) {
                out.write(b, 0, c);
                out.flush();
            }
            out.close();
            in.close();
            }
         return "redirect:/teacher/showFile";
        }
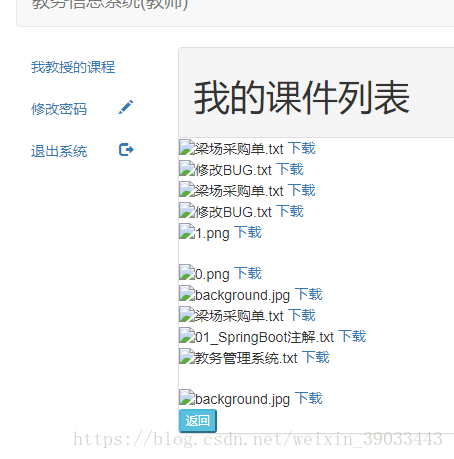
(2)已上传文件显示:
//文件列表的显示
        @RequestMapping(value = "/showFile")
        public String showFile(HttpServletRequest request,Model m){
            ServletContext servletContext = request.getServletContext();
            String path=servletContext.getRealPath("/newuploads");
            File[] fileList = new File(path).listFiles();
            m.addAttribute("fileList", fileList);
            return "/teacher/showFile";
        }
(3)下载文件:
    /*
    * 下载课件
    */
        //用ResponseEntity<byte[]> 返回值完成文件下载
        @RequestMapping(value = "fileDownload")
        public ResponseEntity<byte[]> fileDownload(HttpServletRequest request, @RequestParam(value = "path") String path)
                throws Exception {
            byte[] body = null;
            // ServletContext servletContext = request.getServletContext();
            String fileName = path.substring(path.lastIndexOf("_") + 1); //从uuid_name.jpg中截取文件名
            // String path = servletContext.getRealPath("/WEB-INF/res/" + fileName);
            File file = new File(path);
            InputStream in = new FileInputStream(file);
            body = new byte[in.available()];
            in.read(body);
            HttpHeaders headers = new HttpHeaders();
            fileName = new String(fileName.getBytes("gbk"), "iso8859-1");
            headers.add("Content-Disposition", "attachment;filename=" + fileName);
            HttpStatus statusCode = HttpStatus.OK;
            ResponseEntity<byte[]> response = new ResponseEntity<byte[]>(body, headers, statusCode);
            in.close();
            return response;
        }
4、前端代码实现:
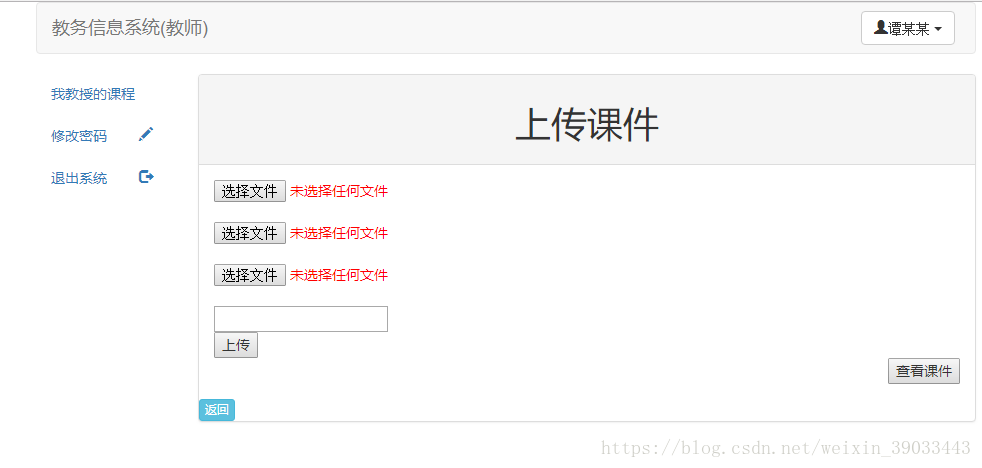
(1)文件上传页面:fileUpload.jsp
(附主要代码)
<div class="panel-body">
                    <form action="${pageContext.request.contextPath}/teacher/fileUpload" method="post" enctype="multipart/form-data">
                        <input style="color: red" type="file" name="photo"><br>
                        <input style="color: red" type="file" name="photo"><br>
                        <input style="color: red" type="file" name="photo"><br>
                        <input type="text" name="desc"><br>
                        <input type="submit" value="上传">
                    </form>
                    <form action="${pageContext.request.contextPath}/teacher/showFile"method="post" enctype="multipart/form-data">
                        <input style="float:right" type="submit" value="查看课件">
                    </form>


                </div>
(2)已上传文件显示:showFile.jsp
<c:choose>
                    <c:when test="${not empty fileList }">
                        <!--索引-->
                        <c:set var="index" value='1'></c:set>
                        <c:forEach items="${fileList }" var="file">
                            <!-- filename:文件的名字,不带UUID -->
                            <c:set var="filename" value='${fn:substring(file.name,fn:indexOf(file.name,"_")+1,fn:length(file.name)) }'/>
                            <!-- filefullname:文件的名字,带UUID -->
                            <c:set var="filefullname" value='${fn:split(file.path,"\\\\")[fn:length(fn:split(file.path,"\\\\"))-1] }'></c:set>
                            <!-- rootdir:文件的目录 -->
                            <c:set var="rootdir" value='${pageContext.request.contextPath}/upload/'></c:set>
                            <div onclick="return check()">
                                <img alt='${filename }' src='${rootdir.concat(filefullname) }'><!-- 文件的全路径 -->
                                <a href="${pageContext.request.contextPath}/teacher/fileDownload?path=${file.path}">下载</a>
                            </div>
                            <!-- 每行显示5张图片 -->
                            <c:if test="${index%5==0 }">
                                <br>
                            </c:if>
                            <!--索引+1-->
                            <c:set var="index" value='${index+1 }'></c:set>
                        </c:forEach>
                    </c:when>
                    <c:otherwise>
                        暂无数据
                    </c:otherwise>
</c:choose><script>
function check(path) {
var mag="您确定要下载该课件吗?";
if(confirm(mag)){
return true;
}
return false;
}
</script>5、结果展示:
点击课件:
选择文件:
点击下载:
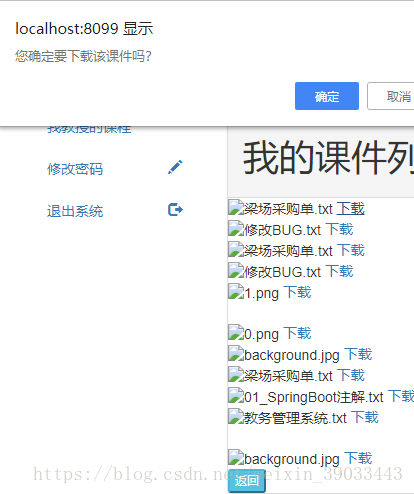
确认下载后:

上传、下载及显示功能完成!
问题:虽然实现了文件的上传和下载,但是并没有做到某个教师将自己的课件上传到某课程对应的文件夹,学生下载的时候也不能保证只能看到该课程对应的课件!!!
开始考虑用数据库代替磁盘文件夹存放文件(课件),但是自己并没有用过数据保存文件,开始尝试吧!
不管尝试结果如何,都将在下一篇博客中记录我的实践过程。
2018.8.15 坚持梦想的方向!


 8206
8206


 被折叠的 条评论
为什么被折叠?
被折叠的 条评论
为什么被折叠?
 到【灌水乐园】发言


