


应用 Python 完成自己的第一个人脸识别系统 上
本地环境
macOS;python3.7
第一步:安装依赖项
第二步:face_recognition 接口
结束语
第一步:安装依赖项
- 安装依赖项:dlib
这里以 macOS 系统为例,其他系统的安装方法可以进入 dlib 官网自行查阅。
git clone https://github.com/davisking/dlib.git
cd dlib/examples
mkdir build
cd build
cmake ..
cmake --build .
cd ..
python3 setup.py install
安装完dlib测试是否成功
python3
import dlib
- 安装 python 包 face_recognition
face_recognition 是一个用 python 实现的人脸识别开源库
pip3 install face_recognition
- 安装 opencv
OpenCV 是一个基于 BSD 许可(开源)发行的跨平台计算机视觉和机器学习软件库,可以运行在 Linux、Windows、Android和Mac OS 操作系统上。它轻量级而且高效——由一系列 C 函数和少量 C++ 类构成,同时提供了 Python、Ruby、MATLAB 等语言的接口,实现了图像处理和计算机视觉方面的很多通用算法。
sudo pip3 install opencv-python
第二步:face_recognition 接口
这里我们先准备三张图片供下面练习使用
基本图片1:tlp01 先生

基本图片2:tlp02 先生

基本图片3:bd 先生
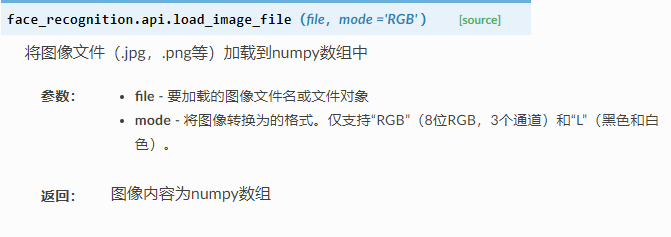
- 读取图片对象,返回图片内容的 numpy 数组
load_image_file()
demo:
import face_recognition
tlp01_numpy = face_recognition.load_image_file("./tlp01.jpg")
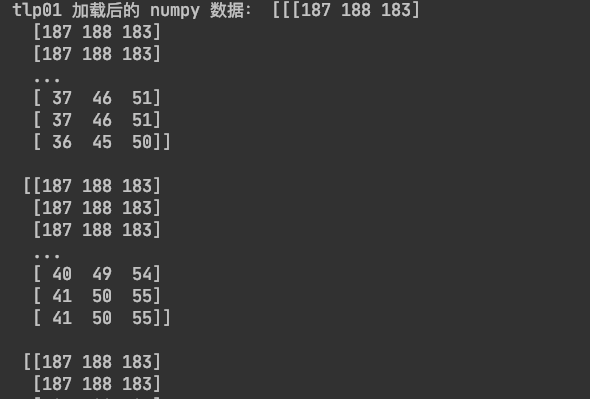
print("tlp01 加载后的 numpy 数据:", tlp01_numpy)
tlp02_numpy = face_recognition.load_image_file("./tlp02.jpg")
print("tlp02 加载后的 numpy 数据:", tlp02_numpy)
bd_numpy = face_recognition.load_image_file("./bd.jpg")
print("bd 加载后的 numpy 数据:", bd_numpy)
结果:
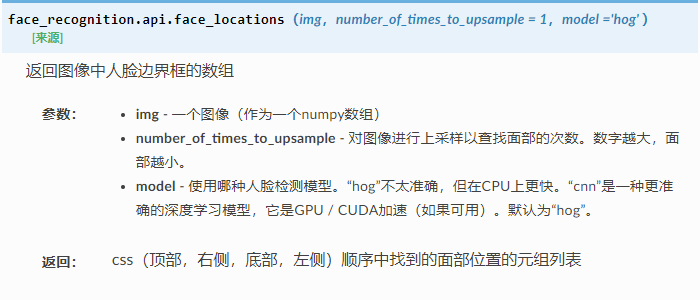
- 识别 numpy 数组中的人脸的位置
face_locations()
demo:
face_locations = face_recognition.face_locations(tlp01_numpy)
print("tlp01 图片中人脸在图片中的相对位置:", face_locations)
结果:
tlp01 图片中人脸在图片中的相对位置: [(82, 339, 211, 210)]
意思是:有一张人脸,人脸框距离顶部距离82,右侧距离339,底部距离211,左侧距离210


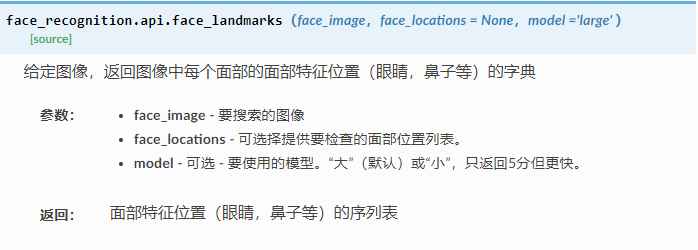
- 识别图片中每个面部特征(眼睛 鼻子等)的位置
face_landmarks()
demo:
face_landmarks = face_recognition.face_landmarks(tlp01_numpy)
print("tlp01 面部特征的位置:", face_landmarks)
结果:
tlp01 面部特征的位置:
[{'chin': [(206, 108), (205, 126), (206, 144), (209, 161), (216, 177), (225, 191), (236, 203), (249, 212), (264, 214), (278, 211), (291, 204), (301, 193), (310, 180), (317, 167), (321, 152), (324, 136), (326, 120)],
'left_eyebrow': [(228, 95), (238, 93), (247, 94), (257, 96), (265, 100)],
'right_eyebrow': [(282, 102), (291, 100), (299, 98), (308, 98), (315, 103)],
'nose_bridge': [(274, 108), (274, 117), (273, 127), (273, 137)],
'nose_tip': [(260, 143), (265, 145), (271, 147), (277, 146), (282, 144)],
'left_eye': [(237, 107), (243, 105), (249, 106), (255, 110), (248, 110), (242, 109)],
'right_eye': [(288, 112), (294, 109), (300, 110), (305, 113), (299, 114), (294, 113)],
'top_lip': [(246, 169), (254, 162), (263, 158), (270, 160), (276, 159), (283, 164), (287, 173), (284, 173), (275, 165), (269, 165), (263, 164), (248, 169)],
'bottom_lip': [(287, 173), (282, 185), (274, 191), (267, 191), (260, 190), (252, 183), (246, 169), (248, 169), (261, 181), (268, 182), (274, 181), (284, 173)]
}]
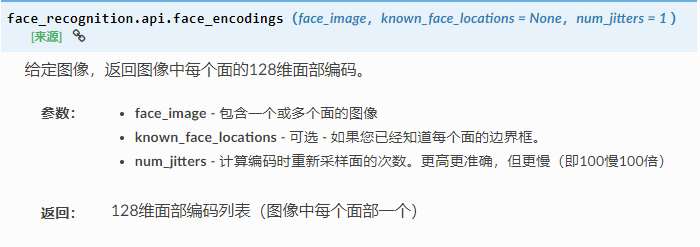
- 对图片中的每张脸进行面部编码
face_encodings()
demo:
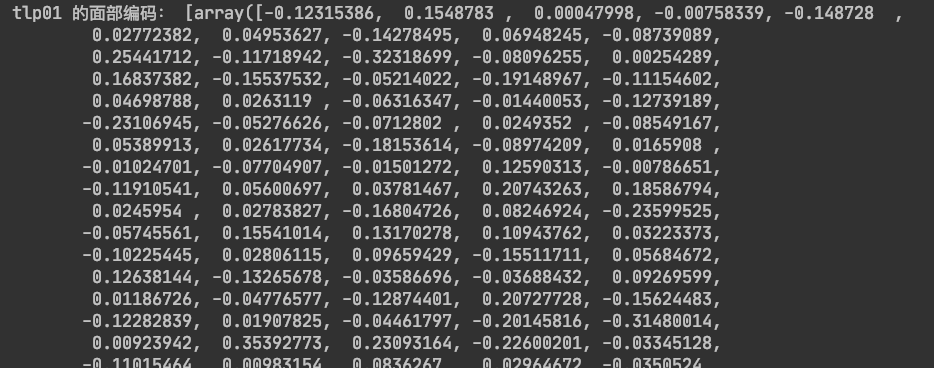
face_encodings = face_recognition.face_encodings(tlp01_numpy)
print("tlp01 的面部编码:", face_encodings)
结果:
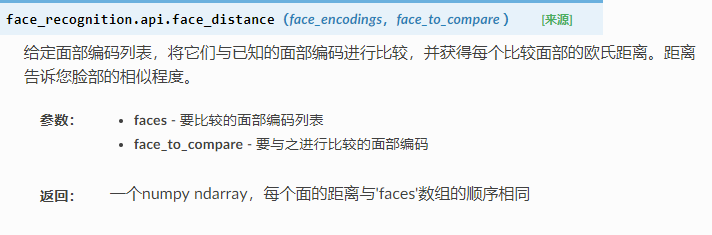
- 将多张脸与一张给定的脸A进行比较,返回每张脸与脸A的相似程度
比如:我有多张面部特征 [face1, face2, face3],现在要看每个face和脸A的相似程度是多少。
face_distance()
demo:
# 因为这里我们知道每张图只有一张人脸,为了方便,我们取数组的第一个值
tlp01_encoding = face_recognition.face_encodings(tlp01_numpy)[0]
tlp02_encoding = face_recognition.face_encodings(tlp02_numpy)[0]
bd_encoding = face_recognition.face_encodings(bd_numpy)[0]

face_distance = face_recognition.face_distance([tlp01_encoding, bd_encoding], tlp02_encoding)
print("tlp02 和 [tlp01, bd] 的欧式距离:", face_distance)
print("tlp02 和 tlp01 的欧式距离", face_distance[0])
print("tlp02 和 bd 的欧式距离", face_distance[1])
结果:

可以看出 tlp02 和 tlp01 距离更近一些,则表明 tlp02 和 tlp01 更相似。
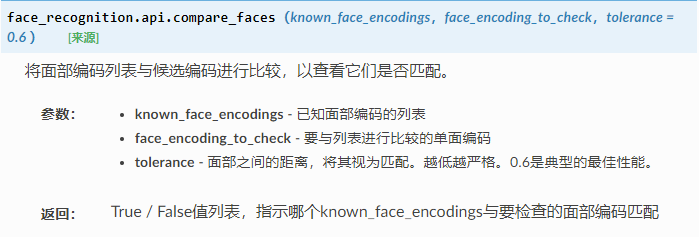
- 将一张脸A与多张已知的脸进行比较,返回脸A与多张已知的脸是否匹配
比如:这里有一个已知的面部池子 [吴彦祖, 谢腾飞, 葛大爷],我要知道另一个脸A和我池子里的每一项是否匹配。
compare_faces()
demo:
compare_faces = face_recognition.compare_faces([tlp01_encoding, bd_encoding], tlp02_encoding)
print("tlp02 和 tlp01 的比较结果:", compare_faces[0])
print("tlp02 和 bd 的比较结果:", compare_faces[1])
结果:

由结果可以看出:
tlp02 和 tlp01 成功匹配;
tlp02 和 bd 不匹配。
结束语
好啦,认真学完上面的这六个接口,明天我们就可以针针儿的实现自己的人脸识别系统啦 !!!


 1万+
1万+


 被折叠的 条评论
为什么被折叠?
被折叠的 条评论
为什么被折叠?
 到【灌水乐园】发言


